综合运用之拖动模态框案例
Posted 实习期小潘
tags:
篇首语:本文由小常识网(cha138.com)小编为大家整理,主要介绍了综合运用之拖动模态框案例相关的知识,希望对你有一定的参考价值。
在制作该案例之前,我们需要先做好准备工作!

有句话怎么说来着?!
没错!
磨刀不误砍柴工!
目录
首先,我们要先复习一个知识点——BOM中的offset系列

Offset系列
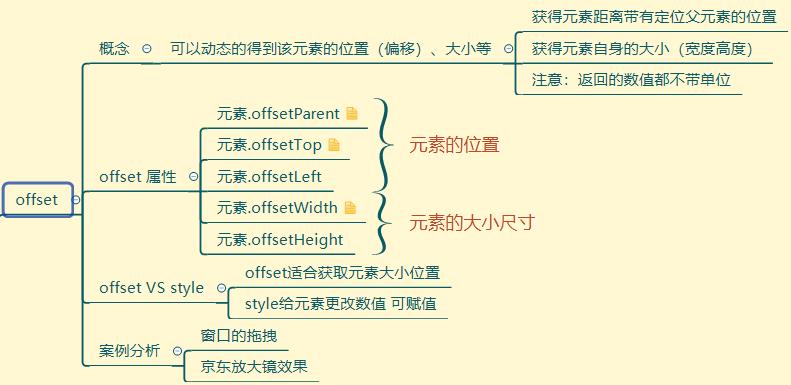
概念
offset系列可以动态的得到该元素的位置(偏移)、大小等。
- 获得元素距离带有定位父元素的位置
- 获得元素自身的大小(宽度高度)
- 注意:返回的数值都不带单位
offset属性
- element.offsetParent
- element.offsetTop
- element.offsetLeft
- element.offsetWidth
- element.offsetHeight
代码实操
offset系列应用感受:
<style>
        *
            margin: 0;
            padding: 0;


        .father
            /* position: relative; */
            width: 400px;
            height: 400px;
            background-color: pink;
            margin: 100px;


        .son
            position: absolute;
            /* 当给子盒子加了absolute那就可以直接让子盒子相对于父盒子的距离得到了 */
            width: 200px;
            height: 200px;
            background-color: purple;
            margin-left: 45px;


        .w
            /* width: 300px; */
            height: 300px;
            margin: 200px auto;
            background-color: skyblue;

    </style>
<body>
<div class="father">
<div class="son"></div>
</div>
<div class="w"></div>
<script>
var father = document.querySelector('.father');
var son = document.querySelector('.son');
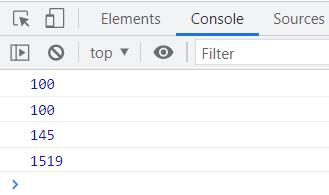
console.log(father.offsetTop); //得到father这个盒子距离页面顶部距离100px
console.log(father.offsetLeft); //得到father这个盒子距离页面左边距离100px
// 它以带有定位的父亲为准,如果没有父亲或者父亲没有定位则以body为准
console.log(son.offsetLeft);
//得到父盒子距离页面左边100px加上+子盒子距离父盒子45px的距离=145px
// 为了得到子盒子在父盒子中的距离就给父盒子加个定位
var w = document.querySelector('.w');
console.log(w.offsetWidth); //如果不给宽度值就会占满整个页面
// offset得到盒子的宽度+border+padding
</script>
</body>
father.offsetTop得到的就是距离father这个盒子距离父盒子的上面相距100px;
同理, father.offsetLeft是father这个盒子距离父盒子的左边相距100px;
son.offsetLeft 中由于son这个盒子绝对定位是相对于整个页面body,father这个盒子没有使用相对定位,所以此时son.offsetLeft得到的值是son盒子距离整个页面body145px;
若给father这个盒子给个相对定位的话,那son这个盒子就相对于father这个盒子此时输出的值就是45px。
Offset知识点小结
了解这个知识点后我们才能更好将知识点灵活运用到我们的案例中!
拖动模态框案例

♠在制作这个案例,我们一拿到手就先去考虑它想要的效果。
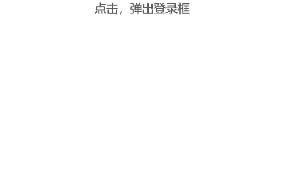
- 当我们点击“点击,弹出登录框”后就会弹出登录框
- 然后当把鼠标按下在“登陆会员”这一栏就能移动这个框框
- 其次就能移动这个框
♠有了思路,我们就要动手先去搭建框架。
CSS样式代码:
<style>
        *
            margin: 0;
            padding: 0;


        a
            text-decoration: none;
            color: #333;


        .login-header
            text-align: center;
            font-size: 30px;


        .login
            display: none;
            position: absolute;
            left: 50%;
            top: 50%;
            margin: 50px auto;
            text-align: center;
            background-color: tomato;
            width: 400px;
            height: 200px;
            padding-top: 20px;
            z-index: 9999;


        #close
            display: block;
            color: black;
            font-size: 12px;
            position: absolute;
            right: -9px;
            top: -10px;
            width: 30px;
            height: 30px;
            background-color: #fff;
            border-radius: 50%;
            text-align: center;
            padding-top: 5px;
            padding-right: 3px;
            box-sizing: border-box;

        /* “关闭”按钮我用来伪类来做 */

        #close::after
            content: '关闭';


        .title:hover
            cursor: move


        .login-input
            margin-top: 35px;


        .login-input>input
            border: #fff;
            padding: 5px 2px;


        .login-input-content
            padding-left: 15px;
            margin-top: 48 px;


        .login-input-content>input
            border: #fff;
            padding: 5px 2px;


        .login-button
            margin-top: 25px;


        #login-button-submit
            padding: 6px 50px;
            border: 1px solid #fff;

        /* 遮罩层 */

        .login-bg
            display: none;
            width: 100%;
            height: 100%;
            position: fixed;
            top: 0;
            left: 0;
            background-color: rgba(0, 0, 0, .2);

</style>html页面框架代码:
<div class="login-header">
        <!-- 用a链接来做点击的按钮 -->
        <a id='link' href="javascript:;">点击,弹出登录框
        </a>
    </div>
    <div class="login">
        <i id="close"></i>
        <!-- “关闭”按钮 -->
        <!-- 每一行用一个div -->
        <div class="title">登陆会员</div>
        <div class="login-input-content">
            <div class="login-input">
                <label>用户名:</label>
                <input type="text" placeholder="请输入用户名" name='info[username]' class="uname">
            </div>

            <div class="login-input">
                <label>登陆密码:</label>
                <input type="password" placeholder="请输入登录密码" name='info[password]' class='paswd'>
            </div>
        </div>
        <!-- “登陆会员”按钮 -->
        <div id='loginBtn' class='login-button'>
            <a href="javascript:void(0);" id="login-button-submit">登录会员</a>
        </div>
    </div>
    <!-- 遮罩层 -->
    <div id="bg" class='login-bg'></div>
    <script>
♠框架出来了,我们就要实现动态效果。
在Javascript中先获取元素,再绑定事件本事件就是当点击的时候能够触发让登录框出现和隐藏(关闭)效果。
<script>
        var header = document.querySelector('.login-header');
        var login = document.querySelector('.login');
        var mask = document.querySelector('.login-bg');
        var closeBtn = document.querySelector('#close');
        header.addEventListener('click', function()
                // 遮罩层出现
                mask.style.display = 'block';
                login.style.display = 'block';
            )
            // 当点击关闭按钮就会把mask和login都隐藏掉
        closeBtn.addEventListener('click', function()
                // 遮罩层消失
                mask.style.display = 'none';
                login.style.display = 'none';
            )
</script>
♠拖动登录框,我们先要获取鼠标再这个登录框的坐标
 var title = document.querySelector('.title');
        title.addEventListener('mousedown', function(e)
            var x = e.pageX - login.offsetLeft;
            var y = e.pageY - login.offsetTop;
♠拖拽登录框时所需要的鼠标事件:mousedown、mousemove、mouseup
鼠标移动的时候,把 鼠标在页面中的坐标减去-鼠标在盒子内的坐标 =就是模态框的left和top值
 document.addEventListener('mousemove', function(e)
                login.style.left = e.pageX - x + 'px';
                //offset不能赋值所以只能够用style来赋值!!
                login.style.top = e.pageY - y + 'px';
            )
            document.addEventListener("mouseup", function(e)
                document.addEventListener("mousemove", function()
                    login.style.left = e.pageX - x + 'px';
                    login.style.top = e.pageY - y + 'px';
                )
Javascript全部代码
💐最后给各位贴心送上Javascript的全部代码:
 <script>
        var header = document.querySelector('.login-header');
        var login = document.querySelector('.login');
        var mask = document.querySelector('.login-bg');
        var closeBtn = document.querySelector('#close');
        header.addEventListener('click', function()
                // 遮罩层出现
                mask.style.display = 'block';
                login.style.display = 'block';
            )
 // 当点击关闭按钮就会把mask和login都隐藏掉
        closeBtn.addEventListener('click', function()
                // 遮罩层消失
                mask.style.display = 'none';
                login.style.display = 'none';
            )
// 开始拖拽这个窗口
// 当我们鼠标按下就获得鼠标在盒子里的坐标
        var title = document.querySelector('.title');
        title.addEventListener('mousedown', function(e)
            var x = e.pageX - login.offsetLeft;
            var y = e.pageY - login.offsetTop;
// 鼠标移动的时候,把 鼠标在页面中的坐标减去-鼠标在盒子内的坐标 =就是模态框的left和top值
            document.addEventListener('mousemove', function(e)
                login.style.left = e.pageX - x + 'px';
//offset不能赋值所以只能够用style来赋值
                login.style.top = e.pageY - y + 'px';
            )
            document.addEventListener("mouseup", function(e)
                document.addEventListener("mousemove", function()
                    login.style.left = e.pageX - x + 'px';
                    login.style.top = e.pageY - y + 'px';
                )

            )
        )
    </script>
总结
这个案例的知识点主要是围绕offset系列属性来进行应用,然后还有一个小案例也结合在里面,就是当鼠标在一个盒子内求出鼠标的坐标。
经过这一案例希望大家能够有较好的学习收获!

以上是关于综合运用之拖动模态框案例的主要内容,如果未能解决你的问题,请参考以下文章