深度学习从入门到精通——图像分割技术原理解析
Posted 小陈phd
tags:
篇首语:本文由小常识网(cha138.com)小编为大家整理,主要介绍了深度学习从入门到精通——图像分割技术原理解析相关的知识,希望对你有一定的参考价值。
图像分割技术原理解析
图像分割
模型
- 早期基于深度学习的图像分割以FCN为核心,旨在重点解决如何更好从卷积下采样中恢复丢掉的信息损失。
后来逐渐形成了以U-Net为核心的这样一种编解码对称的U形结构。 - 语义分割界迄今为止最重要的两个设计,一个是以U-Net为代表的U形结构,目前基于U-Net结构的创新就层出不穷,比如说应用于3D图像的V-Net,嵌套U-Net结构的U-Net++等。除此在外还有SegNet、RefineNet、HRNet和FastFCN。另一个则是以DeepLab系列为代表的Dilation设计,主要包括DeepLab系列和PSPNet。随着模型的Baseline效果不断提升,语义分割任务的主要矛盾也逐从downsample损失恢复像素逐渐演变为如何更有效地利用context上下文信息。
全卷积网络(FCN)
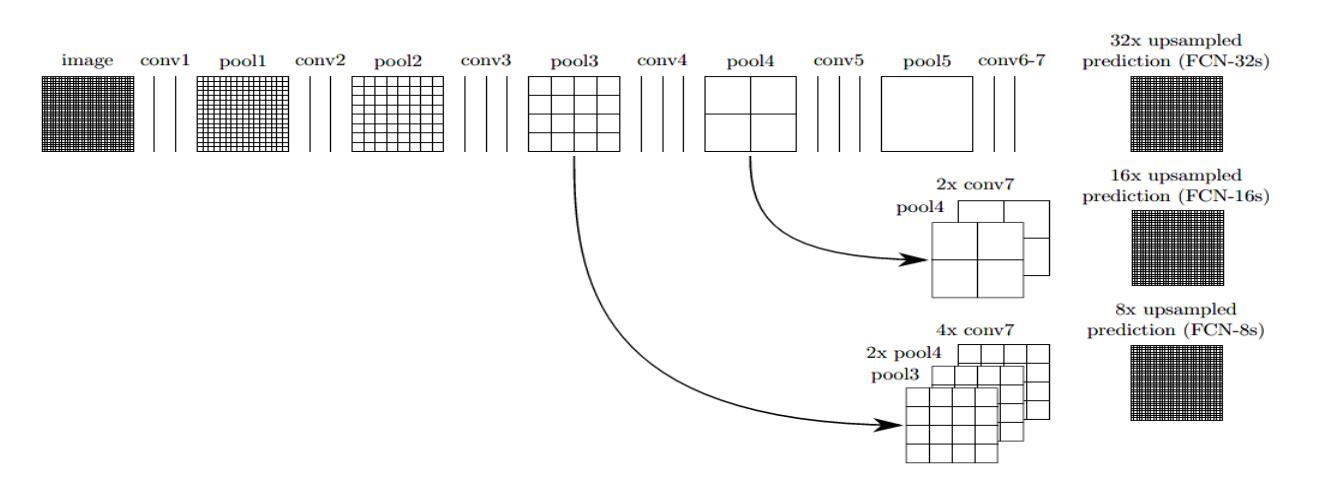
FCN(Fully Convilutional Networks)是语义分割领域的开山之作。FCN的提出是在2016年,相较于此前提出的AlexNet和VGG等卷积全连接的网络结构,FCN提出用卷积层代替全连接层来处理语义分割问题,这也是FCN的由来,即全卷积网络。FCN的关键点主要有三,一是全卷积进行特征提取和下采样,二是双线性插值进行上采样,三是跳跃连接进行特征融合。
import torch
import torch.nn as nn
import torch.nn.init as init
import torch.nn.functional as F
from torch.utils import model_zoo
from torchvision import models
class FCN8(nn.Module):
	def __init__(self, num_classes):
		super().__init__()
		self.feats = nn.Sequential(*feats[0:9])
		self.feat3 = nn.Sequential(*feats[10:16])
		self.feat4 = nn.Sequential(*feats[17:23])
		self.feat5 = nn.Sequential(*feats[24:30])
		for m in self.modules():
			if isinstance(m, nn.Conv2d):
			m.requires_grad = False
		self.fconn = nn.Sequential(
				nn.Conv2d(512, 4096, 7),
				nn.ReLU(inplace=True),
				nn.Dropout(),
				nn.Conv2d(4096, 4096, 1),
				nn.ReLU(inplace=True),
				nn.Dropout()
				)
		 self.score_feat3 = nn.Conv2d(256, num_classes, 1)
		 self.score_feat4 = nn.Conv2d(512, num_classes, 1)
		 self.score_fconn = nn.Conv2d(4096, num_classes, 1)
	def forward(self, x):

		feats = self.feats(x)
		feat3 = self.feat3(feats)
		feat4 = self.feat4(feat3)
		feat5 = self.feat5(feat4)
		fconn = self.fconn(feat5)
		score_feat3 = self.score_feat3(feat3)
		score_feat4 = self.score_feat4(feat4)
		score_fconn = self.score_fconn(fconn)
		score = F.upsample_bilinear(score_fconn, score_feat4.size()[2:])
		score += score_feat4
		score = F.upsample_bilinear(score, score_feat3.size()[2:])
		score += score_feat3
		return F.upsample_bilinear(score, x.size()[2:])
- vgg16作为FCN-8的编码部分,这使得FCN-8具备较强的特征提取能力。
UNet
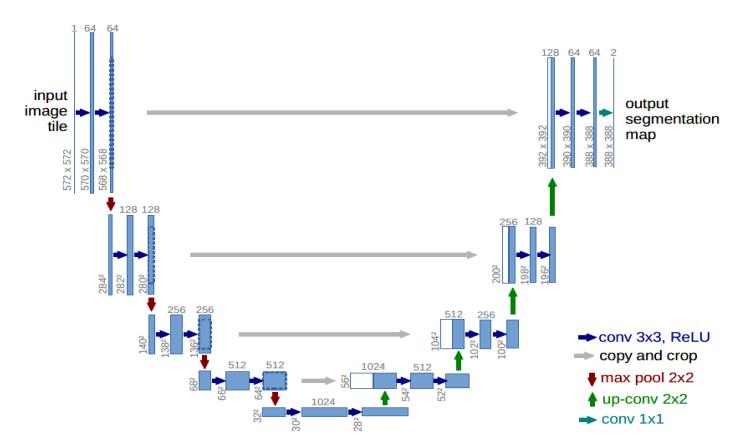
- 早期基于深度学习的图像分割以FCN为核心,旨在重点解决如何更好从卷积下采样中恢复丢掉的信息损失。后来逐渐形成了以UNet为核心的这样一种编解码对称的U形结构。UNet结构能够在分割界具有一统之势,最根本的还是其效果好,尤其是在医学图像领域。所以,做医学影像相关的深度学习应用时,一定都用过UNet,而且最原始的UNet一般都会有一个不错的baseline表现。2015年发表UNet的MICCAI,是目前医学图像分析领域最顶级的国际会议,UNet为什么在医学上效果这么好非常值得探讨一番。U-Net结构如下图所示:
乍一看很复杂,U形结构下貌似有很多细节问题。我们来把UNet简化一下,如下图所示:
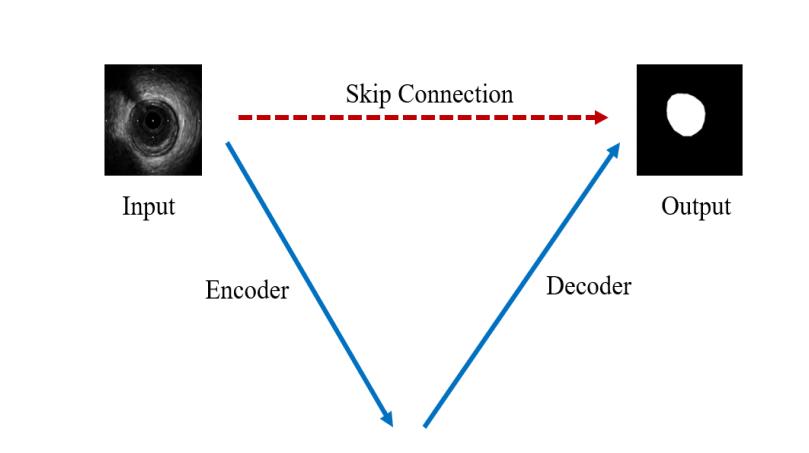
从图中可以看到,简化之后的UNet的关键点只有三条线: - 下采样编码
- 上采样解码
- 跳跃连接
下采样进行信息浓缩和上采样进行像素恢复
UNet进行了4次的最大池化下采样,每一次采样后都使用了卷积进行信息提取得到特征图,然后再经过4次上采样恢复输入像素尺寸。
但UNet最关键的、也是最特色的部分在于图中红色虚线的Skip Connection。
特点:每一次下采样都会有一个跳跃连接与对应的上采样进行级联,这种不同尺度的特征融合对上采样恢复像素大有帮助,具体来说就是高层(浅层)下采样倍数小,特征图具备更加细致的图特征,底层(深层)下采样倍数大,信息经过大量浓缩,空间损失大,但有助于目标区域(分类)判断,当high level和low level的特征进行融合时,分割效果往往会非常好。
import torch
from torch.nn import functional as F

class CNNLayer(torch.nn.Module):
    def __init__(self, C_in, C_out):
        '''
        卷积层
        :param C_in:
        :param C_out:
        '''
        super(CNNLayer, self).__init__()
        self.layer = torch.nn.Sequential(
            torch.nn.Conv2d(C_in, C_out, kernel_size=(3,3), stride=(1,1), padding=(1,1)),
            torch.nn.BatchNorm2d(C_out),
            torch.nn.Dropout(0.3),
            torch.nn.LeakyReLU(),
            torch.nn.Conv2d(C_out, C_out, kernel_size=(3,3), stride=(1,1), padding=(1,1)),
            torch.nn.BatchNorm2d(C_out),
            torch.nn.Dropout(0.4),
            torch.nn.LeakyReLU()
        )

    def forward(self, x):
        return self.layer(x)


class DownSampling(torch.nn.Module):
    def __init__(self, C):
        '''
        下采样
        :param C:
        '''
        super(DownSampling, self).__init__()
        self.layer = torch.nn.Sequential(
            torch.nn.Conv2d(C, C,kernel_size=(3,3), stride=(2,2), padding=(1,1)),
            torch.nn.LeakyReLU()
        )

    def forward(self, x):

        return self.layer(x)


class UpSampling(torch.nn.Module):

    def __init__(self, C):
        '''
        上采样
        :param C:
        '''
        super(UpSampling, self).__init__()
        self.C = torch.nn.Conv2d(C, C // 2, kernel_size=(1,1), stride=(1,1))

    def forward(self, x, r):
        up = F.interpolate(x, scale_factor=2, mode='nearest')
        x = self.C(up)
        return torch.cat((x, r), 1)


class Unet(torch.nn.Module):

    def __init__(self):
        super(Unet, self).__init__()

        self.C1 = CNNLayer(3, 64)
        self.D1 = DownSampling(64)
        self.C2 = CNNLayer(64, 128)
        self.D2 = DownSampling(128)
        self.C3 = CNNLayer(128, 256)
        self.D3 = DownSampling(256)
        self.C4 = CNNLayer(256, 512)
        self.D4 = DownSampling(512)
        self.C5 = CNNLayer(512, 1024)
        self.U1 = UpSampling(1024)
        self.C6 = CNNLayer(1024, 512)
        self.U2 = UpSampling(512)
        self.C7 = CNNLayer(512, 256)
        self.U3 = UpSampling(256)
        self.C8 = CNNLayer(256, 128)
        self.U4 = UpSampling(128)


        self.C9 = CNNLayer(128, 64)
        self.pre = torch.nn.Conv2d(64, 3, kernel_size=(3,3), stride=(1,1), padding=(1,1))
        self.sigmoid = torch.nn.Sigmoid()

    def forward(self, x):
        '''
        U型结构
        :param x:
        :return:
        '''
        R1 = self.C1(x)
        R2 = self.C2(self.D1(R1))
        R3 = self.C3(self.D2(R2))
        R4 = self.C4(self.D3(R3))
        Y1 = self.C5(self.D4(R4))

        O1 = self.C6(self.U1(Y1, R4))
        O2 = self.C7(self.U2(O1, R3))
        O3 = self.C8(self.U3(O2, R2))
        O4 = self.C9(self.U4(O3, R1))

        return self.sigmoid(self.pre(O4))


if __name__ == '__main__':
    a = torch.randn(2, 3, 256, 256) #.cuda()
    net = Unet() #.cuda()
    print(net(a).shape)
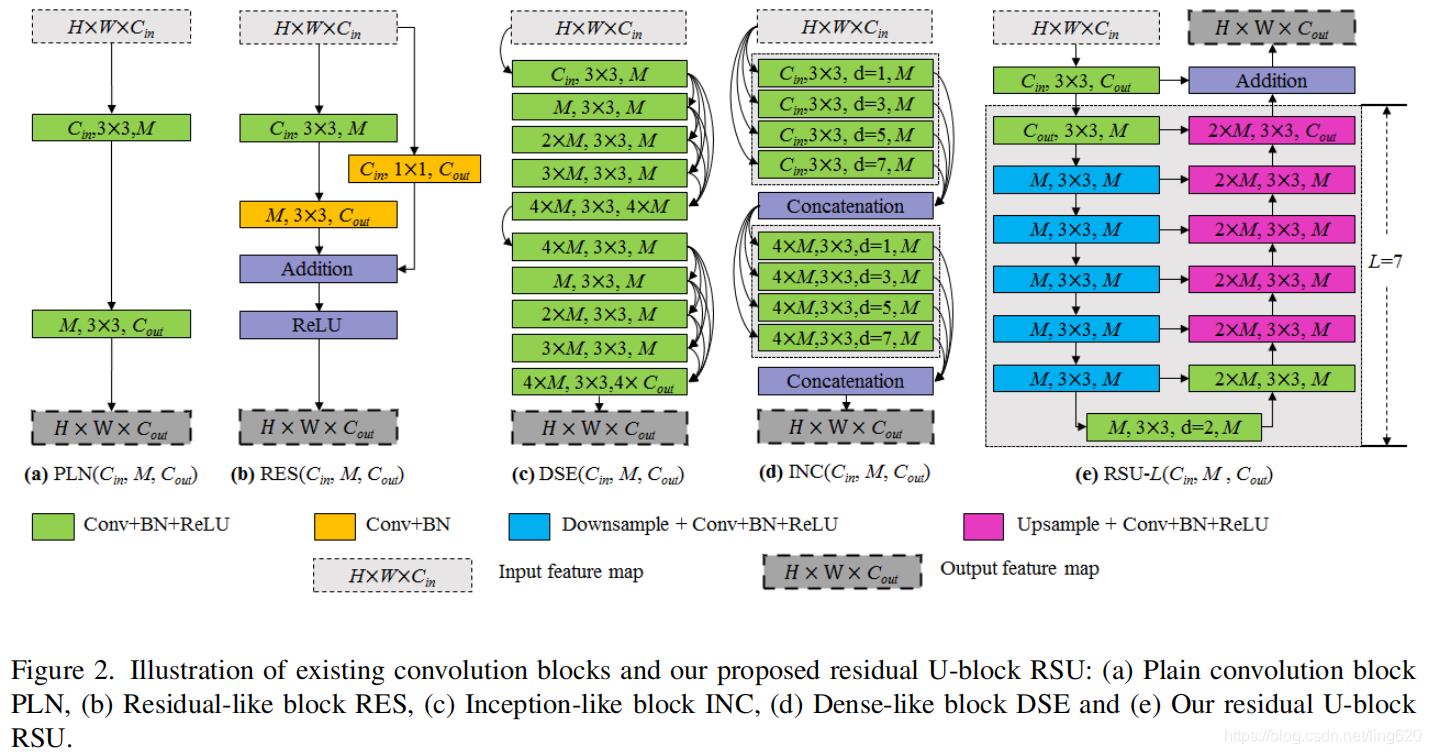
显著性目标检测/图像分割 U2net
- 更强的连接
- 套娃无止境
- 每一层其实都可以作为一个单层模型进行训练计算
- 训练速度快,精度高。建议使用
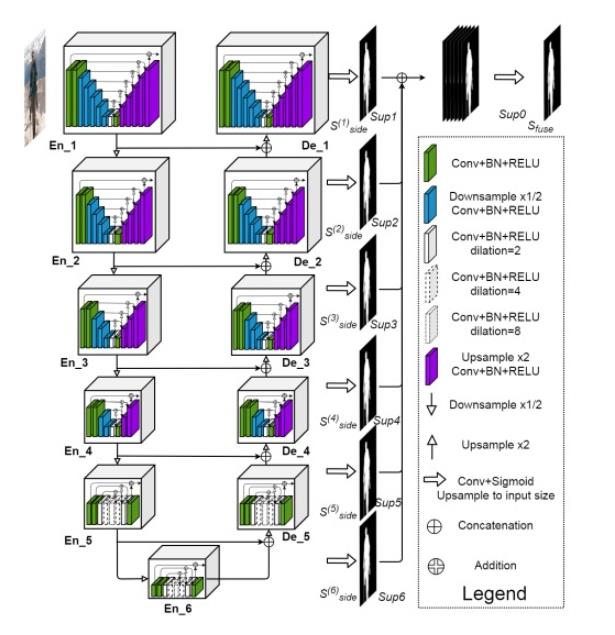
- pytorch实现代码如下:
import torch
import torch.nn as nn
import torch.nn.functional as F


class REBNCONV(nn.Module):
    def __init__(self, in_ch=3, out_ch=3, dirate=1):
        super(REBNCONV, self).__init__()

        self.conv_s1 = nn.Conv2d(in_ch, out_ch, kernel_size=(3, 3), padding=(1 * dirate, 1 * dirate),
                                 dilation=(1 * dirate, 1 * dirate))
        self.bn_s1 = nn.BatchNorm2d(out_ch)
        self.relu_s1 = nn.ReLU(inplace=True)

    def forward(self, x):
        hx = x
        xout = self.relu_s1(self.bn_s1(self.conv_s1(hx)))
        return xout


## upsample tensor 'src' to have the same spatial size with tensor 'tar'
def _upsample_like(src, tar):
    '''
    :param src:
    :param tar:
    :return:
    '''
    src = F.interpolate(src, size=tar.shape[2:], mode='bilinear', align_corners=True)
    return src


### RSU-7 ###
class RSU7(nn.Module):  # UNet07DRES(nn.Module):

    def __init__(self, in_ch=3, mid_ch=12, out_ch=3):
        super(RSU7, self).__init__()

        self.rebnconvin = REBNCONV(in_ch, out_ch, dirate=1)

        self.rebnconv1 = REBNCONV(out_ch, mid_ch, dirate=1)
        self.pool1 = nn.MaxPool2d(2, stride=2, ceil_mode=True)

        self.rebnconv2 = REBNCONV(mid_ch, mid_ch, dirate=1)
        self.pool2 = nn.MaxPool2d(2, stride=2, ceil_mode=True)

        self.rebnconv3 = REBNCONV(mid_ch, mid_ch, dirate=1)
        self.pool3 = nn.MaxPool2d(2, stride=2, ceil_mode=True)

        self.rebnconv4 = REBNCONV(mid_ch, mid_ch, dirate=1)
        self.pool4 = nn.MaxPool2d(2, stride=2, ceil_mode=True)

        self.rebnconv5 = REBNCONV(mid_ch, mid_ch, dirate=1)
        self.pool5 = nn.MaxPool2d(2, stride=2, ceil_mode=True)

        self.rebnconv6 = REBNCONV(mid_ch, mid_ch, dirate=1)

        self.rebnconv7 = REBNCONV(mid_ch, mid_ch, dirate=2)

        self.rebnconv6d = REBNCONV(mid_ch * 2, mid_ch, dirate=1)
        self.rebnconv5d = REBNCONV(mid_ch * 2, mid_ch, dirate=1)
        self.rebnconv4d = REBNCONV(mid_ch * 2, mid_ch, dirate=1)
        self.rebnconv3d = REBNCONV(mid_ch * 2, mid_ch, dirate=1)
        self.rebnconv2d = REBNCONV(mid_ch * 2, mid_ch, dirate=1)
        self.rebnconv1d = REBNCONV(mid_ch * 2, out_ch, dirate=1)

    def forward(self, x):
        hx = x
        hxin = self.rebnconvin(hx)

        hx1 = self.rebnconv1(hxin)
        hx = self.pool1(hx1)

        hx2 = self.rebnconv2(hx)
        hx = self.pool2(hx2)

        hx3 = self.rebnconv3(hx)
        hx = self.pool3(hx3)

        hx4 = self.rebnconv4(hx)
        hx = self.pool4(hx4)

        hx5 = self.rebnconv5(hx)
        hx = self.pool5(hx5)

        hx6 = self.rebnconv6(hx)

        hx7 = self.rebnconv7(hx6)

        hx6d = self.rebnconv6d(torch.cat((hx7, hx6), 1))
        hx6dup = _upsample_like(hx6d, hx5)

        hx5d = self.rebnconv5d(torch.cat((hx6dup, hx5), 1))
        hx5dup = _upsample_like(hx5d, hx4)

        hx4d = self.rebnconv4d(torch.cat((hx5dup, hx4), 1))
        hx4dup = _upsample_like(hx4d, hx3)

        hx3d = self.rebnconv3d(torch.cat((hx4dup, hx3), 1))
        hx3dup = _upsample_like(hx3d, hx2)

        hx2d = self.rebnconv2d(torch.cat((hx3dup, hx2), 1))
        hx2dup = _upsample_like(hx2d, hx1)

        hx1d = self.rebnconv1d(torch.cat((hx2dup, hx1), 1))

        return hx1d + hxin


### RSU-6 ###
class RSU6(nn.Module):  # UNet06DRES(nn.Module):

    def __init__(self, in_ch=3, mid_ch=12, out_ch=3):
        super(RSU6, self).__init__()

        self.rebnconvin = REBNCONV(in_ch, out_ch, dirate=1)

        self.rebnconv1 = REBNCONV(out_ch, mid_ch, dirate=1)
        self.pool1 = nn.MaxPool2d(2, stride=2, ceil_mode=True)

        self.rebnconv2 = REBNCONV(mid_ch, mid_ch, dirate=1以上是关于深度学习从入门到精通——图像分割技术原理解析的主要内容,如果未能解决你的问题,请参考以下文章