Vue+SpringBoot 前后端分离实战(mybatisplus多表分页查询+博客显示)
Posted HUTEROX
tags:
篇首语:本文由小常识网(cha138.com)小编为大家整理,主要介绍了Vue+SpringBoot 前后端分离实战(mybatisplus多表分页查询+博客显示)相关的知识,希望对你有一定的参考价值。
前言
到今天总算是把最基本的功能做出来了,前面修修改改了不少主要是前端先前有点小毛病,调试花费了不少时间。之后就是关于在mybatisplus里面使用纯面对对象的方式来实现多表查询,我测试了最后决定还是手写sql香,对于稍微复杂一点的查询(多表),如果采用纯面对对象的写法的话有点难,而且很麻烦,还不如直接用 xml文件映射过去。除此之外修复了几个小bug
对博客封面的检测
这个是先前偷懒没有去做,后面才发现的,其实我也是忘了,有些网站是不允许,js加载图片的,由于vue其实使用js动态加载图片的所以,有些网站有防护机制,所以我这边就必须检测一下那个图片是否可以被加载。这很重要,不然显示不出来。
这里上传博客的前端代码修改如下(其实主要还是前端)
<template>
  <div class="m_container">

    <!-- 博客内容 -->
    <div class="m_content">
      <el-form ref="editForm" status-icon :model="editForm"   label-width="80px">

        <input type="text" name="blogname" placeholder="请输入文章标题" v-model="editForm.title">
        <el-button  id="submit" type="primary" @click="tosubmitForm('editForm')">发布文章</el-button>


        <br>
        <br>
        <mavon-editor
          v-model="editForm.content"
          ref="md"
          @imgAdd="imgAdd"
          @change="change"
          style="min-height: 800px;width: 100%"
        />

      </el-form>
    </div>

    <!-- 对话框内容 -->
    <el-dialog title="发布文章" :visible.sync="dialogFormVisible" width="35%">
      <el-form :model="editForm" ref="editForm2">

        <el-form-item label="描述" prop="description">
          <textarea :maxlength="120"
                    v-model="editForm.description" style="  width: 80%;height: 150px;border-color: lightgrey;border-radius: 5px"
                    class="texti" placeholder="请编写博文描述(必填)"
          ></textarea>
        </el-form-item>
        <el-form-item label="分类专栏" prop="channel_id" :rules=" required: true, message: '分类专栏不能为空', trigger: 'blur'">

          <el-select v-model="editForm.channel_id" placeholder="请选择频道">
            <el-option v-for="(item,index) in baseChannels" :key="item.index" :label="item.channelName" :value="item.id + ''"></el-option>
          </el-select>

        </el-form-item>
        <el-form-item label="博客封面" prop="first_picture" >
          <el-input v-model="editForm.first_picture" placeholder="请输入封面URL"></el-input>
        </el-form-item>
      </el-form>
      <div slot="footer" class="dialog-footer">
        <el-button @click="dialogFormVisible = false">取消</el-button>
        <el-button type="primary" @click="submitBlog('editForm2')">确定</el-button>
      </div>
    </el-dialog>


  </div>
</template>
<script>
import  mavonEditor  from 'mavon-editor'
import 'mavon-editor/dist/css/index.css'
import axios from "axios";

export default
  name: "Writeboke",
  data()
    return
      editForm:   //博客文章表单

        title: '',
        description: '',
        first_picture: '',
        content: '',
        channel_id: '',
        flag:'',
        published: null,

      ,

      okimg: 1,

      baseChannels: [],  // 进入页面的时候需要被加载的玩意儿
      success: null, //交互状态!


      editForm2:   //用来校验的表单

        channel_id: null,
        flag:'',
        published: null,
      ,
      oldtags:'',  //字符串类型的标签
      type:  //分类专栏
        name:''
      ,

      dialogFormVisible: false,  //控制发布博客对话框
      dialog2: false,  //控制新增分类专栏对话框


  ,
  mounted()
    //获取频道,本来是打算直接在前端获取的,但是想了想还是算了吧,从服务器这边拿数据吧
    this.axios(
      url: "/boot/getbasechannels",
      method: 'post',
    ).then(res=>
      this.baseChannels = res.data.baseChannels
      this.success = res.data.success
      if(this.success == '0')
        alert("数据加载异常")

    )

  ,
  methods:
    //去发布文章

    isokPic()
      this.axios(
        url:this.editForm.first_picture,

      ).catch(error=>
          this.okimg = 0
      )
    ,

    toSubmit()
      this.dialogFormVisible = true
      this.initType()
    ,
    //初始化文章专栏
    initType()

    ,

    submitForm(formName)
      this.$refs[formName].validate((valid) =>
        if (valid)
          this.addNewType()
         else
          return false;

      );
    ,
    //校验博客基本内容表单
    tosubmitForm(formName)
      if(this.editForm.title == '')
        alert("文章标题不能为空")
        return

      if(this.editForm.content == '')
        alert("文章内容不能为空")
        return


      this.toSubmit()

    ,
    //校验发布博客表单,校验成功后发布博客
    submitBlog(formName)
      if(this.editForm.description == '')
        alert("文章描述不能为空")
        return

      if(this.editForm.channel_id == '')
        alert("请选择分类")
        return;


      this.isokPic()

      console.log(this.okimg)
      setTimeout(this.sendBlog,2000)

    ,

    sendBlog()
      if(this.okimg == 1)

            //发布博客
            this.editForm.content = this.html;

            this.axios(
              url: "/boot/userblog/saveblog",
              method: "post",
              data:
                boke: this.editForm
              ,
              headers:

                "token": localStorage.getExpire("tokenhole"),

            ).then(res=>
              if(res.data.success == 0)
                this.dialogFormVisible = false
                alert("博客发送失败")
                return

              alert("博客发布成功")
              this.dialogFormVisible = false

            )

            console.log("博客发布")

           else
            return false;


      if(this.okimg == 0)
        alert("目标图片地址拒绝了我们的访问,请更换图片源!")
        return


    ,

    imgAdd(pos, $file)
      let param = new FormData()
      param.append("file",$file)
      this.axios(
        url: "/boot/boke/bokeImg",
        method: "post",
        data: param,
        headers:
          'Content-Type': 'multipart/form-data',
          "token": localStorage.getExpire("tokenhole"),

      ).then(res=>
        if(res.data.success == 0)
          alert("图片上传失败")
          return

        let url = "/boot"+ res.data.bokeImg
        this.$refs.md.$img2Url(pos,url)

      )

    ,


    // 所有操作都会被解析重新渲染
    change(value, render)        //value为编辑器中的实际内容,即markdown的内容,render为被解析成的html的内容
      this.html = render;
    ,
    // 提交
    submit()                    //点击提交后既可以获取html内容,又可以获得markdown的内容,之后存入到服务端就可以了
      console.log(this.editForm.content);
      console.log(this.html);
    ,


</script>

<style>
.m_container
  margin-top: 20px;

.el-tag + .el-tag
  margin-left: 10px;

.button-new-tag
  margin-left: 10px;
  height: 32px;
  line-height: 30px;
  padding-top: 0;
  padding-bottom: 0;

.input-new-tag
  width: 90px;
  margin-left: 10px;
  vertical-align: bottom;


input

  width: 85%;
  height: 30px;
  border-width: 2px;
  border-radius: 5px;
  border-color: #00c4ff;
  border-bottom-color: #2C7EEA;
  color: #586e75;
  font-size: 15px;


#submit
  width: 10%;
  height: 35px;
  border-width: 0px;
  margin-left: 3%;
  border-radius: 10px;
  background: #1E90FF;
  cursor: pointer;
  outline: none;
  color: white;
  font-size: 17px;

#submit:hover
  background-color: #1E90FF;
  box-shadow: 0 4px 0 powderblue;


.texti:focus
  border-color: #1e88e1;
  outline: 0;
  -webkit-box-shadow: inset 0 1px 1px rgba(0,0,0,.075),0 0 8px rgba(102,175,233,.6);
  box-shadow: inset 0 1px 1px rgba(0,0,0,.075),0 0 8px rgba(102,175,233,.6)

textarea
  resize: none;


</style>
可以看到我这里是故意沉睡了2秒,主要一方面是为了让那个去验证一下图片是否可以被访问,另一方面是故意让用户稍等的,防止爬虫,后面我会再搞个等待加载的玩意。
多表查询分页
那么开始进入正题,前面我介绍了我们整个表的结构,所以这里就不复述了。
需要使用到多表的地方就是那个 频道表和那个博客表,整个也就是整体所在了。
这里提供两个方法
使用注解
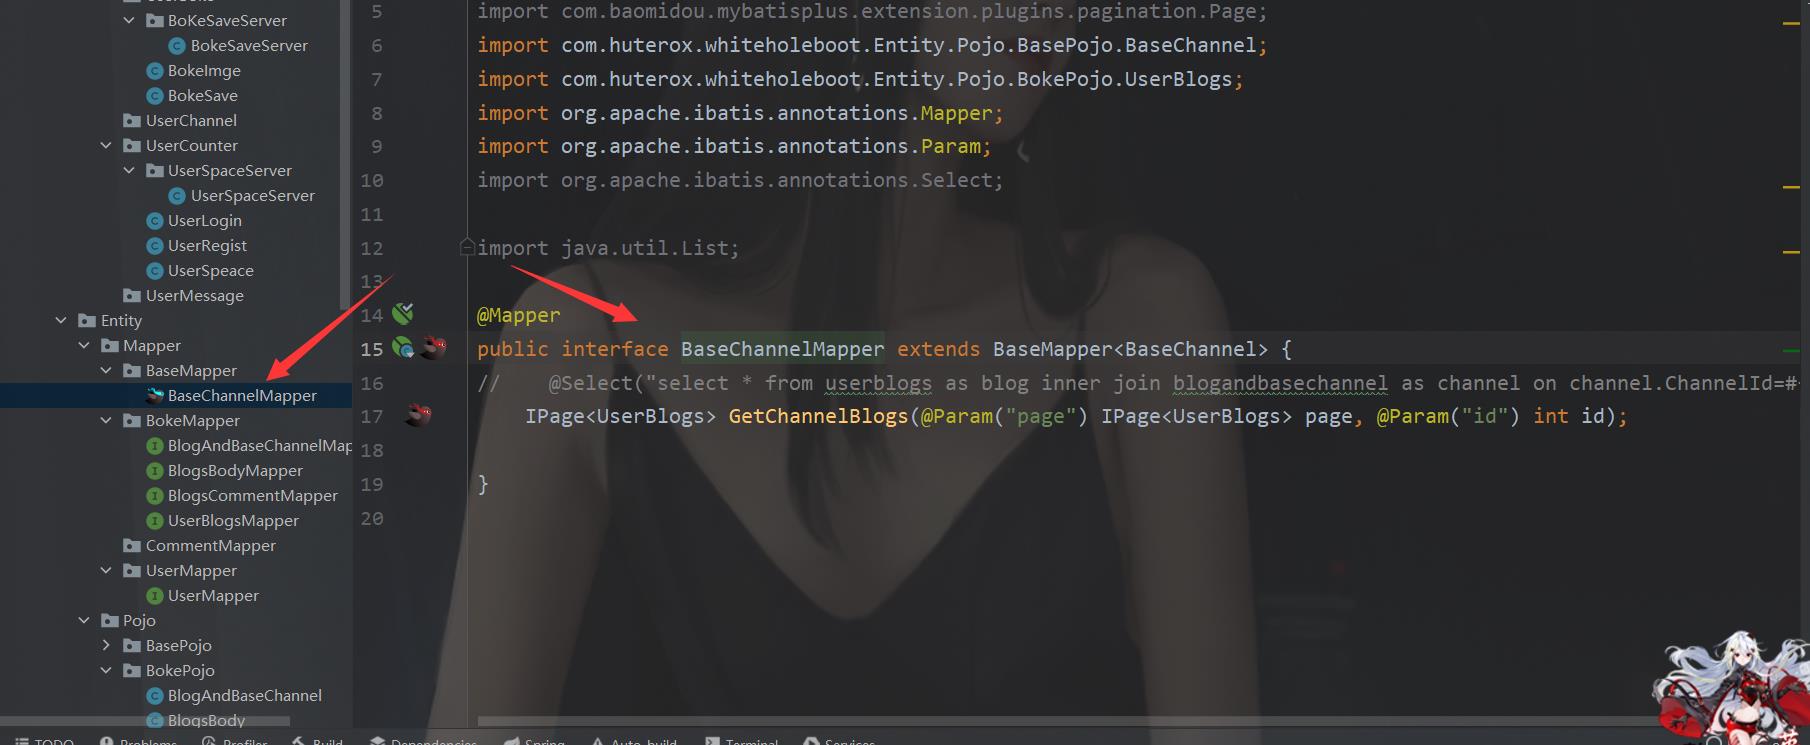
整个简单,我们直接在那个mapper文件里面写注解就好了。

@Mapper
public interface BaseChannelMapper extends BaseMapper<BaseChannel>
    @Select("select * from userblogs as blog inner join blogandbasechannel as channel on channel.ChannelId=#id")
    IPage<UserBlogs> GetChannelBlogs(@Param("page") IPage<UserBlogs> page, @Param("id") int id);
使用xml配置文件
这里需要注意几个点。
首先是制定 你的 xml 放置目录,让myabtisplus 扫描到。
我这里放在

所以修改配置文件
mybatis-plus:
  global-config:

    db-config:
      id-type: auto
      table-underline: false
  mapper-locations:
    - classpath*:/mapping/*.xml
  configuration:
    map-underscore-to-camel-case: false
之后愉快的去写那个xml了
<?xml version="1.0" encoding="UTF-8" ?>
<!DOCTYPE mapper
        PUBLIC "-//mybatis.org//DTD Mapper 3.0//EN"
        "http://mybatis.org/dtd/mybatis-3-mapper.dtd">

<mapper namespace="com.huterox.whiteholeboot.Entity.Mapper.BaseMapper.BaseChannelMapper">

    <!--sql-->
    <select id="GetChannelBlogs" resultType="com.huterox.whiteholeboot.Entity.Pojo.BokePojo.UserBlogs">
        select * from userblogs as blog inner join blogandbasechannel as channel on channel.ChannelId=#id and blog.Id = channel.UserBlogsId
    </select>


</mapper>
分页器
之后是分页器,单表的这个好说,主要是咱们自己定义的方法的分页器,这个很重要。
这个其实也很简单,但是注意细节。
ok 在此之前,不管是单表还是多表,咱们都得去开启咱们的配置
@Configuration
@EnableTransactionManagement
public class MyBatisPlusConfig
    @Bean
    public PaginationInterceptor paginationInterceptor()
        PaginationInterceptor page = new PaginationInterceptor();
        page.setDialectType("mysql");
        return page;
之后在咱们的那个 mapper里面必须这样写
@Mapper
public interface BaseChannelMapper extends BaseMapper<BaseChannel>
    @Select("select * from userblogs as blog inner join blogandbasechannel as channel on channel.ChannelId=#id")
    IPage<UserBlogs> GetChannelBlogs以上是关于Vue+SpringBoot 前后端分离实战(mybatisplus多表分页查询+博客显示)的主要内容,如果未能解决你的问题,请参考以下文章