Arduino ESP32将数据保存到NVS中
Posted perseverance52
tags:
篇首语:本文由小常识网(cha138.com)小编为大家整理,主要介绍了Arduino ESP32将数据保存到NVS中相关的知识,希望对你有一定的参考价值。
Arduino ESP32将数据保存到NVS中
该功能类似AVR单片机里面的EEPROM存储区域。
- 关于ESP32分区表参考《分区表》
Preferences中数据以键值对(key - value)的方式存储。在键值对之上还有一层命名空间(namespace),不同命名空间中可以有相同的键名存在。在Preferences中命名空间和键名均为字符串,并且长度不大于15个字节。
- 一般默认的分区模式
# ESP-IDF Partition Table
# Name,   Type, SubType, Offset,  Size, Flags
nvs,      data, nvs,     0x9000,  0x4000,
otadata,  data, ota,     0xd000,  0x2000,
phy_init, data, phy,     0xf000,  0x1000,
factory,  app,  factory, 0x10000,  1M,
ota_0,    app,  ota_0,   0x110000, 1M,
ota_1,    app,  ota_1,   0x210000, 1M,
那么跟给nvs的容量就是
0x4000,也就是4KB
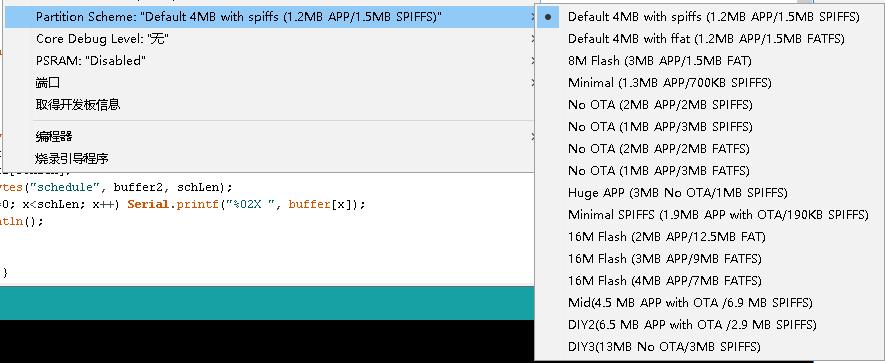
- 在ArduinoIDE里面有很多不同分区表的配置可选择。

- 关于分区表生成,可以参考:《NVS 分区生成程序》
- 如何查看具体位置可以看《Arduino ESP32 flash各型号分区表配置详略整理》
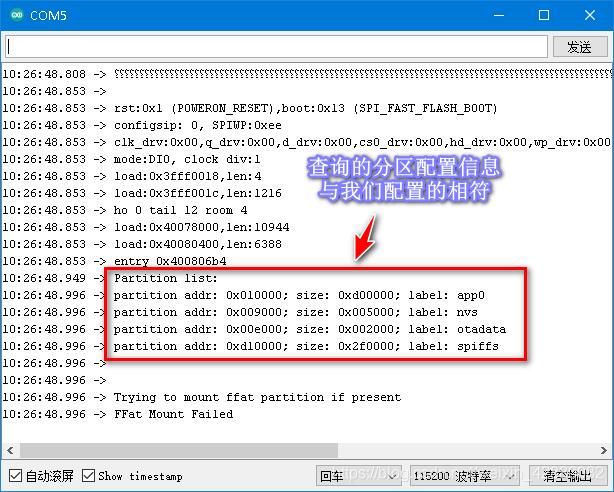
分区表相关的配置信息查询示例程序
/* Code gathered by Marc MERLIN <marc_soft@merlins.org> from code found
on gitter (license unknown) and in esp32-arduino's
libraries/FFat/examples/FFat_Test/FFat_Test.ino */

#include <esp_partition.h>
#include "FFat.h"

void partloop(esp_partition_type_t part_type)
  esp_partition_iterator_t iterator = NULL;
  const esp_partition_t *next_partition = NULL;
  iterator = esp_partition_find(part_type, ESP_PARTITION_SUBTYPE_ANY, NULL);
  while (iterator)
     next_partition = esp_partition_get(iterator);
     if (next_partition != NULL)
        Serial.printf("partition addr: 0x%06x; size: 0x%06x; label: %s\\n", next_partition->address, next_partition->size, next_partition->label);
     iterator = esp_partition_next(iterator);


void listDir(fs::FS &fs, const char * dirname, uint8_t levels)
    Serial.printf("Listing directory: %s\\r\\n", dirname);

    File root = fs.open(dirname);
    if(!root)
        Serial.println("- failed to open directory");
        return;

    if(!root.isDirectory())
        Serial.println(" - not a directory");
        return;


    File file = root.openNextFile();
    while(file)
        if(file.isDirectory())
            Serial.print("  DIR : ");
            Serial.println(file.name());
            if(levels)
                listDir(fs, file.name(), levels -1);

         else
            Serial.print("  FILE: ");
            Serial.print(file.name());
            Serial.print("\\tSIZE: ");
            Serial.println(file.size());

  file.close();
        file = root.openNextFile();


void setup()
    Serial.begin(115200);

    Serial.setDebugOutput(true);

    Serial.println("Partition list:");
    partloop(ESP_PARTITION_TYPE_APP);
    partloop(ESP_PARTITION_TYPE_DATA);

    Serial.println("\\n\\nTrying to mount ffat partition if present");

    // Only allow one file to be open at a time instead of 10, saving 9x4 - 36KB of RAM
    if(!FFat.begin( 0, "", 1 ))
        Serial.println("FFat Mount Failed");
        return;


    Serial.println("File system mounted");
    Serial.printf("Total space: %10lu\\n", FFat.totalBytes());
    Serial.printf("Free space:  %10lu\\n\\n", FFat.freeBytes());
    listDir(FFat, "/", 5);


void loop()

我们在有效数据读取和存储方面,我们更多的关注是如何去利用它。
ArduinoIDE ESP32固件包自带的有关示例
Preferences

Preferences.h头文件涵盖的所支持的数据类型API函数:
存放不同类型数据的API函数
CharputChar(const char* key, int8_t value)Unsigned CharputUChar(const char* key, int8_t value)ShortputShort(const char* key, int16_t value)Unsigned ShortputUShort(const char* key, uint16_t value)IntputInt(const char* key, int32_t value)Unsigned IntputUInt(const char* key, uint32_t value)LongputLong(const char* key, int32_t value)Unsigned LongputULong(const char* key, uint32_t value)Long64putLong64(const char* key, int64_t value)Unsigned Long64putULong64(const char* key, uint64_t value)FloatputFloat(const char* key, const float_t value)DoubleputDouble(const char* key, const double_t value)BoolputBool(const char* key, const bool value)StringputString(const char* key, const String value)BytesputBytes(const char* key, const void* value, size_t len)
读取不同类型数据的API函数
ChargetChar(const char* key, const int8_t defaultValue)Unsigned ChargetUChar(const char* key, const uint8_t defaultValue)- Short getShort(const char* key, const int16_t defaultValue
Unsigned ShortgetUShort(const char* key, const uint16_t defaultValue)IntgetInt(const char* key, const int32_t defaultValue)Unsigned IntgetUInt(const char* key, const uint32_t defaultValue)LonggetLong(const char* key, const int32_t defaultValue)Unsigned LonggetULong(const char* key, const uint32_t defaultValue)Long64getLong64(const char* key, const int64_t defaultValue)Unsigned Long64gettULong64(const char* key, const uint64_t defaultValue)FloatgetFloat(const char* key, const float_t defaultValue)DoublegetDouble(const char* key, const double_t defaultValue)BoolgetBool(const char* key, const bool defaultValue)StringgetString(const char* key, const String defaultValue)StringgetString(const char* key, char* value, const size_t maxLen)BytesgetBytes(const char* key, void * buf, size_t maxLen)
不管是存储还是读取函数,都至少包含2个参数:键名和键值,我们从上面不难发现,不管是获取键值还是存放键值,它们的第二个参数的返回值和操作的对象都是相同的。
数据操作相关的API函数
clear():清除打开的首选项中的所有键。freeEntries():获取剩余可用空间.remove():删除单独一个键值对象。与clear()不同,end():关闭命名空间(namespace)bool begin(const char * name, bool readOnly=false, const char* partition_label=NULL);:第一个参数是必填的,命名空间,第二个参数是默认初始化是只读模式,第三个参数为空,不填。
存储键值到NVS区域示例
#include <Preferences.h>

void setup()
    Serial.begin(115200);
    Serial.println();
    delay(2000);

    Preferences prefs;
    prefs.begin("mynamespace");

    Serial.println(prefs.freeEntries());//查询剩余空间

    prefs.putString("wifiname", "MERCURY_D268G");
    Serial.println(prefs.freeEntries());

    prefs.putInt("int", 1234567890);
    Serial.println(prefs.freeEntries());

    prefs.putChar("char", 127);
    Serial.println(prefs.freeEntries());

    uint8_t buf[5] = 1, 2, 3, 4, 5;
    prefs.putBytes("byte", buf, 5);
    Serial.println(prefs.freeEntries());

    prefs.end();


void loop()
以上是关于Arduino ESP32将数据保存到NVS中的主要内容,如果未能解决你的问题,请参考以下文章
Arduino框架下对ESP32 NVS非易失性存储解读以及应用示例
Arduino方式开发ESP32笔记:使用Preferences保存数据