Antv G6动态更新自定义节点数据
Posted 恁说叫啥就叫啥
tags:
篇首语:本文由小常识网(cha138.com)小编为大家整理,主要介绍了Antv G6动态更新自定义节点数据相关的知识,希望对你有一定的参考价值。
背景
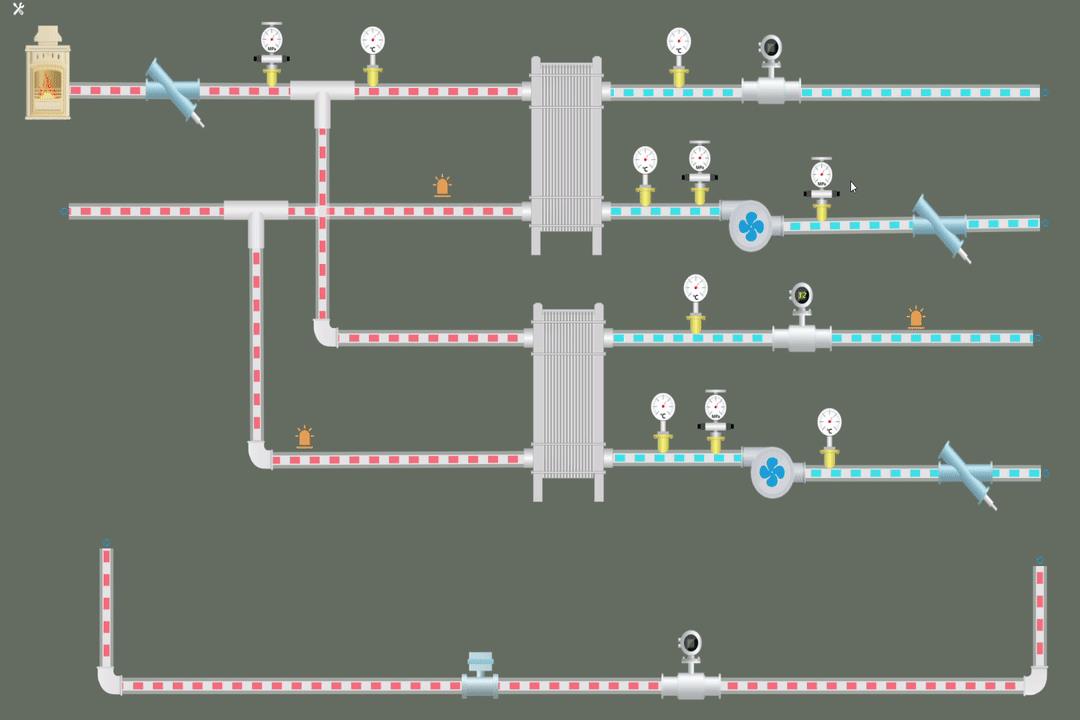
由于公司项目需求,最近研究了一下使用蚂蚁的antv G6来构建拓扑图。
成果实例

由于很多个性需求,所以图中的各种edge和node都是使用G6.registerNode和G6.registerEdge两个方法来自定义的。下面贴一下我自定义节点和边的代码片段。
     G6.registerNode(item.iconName,
          draw(cfg, group)
            if (item.iconName === 'warning1')
              // 警报灯使用字体图标(制作闪烁动画)
              // 定义字体图标
              const keyShape = group.addShape('text',
                attrs:
                  x: 0,
                  y: 0,
                  fontFamily: 'iconfont', // 对应css里面的font-family: "iconfont";
                  textAlign: 'center',
                  textBaseline: 'middle',
                  text: '\\ue60e', // 具体图标
                  fontSize: item.size,
                  fill: '#eaa153'
                ,
                // must be assigned in G6 3.3 and later versions. it can be any value you want
                name: item.type
              )
              // 添加闪烁动画
              keyShape.animate(
                (ratio) =>
                  const color = ratio > 0.5 ? '#eaa153' : '#f83f3f'
                  return
                    fill: color

                ,

                  repeat: true, // 动画重复
                  duration: 1000,
                  easing: 'easeLinear'

              )

              // 强制刷新图标(默认情况刷新页面,图标会变成小方框)
              setTimeout(() =>
                keyShape.attr()
              , 0)

              return keyShape
             else if (item.type === 9)
              // 文本框
              const keyShape = group.addShape('text',
                attrs:
                  x: 0,
                  y: 0,
                  text: '文本框节点',
                  fontSize: item.size,
                  fill: '#FFF'
                ,
                name: 'text-box'
              )
              return keyShape
             else
              // 普通图片节点
              const keyShape = group.addShape('image',
                attrs:
                  x: -(item.width / 2),
                  y: -(item.height / 2),
                  height: item.height,
                  width: item.width,
                  img: require(`@/assets/process_diagram_images/$item.iconName.svg`)
                ,
                // must be assigned in G6 3.3 and later versions. it can be any value you want
                name: item.type
              )
              // 给风扇添加转动动画
              if (item.type === 3)
                keyShape.animate(
                  (ratio) =>
                    const toMatrix = G6.Util.transform(
                      [1, 0, 0, 0, 1, 0, 0, 0, 1],
                      [['r', ratio * Math.PI * 4]]
                    )
                    return
                      matrix: toMatrix

                  ,

                    repeat: true, // 动画重复
                    duration: 3000,
                    easing: 'easeLinear'

                )

              return keyShape

          ,
          // 自定义选中状态
          setState(name, value, item)
            const group = item.getContainer()
            const shape = group.get('children')[0]
            if (name === 'selected')
              if (value)
                shape.attr('shadowBlur', 6)
                shape.attr('shadowColor', '#00a5fc')
               else
                shape.attr('shadowBlur', 0)
                shape.attr('shadowColor', 'transparent')


        )
G6.registerEdge(
'pipeLine',
afterDraw(cfg, group)
const shape = group.get('children')[0]
shape.attr('stroke', 'rgba(255,255,255,0.4)')
// 添加管线白底
const startPoint = shape.getPoint(0)
const endPoint = shape.getPoint(1)
group.addShape('path',
attrs:
path: [
['M', startPoint.x, startPoint.y],
['L', endPoint.x, endPoint.y]
],
stroke: 'rgb(229,229,229)',
lineWidth: 8
,
// must be assigned in G6 3.3 and later versions. it can be any value you want
name: 'line-bg'
)
// 添加流动动画
const flowPath = group.addShape('path',
attrs:
path: [
['M', startPoint.x, startPoint.y],
['L', endPoint.x, endPoint.y]
],
stroke: item.color,
lineWidth: 6
,
// must be assigned in G6 3.3 and later versions. it can be any value you want
name: 'line-flow'
)
// 定义流向动画
const lineDash = [10, 10, 10, 10]
let index = 0
flowPath.animate(
() =>
index += 0.3
if (index > 40)
index = 0
const res =
lineDash,
lineDashOffset: -index
// returns the modified configurations here, lineDash and lineDashOffset here
return res
,
repeat: true, // whether executes the animation repeatly
duration: 3000 // the duration for executing once
)
,
update: undefined
,
'line' // extend the built-in edge 'cubic'
)问题
根据需求,需要动态更新节点(node)和边(edge)的样式,比如需要动态修改一个文本节点的文本内容或者动态修改edge的颜色。在修改edge颜色的时候我使用的方法是通过graph.findById方法先查找到对应的节点,在通过点属性直接修改对应的属性值(最后不要忘了使用refreshItem函数重新渲染该元素)
 const el = this.graph.findById('edgeId')
  // 修改管道颜色(背景)
 el._cfg.model.style.stroke = 'rgba(99,99,99,0.77)'
  // 重新渲染
 this.graph.refreshItem(el)
但是,我想通过同样的方式修改文本框内容时候,却怎么也不生效
 const el = this.graph.findById('nodeId')
  // 修改文本内容
 el._cfg.keyshape.attrs.text = '我是变化后的文本'
  // 重新渲染
 this.graph.refreshItem(el)
最后通过反复阅读官方关于自定义节点部分的文档,终于发现了问题所在

换句话说,我在自定义edge时,使用的是afterDraw方法,并且继承了内置元素line的属性,所以在更新时他会执行line这个内置元素的update方法(具体实现请自行查阅)去修改我们edge数据,但是在我在自定义节点时使用的时使用的是draw方法,并且没有继承内置元素,所以在更新时,会重新执行draw这个方法,执行同样的方法,节点数据当然不会发生改变了。
解决方法
在自定义节点时,需要自己去定义update这个方法,我的代码如下
        update(cfg, node)
            // 若未指定registerNode的第三个参数并且未定义update方法时,则节点更新时会执行 draw 方法,所有图形清除重绘
            if (item.type === 9 && cfg.attrs)
              // 定义更新文本节点的方法
              node.get('keyShape').attrs.text = cfg.attrs.text
              node.get('keyShape').attrs.fill = cfg.attrs.fill
              node.get('keyShape').attrs.font = `normal normal normal $cfg.attrs.fontSizepx sans-serif`
              node.get('keyShape').attrs.fontSize = cfg.attrs.fontSize

,最后在动态更新时,只需要使用graph.updateItem修改节点的数据即可
// 动态刷新文本框的节点的内容
    refreshTextBox(params)
      const  id, text, fontSize, fill, variation  = params
      const node = this.graph.findById(id)
      // fontSize参数必须为数字
      this.graph.updateItem(node,
        attrs:
          text: text || '文本内容出错',
          fontSize: fontSize || 14,
          fill: fill || '#FFF',
          variation: variation || 'test'

      )
核心
解决方案的核心就是在自定义节点时使用update这个方法,另外大家在使用第三方插件时,遇到问题一定要去多阅读文档,答案或许就在文档中。
以上是关于Antv G6动态更新自定义节点数据的主要内容,如果未能解决你的问题,请参考以下文章