HI3861学习笔记(18)——UART串口使用
Posted Leung_ManWah
tags:
篇首语:本文由小常识网(cha138.com)小编为大家整理,主要介绍了HI3861学习笔记(18)——UART串口使用相关的知识,希望对你有一定的参考价值。
一、简介
1.1 UART
通用异步收发送器(UART)是一种硬件特性,它使用广泛适应的异步串行通信接口(如RS 232、RS 422、RS 485)来处理通信(即时序要求和数据帧)。UART提供了一种广泛采用和廉价的方法来实现不同设备之间的全双工或半双工数据交换。
1.2 GPIO复用功能
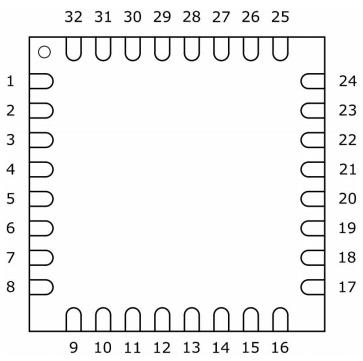
HI3861V100 芯片有 15 个 GPIO,引脚分布如下:


其中 UART 端口有 3 个,其中 UART0 用于调试,每个 GPIO 可复用成 UART 的端口如下:
| Pin | 管脚名称 | 复用信号 |
|---|---|---|
| 2 | GPIO_00 | UART1_TXD |
| 3 | GPIO_01 | UART1_RXD |
| 4 | GPIO_02 | UART1_RTS, UART1 的流控管脚,发送请求信号,输出 |
| 5 | GPIO_03 | 复用信号 0:UART0_LOG_TXD,数据发送, Debug 和下载串口接口 复用信号 1:UART1_CTS, UART1 的流控管脚,清除发送信号,输入 |
| 6 | GPIO_04 | UART0_LOG_RXD 数据接收, Debug 和下载串口接口 |
| 17 | GPIO_05 | UART1_RXD,数据接收口 |
| 18 | GPIO_06 | UART1_TXD,数据发送口 |
| 19 | GPIO_07 | UART1_CTS,清除发送信号,通信串口 |
| 20 | GPIO_08 | UART1_RTS,发送请求信号,通信串口 |
| 27 | GPIO_09 | UART2_RTS,发送请求信号,通信串口,输出信号 |
| 28 | GPIO_10 | UART2_CTS,发送清除信号,通信串口,输入信号 |
| 29 | GPIO_11 | UART2_TXD |
| 30 | GPIO_12 | UART2_RXD |
| 31 | GPIO_13 | 复用信号 1:UART2_RTS 复用信号 2:UART0_LOG_TXD |
| 32 | GPIO_14 | 复用信号 1:UART2_CTS 复用信号 2:UART0_LOG_RXD |
二、API说明
以下 UART 接口位于 base\\iot_hardware\\interfaces\\kits\\wifiiot_lite\\wifiiot_uart.h。
业务BUILD.gn中包含路径
include_dirs = [
        "//utils/native/lite/include",
        "//kernel/liteos_m/components/cmsis/2.0",
        "//base/iot_hardware/interfaces/kits/wifiiot_lite",
    ]
2.1 UartInit
| 功能 | 配置一个UART设备 |
|---|---|
| 函数定义 | unsigned int UartInit(WifiIotUartIdx id, const WifiIotUartAttribute *param, const WifiIotUartExtraAttr *extraAttr) |
| 参数 | id:UART端口号 param:表示基本UART属性 extraAttr:表示扩展UART属性 |
| 返回 | 错误码 |
2.2 UartWrite
| 功能 | 将数据写入UART设备 |
|---|---|
| 函数定义 | int UartWrite(WifiIotUartIdx id, const unsigned char *data, unsigned int dataLen) |
| 参数 | id:UART端口号 data:表示指向要写入数据的起始地址的指针 dataLen:表示读取数据的长度 |
| 返回 | 成功时返回写入的字节长度 |
2.3 UartRead
| 功能 | 从UART设备读取数据 |
|---|---|
| 函数定义 | int UartRead(WifiIotUartIdx id, unsigned char *data, unsigned int dataLen) |
| 参数 | id:UART端口号 data:表示指向要读取数据的起始地址的指针 dataLen:表示读取数据的长度 |
| 返回 | 成功时返回读取的字节长度 |
2.4 UartSetFlowCtrl
| 功能 | 设置UART硬件流控制 |
|---|---|
| 函数定义 | unsigned int UartSetFlowCtrl(WifiIotUartIdx id, WifiIotFlowCtrl flowCtrl) |
| 参数 | id:UART端口号 flowCtrl:用于硬件流控制的参数 |
| 返回 | 错误码 |
三、使用UART进行数据的收发
编译时在业务BUILD.gn中包含路径
include_dirs = [
        "//utils/native/lite/include",
        "//kernel/liteos_m/components/cmsis/2.0",
        "//base/iot_hardware/interfaces/kits/wifiiot_lite",
    ]
使用板载 E53 接口的 UART 作为测试,如原理图所示第 18 和 19 脚分别为 TXD 和 RXD ,连接了主控芯片的 GPIO_6 和 GPIO_5 ,所以在编写软件的时候需要将 GPIO_6 和 GPIO_5 分别复用为 TXD 和 RXD 。

#include <stdio.h>
#include <string.h>
#include <unistd.h>

#include "ohos_init.h"
#include "cmsis_os2.h"
#include "wifiiot_errno.h"
#include "wifiiot_gpio.h"
#include "wifiiot_gpio_ex.h"
#include "wifiiot_adc.h"
#include "wifiiot_uart.h"

#define UART_TASK_STACK_SIZE 1024 * 8
#define UART_TASK_PRIO 25
#define UART_BUFF_SIZE 1000

static const char *data = "Hello, BearPi!\\r\\n";

static void UART_Task(void)

    uint8_t uart_buff[UART_BUFF_SIZE] = 0;
    uint8_t *uart_buff_ptr = uart_buff;
    uint32_t ret;

    // 这部分代码为UART初始化的代码,首先要在uart_attr结构体这配置波特率、数据位、停止位、奇偶检验位,然后通过UartInit()函数对串口1进行配置。
    WifiIotUartAttribute uart_attr =

        //波特率: 115200
        .baudRate = 115200,

        //data_bits: 8bits
        .dataBits = 8,
        .stopBits = 1,
        .parity = 0,
    ;

    //Initialize uart driver
    ret = UartInit(WIFI_IOT_UART_IDX_1, &uart_attr, NULL);
    if (ret != WIFI_IOT_SUCCESS)

        printf("Failed to init uart! Err code = %d\\n", ret);
        return;

    printf("UART Test Start\\n");
    while (1)

        printf("=======================================\\r\\n");
        printf("*************UART_example**************\\r\\n");
        printf("=======================================\\r\\n");

        //通过串口1发送数据
        UartWrite(WIFI_IOT_UART_IDX_1, (unsigned char *)data, strlen(data));

        //通过串口1接收数据
        UartRead(WIFI_IOT_UART_IDX_1, uart_buff_ptr, UART_BUFF_SIZE);

        printf("Uart1 read data:%s", uart_buff_ptr);
        usleep(1000000);


static void UART_ExampleEntry(void)

    osThreadAttr_t attr;

    attr.name = "UART_Task";
    attr.attr_bits = 0U;
    attr.cb_mem = NULL;
    attr.cb_size = 0U;
    attr.stack_mem = NULL;
    attr.stack_size = UART_TASK_STACK_SIZE;
    attr.priority = UART_TASK_PRIO;

    if (osThreadNew((osThreadFunc_t)UART_Task, NULL, &attr) == NULL)

        printf("[ADCExample] Falied to create UART_Task!\\n");


APP_FEATURE_INIT(UART_ExampleEntry);
查看打印:

• 由 Leung 写于 2021 年 11 月 29 日
以上是关于HI3861学习笔记(18)——UART串口使用的主要内容,如果未能解决你的问题,请参考以下文章