Linux CentOS 6 NAT 转发 完整教程
Posted
tags:
篇首语:本文由小常识网(cha138.com)小编为大家整理,主要介绍了Linux CentOS 6 NAT 转发 完整教程相关的知识,希望对你有一定的参考价值。
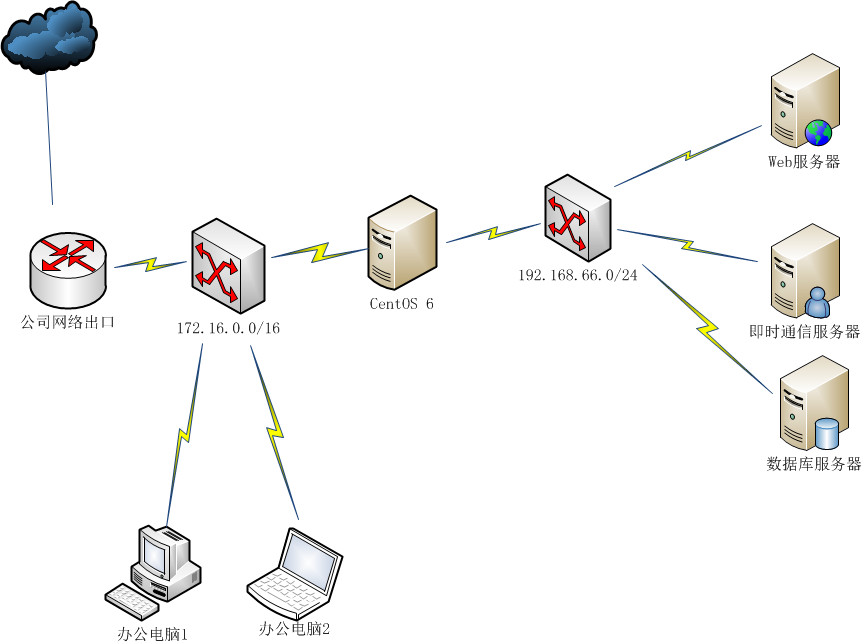
网络拓补图:
环境介绍:
一台CentOS6 主机,双网卡,两网段
网口设定如下:
[[email protected] ~]# cat /etc/sysconfig/network-scripts/ifcfg-eth0
DEVICE=eth0
TYPE=Ethernet
ONBOOT=yes
BOOTPROTO=dhcp
[[email protected] ~]#

[[email protected] ~]# cat /etc/sysconfig/network-scripts/ifcfg-eth1
DEVICE=eth1
TYPE=Ethernet
ONBOOT=yes
BOOTPROTO=static

IPADDR=192.168.66.1
NETMASK=255.255.255.0

[[email protected] ~]# service network restart


[[email protected] ~]# ifconfig -a
eth0      Link encap:Ethernet  HWaddr 00:0C:29:37:00:93
          inet addr:172.16.20.183  Bcast:172.16.255.255  Mask:255.255.0.0


eth1      Link encap:Ethernet  HWaddr 00:0C:29:37:00:9D
          inet addr:192.168.66.1  Bcast:192.168.66.255  Mask:255.255.255.0
打开网卡转发
[[email protected] ~]# vim /etc/sysctl.conf
net.ipv4.ip_forward = 1
立即生效
[[email protected] ~]# sysctl -p
转发规则:
[[email protected] ~]# iptables -t nat -A POSTROUTING -s 192.168.66.0/24 -j SNAT --to 172.16.20.183 #出口为静态IP选这个
[[email protected] ~]# iptables -t nat -A POSTROUTING -s 192.168.66.0/24 -o eth0 -j MASQUERADE #出口为动态IP选这个
查看/保存转发规则
[[email protected] ~]# iptables -t nat -nL
[[email protected] ~]# service iptables save
===================验证NAT===============
在192.168.66/24网段内,一台linux主机设置为:
[[email protected] ~]# cat /etc/sysconfig/network-scripts/ifcfg-eth0
DEVICE=eth0
TYPE=Ethernet
ONBOOT=yes
BOOTPROTO=static

IPADDR=192.168.66.2
NETMASK=255.255.255.0
GATEWAY=192.168.66.1
DNS1=180.76.76.76.76
DNS2=8.8.8.8

[[email protected] ~]#


重启网络服务
[[email protected] ~]# service network restart
Shutting down interface eth0:                              [  OK  ]
Shutting down loopback interface:                          [  OK  ]
开始测试
ping 自己测试
[[email protected] ~]# ping 192.168.66.2
PING 192.168.66.2 (192.168.66.2) 56(84) bytes of data.
64 bytes from 192.168.66.2: icmp_seq=1 ttl=64 time=0.042 ms

ping网关测试
[[email protected] ~]# ping 192.168.66.1
PING 192.168.66.1 (192.168.66.1) 56(84) bytes of data.
64 bytes from 192.168.66.1: icmp_seq=1 ttl=64 time=0.261 ms

ping nat出口测试
[[email protected] ~]# ping 172.16.20.183
PING 172.16.20.183 (172.16.20.183) 56(84) bytes of data.
64 bytes from 172.16.20.183: icmp_seq=1 ttl=64 time=0.280 ms

ping nat外的工作机
[[email protected] ~]# ping 172.16.20.245
PING 172.16.20.245 (172.16.20.245) 56(84) bytes of data.
64 bytes from 172.16.20.245: icmp_seq=1 ttl=63 time=2.39 ms

ping 百度DNS
[[email protected] ~]# ping 180.76.76.76
PING 180.76.76.76 (180.76.76.76) 56(84) bytes of data.
64 bytes from 180.76.76.76: icmp_seq=1 ttl=52 time=10.2


ping 网易163
[[email protected] ~]# ping www.163.com
PING 1stcncloud163.xdwscache.ourwebpic.com (114.80.143.193) 56(84) bytes of data.
64 bytes from 114.80.143.193: icmp_seq=1 ttl=55 time=9.58 ms

ping 淘宝网
[[email protected] ~]# ping www.taobao.com
PING www.taobao.com.danuoyi.tbcache.com (114.80.174.46) 56(84) bytes of data.
64 bytes from 114.80.174.46: icmp_seq=1 ttl=48 time=8.83 ms
完。。
本文出自 “李春利” 博客,请务必保留此出处http://990487026.blog.51cto.com/10133282/1939701
以上是关于Linux CentOS 6 NAT 转发 完整教程的主要内容,如果未能解决你的问题,请参考以下文章
