OpenCV入门快速学会OpenCV5图像处理基础像素处理
Posted 小幽余生不加糖
tags:
篇首语:本文由小常识网(cha138.com)小编为大家整理,主要介绍了OpenCV入门快速学会OpenCV5图像处理基础像素处理相关的知识,希望对你有一定的参考价值。
OpenCV入门(六)快速学会OpenCV5图像处理基础(二)
作者:Xiou
像素是图像构成的基本单位,像素处理是图像处理的基本操作,可以通过位置索引的形式对图像内的元素进行访问、处理。
1.二值化操作
需要说明的是,在OpenCV中,最小的数据类型是无符号的8位数。
因此,在OpenCV中实际上并没有二值图像这种数据类型,二值图像经常是通过处理得到的,然后使用0表示黑色,使用255表示白色。可以将二值图像理解为特殊的灰度图像。
在数字图像处理中,二值图像占有非常重要的地位,图像的二值化使图像中数据量大为减少,从而能凸显出目标的轮廓。
声明如下:
ret, dst = cv2.threshold(src, thresh, maxval, type)
参数:
src: 需要转换的图
thresh: 阈值
maxval: 超过阈值所赋的值
type: 二值化操作类型
返回值:
ret: 输入的阈值
dst: 处理好的图片
原图如下所示:

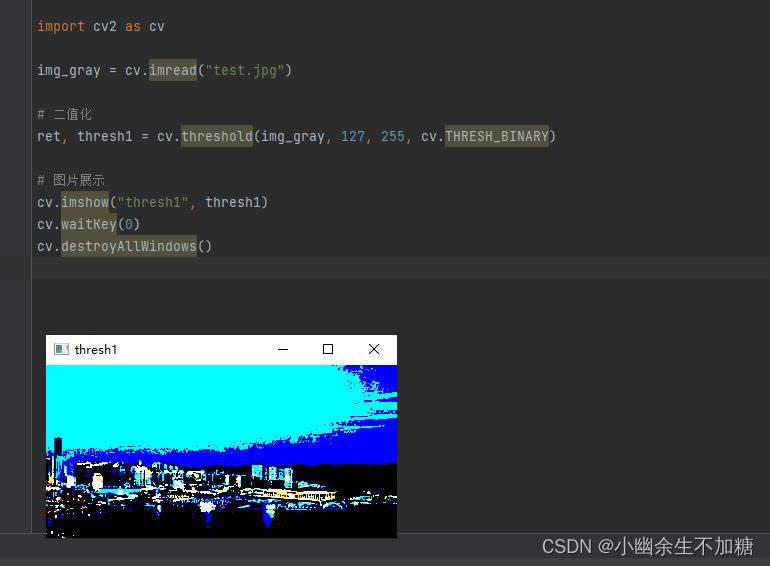
1.1 Binary
大于阈值的设为 255, 低于或等于阈值的为 0。
实例代码:
import cv2 as cv

img_gray = cv.imread("test.jpg")

# 二值化
ret, thresh1 = cv.threshold(img_gray, 127, 255, cv.THRESH_BINARY)

# 图片展示
cv.imshow("thresh1", thresh1)
cv.waitKey(0)
cv.destroyAllWindows()
输出结果:
1.2 Binary Inverse
与 Binary 相反。
代码实例:
import cv2 as cv

img_gray = cv.imread("test.jpg")

# 二值化
ret, thresh1 = cv.threshold(img_gray, 127, 255, cv.THRESH_BINARY)
ret, thresh2 = cv.threshold(img_gray, 127, 255, cv.THRESH_BINARY_INV)
# 图片展示
cv.imshow("thresh1", thresh1)
cv.imshow("thresh2", thresh2)
cv.waitKey(0)
cv.destroyAllWindows()
输出结果:

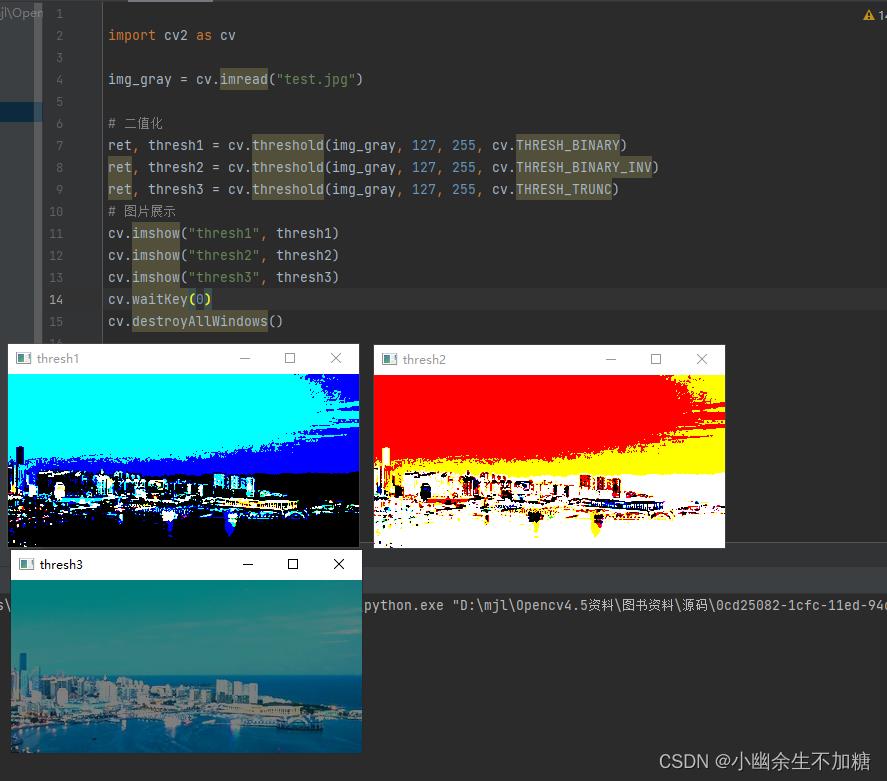
1.3 Trunc
大于阈值的设为 255, 低于或等于阈值的不变。
代码实例:
import cv2 as cv

img_gray = cv.imread("test.jpg")

# 二值化
ret, thresh1 = cv.threshold(img_gray, 127, 255, cv.THRESH_BINARY)
ret, thresh2 = cv.threshold(img_gray, 127, 255, cv.THRESH_BINARY_INV)
ret, thresh3 = cv.threshold(img_gray, 127, 255, cv.THRESH_TRUNC)
# 图片展示
cv.imshow("thresh1", thresh1)
cv.imshow("thresh2", thresh2)
cv.imshow("thresh3", thresh3)
cv.waitKey(0)
cv.destroyAllWindows()
输出结果:
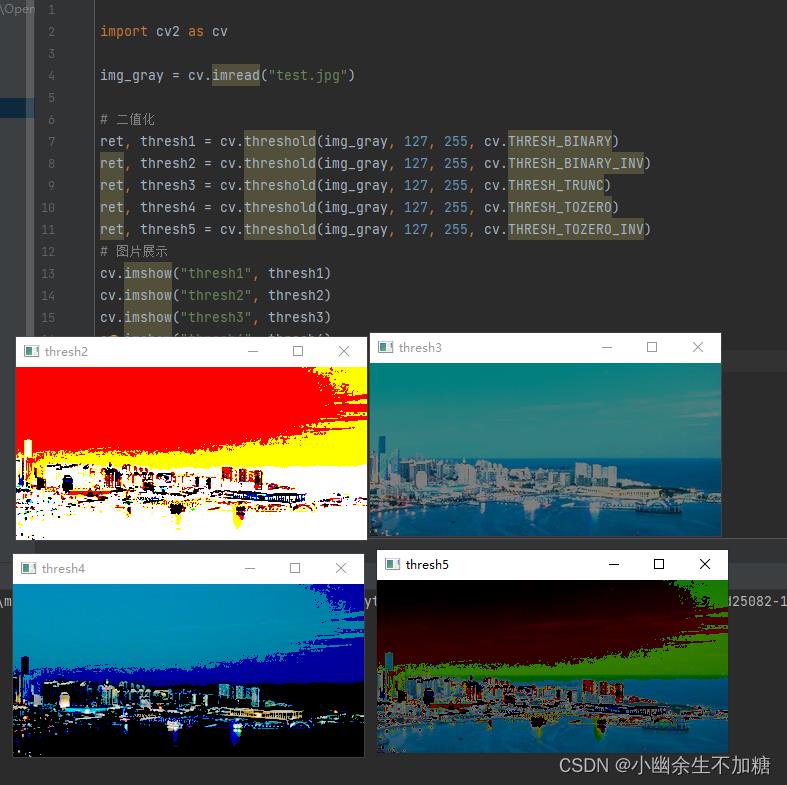
1.4 Tozero
大于阈值部分不变, 否则设为 0。
代码实例:
import cv2 as cv

img_gray = cv.imread("test.jpg")

# 二值化
ret, thresh1 = cv.threshold(img_gray, 127, 255, cv.THRESH_BINARY)
ret, thresh2 = cv.threshold(img_gray, 127, 255, cv.THRESH_BINARY_INV)
ret, thresh3 = cv.threshold(img_gray, 127, 255, cv.THRESH_TRUNC)
ret, thresh4 = cv.threshold(img_gray, 127, 255, cv.THRESH_TOZERO)
# 图片展示
cv.imshow("thresh1", thresh1)
cv.imshow("thresh2", thresh2)
cv.imshow("thresh3", thresh3)
cv.imshow("thresh4", thresh4)
cv.waitKey(0)
cv.destroyAllWindows()
输出结果:

1.5 Tozero Inverse
与 Tozero 相反。
代码实例:
import cv2 as cv

img_gray = cv.imread("test.jpg")

# 二值化
ret, thresh1 = cv.threshold(img_gray, 127, 255, cv.THRESH_BINARY)
ret, thresh2 = cv.threshold(img_gray, 127, 255, cv.THRESH_BINARY_INV)
ret, thresh3 = cv.threshold(img_gray, 127, 255, cv.THRESH_TRUNC)
ret, thresh4 = cv.threshold(img_gray, 127, 255, cv.THRESH_TOZERO)
ret, thresh5 = cv.threshold(img_gray, 127, 255, cv.THRESH_TOZERO_INV)
# 图片展示
cv.imshow("thresh1", thresh1)
cv.imshow("thresh2", thresh2)
cv.imshow("thresh3", thresh3)
cv.imshow("thresh4", thresh4)
cv.imshow("thresh5", thresh5)
cv.waitKey(0)
cv.destroyAllWindows()
输出结果:
2.颜色转换
灰度转换:
如果拍照时曝光不足或曝光过度,照片会灰蒙蒙的或者过白,这实际上是因为对比度太小、输入图像亮度分量的动态范围较小造成的,例如x光照片或陆地资源卫星多光谱图像。改善这些图像的质量可以采用灰度变换法,通过扩展输入图像的动态范围达到图像增强的目的。
灰度变换是图像处理最基本的方法之一,灰度变换可使图像动态范围加大、图像对比度增强、图像清晰、特征明显,是图像增强的重要手段。图像的灰度变换又称为灰度增强,是根据某种目标条件按一定变换关系逐点改变原图像中每一个像素灰度值的方法。
灰度变换主要利用点运算来修正像素灰度,由输入像素点的灰度值确定相应输出点的灰度值,是一种基于图像变换的操作。灰度变换不改变图像内的空间关系,除了灰度级的改变是根据特定的灰度函数变换进行之外,可以看作是“从像素到像素”复制操作,基于点运算的灰度变换可表示为s=T®。
其中,T是灰度变换函数,描述输入灰度值和输出灰度值之间的关系,一旦灰度变换函数确定,该灰度变换就被完全确定下来;r是变换前的灰度;s是变换后的像素。
灰度变换的作用:
(1)改善图像的质量,使图像能够显示更多的细节,提高图像的对比度(对比度拉伸)。
(2)有选择地突出图像感兴趣的特征,或者抑制图像中不需要的特征。
(3)可以有效地改变图像的直方图分布,使像素的分布更为均匀。
灰度变换函数描述了输入灰度值和输出灰度值之间的变换关系,一旦灰度变换函数确定下来,那么其输出的灰度值也就确定了。灰度变换函数的性质决定了灰度变换所能达到的效果。
cv.cvtColor可以帮助我们转换图片通道。
声明如下:
cv2.cvtColor(src, code[, dst[, dstCn]])
参数:
src: 需要转换的图片
code: 颜色空间转换码
dst: 输出图像大小深度相同, 可选参数
desCn: 输出图像的颜色通道, 可选参数
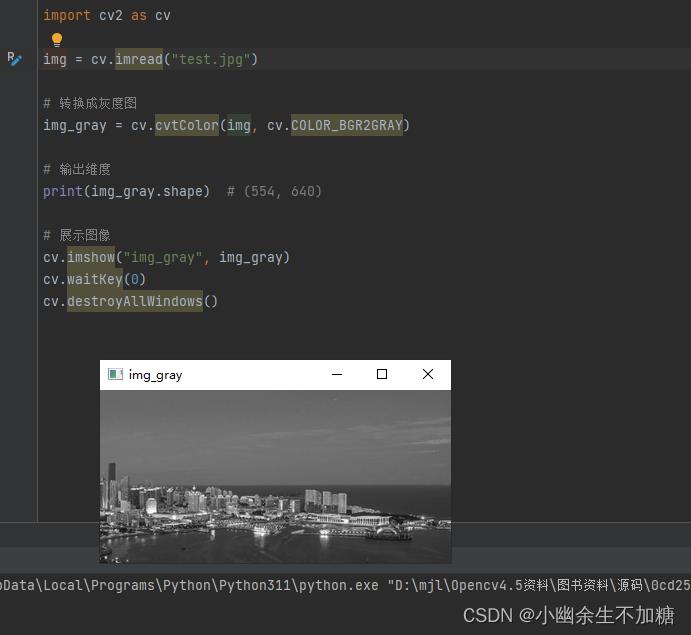
2.1 灰度转换
RGB 到灰度图转换公式:
Y' = 0.299 R + 0.587 G + 0.114 B
代码实例:
import cv2 as cv

img = cv.imread("test.jpg")

# 转换成灰度图
img_gray = cv.cvtColor(img, cv.COLOR_BGR2GRAY)

# 输出维度
print(img_gray.shape)  # (554, 640)

# 展示图像
cv.imshow("img_gray", img_gray)
cv.waitKey(0)
cv.destroyAllWindows()
输出结果:
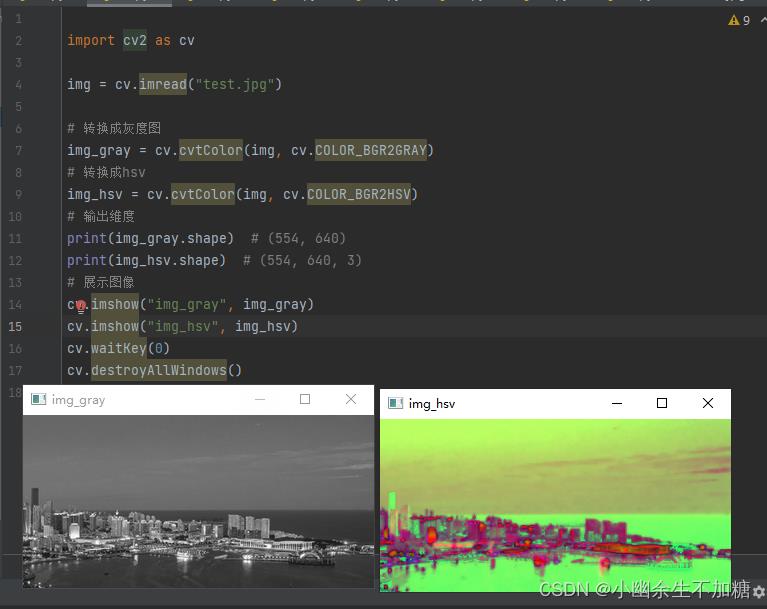
2.2 HSV
HSV (Hue, Saturation, Value) 是根据颜色的直观特性由 A.R. Smith 在 1978 年创建的一种颜色空间。
代码实例:
import cv2 as cv

img = cv.imread("test.jpg")

# 转换成灰度图
img_gray = cv.cvtColor(img, cv.COLOR_BGR2GRAY)
# 转换成hsv
img_hsv = cv.cvtColor(img, cv.COLOR_BGR2HSV)
# 输出维度
print(img_gray.shape)  # (554, 640)
print(img_hsv.shape)  # (554, 640, 3)
# 展示图像
cv.imshow("img_gray", img_gray)
cv.imshow("img_hsv", img_hsv)
cv.waitKey(0)
cv.destroyAllWindows()
输出结果:
2.3 YUV
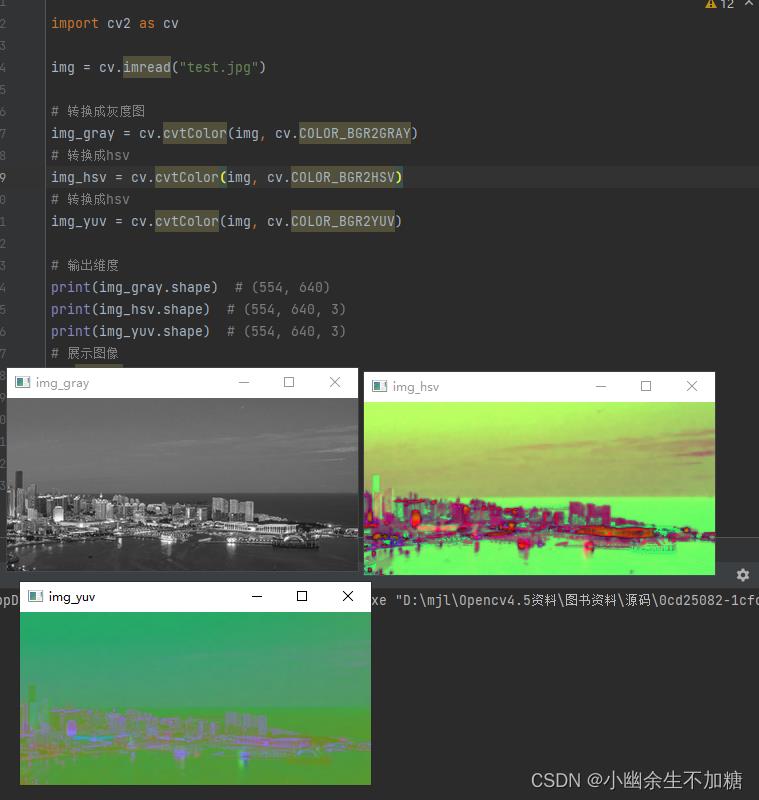
YUV 是一种颜色编码的方法, 主要用在视频, 图形处理流水线中。
代码实例:
import cv2 as cv

img = cv.imread("test.jpg")

# 转换成灰度图
img_gray = cv.cvtColor(img, cv.COLOR_BGR2GRAY)
# 转换成hsv
img_hsv = cv.cvtColor(img, cv.COLOR_BGR2HSV)
# 转换成hsv
img_yuv = cv.cvtColor(img, cv.COLOR_BGR2YUV)

# 输出维度
print(img_gray.shape)  # (554, 640)
print(img_hsv.shape)  # (554, 640, 3)
print(img_yuv.shape)  # (554, 640, 3)
# 展示图像
cv.imshow("img_gray", img_gray)
cv.imshow("img_hsv", img_hsv)
cv.imshow("img_yuv", img_yuv)
cv.waitKey(0)
cv.destroyAllWindows()
输出结果:
以上是关于OpenCV入门快速学会OpenCV5图像处理基础像素处理的主要内容,如果未能解决你的问题,请参考以下文章