qmlbook学习总结
Posted yantuguiguziPGJ
tags:
篇首语:本文由小常识网(cha138.com)小编为大家整理,主要介绍了qmlbook学习总结相关的知识,希望对你有一定的参考价值。
这是 土盐 的第183篇原创文章

1
大家好,我是土盐。
今天把qmlbook的案例代码跑了一遍,感觉还是很酸爽的。
文章写完,发现代码默认排版不舒服。
于是去如下网站,http://md.aclickall.com/
美化代码排版后,复制回公众号编辑器。
无用的win下python虚拟机环境搭建。
git clone https://github.com/qmlbook/qmlbook.git
cd C:\\\\Users\\\\pgjgg\\\\Desktop\\\\qml_learn\\\\qmlbook
pip install -i https://pypi.doubanio.com/simple/ virtualenv
virtualenv -p python3 qmlbook_env
./qmlbook_env/Scripts/activate.bat
pip install -i https://pypi.doubanio.com/simple/ -r requirements.txt
pip install -i https://pypi.doubanio.com/simple/  python-language-server

参考链接:
https://github.com/qmlbook/qmlbook
windows下python虚拟环境virtualenv安装和使用 - 倥偬时光 - 博客园 (cnblogs.com)
https://www.cnblogs.com/cwp-bg/p/python.html
python三大神器之virtualenv - 似是故人来~ - 博客园 (cnblogs.com)
https://www.cnblogs.com/freely/p/8022923.html
qml+python代码运行效果,cpu内存占用动态显示:
代码位置:C:\\Users\\pgjgg\\Desktop\\qml_learn\\qmlbook\\docs\\ch20-python\\src\\model
直接运行依赖项安装出错的情况下,进行了如下错误示范:
pip install -r requirements.txt
pip install Pygments-2.10.0-py3-none-any.whl
pip install requests
pip install pytz-2021.3-py2.py3-none-any.whl
pip install Babel-2.9.1-py2.py3-none-any.whl
pip install sphinxcontrib-jsmath
pip install docutils-0.18-py2.py3-none-any.whl
pip install sphinxcontrib_serializinghtml-1.1.5-py2.py3-none-any.whl
pip install imagesize-1.3.0-py2.py3-none-any.whl
pip install sphinxcontrib_applehelp-1.0.2-py2.py3-none-any.whl
pip install sphinxcontrib_devhelp-1.0.2-py2.py3-none-any.whl
pip install MarkupSafe
pip install Jinja2-3.0.3-py3-none-any.whl
pip install colorama
pip install alabaster-0.7.12-py2.py3-none-any.whl
pip install snowballstemmer-2.2.0-py2.py3-none-any.whl
pip install sphinxcontrib-htmlhelp
pip install sphinxcontrib_qthelp-1.0.3-py2.py3-none-any.whl
pip install Sphinx-4.3.0-py3-none-any.whl
2
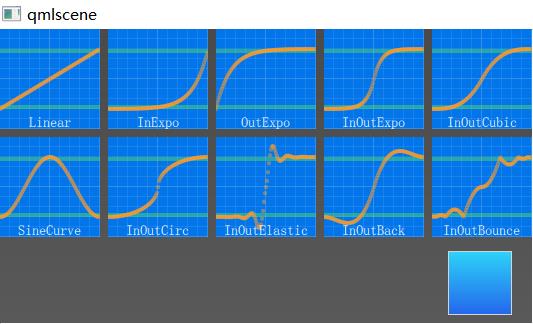
视频制作尝试,动画效果测试:
代码位置:C:\\Users\\pgjgg\\Desktop\\qml_learn\\qmlbook-master\\docs\\ch05-fluid\\src\\EasingCurves
测试的是如下蓝色字体参数,在足球到最高点后的下落段的移动特效。
代码位置:C:\\Users\\pgjgg\\Desktop\\qml_learn\\qmlbook\\docs\\ch05-fluid\\src\\animation\\BouncingBallExample.qml
3
还有很多亮点,直接亮代码吧。
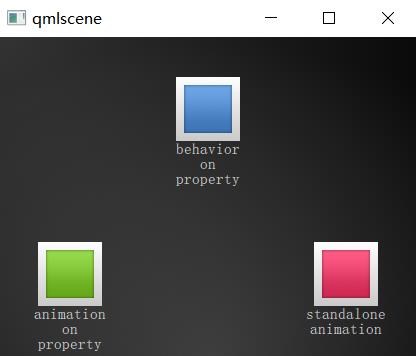
三种动画类型。
1:直接运动。
2:全过程可交互运动。
3:部分过程可交互运动。

代码位置:C:\\Users\\pgjgg\\Desktop\\qml_learn\\qmlbook\\docs\\ch05-fluid\\src\\animation\\AnimationTypesExample.qml//M1>>
ClickableImageV2
id: greenBox
x: 40; y: root.height-height
source: "assets/box_green.png"
text: "animation on property"
NumberAnimation on y
to: 40; duration: 4000
//<<M1
//M2>>
ClickableImageV2
id: blueBox
x: (root.width-width)/2; y: root.height-height
source: "assets/box_blue.png"
text: "behavior on property"
Behavior on y
NumberAnimation duration: 4000
onClicked: y = 40
// random y on each click
// onClicked: y = 40+Math.random()*(205-40)
//<<M2
//M3>>
ClickableImageV2
id: redBox
x: root.width-width-40; y: root.height-height
source: "assets/box_red.png"
onClicked: anim.start()
// onClicked: anim.restart()
text: "standalone animation"
NumberAnimation
id: anim
target: redBox
properties: "y"
to: 40
duration: 4000
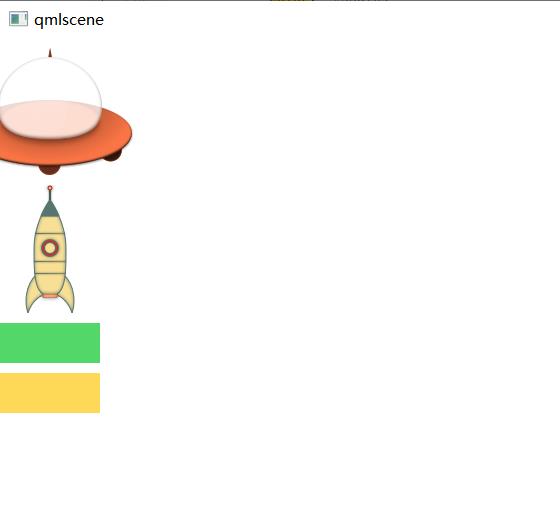
//<<M3序列化和反序列化,基于xml创建和销毁多个实例对象。

代码位置:C:\\Users\\pgjgg\\Desktop\\qml_learn\\qmlbook\\docs\\ch15-dynamicqml\\src\\dynamic-scene\\main.qmlimport QtQuick.XmlListModel 2.0
// M1>>
import QtQuick 2.5
import "create-object.js" as CreateObject
Item
id: root
ListModel
id: objectsModel
function addUfo()
CreateObject.create("ufo.qml", root, itemAdded);
function addRocket()
CreateObject.create("rocket.qml", root, itemAdded);
function itemAdded(obj, source)
objectsModel.append("obj": obj, "source": source)
// <<M1
width: 1024
height: 600
// M2>>
function clearItems()
while(objectsModel.count > 0)
objectsModel.get(0).obj.destroy();
objectsModel.remove(0);
// <<M2
// M3>>
function serialize()
var res = "<?xml version=\\"1.0\\" encoding=\\"utf-8\\"?>\\n<scene>\\n";
for(var ii=0; ii < objectsModel.count; ++ii)
var i = objectsModel.get(ii);
res += " <item>\\n <source>" + i.source + "</source>\\n <x>" + i.obj.x + "</x>\\n <y>" + i.obj.y + "</y>\\n </item>\\n"
res += "</scene>";
return res;
// <<M3
// M4>>
XmlListModel
id: xmlModel
query: "/scene/item"
XmlRole name: "source"; query: "source/string()"
XmlRole name: "x"; query: "x/string()"
XmlRole name: "y"; query: "y/string()"
function deserialize()
dsIndex = 0;
CreateObject.create(xmlModel.get(dsIndex).source, root, dsItemAdded);
function dsItemAdded(obj, source)
itemAdded(obj, source);
obj.x = xmlModel.get(dsIndex).x;
obj.y = xmlModel.get(dsIndex).y;
dsIndex ++;
if (dsIndex < xmlModel.count)
CreateObject.create(xmlModel.get(dsIndex).source, root, dsItemAdded);
property int dsIndex
// <<M4
Column
anchors.left: parent.left
anchors.top: parent.top
anchors.topMargin: 10
spacing: 10
width: 100
Image
anchors.horizontalCenter: parent.horizontalCenter
source: "ufo.png"
MouseArea
anchors.fill: parent
onClicked: addUfo();
Image
anchors.horizontalCenter: parent.horizontalCenter
source: "rocket.png"
MouseArea
anchors.fill: parent
onClicked: addRocket();
Rectangle
anchors.horizontalCenter: parent.horizontalCenter
width: 100
height: 40
color: "#53d769"
MouseArea
anchors.fill: parent
onClicked:
xmlModel.xml = serialize();
clearItems();
Rectangle
anchors.horizontalCenter: parent.horizontalCenter
width: 100
height: 40
color: "#fed958"
MouseArea
anchors.fill: parent
onClicked: deserialize();
4
图片阅读器:

代码位置:C:\\Users\\pgjgg\\Desktop\\qml_learn\\qmlbook\\docs\\ch06-controls\\src\\imageviewer-desktopImage
id: image
anchors.fill: parent
fillMode: Image.PreserveAspectFit
asynchronous: true
FileDialog
id: fileOpenDialog
// ...
title: "Select an image file"
folder: shortcuts.documents
nameFilters: [ "Image files (*.png *.jpeg *.jpg)" ]
onAccepted: image.source = fileOpenDialog.fileUrl;
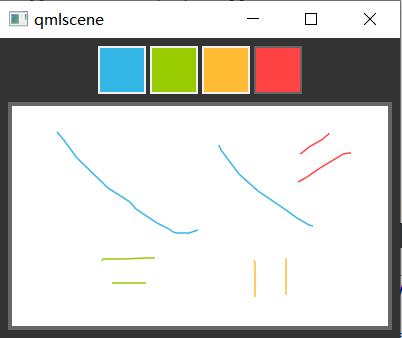
画笔画布工具:

代码位置:C:\\Users\\pgjgg\\Desktop\\qml_learn\\qmlbook\\docs\\ch09-canvas\\src\\canvas\\paint.qml// M1>>
Row
id: colorTools
anchors
horizontalCenter: parent.horizontalCenter
top: parent.top
topMargin: 8
property variant activeSquare: red
property color paintColor: "#33B5E5"
spacing: 4
Repeater
model: ["#33B5E5", "#99CC00", "#FFBB33", "#FF4444"]
ColorSquare
id: red
color: modelData
active: parent.paintColor == color
onClicked:
parent.paintColor = color
// <<M1
Rectangle
anchors.fill: canvas
border.color: "#666666"
border.width: 4
// M2>>
Canvas
id: canvas
anchors
left: parent.left
right: parent.right
top: colorTools.bottom
bottom: parent.bottom
margins: 8
property real lastX
property real lastY
property color color: colorTools.paintColor
onPaint:
var ctx = getContext('2d')
ctx.lineWidth = 1.5
ctx.strokeStyle = canvas.color
ctx.beginPath()
ctx.moveTo(lastX, lastY)
lastX = area.mouseX
lastY = area.mouseY
ctx.lineTo(lastX, lastY)
ctx.stroke()
MouseArea
id: area
anchors.fill: parent
onPressed:
canvas.lastX = mouseX
canvas.lastY = mouseY
onPositionChanged:
canvas.requestPaint()
// <<M2qmlbook书籍代码和运行环境分享
链接:https://pan.baidu.com/s/1Bt1vRkjfazQTnLfoTXgzlQ
提取码:5514今天又是秃头的一天,卒。
--End--
以上是关于qmlbook学习总结的主要内容,如果未能解决你的问题,请参考以下文章