OpenCV 完整例程33. 图像的复合变换
Posted Python小白进阶
tags:
篇首语:本文由小常识网(cha138.com)小编为大家整理,主要介绍了OpenCV 完整例程33. 图像的复合变换相关的知识,希望对你有一定的参考价值。
【OpenCV 完整例程】33. 图像的复合变换
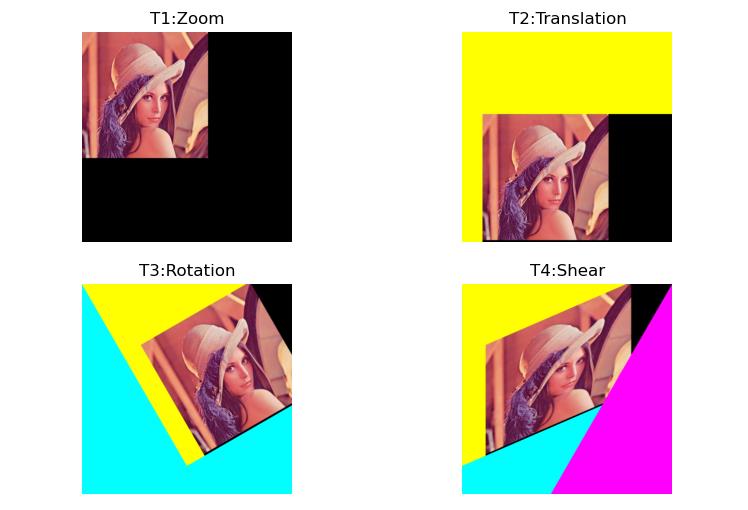
图像的复合变换是指对给定的图像连续进行多次上述的平移、旋转、翻转、缩放、错切等基本变换,也称为级联变换。
对给定图像按一定顺序执行若干次基本变换,其变换矩阵仍然可以用 3x3 阶变换矩阵表示。进一步地,对图像依次执行基本变换 F1、F2、…Fn 的变换矩阵分别为 M1、M2、…Mn,可以证明,以图像中心点为中心进行比例、旋转进行变换,则复合变换的变换矩阵 M 等于各基本变换矩阵依次相乘所得到的组合矩阵:
M
=
M
1
×
M
2
×
⋯
×
M
n
M = M_1 \\times M_2 \\times \\dots \\times M_n
M=M1×M2×⋯×Mn
缩放:
M
A
Z
=
[
f
x
0
0
0
f
y
0
0
0
1
]
M_{AZ} = \\begin{bmatrix} fx &0 &0\\\\ 0 &f_y &0\\\\ 0 &0 &1 \\end{bmatrix}
MAZ=⎣⎡fx000fy0001⎦⎤
旋转:
M
A
R
=
[
c
o
s
θ
−
s
i
n
θ
0
s
i
n
θ
c
o
s
θ
0
0
0
1
]
M_{AR} = \\begin{bmatrix} cos \\theta &-sin \\theta &0\\\\ sin \\theta &cos \\theta &0\\\\ 0 &0 &1 \\end{bmatrix}
MAR=⎣⎡cosθsinθ0−sinθcosθ0001⎦⎤
平移:
M
A
T
=
[
1
0
d
x
0
1
d
y
0
0
1
]
M_{AT} = \\begin{bmatrix} 1 &0 &d_x\\\\ 0 &1 &d_y\\\\ 0 &0 &1 \\end{bmatrix}
MAT=⎣⎡100010dxdy1⎦⎤
扭变:
M
A
S
=
[
1
t
a
n
θ
0
0
1
0
0
0
1
]
M_{AS} = \\begin{bmatrix} 1 &tan \\theta &0\\\\ 0 &1 &0\\\\ 0 &0 &1 \\end{bmatrix}
MAS=⎣⎡100tanθ10001⎦⎤
镜像:
M
A
F
=
[
−
1
0
f
w
0
1
0
0
0
1
]
M_{AF} = \\begin{bmatrix} -1 &0 &f_w\\\\ 0 &1 &0\\\\ 0 &0 &1 \\end{bmatrix}
MAF=⎣⎡−100010fw01⎦⎤
基本例程:1.42 图像的复合变换
    # 1.42 图像的复合变换
    img = cv2.imread("../images/imgLena.tif")  # 读取彩色图像(BGR)
    height, width = img.shape[:2]  # 图片的高度和宽度

    # (1) 缩放
    fx, fy = 0.6, 0.6
    MAZ = np.float32([[fx, 0, 0], [0, fy, 0]])  # 构造缩放变换矩阵
    imgT1 = cv2.warpAffine(img, MAZ, (width, height))  # 仿射变换, 黑色填充
    # (2) 平移
    dx, dy = 50, 200  # dx=100 向右偏移量, dy=50 向下偏移量
    MAT = np.float32([[1, 0, dx], [0, 1, dy]])  # 构造平移变换矩阵
    imgT2 = cv2.warpAffine(imgT1, MAT, (width, height), borderValue=(0,255,255))  # 实现仿射变换
    # (3) 旋转
    theta = -30 * np.pi / 180  # 逆时针旋转 30°
    cosTheta = np.cos(theta)
    sinTheta = np.sin(theta)
    MAR = np.float32([[cosTheta, -sinTheta, 0], [sinTheta, cosTheta, 0]])  # 构造旋转变换矩阵
    imgT3 = cv2.warpAffine(imgT2, MAR, (width, height), borderValue=(255,255,0))  # 实现仿射变换
    # (4) 扭曲
    theta = -30 * np.pi / 180  # 逆时针扭变 30°
    MAS = np.float32([[1, np.tan(theta), 0], [0, 1, 0]])  # 构造扭变变换矩阵
    imgT4 = cv2.warpAffine(imgT3, MAS, (width, height), borderValue=(255,0,255))  # 实现仿射变换

    plt.figure(figsize=(9,6))
    plt.subplot(221), plt.axis('off'), plt.title("T1:Zoom")
    plt.imshow(cv2.cvtColor(imgT1, cv2.COLOR_BGR2RGB)),
    plt.subplot(222), plt.axis('off'), plt.title("T2:Translation")
    plt.imshow(cv2.cvtColor(imgT2, cv2.COLOR_BGR2RGB))
    plt.subplot(223), plt.axis('off'), plt.title("T3:Rotation")
    plt.imshow(cv2.cvtColor(imgT3, cv2.COLOR_BGR2RGB))
    plt.subplot(224), plt.axis('off'), plt.title("T4:Shear")
    plt.imshow(cv2.cvtColor(imgT4, cv2.COLOR_BGR2RGB))
    plt.show()

(本节完)
欢迎关注 『Python小白从零开始 OpenCV 学习课』系列,持续更新
【OpenCV 完整例程】01. 图像的读取(cv2.imread)
【OpenCV 完整例程】02. 图像的保存(cv2.imwrite)
【OpenCV 完整例程】03. 图像的显示(cv2.imshow)
【OpenCV 完整例程】04. 用 matplotlib 显示图像(plt.imshow)
【OpenCV 完整例程】05. 图像的属性(np.shape)
【OpenCV 完整例程】06. 像素的编辑(img.itemset)
【OpenCV 完整例程】07. 图像的创建(np.zeros)
【OpenCV 完整例程】08. 图像的复制(np.copy)
【OpenCV 完整例程】09. 图像的裁剪(cv2.selectROI)
【OpenCV 完整例程】10. 图像的拼接(np.hstack)
【OpenCV 完整例程】11. 图像通道的拆分(cv2.split)
【OpenCV 完整例程】12. 图像通道的合并(cv2.merge)
【OpenCV 完整例程】13. 图像的加法运算(cv2.add)
【OpenCV 完整例程】14. 图像与标量相加(cv2.add)
【OpenCV 完整例程】15. 图像的加权加法(cv2.addWeight)
【OpenCV 完整例程】16. 不同尺寸的图像加法
【OpenCV 完整例程】17. 两张图像的渐变切换
【OpenCV 完整例程】18. 图像的掩模加法
【OpenCV 完整例程】19. 图像的圆形遮罩
【OpenCV 完整例程】20. 图像的按位运算
【OpenCV 完整例程】21. 图像的叠加
【OpenCV 完整例程】22. 图像添加非中文文字
【OpenCV 完整例程】23. 图像添加中文文字
【OpenCV 完整例程】23. 图像添加中文文字
【OpenCV 完整例程】24. 图像的仿射变换
【OpenCV 完整例程】25. 图像的平移
【OpenCV 完整例程】26. 图像的旋转(以原点为中心)
【OpenCV 完整例程】27. 图像的旋转(以任意点为中心)
【OpenCV 完整例程】28. 图像的旋转(直角旋转)
【OpenCV 完整例程】29. 图像的翻转(cv2.flip)
【OpenCV 完整例程】30. 图像的缩放(cv2.resize)
【OpenCV 完整例程】31. 图像金字塔(cv2.pyrDown)
【OpenCV 完整例程】32. 图像的扭变(错切)
以上是关于OpenCV 完整例程33. 图像的复合变换的主要内容,如果未能解决你的问题,请参考以下文章