NodeMCU入门:搭建Web服务器,配置网络连接
Posted Zeroes
tags:
篇首语:本文由小常识网(cha138.com)小编为大家整理,主要介绍了NodeMCU入门:搭建Web服务器,配置网络连接相关的知识,希望对你有一定的参考价值。
准备工作
1.NodeMCU模块
2.ESPlorer v0.2.0-rc6
3.NodeMCU-HTTP-Server
搭建web服务器
下载https://github.com/wangzexi/NodeMCU-HTTP-Server文件,并上传到NodeMCU中

修改init.lua文件,可参看NodeMCU-HTTP-Server Example

-- init.lua

---------------------
-- wifi
---------------------

print(\'Setting up WIFI...\')
wifi.setmode(wifi.STATION)
wifi.sta.config(\'WX401901\', \'smyh1234\')
wifi.sta.autoconnect(1)

tmr.alarm(1, 1000, tmr.ALARM_AUTO, function()
    if wifi.sta.getip() == nil then
        print(\'Waiting for IP ...\')
    else
        print(\'IP is \' .. wifi.sta.getip())
    tmr.stop(1)
    end
end)

-- Serving static files
dofile(\'httpServer.lua\')
httpServer:listen(80)

-- Custom API
-- Get text/html
httpServer:use(\'/welcome\', function(req, res)
    res:send(\'Hello \' .. req.query.name) -- /welcome?name=doge
end)

-- Get file
httpServer:use(\'/doge\', function(req, res)
    res:sendFile(\'doge.jpg\')
end)

-- Get json
httpServer:use(\'/json\', function(req, res)
    res:type(\'application/json\')
    res:send(\'{"doge": "smile"}\')
end)

-- Redirect
httpServer:use(\'/redirect\', function(req, res)
    res:redirect(\'doge.jpg\')
end)
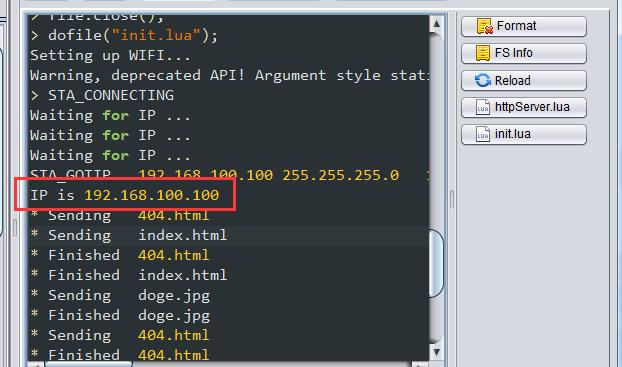
现在是工作在STATION模式下,保存后可以看到获取的IP地址,在浏览器中输入http://192.168.100.100就可以看到一个简单的页面了。

修改成 wifi.setmode(wifi.STATIONAP) 模式,出现了内存不足的错误,无视它。
E:M 248
not enough memory
stack traceback:
[C]: in function \'dofile\'
init.lua:22: in main chunk
[C]: in function \'dofile\'
stdin:1: in main chunk
现在NodeMCU有两个IP,一个是作为STATION的192.168.100.100,另外一个是作为AP的192.168.4.1,这时在无线列表中会多出一个AI-THINKER_AC72F4,用手机或电脑连上后浏览器中输入http://192.168.4.1 也可以看到页面。
实现Web配置无线连接账号和密码
这里借用NodeMCU之旅(四):实现Web配置页面的配置页面。
首先,删除上一步中上传的测试文件 404.html和doge.jpg

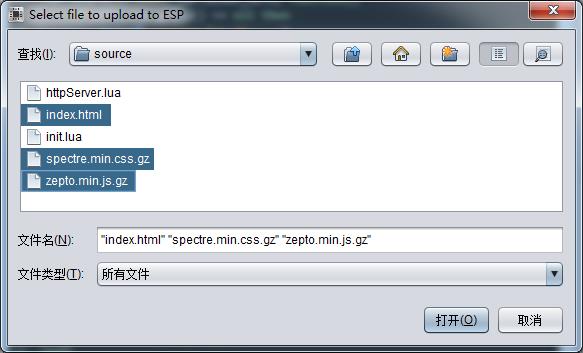
然后,上传新的配置页面

最后,修改init.lua文件去掉演示web相关的路由配置添加两个新的路由:
httpServer:use(\'/config\', function(req, res)
    if req.query.ssid ~= nil and req.query.pwd ~= nil then
        wifi.sta.config(req.query.ssid, req.query.pwd)

        status = \'STA_CONNECTING\'
        status_sleep=0
        tmr.alarm(TMR_WIFI, 1000, tmr.ALARM_AUTO, function()
            status_sleep=status_sleep+1
       --当设置的账号密码错误时,定时器不会停止,所以这里添加了超时检查
            if(status_sleep==10) then
                   res:type(\'application/json\')
                res:send(\'{"status":"timeout"}\')
                tmr.stop(TMR_WIFI)
             end

            if status ~= \'STA_CONNECTING\'  then
                res:type(\'application/json\')
                res:send(\'{"status":"\' .. status .. \'"}\')
                tmr.stop(TMR_WIFI)
            end


        end)
    end
end)

-- Get json
httpServer:use(\'/scanap\', function(req, res)

  wifi.sta.getap(function(table)
        local aptable = {}
        for ssid,v in pairs(table) do
            local authmode, rssi, bssid, channel = string.match(v, "([^,]+),([^,]+),([^,]+),([^,]+)")
            aptable[ssid] = {
                authmode = authmode,
                rssi = rssi,
                bssid = bssid,
                channel = channel
            }
        end
        res:type(\'application/json\')
--原来是cjson.encode(aptable),因为构建固件时没有找到cjson用了sjson,所以这里改成sjson
        res:send(sjson.encode(aptable)) end)
end)
当请求的方法里出现异常时前端看到的是404错误,这个坑让我一直怀疑是httpServer.lua的问题
保存后,访问http://192.168.100.100,修改成一个错误的密码,点击连接网络,Led灯开始闪烁然后模块重启常亮,表示修改失败。
* Sending index.html
* Finished index.html
PANIC: unprotected error in call to Lua API (httpServer.lua:77: not connected)
还得切换Wifi到AI-THINKER_AC72F4,通过http://192.168.4.1修改账号密码。


-- init.lua

----------------------
--define
---------------------
IO_BLINK = 4

TMR_WIFI = 4
TMR_BLINK = 5
TMR_BTN = 6

gpio.mode(IO_BLINK, gpio.OUTPUT)


---------------------
-- blink
---------------------
blink = nil
tmr.register(TMR_BLINK, 100, tmr.ALARM_AUTO, function()
    gpio.write(IO_BLINK, blink.i % 2)
    tmr.interval(TMR_BLINK, blink[blink.i + 1])
    blink.i = (blink.i + 1) % #blink
end)

function blinking(param)
    if type(param) == \'table\' then
        blink = param
        blink.i = 0
        tmr.interval(TMR_BLINK, 1)
        running, _ = tmr.state(TMR_BLINK)
        if running ~= true then
            tmr.start(TMR_BLINK)
        end
    else
        tmr.stop(TMR_BLINK)
        gpio.write(IO_BLINK, param or gpio.LOW)
    end
end

---------------------
-- wifi
---------------------

print(\'Setting up WIFI...\')
wifi.setmode(wifi.STATIONAP )
wifi.sta.config(\'WX401901\', \'smyh1234\')
wifi.sta.autoconnect(1)

tmr.alarm(1, 1000, tmr.ALARM_AUTO, function()
    if wifi.sta.getip() == nil then
        print(\'Waiting for IP ...\')
    else
        print(\'IP is \' .. wifi.sta.getip())
    tmr.stop(1)
    end
end)

status=nil

wifi.sta.eventMonReg(wifi.STA_WRONGPWD, function()
    blinking({100, 100 , 100, 500})
    status = \'STA_WRONGPWD\'
    print(status)
end)

wifi.sta.eventMonReg(wifi.STA_APNOTFOUND, function()
    blinking({2000, 2000})
    status = \'STA_APNOTFOUND\'
    print(status)
end)

wifi.sta.eventMonReg(wifi.STA_CONNECTING, function(previous_State)
    blinking({300, 300})
    status = \'STA_CONNECTING\'
    print(status)
end)

wifi.sta.eventMonReg(wifi.STA_GOTIP, function()
    blinking()
    status = \'STA_GOTIP\'
    print(status, wifi.sta.getip())
end)

wifi.sta.eventMonStart(1000)

---------------------
-- http
---------------------
dofile(\'httpServer.lua\')
httpServer:listen(80)

httpServer:use(\'/config\', function(req, res)
    if req.query.ssid ~= nil and req.query.pwd ~= nil then
        wifi.sta.config(req.query.ssid, req.query.pwd)

        status = \'STA_CONNECTING\'
        status_sleep=0
        tmr.alarm(TMR_WIFI, 1000, tmr.ALARM_AUTO, function()
            status_sleep=status_sleep+1

            if(status_sleep==10) then
                   res:type(\'application/json\')
                res:send(\'{"status":"timeout"}\')
                tmr.stop(TMR_WIFI)
             end

            if status ~= \'STA_CONNECTING\'  then
                res:type(\'application/json\')
                res:send(\'{"status":"\' .. status .. \'"}\')
                tmr.stop(TMR_WIFI)
            end

        end)
    end
end)

-- Get json
httpServer:use(\'/scanap\', function(req, res)

  wifi.sta.getap(function(table)
        local aptable = {}
        for ssid,v in pairs(table) do
            local authmode, rssi, bssid, channel = string.match(v, "([^,]+),([^,]+),([^,]+),([^,]+)")
            aptable[ssid] = {
                authmode = authmode,
                rssi = rssi,
                bssid = bssid,
                channel = channel
            }
        end
        res:type(\'application/json\')
        res:send(sjson.encode(aptable))
    end)
end)
相关资源
本文是在NodeMCU之旅(三):响应配置按钮、NodeMCU之旅(四):实现Web配置页面 基础之上的学习过程,感谢原作者。
以上是关于NodeMCU入门:搭建Web服务器,配置网络连接的主要内容,如果未能解决你的问题,请参考以下文章
