DataBinding的双向绑定实现原理
Posted 一代小强
tags:
篇首语:本文由小常识网(cha138.com)小编为大家整理,主要介绍了DataBinding的双向绑定实现原理相关的知识,希望对你有一定的参考价值。
“ 悄悄咪咪告诉你,DataBinding是怎么实现双向绑定的“
在讲DataBinding之前,有必要讲讲ViewBinding
1、ViewBinding
1) 配置
要使用ViewBinding,只需要在gradle 添加如下配置即可
android {
        ...
        viewBinding {
            enabled = true
        }
 }
如果需要在生成绑定类时忽略某个布局文件,请将 tools:viewBindingIgnore=“true” 属性添加到相应布局文件的根视图中:
<LinearLayout
        ...
            tools:viewBindingIgnore="true" >
        ...
</LinearLayout>
2)用法
在创建xml文件后,Android Studio会自动创建对应的类,类名格式为:XML 文件的名称转换为驼峰式大小写,并在末尾添加Binding一词。
比如,创建了一个activity_view.xml
<LinearLayout
           ...>
    <TextView
        android:id="@+id/viewBindingView"
        android:layout_width="match_parent"
        android:layout_height="20dp" />
</LinearLayout>
生成的绑定类就叫做ActivityViewBinding,然后在对应的activity中使用布局绑定
public class ViewBindingActivity extends AppCompatActivity {
    private ActivityViewBinding activityViewBinding;

    @Override
    protected void onCreate(@Nullable Bundle savedInstanceState) {
        super.onCreate(savedInstanceState);
        // 初始化布局和view
        activityViewBinding = ActivityViewBinding.inflate(getLayoutInflater());
        // 设置contentView
        setContentView(activityViewBinding.getRoot());
        // 获取到id为viewBindingView的textView,并设置文本
        activityViewBinding.viewBindingView.setText("你好,我是viewBinding");
    }
}
3) 原理
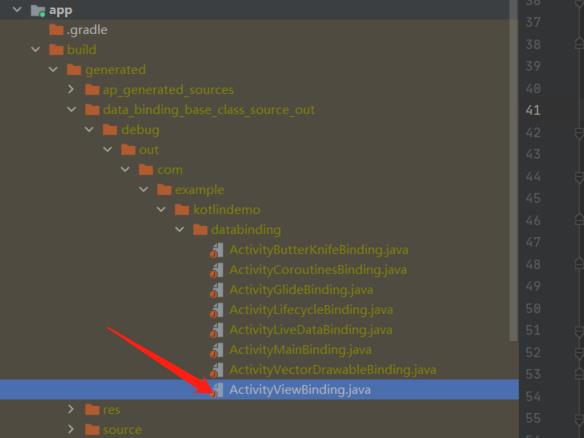
在build之后,会在如下路径生成对应的类

生成如下代码
public final class ActivityViewBinding implements ViewBinding {
    @NonNull
    private final LinearLayout rootView;
    // 通过遍历xml,找到声明id了的view,id作为变量名
    @NonNull
    public final TextView viewBindingView;

    private ActivityViewBinding(@NonNull LinearLayout rootView, @NonNull TextView viewBindingView) {
        this.rootView = rootView;
        this.viewBindingView = viewBindingView;
    }

    @Override
    @NonNull
    public LinearLayout getRoot() {
        return rootView;
    }

    // 传入LayoutInflater,用于获取对应布局的view
    @NonNull
    public static ActivityViewBinding inflate(@NonNull LayoutInflater inflater) {
        return inflate(inflater, null, false);
    }

    @NonNull
    public static ActivityViewBinding inflate(@NonNull LayoutInflater inflater,
                                              @Nullable ViewGroup parent, boolean attachToParent) {
        // 通过指定的布局获取到rootView
        View root = inflater.inflate(R.layout.activity_view, parent, false);
        if (attachToParent) {
            parent.addView(root);
        }
        return bind(root);
    }
    // 核心代码,通过代码模板,找到对应的view
    @NonNull
    public static ActivityViewBinding bind(@NonNull View rootView) {
        int id;
        missingId:
        {
            id = R.id.viewBindingView;
            TextView viewBindingView = rootView.findViewById(id);
            if (viewBindingView == null) {
                break missingId;
            }
            return new ActivityViewBinding((LinearLayout) rootView, viewBindingView);
        }
        String missingId = rootView.getResources().getResourceName(id);
        throw new NullPointerException("Missing required view with ID: ".concat(missingId));
    }
}
生成的类通过LayoutInflater获取布局,然后依次初始化view。
2、DataBinding
1)配置
DataBinding 跟ViewBinding一样,只需要在gradle中添加如下配置即可
android {
        ...
        dataBinding {
            enabled = true
        }
    }
2)用法
我们先看activity_main.xml布局:
<?xml version="1.0" encoding="utf-8"?>
<layout xmlns:android="http://schemas.android.com/apk/res/android">
    <data>
        <variable
            name="video"
            type="com.example.databinding.VideoBean" />
    </data>
    <LinearLayout xmlns:tools="http://schemas.android.com/tools"
        android:layout_width="match_parent"
        android:layout_height="match_parent"
        android:orientation="vertical"
        tools:context=".MainActivity">

        <TextView
            android:id="@+id/bind_text1"
            android:layout_width="match_parent"
            android:layout_height="30dp"
            android:gravity="center"
            android:text="@{video.title}" />

        <Button
            android:id="@+id/bind_text2"
            android:layout_width="match_parent"
            android:layout_height="50dp"
            android:text="@{String.valueOf(video.score + 1)}" />

    </LinearLayout>
</layout>
与正常的xml布局不一样的是,DataBinding 以layout作为第一层。第二层分别是 data和view的根布局。
其中data下的name作为对象,type为类路径名
package com.example.databinding;
public class VideoBean {
    public String title;
    public int score;
    public VideoBean(String title, int score) {
        this.title = title;
        this.score = score;
    }
}
然后在布局中就可以把对象的属性值显示到TextView上
<TextView
     ...
     android:text="@{video.title}" />
在对应的activity中,使用的方式与ViewBinding类似
public class MainActivity extends AppCompatActivity {
    private ActivityMainBinding mainBinding;
    private VideoBean video;

    @Override
    protected void onCreate(@Nullable  Bundle savedInstanceState) {
        super.onCreate(savedInstanceState);
        // 获取对应的binding类
        mainBinding = ActivityMainBinding.inflate(getLayoutInflater());
        setContentView(mainBinding.getRoot());
        video = new VideoBean("小黄人", 8);
        // 设置对应的数据
        mainBinding.setVideo(video);
        // 设置周期监听,可选
        mainBinding.setLifecycleOwner(this);
    }
}
全程我们没有初始化对应的view,只是获取bean,然后更新一下即可

当然,我们也可以在布局中添加对应的事件响应
      <Button
            android:id="@+id/bind_text2"
            android:layout_width="match_parent"
            android:layout_height="50dp"
            android:onClick="@{video::increaseScore}"
            android:text="@{String.valueOf(video.score + 1)}" />
在类中添加 increaseScore方法,如下所示,即可实现点击button修改score的值,并更新ui。
public class VideoBean extends BaseObservable {
    public String title;
    // 声明该属性是可绑定监听的
    @Bindable
    public int score;
    public VideoBean(String title, int score) {
        this.title = title;
        this.score = score;
    }

    public void increaseScore(View view) {
        score++;
        // 通知score属性变化了
        notifyPropertyChanged(BR.score);
    }
}
我们只需要修改少量代码即可实现双向绑定,接下来将会讲解对应的原理。
更多见布局和绑定表达式
3)原理
view的初始化
生成的类路径与ViewBinding一样,直接看看对应的类
// 抽象类
public abstract class ActivityMainBinding extends ViewDataBinding {
  @NonNull
  public final Button bindText2;
  @Bindable
  protected VideoBean mVideo;
  protected ActivityMainBinding(Object _bindingComponent, View _root, int _localFieldCount,
                                TextView bindText1, Button bindText2) {
    super(_bindingComponent, _root, _localFieldCount);
    this.bindText1 = bindText1;
    this.bindText2 = bindText2;
  }

  // 把data下的参数都声明了get/set方法
  public abstract void setVideo(@Nullable VideoBean video);

  @Nullable
  public VideoBean getVideo() {
    return mVideo;
  }

  @NonNull
  public static ActivityMainBinding inflate(@NonNull LayoutInflater inflater) {
    return inflate(inflater, DataBindingUtil.getDefaultComponent());
  }

  @NonNull
  @Deprecated
  public static ActivityMainBinding inflate(@NonNull LayoutInflater inflater,
                                            @Nullable Object component) {
    return ViewDataBinding.<ActivityMainBinding>inflateInternal(inflater, R.layout.activity_main, null, false, component);
  }
  ...
}
这里的ActivityMainBinding 继承了ViewDataBinding,但是内部却没有类似ViewBinding那样,直接通过findViewById方式初始化我们需要的view,那这些view是怎么来的?
这个问题我们先放一放,上面的inflate方法调用了ViewDataBinding的inflateInternal 方法
public abstract class ViewDataBinding extends BaseObservable implements ViewBinding {
    ...
    protected static <T extends ViewDataBinding> T inflateInternal(
            @NonNull LayoutInflater inflater, int layoutId, @Nullable ViewGroup parent,
            boolean attachToParent, @Nullable Object bindingComponent) {
        return DataBindingUtil.inflate(
                inflater,
                layoutId,
                parent,
                attachToParent,
                checkAndCastToBindingComponent(bindingComponent)
        );
    }
}
来到DataBindingUtil 这个工具类
public class DataBindingUtil {
   private static DataBinderMapper sMapper = new DataBinderMapperImpl();

   public static <T extends ViewDataBinding> T inflate(
            @NonNull LayoutInflater inflater, int layoutId, @Nullable ViewGroup parent,
            boolean attachToParent, @Nullable DataBindingComponent bindingComponent) {
        final boolean useChildren = parent != null && attachToParent;
        final int startChildren = useChildren ? parent.getChildCount() : 0;
        final View view = inflater.inflate(layoutId, parent, attachToParent);
        if (useChildren) {
            return bindToAddedViews(bindingComponent, parent, startChildren, layoutId);
        } else {
            // activity里面传的parent为null ,所以会走这里
            return bind(bindingComponent, view, layoutId);
        }
    }
    static <T extends ViewDataBinding> T bind(DataBindingComponent bindingComponent, View root,
            int layoutId) {
        return (T) sMapper.getDataBinder(bindingComponent, root, layoutId);
    }

}
DataBinderMapperImpl 的实现如下
package androidx.databinding;

public class DataBinderMapperImpl extends MergedDataBinderMapper {
  DataBinderMapperImpl() {
    // 将impl添加到mMappers中
    addMapper(new com.example.databinding.DataBinderMapperImpl());
  }
}
// 对应的基类
public class MergedDataBinderMapper extends DataBinderMapper {
    ....
    @Override
    public ViewDataBinding getDataBinder(DataBindingComponent bindingComponent, View view,
            int layoutId) {
        // 遍历 mMappers
        for(DataBinderMapper mapper : mMappers) {
            ViewDataBinding result = mapper.getDataBinder(bindingComponent, view, layoutId);
            if (result != null) {
                return result;
            }
        }
        if (loadFeatures()) {
            return getDataBinder(bindingComponent, view, layoutId);
        }
        return null;
    }
}
那就看看com.example.databinding.DataBinderMapperImpl 的实现
public class DataBinderMapperImpl extends DataBinderMapper {
  private static final int LAYOUT_ACTIVITYMAIN = 1;

  private static final SparseIntArray INTERNAL_LAYOUT_ID_LOOKUP = new SparseIntArray(1);

  static {
    // 保存我们创建的layout与 index的映射
    INTERNAL_LAYOUT_ID_LOOKUP.put(com.example.databinding.R.layout.activity_main, LAYOUT_ACTIVITYMAIN);
  }

  @Override
  public ViewDataBinding getDataBinder(DataBindingComponent component, View view, int layoutId) {
    // 通过layoutId,获取到index,上面传的是R.layout.activity_main,
    // 所以这里localizedLayoutId为LAYOUT_ACTIVITYMAIN
    int localizedLayoutId = INTERNAL_LAYOUT_ID_LOOKUP.get(layoutId);
    if(localizedLayoutId > 0) {
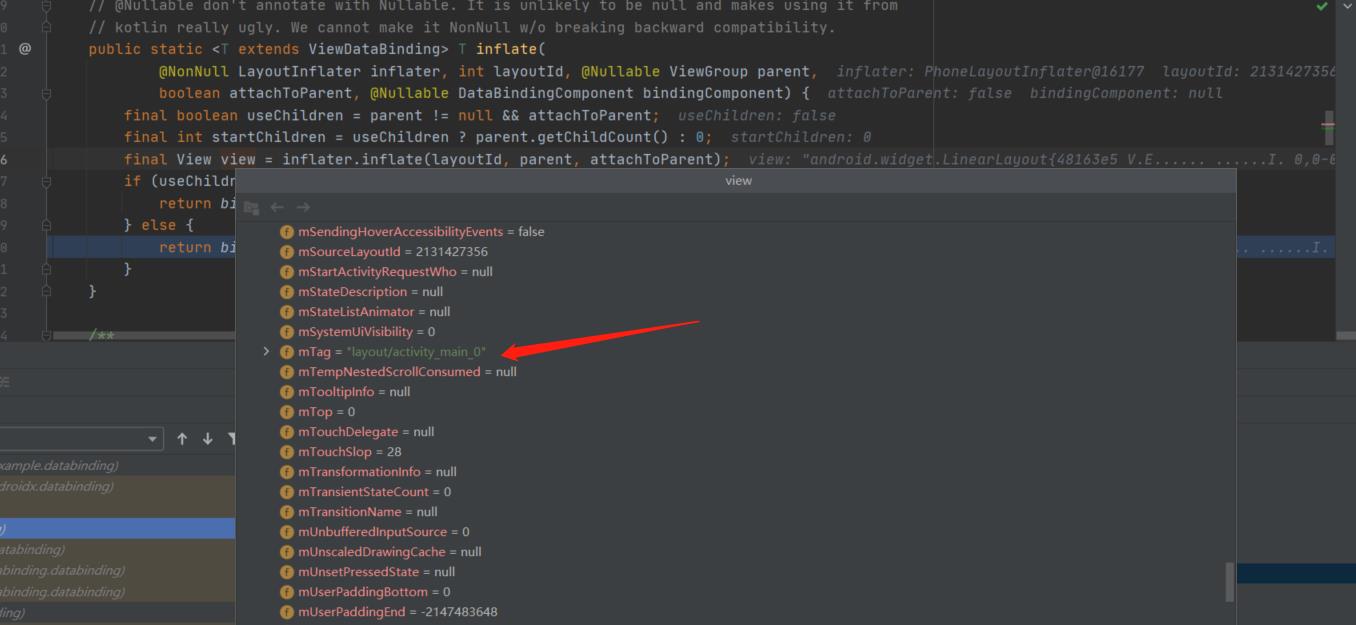
       // 获取到TAG,上面的代码没有设置tag的地方,但是通过debug得知对应的tag为"layout/activity_main_0"
      final Object tag = view.getTag();
      if(tag == null) {
        throw new RuntimeException("view must have a tag");
      }
      switch(localizedLayoutId) {
        case  LAYOUT_ACTIVITYMAIN: {
          if ("layout/activity_main_0".equals(tag)) {
            return new ActivityMainBindingImpl(component, view);
          }
          throw new IllegalArgumentException("The tag for activity_main is invalid. Received: " + tag);
        }
      }
    }
    return null;
  }
  ...
}
至于view的tag是怎么来的,笔者猜测是Android Studio自动添加的

最终我们获取到了ActivityMainBindingImpl的实例,对应实现如下
public class ActivityMainBindingImpl extends ActivityMainBinding  {
    @Nullable
    private static final androidx.databinding.ViewDataBinding.IncludedLayouts sIncludes;
    @Nullable
    private static final android.util.SparseIntArray sViewsWithIds;
    static {
        sIncludes = null;
        sViewsWithIds = null;
    }
    // views
    @NonNull
    private final android.widget.LinearLayout mboundView0;
    // listeners
    private OnClickListenerImpl mVideoIncreaseScoreAndroidViewViewOnClickListener;
    // Inverse Binding Event Handlers

    public ActivityMainBindingImpl(@Nullable androidx.databinding.DataBindingComponent bindingComponent, @NonNull View root) {
        // 通过mapBindings方法获取view的数组
        this(bindingComponent, root, mapBindings(bindingComponent, root, 3, sIncludes, sViewsWithIds));
    }
    private ActivityMainBindingImpl(androidx.databinding.DataBindingComponent bindingComponent, View root, Object[] bindings) {
        // 调用super即ActivityMainBinding的构造函数初始化view
        super(bindingComponent, root, 0
            , (android.widget.TextView) bindings[1]
            , (android.widget.Button) bindings[2]
            );
        this.bindText1.setTag(null);
        this.bindText2.setTag(null);
        this.mboundView0 = (android.widget.LinearLayout) bindings[0];
        this.mboundView0.setTag(null);
        setRootTag(root);
        invalidateAll();
    }
    ...
    public void setVideo(@Nullable com.example.databinding.VideoBean Video) {
        this.mVideo = Video;
        synchronized(this) {
            mDirtyFlags |= 0x1L;
        <以上是关于DataBinding的双向绑定实现原理的主要内容,如果未能解决你的问题,请参考以下文章