Mybatis Plus超详解-p1(常用操作&基础配置)
Posted LL.LEBRON
tags:
篇首语:本文由小常识网(cha138.com)小编为大家整理,主要介绍了Mybatis Plus超详解-p1(常用操作&基础配置)相关的知识,希望对你有一定的参考价值。
文章目录
Mybatis-Plus超详解
视频指路👉黑马程序员MybatisPlus
1.了解Mybatis-Plus
1.1简介
MyBatis-Plus(简称 MP)是一个 MyBatis 的增强工具,在 MyBatis 的基础上只做增强不做改变,为简化开发、提高效率而生。官网→这里
1.2特性
- 无侵入:只做增强不做改变,引入它不会对现有工程产生影响,如丝般顺滑
- 损耗小:启动即会自动注入基本 CURD,性能基本无损耗,直接面向对象操作
- 强大的 CRUD 操作:内置通用 Mapper、通用 Service,仅仅通过少量配置即可实现单表大部分 CRUD 操作,更有强大的条件构造器,满足各类使用需求
- 支持 Lambda 形式调用:通过 Lambda 表达式,方便的编写各类查询条件,无需再担心字段写错
- 支持主键自动生成:支持多达 4 种主键策略(内含分布式唯一 ID 生成器 - Sequence),可自由配置,完美解决主键问题
- 支持 ActiveRecord 模式:支持 ActiveRecord 形式调用,实体类只需继承 Model 类即可进行强大的 CRUD 操作
- 支持自定义全局通用操作:支持全局通用方法注入( Write once, use anywhere )
- 内置代码生成器:采用代码或者 Maven 插件可快速生成 Mapper 、 Model 、 Service 、 Controller 层代码,支持模板引擎,更有超多自定义配置等您来使用
- 内置分页插件:基于 MyBatis 物理分页,开发者无需关心具体操作,配置好插件之后,写分页等同于普通 List 查询
- 分页插件支持多种数据库:支持 mysql、MariaDB、Oracle、DB2、H2、HSQL、SQLite、Postgre、SQLServer 等多种数据库
- 内置性能分析插件:可输出 SQL 语句以及其执行时间,建议开发测试时启用该功能,能快速揪出慢查询
- 内置全局拦截插件:提供全表 delete 、 update 操作智能分析阻断,也可自定义拦截规则,预防误操作
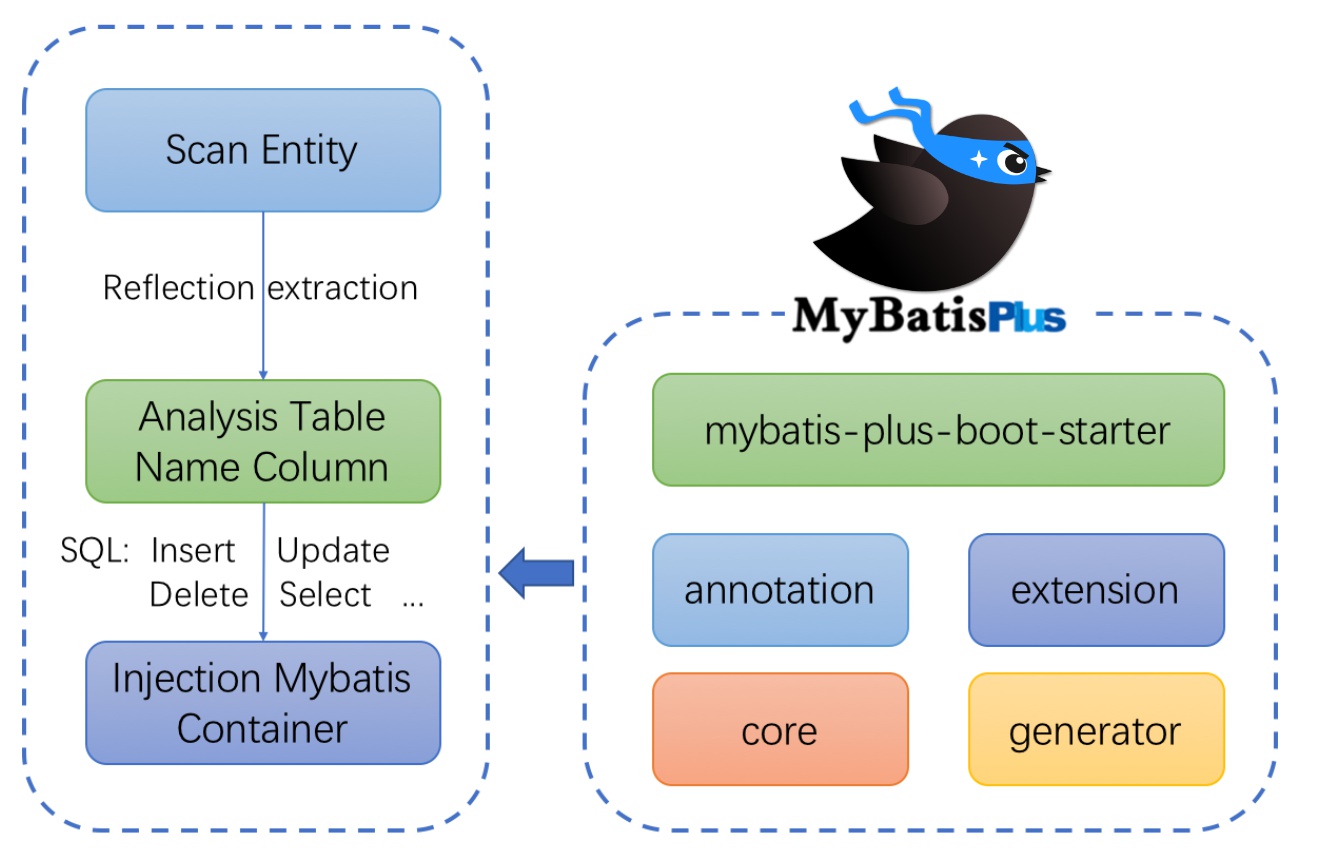
1.3框架结构
2.快速开始
2.1创建测试的数据库以及表
-- 创建数据库
CREATE DATABASE mp;
-- 创建测试表
CREATE TABLE `tb_user` (
`id` bigint(20) NOT NULL AUTO_INCREMENT COMMENT '主键ID',
`user_name` varchar(20) NOT NULL COMMENT '用户名',
`password` varchar(20) NOT NULL COMMENT '密码',
`name` varchar(30) DEFAULT NULL COMMENT '姓名',
`age` int(11) DEFAULT NULL COMMENT '年龄',
`email` varchar(50) DEFAULT NULL COMMENT '邮箱',
PRIMARY KEY (`id`)
) ENGINE=InnoDB AUTO_INCREMENT=1 DEFAULT CHARSET=utf8;
-- 插入测试数据
INSERT INTO `tb_user` (`id`, `user_name`, `password`, `name`, `age`, `email`) VALUES
('1', 'zhangsan', '123456', '张三', '18', 'test1@itcast.cn');
INSERT INTO `tb_user` (`id`, `user_name`, `password`, `name`, `age`, `email`) VALUES
('2', 'lisi', '123456', '李四', '20', 'test2@itcast.cn');
INSERT INTO `tb_user` (`id`, `user_name`, `password`, `name`, `age`, `email`) VALUES
('3', 'wangwu', '123456', '王五', '28', 'test3@itcast.cn');
INSERT INTO `tb_user` (`id`, `user_name`, `password`, `name`, `age`, `email`) VALUES
('4', 'zhaoliu', '123456', '赵六', '21', 'test4@itcast.cn');
INSERT INTO `tb_user` (`id`, `user_name`, `password`, `name`, `age`, `email`) VALUES
('5', 'sunqi', '123456', '孙七', '24', 'test5@itcast.cn');
2.2创建Spring Boot工程


在pom.xml中添加mybatis-plus依赖:
<dependency>
    <groupId>com.baomidou</groupId>
    <artifactId>mybatis-plus-boot-starter</artifactId>
    <version>3.4.1</version>
</dependency>
2.3编写相关的配置文件
在application.properties或application.yml 添加数据库配置:
spring.datasource.driver-class-name=com.mysql.jdbc.Driver
spring.datasource.url=jdbc:mysql:///mp
spring.datasource.username=root
spring.datasource.password=root
或者
spring:
  datasource:
    driver-class-name: com.mysql.jdbc.Driver
    url: jdbc:mysql:///mp
    username: root
    password: root
2.4创建实体类
@Data
@AllArgsConstructor
@NoArgsConstructor
@TableName("tb_user")
public class User {
        @TableId(value = "id",type = IdType.AUTO)//@TableId 设置主键, IdType.AUTO 使用自动增长产生主键
    private Long id;
    private String userName;
    private String password;
    private String name;
    private Integer age;
    private String email;
}
2.5编写mapper
@Mapper
public interface UserMapper extends BaseMapper<User> {
}
如果不添加@Mapper注解的话,可以在启动类上添加@MapperScan指定要扫描的包即可。
@SpringBootApplication
@MapperScan("com.example.xpp.mapper")//设置mapper接口的扫描包
public class SpringbootMybatisPlusApplication {

    public static void main(String[] args) {
        SpringApplication.run(SpringbootMybatisPlusApplication.class, args);
    }
}
2.6编写测试用例
@SpringBootTest
class TestUserMapper {

    @Autowired
    private UserMapper userMapper;

    @Test
    public void testSelect() {
        List<User> users = userMapper.selectList(null);
        for (User user : users) {
            System.out.println(user);
        }
    }
}
输出:
User(id=1, userName=zhangsan, password=123456, name=张三, age=18, email=test1@itcast.cn)
User(id=2, userName=lisi, password=123456, name=李四, age=20, email=test2@itcast.cn)
User(id=3, userName=wangwu, password=123456, name=王五, age=28, email=test3@itcast.cn)
User(id=4, userName=zhaoliu, password=123456, name=赵六, age=21, email=test4@itcast.cn)
User(id=5, userName=sunqi, password=123456, name=孙七, age=24, email=test5@itcast.cn)
3.通用CRUD
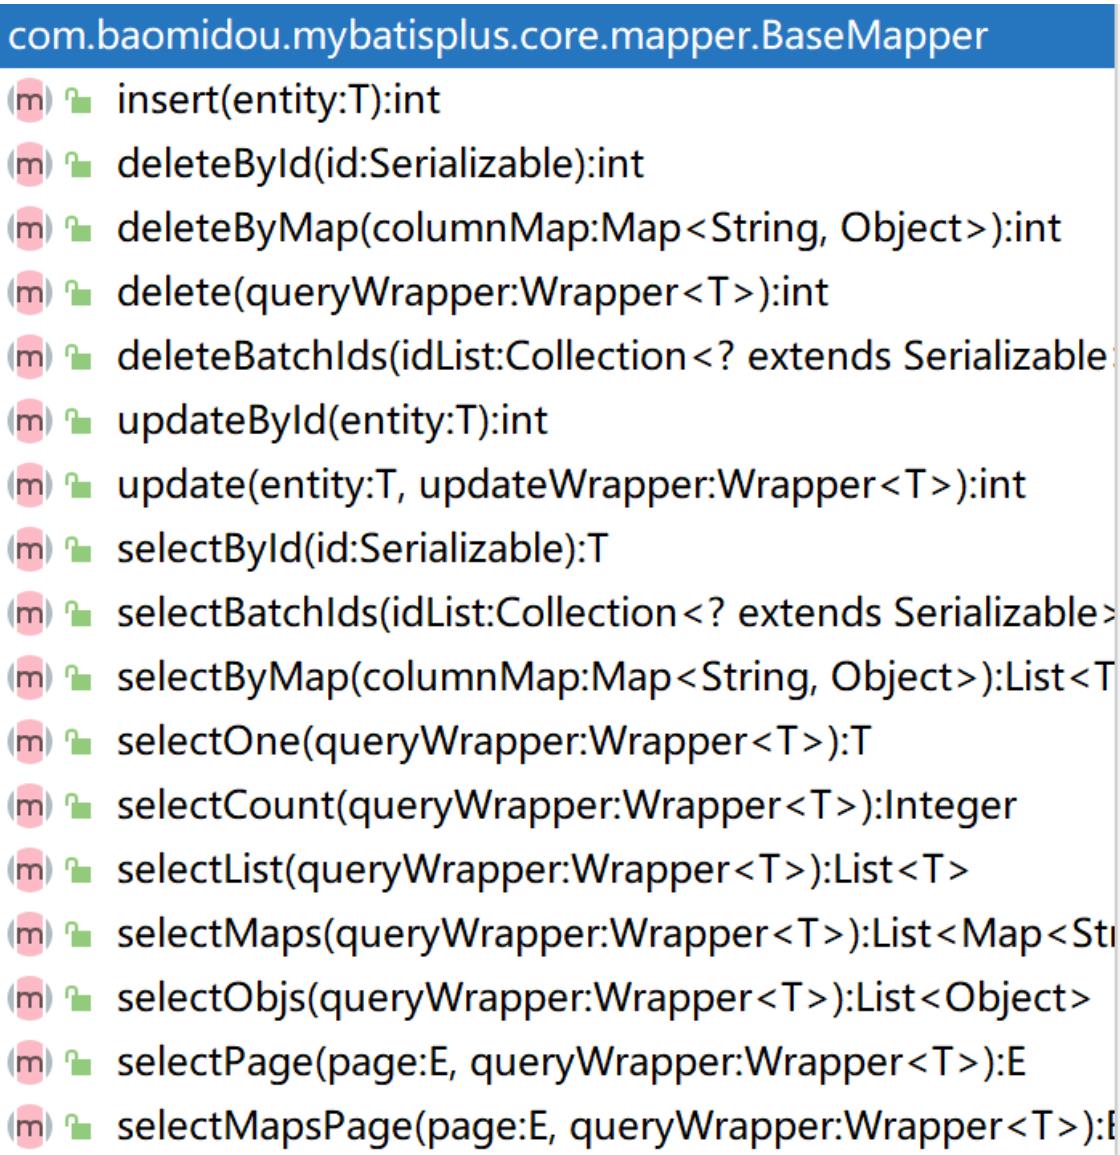
通过前面的学习,我们了解到通过继承BaseMapper就可以获取到各种各样的单表操作,接下来我们将详细讲解这些操作。
3.1插入操作 Insert
3.1.1 方法定义
/**
* 插入一条记录
*
* @param entity 实体对象
*/
int insert(T entity);
3.1.2 insert
@SpringBootTest
class TestUserMapper {

    @Autowired
    private UserMapper userMapper;

    @Test
    public void testInsert(){
        User user = new User();
        user.setUserName("xpp1");
        user.setPassword("123456");
        user.setName("小屁屁");
        user.setAge(23);
        user.setEmail("test6@itcast.cn");
        int insert = userMapper.insert(user);//返回数据库受影响的行数
        System.out.println(insert);
        System.out.println(user.getId());//自增后的id会回填到对象中,需要在相应的实体类标明自增注解
    }
}
输出结果:
1
6
3.1.2 @TableField
在MP中通过@TableField注解可以指定字段的一些属性,常常解决的问题有2个:
- 对象中的属性名和字段名不一致的问题(非驼峰)
- 对象中的属性字段在表中不存在的问题
@TableField(value = "email")//指定数据库中的字段名
private String mail;
@TableField(exist = false)//该字段在数据库中不存在
private String address;
其他用法,如果想要某些数据不被查询出来,可以用:
@TableField(select = false)
private String password;
效果:

3.2更新操作 Update
在MP中,更新操作有2种,一种是根据id更新,另一种是根据条件更新。
3.2.1 方法定义
// 根据 ID 修改
int updateById(@Param(Constants.ENTITY) T entity);
// 根据 whereWrapper 条件,更新记录
int update(@Param(Constants.ENTITY) T updateEntity, @Param(Constants.WRAPPER) Wrapper<T> whereWrapper);
3.2.2 updateById
根据 ID 修改
@Test
public void testUpdateById(){
    User user=new User();
    user.setId(1L);//条件,根据id更新
    user.setAge(19);//更新的字段
    int result = userMapper.updateById(user);
    System.out.println("result===>"+result);
}
//输出:result===>1
3.2.3 update
根据 wrapper 条件,更新记录
①用QueryWrapper,只可以设置更新的条件
@Test
public void testUpdate(){
    User user=new User();
    user.setAge(20);
    user.setPassword("666666");//要更新的信息

    QueryWrapper<User> wrapper=new QueryWrapper<>();
    wrapper.eq("user_name","zhangsan");//根据条件更新,这里是匹配数据库中的user_name字段的值等于zhangsan

    int update = userMapper.update(user, wrapper);
    System.out.println("update===>"+update);
}
//输出:update===>1
②用UpdateWrapper,不仅可以设置条件还可以设置要更新的字段
@Test
public void testUpdate2(){
    UpdateWrapper<User> wrapper=new UpdateWrapper<>();
    wrapper.set("age","100").set("password","999999") //更新的字段
        .eq("user_name","zhangsan"); //更新的条件
    int update = userMapper.update(null, wrapper);
    System.out.println("update===>"+update);
}
3.3删除操作 Delete
3.3.1 方法定义
// 根据 entity 条件,删除记录
int delete(@Param(Constants.WRAPPER) Wrapper<T> wrapper);
// 删除(根据ID 批量删除)
int deleteBatchIds(@Param(Constants.COLLECTION) Collection<? extends Serializable> idList);
// 根据 ID 删除
int deleteById(Serializable id);
// 根据 columnMap 条件,删除记录
int deleteByMap(@Param(Constants.COLUMN_MAP) Map<String, Object> columnMap);
参数说明:
| 类型 | 参数名 | 描述 |
|---|---|---|
| Wrapper | wrapper | 实体对象封装操作类(可以为 null) |
| Collection<? extends Serializable> | idList | 主键ID列表(不能为 null 以及 empty) |
| Serializable | id | 主键ID |
| Map<String, Object> | columnMap | 表字段 map 对象 |
3.3.2 deleteById
根据 ID 删除
@Test
public void testDeleteById(){
    int delete = userMapper.deleteById(7L);
    System.out.println("delete===>"+delete);
}
//输出:delete===>1
3.3.3 deleteByMap
根据 map 条件,删除记录
@Test
public void testDeleteByMap() {
    Map<String, Object> map = new HashMap<>();
    map.put("user_name", "zhangsan");
    map.put("age", "100");
    //根据map删除数据,多条件之间是and关系
    int deleteByMap = userMapper.deleteByMap(map);
    System.out.println("deleteMap===>" + deleteByMap);
}
//输出:deleteMap===>1
3.3.4 delete
根据 entity 条件,删除记录
用法一:
@Test
public void testDelete() {
    QueryWrapper<User> wrapper = new QueryWrapper<>();
    wrapper.eq("user_name", "xpp1")
        .eq("password", "123456");
    //根据包装条件做删除,多条件之间是and关系
    int delete = userMapper.delete(wrapper);
    System.out.println("delete===>" + delete);
}
//输出:delete===>1
用法二(更推荐):
@Test
public void testDelete() {
    User user = new User();
    user.setPassword("123456");
    user.setUserName("lisi");
    QueryWrapper<User> wrapper = new QueryWrapper<>(user);
    //根据包装条件做删除,多条件之间是and关系
    int delete = userMapper.delete(wrapper);
    System.out.println("delete===>" + delete);
}
//输出:delete===>1
3.3.5 deleteBatchIds
根据 ID 批量删除
@Test
public void testDeleteBatchlds() {
    //根据id集合批量删除
    int deleteBatchIds = userMapper.deleteBatchIds(Arrays.asList(1L, 3L));
    System.out.println("deleteBatchIds===>" + deleteBatchIds);
}
//输出:deleteBatchIds===>2
3.4查询操作 Select
MP提供了多种查询操作,包括根据id查询、批量查询、查询单条数据、查询列表、分页查询等操作。
3.4.1 方法定义
// 根据 ID 查询
T selectById(Serializable id);

// 查询(根据ID 批量查询)
List<T> selectBatchIds(@Param(Constants.COLLECTION) Collection<? extends Serializable> idList);

// 根据 entity 条件,查询一条记录
T selectOne(@Param(Constants.WRAPPER) Wrapper<T> queryWrapper);

// 根据 Wrapper 条件,查询总记录数
Integer selectCount(@Param(Constants.WRAPPER) Wrapper<T> queryWrapper);

// 根据 entity 条件,查询全部记录
List<T> selectList(@Param(Constants.WRAPPER) Wrapper<T> queryWrapper);

// 根据 entity 条件,查询全部记录(并翻页)
IPage<T> selectPage(IPage<T> page, @Param(Constants.WRAPPER) Wrapper<T> queryWrapper);
3.4.2 selectById
根据 ID 查询
@Test
public void testSelectById() {
    User user = userMapper.selectById(1L);
    System.out.println(user);
}
/*输出:
User(id=1, userName=xpp1, password=null, name=西安, age=11, mail=adad, address=null)
*/
3.4.3 selectBatchIds
根据ID 批量查询
@Test
public void testSelectBatchIds() {
    List<User> users = userMapper.selectBatchIds(Arrays.asList(1L, 2L));
    for (User user : users) {
        System.out.println(user);
    }
}
/*输出:
User(id=1, userName=xpp1, password=null, name=西安, age=11, mail=adad, address=null)
User(id=2, userName=xpp2, password=null, name=北京, age=12, mail=adddd, address=null)
*/
3.4.5 selectOne
根据 entity 条件,查询一条记录
@Test
public void testSelectOne() {
    QueryWrapper<User> wrapper = new QueryWrapper<>();
    //查询条件
    wrapper.eq("id", "1")
        .eq("user_name", "xpp1");
    //查询的数据超过一条时,会抛出异常
    User user = userMapper.selectOne(wrapper);
    System.out.println(user)以上是关于Mybatis Plus超详解-p1(常用操作&基础配置)的主要内容,如果未能解决你的问题,请参考以下文章