使用Nginx1.9.9+Keepalived1.2.x搭建高可用负载均衡集群
Posted
tags:
篇首语:本文由小常识网(cha138.com)小编为大家整理,主要介绍了使用Nginx1.9.9+Keepalived1.2.x搭建高可用负载均衡集群相关的知识,希望对你有一定的参考价值。
一 简介以及原理介绍
(1)nginx概念介绍:
Nginx是一款轻量级的Web 服务器/反向代理服务器及电子邮件(IMAP/POP3)代理服务器,并在一个BSD-like 协议下发行。由俄罗斯的程序设计师Igor Sysoev所开发。其特点是占有内存少,并发能力强,事实上nginx的并发能力确实在同类型的网页服务器中表现较好,中国大陆使用nginx网站用户有:百度、京东、新浪、网易、腾讯、淘宝等
(2)Keepalived概念介绍:
Keepalived的作用是检测服务器的状态,如果有一台web服务器死机,或工作出现故障,Keepalived将检测到,并将有故障的服务器从系统中剔除,同时使用其他服务器代替该服务器的工作,当服务器工作正常后Keepalived自动将服务器加入到服务器群中,这些工作全部自动完成,不需要人工干涉,需要人工做的只是修复故障的服务器
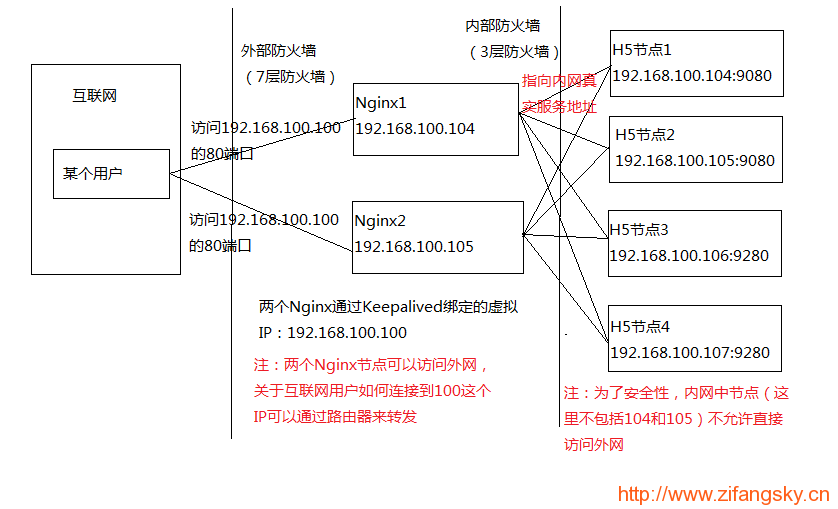
(3)下面实例的简单网络拓扑图:
几个重要概念:
反向代理:指以代理服务器来接受internet上的连接请求,然后将请求转发给内部网络上的服务器,并将从服务器上得到的结果返回给internet上请求连接的客户端,此时代理服务器对外就表现为一个反向代理服务器
负载均衡:将来自互联网的大量请求通过某种算法分配到多台应用服务器上执行,以此增加应用吞吐量、加强网络数据处理能力以及提高网络的灵活性和可用性
(4)原理介绍:
使用Nginx搭建高可用负载均衡集群,顾名思义就是使用Nginx充当反向代理服务器,将来自互联网的大量请求通过某种hash策略均匀地分配到内网中的多个应用节点。当某个应用节点因为某种原因变得不可用时,Nginx将会自动将该节点从这个服务的节点列表中剔除,直到该节点恢复正常
从上面的我画的这个网络拓扑图中可以看出,这里的具体业务就是一个H5应用了。至于这个应用是用Java来写的还是用php或者其他语言来写的都不是我们这里关心的重点,重点是我们知道这个H5应用分别运行在192.168.100.104和192.168.100.105的9080端口、192.168.100.106和192.168.100.107的9280端口就足够了
那么,从用户点击一条链接到返回对应视图到用户的浏览器,这个整个流程是如何通过Nginx来实现的呢?
这里,我就以用户点击H5应用的“首页”来简单叙述整个过程:
访问“首页”,如:http://h5.zifangsky.cn/index.html
通过DNS解析,h5.zifangsky.cn个域名被解析到整个应用集群的外网IP:xx.xx.xx.xx,也就是说在这一步请求的是:http://xx.xx.xx.xx/index.html
当然,这里的外网IP并没有解析到某一个具体的服务器,而是连接的路由器,因此接下来通过路由器的端口映射,这个请求就被指向192.168.100.100这个Keepalived生成的虚拟IP。因此这时相当于请求的是:http://192.168.100.100/index.html
这个虚拟IP对应于某个真实的Nginx服务器的IP(PS:关于Keepalived生成一个虚拟IP的作用以及如何对应到一台具体的服务器我会在下面再说),如:192.168.100.104,因此这时相当于请求的是:http://192.168.100.104/index.html
到了这一步,nginx将通过请求的域名、端口号以及URI地址等因素决定将该请求分配给哪个upstream(某个应用的节点列表),当然这里的节点列表包括104-107四个节点。此时,来自互联网的这个请求才通过nginx的某种hash策略被分配到一个具体的应用服务器,如:http://192.168.100.107:9280/h5/index.html
应用服务器执行完请求之后将结果原路返回给用户
用户浏览器根据返回数据包展示页面。到此,此次请求流程结束
看到这里,很多童鞋可能会有疑问:为什么在上面的网络拓扑图中安装了2个nginx,一个nginx不是也可以达到我们所需要的效果吗?为什么要用keepalived产生一个虚拟IP?为什么还要多此一举通过那个虚拟IP转一次?
其实原因很简单,那就是如果只用一台服务器装nginx来做反向代理服务器,那么这个集群的所有请求都将会通过这个nginx来转发,如果某一天这台装nginx的服务器突然宕机了,那将导致所有服务都没法使用了,直到nginx恢复正常工作
因此,为了避免这个问题的产生,一般需要安装两个nginx来做反向代理服务器。同时这两个nginx之间是一种主-备份策略的模式,也就是说当某一个nginx挂掉的时候,外网的所有请求可以自动转发到另一台nginx上去。那么怎么来实现这个目的呢?
这时,keepalived就派上用场了,keepalived的作用是:可以将多个IP绑定在一起,生成一个虚拟IP。其中,当有多个IP节点存在时,可以设置一个主节点以及多个备份节点。当keepalived启动时,将会在主节点上生成我们在配置文件中配置的虚拟IP,如果某一时刻keepalived检测到主节点不可用(PS:通过检测IP是否可以ping通、某个预先配置的端口是否打开等手段来检测)时,将会自动把该虚拟IP切换到其他备份节点上,至于切换到哪个备份节点是根据每个备份节点的权重来决定的(PS:可以在每个节点的keepalived配置文件中配置权重等参数)。因为来自外网的请求一直请求的是虚拟IP,因此只要不是所有的nginx节点同时挂掉,整个应用服务都是可用的,这样就保证了应用的高可用性
关于原理的介绍我就暂时说到这里了,下面我将以具体的实例来简单介绍具体应该如何安装和搭建
注:以上概念部分参考至百度百科
二 nginx安装和配置
1 关闭SELinux:
查看SELinux的状态:
[[email protected] src]# getenforce
如果是开启状态,则
[[email protected] src]# vim /etc/selinux/config
修改如下:
#SELINUX=enforcing #注释掉
#SELINUXTYPE=targeted #注释掉
SELINUX=disabled #增加
重启系统:
[[email protected] src]# reboot
2 安装编译工具:
[[email protected] src]# yum update
[[email protected] src]# yum install wget make gcc gcc-c++ zlib-devel openssl openssl-devel pcre-devel gd kernel keyutils patch perl mhash

[[email protected] src]# yum install popt-devel -y
3 系统约定:
软件源代码包存放位置:/usr/local/src
源码包编译安装位置:/usr/local/软件名字
默认系统就会加载/dev/shm ,它就是所谓的tmpfs,有人说跟ramdisk(虚拟磁盘),但不一样。象虚拟磁盘一样,tmpfs 可以使用您的
RAM,但它也可以使用您的交换分区来存储。而且传统的虚拟磁盘是个块设备,并需要一个 mkfs 之类的命令才能真正地使用它,tmpfs
是一个文件系统,而不是块设备;您只是安装它,它就可以使用了。
tmpfs有以下优势:
1)动态文件系统的大小,
2)tmpfs 的另一个主要的好处是它闪电般的速度。因为典型的 tmpfs 文件系统会完全驻留在 RAM 中,读写几乎可以是瞬间的。
3)tmpfs 数据在重新启动之后不会保留,因为虚拟内存本质上就是易失的。所以有必要做一些脚本做诸如加载,绑定的操作。
首先在/dev/shm建个tmp文件夹,然后与实际/tmp绑定
[[email protected] src]# mkdir /dev/shm/tmp

[[email protected] src]# chmod 777 /dev/shm/tmp
[[email protected] src]# mount --bind /dev/shm/tmp /tmp
4 下载软件:
[[email protected] src]# cd /usr/local/src
(1)下载nginx:
[[email protected] src]# wget http://nginx.org/download/nginx-1.9.9.tar.gz
(2)下载pcre (支持nginx伪静态):
[[email protected] src]# wget ftp://ftp.csx.cam.ac.uk/pub/software/programming/pcre/pcre-8.36.tar.gz
(3)下载ngx_cache_purge(清除指定URL缓存):
[[email protected] src]# wget http://labs.frickle.com/files/ngx_cache_purge-2.0.tar.gz
(4)下载keepalived:
[[email protected] src]# wget http://www.keepalived.org/software/keepalived-1.2.2.tar.gz
注:由于这些软件包是我当初下载安装的,因此其他童鞋现在安装时可以考虑下载新版安装包
5 添加www用户以及www用户组:
[[email protected] src]# groupadd www #添加www组
[[email protected] src]# useradd -g www www -s /bin/false
6 安装pcre:
[[email protected] src]# tar zxvf pcre-8.36.tar.gz
[[email protected] src]# cd /usr/local/src/pcre-8.38
[[email protected] pcre-8.38]# ./configure
[[email protected] pcre-8.38]# make
[[email protected] pcre-8.38]# make install
7 安装nginx:
(1)解压缩:
[[email protected] src]# tar -zxvf ngx_cache_purge-2.0.tar.gz
[[email protected] src]# tar -zxvf nginx-1.9.9.tar.gz
[[email protected] src]# cd nginx-1.9.9
(2)编译安装:
[[email protected] nginx-1.9.9]# ./configure --prefix=/usr/local/nginx --user=www --group=www --with-http_stub_status_module --with-http_ssl_module --with-openssl=/usr/local/ssl --with-pcre=/usr/local/src/pcre-8.38 --addmodule=/usr/local/src/ngx_cache_purge-2.3 --with-http_gzip_static_module

[[email protected] nginx-1.9.9]# make && make install
[[email protected] nginx-1.9.9]# chown www.www -R /usr/local/nginx/html #设置目录所有者
注:如果不需要https证书的话,可以把“–with-http_ssl_module –with-openssl=/usr/local/ssl”删掉,否则需要安装openssl
附:openssl安装:
i)下载地址:
https://www.openssl.org/source/openssl-1.0.2h.tar.gz
ii)安装:
[[email protected] src]# tar zxvf ./openssl-1.0.2h.tar.gz
[[email protected] src]# cd ./openssl-1.0.2h
[[email protected] src]# ./config enable-tlsext
[[email protected] src]# make && make install
注:
编译时添加的“enable-tlsext”是为了提供对多个https证书的支持
如果nginx在添加openssl之后编译出错的话,可以参考下我以前写过的这篇文章:https://www.zifangsky.cn/519.html
(3)添加nginx启动脚本:
i)如果是redhat7.x或centos7.x的话,使用以下脚本:
[[email protected] init.d]# vim /usr/lib/systemd/system/nginx.service
内容如下:
[Unit]
Description=nginx - high performance web server
Documentation=http://nginx.org/en/docs/
After=network.target remote-fs.target nss-lookup.target
[Service]
Type=forking
PIDFile=/usr/local/nginx/logs/nginx.pid
ExecStartPre=/usr/local/nginx/sbin/nginx -t -c /usr/local/nginx/conf/nginx.conf
ExecStart=/usr/local/nginx/sbin/nginx -c /usr/local/nginx/conf/nginx.conf
ExecReload=/bin/kill -s HUP $MAINPID
ExecStop=/bin/kill -s QUIT $MAINPID
PrivateTmp=true
[Install]
WantedBy=multi-user.target
给脚本添加执行权限:
[[email protected] init.d]# chmod a+x /usr/lib/systemd/system/nginx.service
ii)如果是CentOS6.x或者redhat6.x的话使用下面这个脚本:
[[email protected] ~]# vim /etc/init.d/nginx
内容如下:
#!/bin/sh
#
# nginx - this script starts and stops the nginx daemon
#
# chkconfig:   - 85 15
# description: Nginx is an HTTP(S) server, HTTP(S) reverse #               proxy and IMAP/POP3 proxy server
# processname: nginx
# config:      /etc/nginx/nginx.conf
# config:      /etc/sysconfig/nginx
# pidfile:     /var/run/nginx.pid
# Source function library.
. /etc/rc.d/init.d/functions
# Source networking configuration.
. /etc/sysconfig/network
# Check that networking is up.
[ "$NETWORKING" = "no" ] && exit 0
nginx="/usr/local/nginx/sbin/nginx"
prog=$(basename $nginx)
NGINX_CONF_FILE="/usr/local/nginx/conf/nginx.conf"
[ -f /etc/sysconfig/nginx ] && . /etc/sysconfig/nginx
lockfile=/var/lock/subsys/nginx
start() {
    [ -x $nginx ] || exit 5
    [ -f $NGINX_CONF_FILE ] || exit 6
    echo -n $"Starting $prog: "
    daemon $nginx -c $NGINX_CONF_FILE
    retval=$?
    echo
    [ $retval -eq 0 ] && touch $lockfile
    return $retval
}
stop() {
    echo -n $"Stopping $prog: "
    killproc $prog -QUIT
    retval=$?
    echo
    [ $retval -eq 0 ] && rm -f $lockfile
    return $retval
killall -9 nginx
}
restart() {
    configtest || return $?
    stop
    sleep 1
    start
}
reload() {
    configtest || return $?
    echo -n $"Reloading $prog: "
    killproc $nginx -HUP
RETVAL=$?
    echo
}
force_reload() {
    restart
}
configtest() {
$nginx -t -c $NGINX_CONF_FILE
}
rh_status() {
    status $prog
}
rh_status_q() {
    rh_status >/dev/null 2>&1
}
case "$1" in
    start)
        rh_status_q && exit 0
    $1
        ;;
    stop)
        rh_status_q || exit 0
        $1
        ;;
    restart|configtest)
        $1
        ;;
    reload)
        rh_status_q || exit 7
        $1
        ;;
    force-reload)
        force_reload
        ;;
    status)
        rh_status
        ;;
    condrestart|try-restart)
        rh_status_q || exit 0
            ;;
    *)
      echo $"Usage: $0 {start|stop|status|restart|condrestart|try-restart|reload|force-reload|configtest}"
        exit 2
esac
同样给脚本添加可执行权限:
[[email protected] ~]# chmod a+x /etc/init.d/nginx
关闭80端口进程:
[[email protected] init.d]# fuser -k 80/tcp
[[email protected] init.d]# systemctl daemon-reload
将nginx添加到开机自启:
[[email protected] ~]# chkconfig nginx on
(4)启动nginx:
[[email protected] ~]# service nginx start
如果nginx能够顺利启动的话,那么nginx的安装就完成了,剩下就是nginx的配置了
8 配置和优化nginx:
(1)关闭nginx:
[[email protected] ~]# service nginx stop
(2)新建目录vhost:
[[email protected] ~]# cd /usr/local/nginx/conf
[[email protected] conf]# mkdir vhost
注:nginx可以监听来自多个域名或者同一域名不同端口的多种请求,对这些请求进行反向代理都将在这个目录中配置
(3)配置nginx:
添加以下4个文件(在/usr/local/nginx/conf目录下),如果原文件存在则覆盖
i)gzip.conf:
#网页GZIP压缩设置
#2012.4.2
 #可通过http://tool.chinaz.com/Gzips/检测压缩情况
#
 #启动预压缩功能,对所有类型的文件都有效
gzip_static on;    #开启nginx_static后,对于任何文件都会先查找是否有对应的gz文件

#找不到预压缩文件,进行动态压缩
gzip on;
 gzip_min_length   1k;  #设置最小的压缩值,单位为bytes.超过设置的min_length的值会进行压缩,小于的不压缩.
gzip_comp_level   3;   #压缩等级设置,1-9,1是最小压缩,速度也是最快的;9刚好相反,最大的压缩,速度是最慢的,消耗的CPU资源也多
gzip_buffers      16 64k;   #设置系统的缓存大小,以存储GZIP压缩结果的数据流,它可以避免nginx频烦向系统申请压缩空间大小
gzip_types text/plain application/x-javascript text/css text/javascript;

 #关于gzip_types,如果你想让图片也开启gzip压缩,那么用以下这段吧:
#gzip_types text/plain application/x-javascript text/css text/javascript application/x-httpd-php image/jpeg image/gif image/png;

 #gzip公共配置
gzip_http_version 1.1;      #识别http的协议版本(1.0/1.1)
 gzip_proxied      any;      #设置使用代理时是否进行压缩,默认是off的
gzip_vary         on;       #和http头有关系,加个vary头,代理判断是否需要压缩
gzip_disable "MSIE [1-6]."; #禁用IE6的gzip压缩
这个文件是配置gzip压缩的
ii)proxy.conf:
proxy_temp_path   /tmp/proxy_temp;
 proxy_cache_path  /tmp/proxy_cache levels=1:2 keys_zone=cache_one:500m inactive=1d max_size=3g;
 client_body_buffer_size  512k;     #原为512k
 proxy_connect_timeout    50;       #代理连接超时
proxy_read_timeout       600;      #代理发送超时
proxy_send_timeout       600;      #代理接收超时
proxy_buffer_size        128k;     #代理缓冲大小,原为32k
 proxy_buffers           16 256k;   #代理缓冲,原为4 64k
 proxy_busy_buffers_size 512k;      #高负荷下缓冲大小,原为128k
 proxy_temp_file_write_size 1024m;  #proxy缓存临时文件的大小原为128k
 #proxy_ignore_client_abort  on;    #不允许代理端主动关闭连接
proxy_next_upstream error timeout invalid_header http_500 http_503 http_404 http_502 http_504;
这个文件是关于代理的一些配置
iii)nginx.conf:
user  www www;
 worker_processes  32;   # 工作进程数,为CPU的核心数或者两倍
 error_log   logs/error.log  crit; # debug|info|notice|warn|error|crit
 pid        logs/nginx.pid;

 events {
    use epoll;                            #Linux最常用支持大并发的事件触发机制
    worker_connections  65535;
 }

 http {
     include       mime.types;             #设定mime类型,类型由mime.type文件定义
     default_type  application/octet-stream;

    log_format  main  ‘$remote_addr - $remote_user [$time_local] "$request" ‘
                      ‘$status $body_bytes_sent "$http_referer" ‘
                      ‘"$http_user_agent" "$http_x_forwarded_for"‘;
    log_format zifangsky_log ‘$remote_addr – $remote_user [$time_local] "$request" ‘
                      ‘$status $body_bytes_sent "$http_referer" ‘
                      ‘"$http_user_agent" "$http_x_forwarded_for" ‘
                      ‘"$upstream_addr" "$upstream_cache_status" "$upstream_status" "$upstream_response_time" "$cookie_jsessionid"‘;

    log_format h5_log ‘$remote_addr – $remote_user [$time_local] "$request" ‘
                      ‘$status $body_bytes_sent "$http_referer" ‘
                      ‘"$http_user_agent" "$http_x_forwarded_for" "$proxy_add_x_forwarded_for"‘;

     access_log  logs/access.log  main;

     #设定请求缓冲
     server_names_hash_bucket_size 256;    #增加,原为128
     client_header_buffer_size 256k;       #增加,原为32k
     large_client_header_buffers 4 256k;   #增加,原为32k

     #size limits
     client_max_body_size          50m;    #允许客户端请求的最大的单个文件字节数
     client_header_timeout         3m;
     client_body_timeout           3m;
     send_timeout                  3m;

     sendfile                      on;
     tcp_nopush                    on;  #防止网络阻塞
     keepalive_timeout             120;  #长连接超时时间,单位是秒
     tcp_nodelay                   on;  #防止网络阻塞
     server_tokens                 off;    #不显示nginx版本信息
     autoindex off;

    limit_conn_zone $binary_remote_addr zone=perip:10m; #添加limit_zone,限制同一IP并发数
    #fastcgi_intercept_errors on;        #开启错误页面跳转
    add_header X-Frame-Options SAMEORIGIN;

    include  gzip.conf;    #压缩配置文件
    include  proxy.conf;    #proxy_cache参数配置文件
    include  vhost/*.conf;    #nginx虚拟主机包含文件目录
    include  mysvrhost.conf;    #后端WEB服务器列表文件
}
这个文件是nginx的主配置文件,可以看到最后几行引入了其他的一些配置文件
iv)mysvrhost.conf:
upstream h5 {
   ip_hash;  #会话保持
   server 192.168.100.104:9080 max_fails=1 fail_timeout=60s;
   server 192.168.100.105:9080 max_fails=1 fail_timeout=60s;
   server 192.168.100.106:9280 max_fails=1 fail_timeout=60s;
   server 192.168.100.107:9280 max_fails=1 fail_timeout=60s;
 }
可以发现,在这个文件中就是配置好一个应用具体有哪些服务器节点。其中第一行的 ip_hash nginx的其中一种分发请求的策略了,显而易见就是根据请求的IP来决定一次请求让哪个应用服务器来处理
目前,nginx一般支持以下四种负载均衡的算法,分别是:
round-robin 循环轮询算法,同时也是nginx默认的负载均衡算法
ip-hash 根据请求的客户端IP地址来决定当前请求应该交给哪个应用服务器
least-connected 最少连接算法,即:每次都找连接数最少的服务器来转发请求
weighted 权重算法,会根据每个应用节点的权重来分发请求,权重大的会多分发一点请求,权重小的会少分发一点请求
关于这四种算法的简单例子如下:
(a)round-robin:
nginx默认的负载均衡算法
http {
    upstream h5_server {
        server 192.168.100.104:9080;
        server 192.168.100.105:9080;
    }
    server {
        listen 80;
        location / {
            proxy_pass http://h5_server/h5;
        }
    }
}
使用此种配置,nginx在接收到请求之后将按顺序把请求分发给104和105服务器,其策略是:如果第1个请求分发给了104,那么第2个请求就分发给105,第3个请求给104,后面的以此类推
(b)ip-hash:
根据请求的客户端IP地址来决定当前请求应该交给哪个应用服务器,使用ip-hash算法时nginx会确保来自同IP的请求都分发到同一服务器上。要想使用ip-hash只需要在对应的upstream中添加上ip-hash即可
upstream h5 {
   ip_hash;
   server 192.168.100.104:9080;
   server 192.168.100.105:9080;
}注:ip-hash这种算法虽然在一般情况下都适用,但是当我们的域名使用了CDN加速之后,由于CDN节点需要对图片、CSS、JS等静态资源进行缓存,因此在nginx这里会面临来自少数IP的大量请求。特别是当我们将一些动态请求也以.html结尾时(比如:springmvc就可以设置动态处理的后缀名),这种现象就更严重了,使用ip-hash之后可以发现一些节点有非常大的请求,与此相反另外一些节点却只有很少一点请求。因此,这时可以考虑使用自定义的IP的hash策略,关于这一点我在后面会专门写一篇文章来说明,这里暂时不谈
(c)least-connected:
每次都找连接数最少的服务器来转发请求
upstream h5 {
   least_conn;
   server 192.168.100.104:9080;
   server 192.168.100.105:9080;
 }
(d)weighted:
根据每个应用节点的权重来分发请求,权重大的会多分发一点请求,权重小的会少分发一点请求
upstream h5 {
   server 192.168.100.104:9080 weight=4;
   server 192.168.100.105:9080;
 }
上面配置的意思是说,nginx在收到请求后,大概每5个请求会分4个请求给104,剩下的一个才分给105
(4)配置实际处理H5应用的配置文件h5.conf:
[[email protected] conf]# cd vhost/
[[email protected] conf]# vim h5.conf
其内容是:
server {
        server_name h5.zifangsky.cn;
        listen 80;

        location =/
         {
               proxy_redirect off;
               proxy_set_header        Host $host;
               proxy_set_header        X-Real-IP $remote_addr;
               proxy_set_header        X-Forwarded-For $proxy_add_x_forwarded_for;
               proxy_pass http://h5/h5;
               allow  192.168.0.0/16;
               deny all;
         }

        location /h5
         {
               proxy_redirect off;
               proxy_set_header        Host $host;
               proxy_set_header        X-Real-IP $remote_addr;
               proxy_set_header        X-Forwarded-For $proxy_add_x_forwarded_for;
               proxy_pass http://h5/h5;
               allow  192.168.0.0/16;
               deny all;
         }

         location /h5/.*\.(jpg|png|gif|css|js)$
         {
               proxy_pass http://h5/h5;
               proxy_redirect off;
               proxy_set_header        Host $host;
               proxy_set_header        X-Real-IP $remote_addr;
               proxy_set_header        X-Forwarded-For $proxy_add_x_forwarded_for;
               proxy_cache cache_one;
               proxy_cache_valid 200 302 304 1h; #200、302、304错误状态码保存1小时
               proxy_cache_valid 301 1d; #301错误状态码保存1天
               proxy_cache_valid any 1m; #其余的保存1分钟
               #以域名、URI、参数组合成Web缓存的Key值,存储缓存内容到二级缓存目录内
               proxy_cache_key $host$uri$is_args$args;
               expires 15d; #设置失效时间为30天
        }

         # 查看nL缓存
         location ~ /purge(/.*)
         {
              # 设置只允许指定的IP或IP段才可以清除URL缓存
              allow  127.0.0.1;
              deny all;
              proxy_cache_purge  cache_one  $host$1$is_args$args;
         }

         location /NginxStatus
         {
              allow  192.168.0.0/16;
              deny all;
              stub_status             on;
              access_log              off;
              auth_basic              "NginxStatus";
         }

         access_log logs/access_h5.log  zifangsky_log;
         error_page 404  /404.html;
         error_page   500 502 503 504 /404.html;
         location = /404.html {
               proxy_redirect off;
               proxy_set_header        Host $host;
               proxy_set_header        X-Real-IP $remote_addr;
               proxy_set_header        X-Forwarded-For $proxy_add_x_forwarded_for;
               proxy_pass http://h5/h5/error/404.jsp;
         }
         limit_conn perip 500;  #同一ip并发数为500,超过会返回503
 }
需要说明的是,上面的location限定了域名后面的哪些请求分发到哪些应用服务器中去处理,比如说请求的是后台路径,那么完全是可以让其他服务器节点的对应web应用来响应的,当然也可以限制访问IP。其次是上面配置的“/NginxStatus”在浏览器中访问 http://h5.zifangsky.cn/NginxStatus 时就可以查看当前nginx的连接数等nginx状态参数
(5)设置proxy_cache参数配置:
[[email protected] ~]# cd /tmp
[[email protected] ~]# mkdir -p /tmp/proxy_temp #proxy_temp_dir与proxy_cache_dir这两个文件夹必须在同一个分区
[[email protected] ~]# mkdir -p /tmp/proxy_cache #proxy_cache_dir与proxy_temp_dir这两个文件夹必须在同一个分区
[[email protected] ~]# chown www.www -R /tmp/proxy_temp /tmp/proxy_cache #设置目录所有者
[[email protected] ~]# chmod -R 777 /tmp/proxy_temp /tmp/proxy_cache #设置目录权限
(6)nginx优化设置基本的TCP配置 :
[[email protected] ~]# vim /etc/sysctl.conf
其内容是:
net.ipv4.ip_forward = 0
net.ipv4.conf.default.rp_filter = 1
net.ipv4.conf.default.accept_source_route = 0
kernel.sysrq = 0
kernel.core_uses_pid = 1
net.ipv4.tcp_syncookies = 1
kernel.msgmnb = 65536
kernel.msgmax = 65536
kernel.shmmax = 68719476736
kernel.shmall = 4294967296
net.ipv4.tcp_max_tw_buckets = 6000
net.ipv4.tcp_sack = 1
net.ipv4.tcp_window_scaling = 1
net.ipv4.tcp_rmem = 4096 87380 4194304
net.ipv4.tcp_wmem = 4096 16384 4194304
net.core.wmem_default = 8388608
net.core.rmem_default = 8388608
net.core.rmem_max = 16777216
net.core.wmem_max = 16777216
net.core.netdev_max_backlog = 262144
#net.core.somaxconn = 262144
net.ipv4.tcp_max_orphans = 3276800
net.ipv4.tcp_max_syn_backlog = 262144
net.ipv4.tcp_timestamps = 0
net.ipv4.tcp_synack_retries = 1
net.ipv4.tcp_syn_retries = 1
net.ipv4.tcp_tw_recycle = 1
net.ipv4.tcp_tw_reuse = 1
net.ipv4.tcp_mem = 94500000 915000000 927000000
net.ipv4.tcp_fin_timeout = 1
net.ipv4.tcp_keepalive_time = 30
#net.ipv4.ip_local_port_range = 1024 65000 #允许系统打开的端口范围
使配置立即生效:
[[email protected] ~]# /sbin/sysctl -p
9 测试nginx能够正常启动:
[[email protected] ~]# service nginx start
如果nginx能够正常启动的话,那么到此nginx的配置和优化就已经全部完成了,下面将开始keepalived的安装和配置
三 Keepalived的安装和配置
(1)安装:
[[email protected] ~]# cd /usr/local/src
[[email protected] ~]# tar zxvf keepalived-1.2.2.tar.gz
[[email protected] ~]# cd keepalived-1.2.2
[[email protected] ~]# ./configure
[[email protected] ~]# make && make install
(2)将keepalived 以服务方式启动:
[[email protected] ~]# cp /usr/local/etc/rc.d/init.d/keepalived /etc/rc.d/init.d/
[[email protected] ~]# cp /usr/local/etc/sysconfig/keepalived /etc/sysconfig
[[email protected] ~]# mkdir /etc/keepalived
[[email protected] ~]# cp /usr/local/etc/keepalived/keepalived.conf /etc/keepalived/
[[email protected] ~]# cp /usr/local/sbin/keepalived /usr/sbin
[[email protected] ~]# chkconfig keepalived on
(3)修改keepalived配置文件:
i)设置192.168.100.104为虚拟IP的主节点:
[[email protected] ~]# vim /etc/keepalived/keepalived.conf
其内容如下:
! Configuration File for keepalived

global_defs {
   notification_email {
   [email protected]
   }
   notification_email_from [email protected]
   smtp_server mail.zifangsky.cn
  # smtp_connect_timeout 30
   router_id LVS_DEVEL
}

vrrp_script chk_http_port {
    script "/etc/keepalived/nginx_pid.sh"   # 检查nginx状态的脚本
    interval 2
    weight 3
}

vrrp_instance VI_1 {
    state MASTER                 #状态,位主,从机使用BACKUP
    interface eth0                   #绑定虚拟IP的网络接口
    virtual_router_id 65          #VRRP组名,两个节点的设置必须一样,以指明各个节点属于同一VRRP组
    priority 100                      #权重,哪权重高,那个就是主的,所以MASTER的权重必须高于BACKUP
    advert_int 1                       #组播信息发送间隔,两个节点设置必须一样
    authentication {
        auth_type PASS             #主从机子通信的加密方式,两台必须一样
        auth_pass www.zifangsky.cn             #主从机子通信的加密密码,两台必须一样
    }
      mcast_src_ip 192.168.100.104   #本机IP
    virtual_ipaddress {
        192.168.100.100                 #指定虚拟IP, 两个节点设置必须一样
    }
    track_script {
    chk_http_port                 #监控脚本,chk_http_port对应的是第3行的vrrp_script chk_http_port
    }
}

virtual_server 192.168.100.100  {
    delay_loop 6
    lb_algo rr
    lb_kind DR
    persistence_timeout 50
    protocol TCP

    real_server 192.168.100.104 80 {
        weight 3
        TCP_CHECK {
            connect_timeout 10
            nb_get_retry 3
            delay_before_retry 3
            connect_port 80
        }
    }
    real_server 192.168.100.105 80 {
        weight 3
        TCP_CHECK {
            connect_timeout 10
            nb_get_retry 3
            delay_before_retry 3
            connect_port 80
        }
    }
}从上面的配置可以看出,主节点和备份节点的virtual_router_id值必须一样,同时主节点的priority值必须比备份节点的priority值要高
这里设置了一个虚拟IP:192.168.100.100
包括两个真实服务器节点,一个主节点:192.168.100.104 ,一个备份节点:192.168.100.105
同时设置了keepalived的连接端口和监听端口都是80,也就是监听nginx的80端口的服务是否挂掉,如果挂掉则将192.168.100.100这个IP自动切换到另一台服务器上去(192.168.100.100这个IP默认在192.168.100.104上)
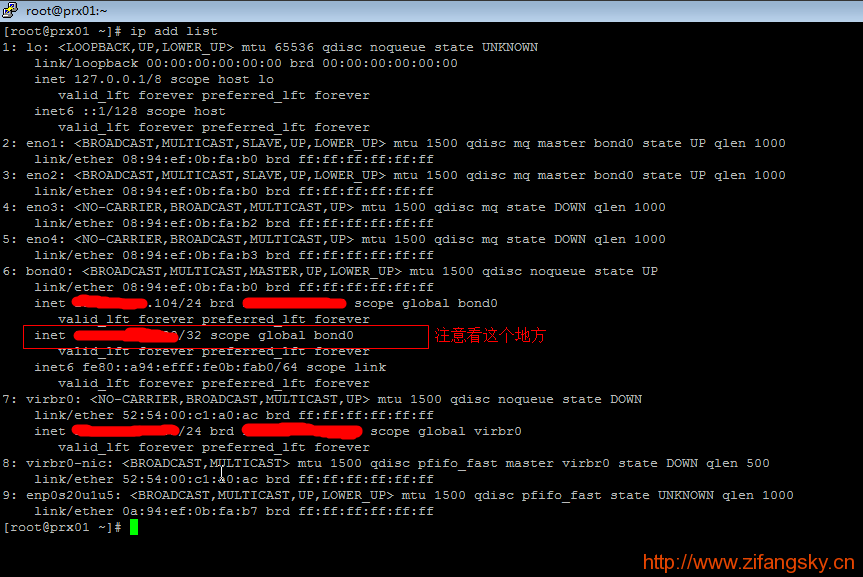
启动keepalived,并查看虚拟IP是否已经绑定:
[[email protected] ~]# service keepalived start
[[email protected] ~]# ip add list
如果命令结果显示有192.168.100.100这个IP的话,那说明192.168.100.104上的keepalived已经配置安装好了
ii)设置192.168.100.105为虚拟IP的备份节点:
注:192.168.100.105上的keepalived安装除了这一步的配置文件之外,其他跟192.168.100.104上的安装步骤一样,因此这里就不多说了
[[email protected] ~]# vim /etc/keepalived/keepalived.conf
其内容如下:
! Configuration File for keepalived

global_defs {
   notification_email {
   [email protected]
   }
   notification_email_from [email protected]
   smtp_server mail.zifangsky.cn
  # smtp_connect_timeout 30
   router_id LVS_DEVEL
}

vrrp_script chk_http_port {
    script "/etc/keepalived/nginx_pid.sh"   # 检查nginx状态的脚本
    interval 2
    weight 3
}

vrrp_instance VI_1 {
    state BACKUP                 #状态,位主,从机使用BACKUP
    interface eth0                   #绑定虚拟IP的网络接口
    virtual_router_id 65          #VRRP组名,两个节点的设置必须一样,以指明各个节点属于同一VRRP组
    priority 50                      #权重,哪权重高,那个就是主的,所以MASTER的权重必须高于BACKUP
    advert_int 1                       #组播信息发送间隔,两个节点设置必须一样
    authentication {
        auth_type PASS             #主从机子通信的加密方式,两台必须一样
        auth_pass www.zifangsky.cn             #主从机子通信的加密密码,两台必须一样
    }
      mcast_src_ip 192.168.100.105   #本机IP
    virtual_ipaddress {
        192.168.100.100                 #指定虚拟IP, 两个节点设置必须一样
    }
    track_script {
    chk_http_port                 #监控脚本,chk_http_port对应的是第3行的vrrp_script chk_http_port
    }
}

virtual_server 192.168.100.100  {
    delay_loop 6
    lb_algo rr
    lb_kind DR
    persistence_timeout 50
    protocol TCP

    real_server 192.168.100.104 80 {
        weight 3
        TCP_CHECK {
            connect_timeout 10
            nb_get_retry 3
            delay_before_retry 3
            connect_port 80
        }
    }
    real_server 192.168.100.105 80 {
        weight 3
        TCP_CHECK {
            connect_timeout 10
            nb_get_retry 3
            delay_before_retry 3
            connect_port 80
        }
    }
}
注:这里只修改了3个地方,第一个地方是将“MASTER”改成了“BACKUP”,表明是备份节点;第二个地方是修改了权重,修改成了比100小的50;第三个地方是修改了本机IP
结果显而易见,先启动“MASTER”的keepalived然后再启动“BACKUP”的keepalived,因此“BACKUP”所在的服务器是不会绑定192.168.100.100这个虚拟IP的
(4)添加检查nginx状态的脚本,当nginx停止运行时,会自动将nginx启动(104和105都需要添加这个脚本):
[[email protected] ~]# vim /etc/keepalived/nginx_pid.sh
其内容是:
#!/bin/bash
#version 0.0.1
#
A=`ps -C nginx --no-header |wc -l`
if [ $A -eq 0 ];then
#  /usr/sbin/nginx
      service nginx start
              sleep 3
                if [ `ps -C nginx --no-header |wc -l` -eq 0 ];then
#                       killall keepalived
                        service  keepalived stop
fi
fi
[[email protected] ~]# chmod a+x /etc/keepalived/nginx_pid.sh
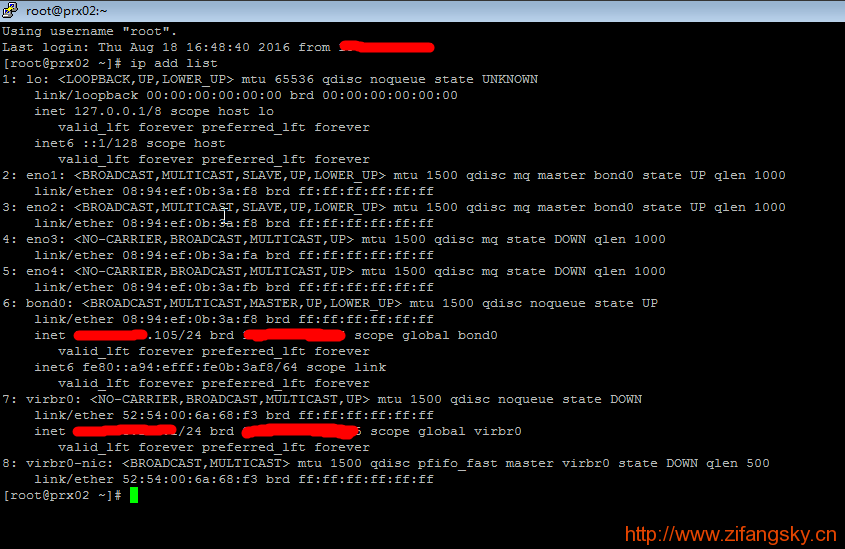
启动keepalived,并查看虚拟IP是否已经绑定:
[[email protected] ~]# service keepalived start
[[email protected] ~]# ip add list
到此,keepalived的安装和配置已经全部结束
问:如何测试keepalived的虚拟IP(192.168.100.100)可以自动在两个服务器之间漂移?
很简单,只需要以下几步即可验证:
去掉104和105上的/etc/keepalived/nginx_pid.sh这个脚本的执行权限(PS:因为不去掉的话停掉nginx时因为这个脚本nginx会自动重启)
停掉104的nginx(service nginx stop)
等几秒钟之后,分别在104和105上执行:ip add list
可以发现192.168.100.100这个虚拟IP已经从104上漂移到105上去了
启动104的nginx(service nginx start)
等几秒钟之后,分别在104和105上再次执行:ip add list
可以发现192.168.100.100这个虚拟IP又从105上漂移回到104上去了
到此,“使用Nginx1.9.9+Keepalived1.2.x搭建高可用负载均衡集群”的详细安装和配置就已经结束了
参考文档:
PS:上面图片中的水印是我个人博客的域名,因此还请管理员手下留情不要给我标为“转载文章”,谢谢!!!
本文出自 “zifangsky的个人博客” 博客,请务必保留此出处http://983836259.blog.51cto.com/7311475/1862540
以上是关于使用Nginx1.9.9+Keepalived1.2.x搭建高可用负载均衡集群的主要内容,如果未能解决你的问题,请参考以下文章
mysql5.7+keepalived1.3.5搭建热备服务器


