CANoe DLL编程——SendKey DLL的CANoe应用
Posted 蚂蚁小兵
tags:
篇首语:本文由小常识网(cha138.com)小编为大家整理,主要介绍了CANoe DLL编程——SendKey DLL的CANoe应用相关的知识,希望对你有一定的参考价值。
相关文章

CANoe DLL编程(一)—— Visual Studio 创建DLL以及动态调用
CANoe DLL编程(二)—— 创建CANoe适用的DLL以及调用
前言
-
每个在使用CANoe的同学,都绕不开Sendkey 的,这一节,我们先不讲dll怎么制作和生成,我们还是先结合帮助文档和官方示例来弄明白,怎么使用seedkey的响应机制。
-
软件环境:
win10 x64
visual studio 2019
CANoe 11 x64

文章目录

官方示例解读
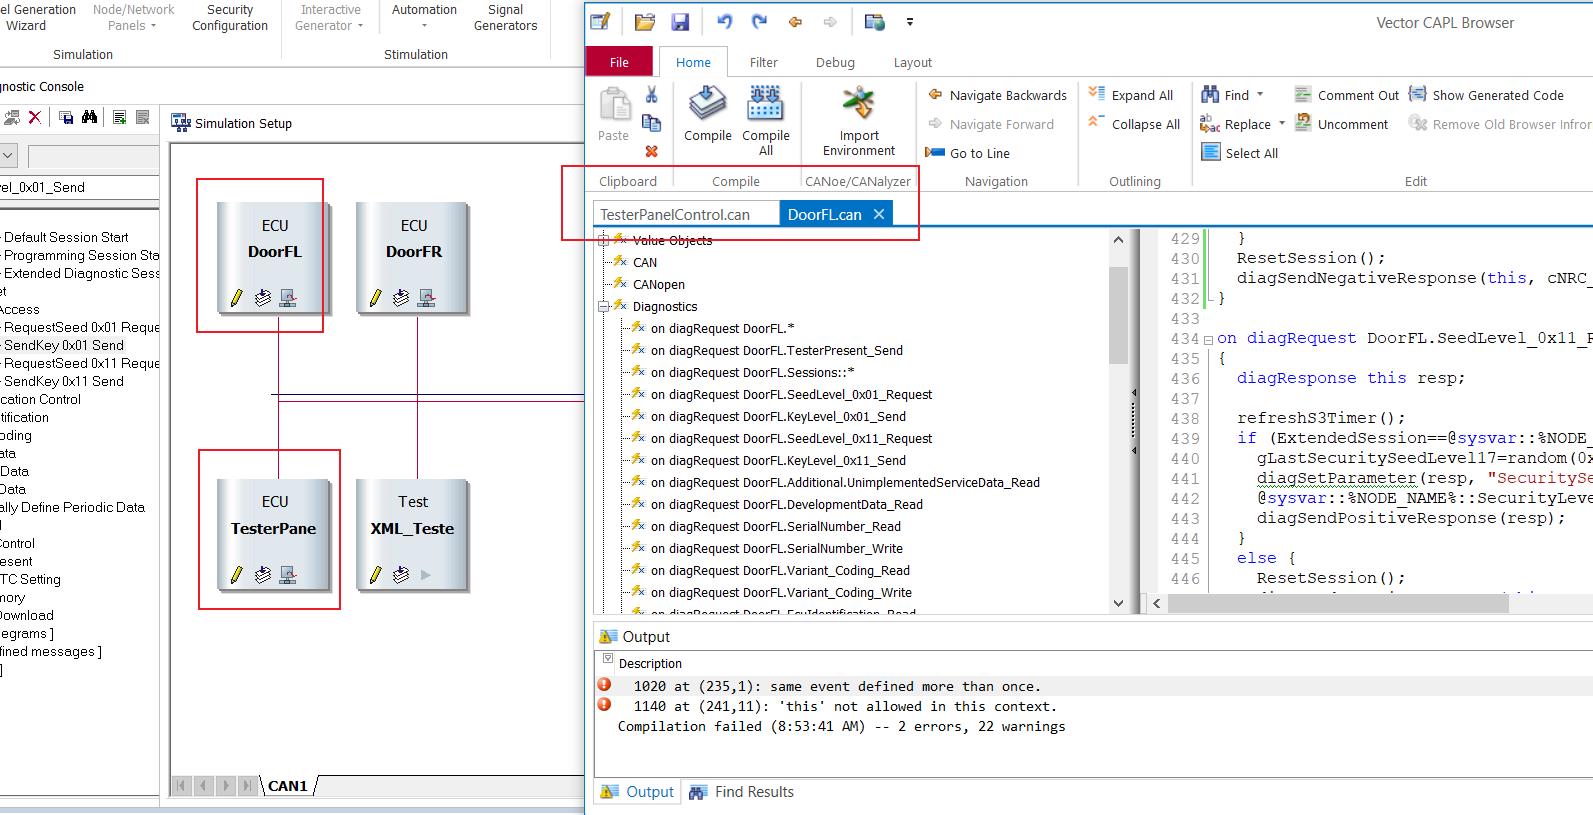
①,我们先把C:\\Users\\Public\\Documents\\Vector\\CANoe\\Sample Configurations 11.0.55\\CAN\\Diagnostics\\UDSSystem 这个工程拷贝一份,不要破坏源码
下图是打开示例工程,我们先看下DLL在哪里加载进来的

通过诊断控制台看seedkey响应机制
②,打开 DoorFL - Diagnostic console,我们先不管sendkey怎么运作的,先顺序执行下面的指令看下输出结果,是能够正常解锁的
- 进入拓展会话 10 03
- 请求种子 27 01
- 发送密钥 27 02

③,因为 DoorFL - Diagnostic console,里面设置的target ecu 是 DoorFL ,DoorFL是仿真节点,这里没有实物ECU,所有诊断的响应都是仿真实现的。我们看DoorFL.can 里面定义了很多的 on diagRequest XXX ,当我们在 DoorFL - Diagnostic console 发送方诊断的时候,就会触发这些on diagRequest 然后做出response
- 下面我把
DoorFL.can中对seed key的诊断响应代码贴出来,并且添加了一些打印信息
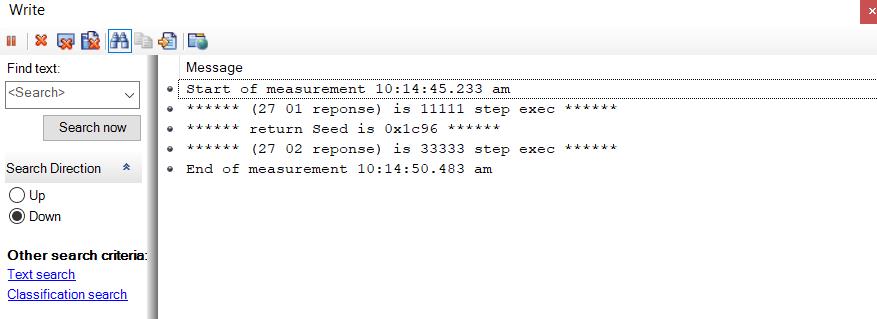
1, 当我们从DoorFL - Diagnostic console发送了 27 01请求种子的指令后,下面的事件会触发,然后把种子反回给DoorFL - Diagnostic console,诊断控制台会根据seedkey.dll自动计算key,然后自动填写到27 02 xx xx xx ,等待用户发送。
on diagRequest DoorFL.SeedLevel_0x01_Request
{
  diagResponse this resp;

  write("****** (27 01 reponse) is 11111 step exec ******");
  refreshS3Timer();
  if (ExtendedSession==@sysvar::%NODE_NAME%::CurrentSession || ProgrammingSession==@sysvar::%NODE_NAME%::CurrentSession) {
    gLastSecuritySeedLevel1=random(0x10000);
    write("****** return Seed is 0x%x ******",gLastSecuritySeedLevel1);
    diagSetParameter(resp, "SecuritySeed", gLastSecuritySeedLevel1); // Use 2-byte random value as seed
    diagSendPositiveResponse(resp);
  }
  else {
    ResetSession();
    diagSendNegativeResponse(this, cNRC_ConditionsNotCorrectOrRequestSequenceError);
  }
}
- 2,上一步种子从
DoorFL.can回来DoorFL - Diagnostic console后
诊断控制台会根据seedkey.dll自动计算key,然后自动填写到27 02 xx xx xx ,等待用户发送。

- 3, 在上一步用户 发送了
27 02 xx xx xx后,下面的事件会触发,然后check key
是否正确,正确就postival response 否则NRC
on diagRequest DoorFL.KeyLevel_0x01_Send
{
  diagResponse this resp;
  long securityKey, receivedKey;
  byte seedArray[2];
  byte keyArray[2];
  dword keyArraySize;

  write("****** (27 02 reponse) is 33333 step exec ******");
  refreshS3Timer();
  if (ExtendedSession==@sysvar::%NODE_NAME%::CurrentSession || ProgrammingSession==@sysvar::%NODE_NAME%::CurrentSession) {
    seedArray[0]=(gLastSecuritySeedLevel1>>8)&0xFF;
    seedArray[1]=gLastSecuritySeedLevel1&0xFF;
    diagGenerateKeyFromSeed(seedArray, 2, 17, "", "", keyArray, 2, keyArraySize); // Use 2-byte random value as seed
    securityKey=keyArray[0];
    securityKey=(securityKey<<8) + keyArray[1];

    receivedKey=diagGetParameter(this, "SecurityKey");
    if (securityKey==receivedKey) {
      @sysvar::%NODE_NAME%::SecurityStatus=Unlocked;
      @sysvar::%NODE_NAME%::SecurityLevel=Unlocked_Level_1;
      diagSendPositiveResponse(resp);
      return;
    }
  }
  ResetSession();
  diagSendNegativeResponse(this, cNRC_InvalidKey);
}
4, 下面的打印结果是`DoorFL.can`中我们添加的打印信息。
通过 simulation node 看seedkey响应机制
①, 看下图TesterPanel ,我们不用 DoorFL - Diagnostic console发送诊断,我们在TesterPanelControl.can文件中通过SendRequest() 发送种子请求,并在这个文件中处理 响应和生成key,并把key发送出去。
②,下面我们再把27 服务的整个响应机制写下来,具体代码,上一步骤贴出来过的,在这就拿掉了。
-1, 当我们在TesterPanelControl.can发送了 27 01请求种子的指令后, DoorFL.can:的on diagRequest DoorFL.SeedLevel_0x01_Request事件会触发,然后把种子reponse 回来
on diagRequest DoorFL.SeedLevel_0x01_Request
{
}
- 上一步种子reponse 回来后,会触发
TesterPanelControl.can:的on diagResponse事件,代码在这里通过diagGenerateKeyFromSeed函数生成key,然后以27 02 xx xx xx发送出去去
on diagResponse DoorFL.SeedLevel_0x01_Request
{
diagRequest DoorFL.KeyLevel_0x01_Send reqKeySend;
diagRequest DoorFL.Variant_Coding_Write reqCodingWrite;
word seed;
word securityKey;
byte seedArray[2];
byte keyArray[2];
dword keyActualSizeOut;
seed=this.GetParameter("SecuritySeed");
seedArray[1]=(seed>>8)&0xFF;
seedArray[0]=seed&0xFF;
diagGenerateKeyFromSeed(gECU, seedArray , 2, 1, "", "" , keyArray, elcount(keyArray), keyActualSizeOut);
securityKey=(((word)keyArray[1])<<8) | keyArray[0];
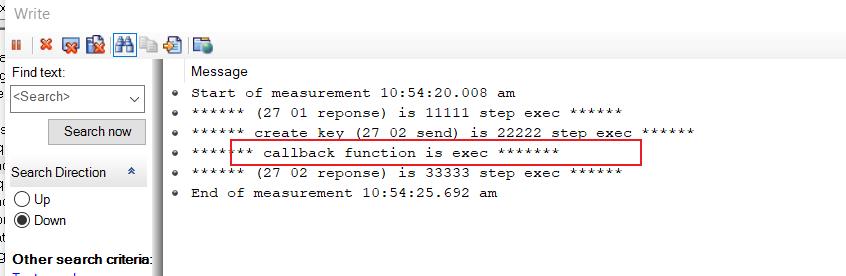
write("****** create key (27 02 send) is 22222 step exec ******");
write("****** create key is 0x%x ******",securityKey);
reqKeySend.SetParameter("SecurityKey", securityKey);
// Checking on return values indicating an error when sending the requests or when receiving the responses was omitted here to simplify the example
reqKeySend.SendRequest();
}
- 2,
DoorFL.can:收到发送了27 02 xx xx xx后,下面的事件会触发,然后check key 是否正确,正确就postival response 否则NRC
on diagRequest DoorFL.KeyLevel_0x01_Send
{
}
- 3, 我们在
TesterPanelControl.can:文件中再添加on key ‘a’,把种子请求诊断发出去,对比看下打印结果。
On key 'a' // unlock
{
  diagRequest DoorFL.SeedLevel_0x01_Request rqRequestSeed;
  rqRequestSeed.SendRequest();
}
- 4, 看下打印结果。

休息下1分钟。。。

通过 seedkey的回调函数看响应机制
① 上面的两种方式其实同属一种类型,都是通过调用函数diagGenerateKeyFromSeed来生成的key,下面CANoe还提供了另外一种函数DiagStartGenerateKeyFromSeed当执行了这个函数,就会调用_Diag_GenerateKeyResult回调函数,携带这key
-
对比下面两个函数长得不同
-
diagGenerateKeyFromSeed -
DiagStartGenerateKeyFromSeed -
我们把
TesterPanelControl.can:文件中的on diagResponse DoorFL.SeedLevel_0x01_Request注释掉,添加下面的回到函数代码:
on diagResponse DoorFL.SeedLevel_0x01_Request
{
   char gECU[20]="DoorFL";
   BYTE seed[2];
  int count;
  write("****** create key (27 02 send) is 22222 step exec ******");
  count = this.GetParameterRaw( "SecuritySeed", seed, elcount(seed));
  // _Diag_GetError is called when an error occurs
  DiagStartGenerateKeyFromSeed( gECU,seed, elcount( seed), 1);
}

_Diag_GenerateKeyResult( long result, BYTE computedKey[])
{
  diagRequest DoorFL.KeyLevel_0x01_Send reqKeySend;

  write("******* callback function is exec *******");
  if( 0 != result)
  {
    write( "Error: computing key returned %d", result);
    return;
  }
  // Success, i.e. a key was computed, so send it to the ECU
  reqKeySend.SetParameterRaw( "SecurityKey", computedKey, elcount( computedKey));
  reqKeySend.SendRequest();
}
_Diag_GetError (char buffer[])
{
  //called if error in DiagGenerateKeyFromSeed occurs
  write("Diagnostic Error: %s", buffer);
}

On key 'a' // unlock
{
  diagRequest DoorFL.SeedLevel_0x01_Request rqRequestSeed;
  rqRequestSeed.SendRequest();
}
②,按键‘a’,观察打印结果
③, 当 diagGenerateKeyFromSeed 返回值非0的时候 就会自动触发 回调函_Diag_GetError
-
DiagStartGenerateKeyFromSeed报错的话,不会触发_Diag_GetError -
下面我们把
DiagStartGenerateKeyFromSeed相关代码在注释掉,把on diagResponse DoorFL.SeedLevel_0x01_Request代码放出来。 -
把按照下面贴图更改,改成1,
-
点击 按键‘a’测试看下结果

- 根据打印结果我们看到,程序进入了
_Diag_GetError函数中。

通过CAPL Test Node 看seedkey响应机制
① 恰好这个工程跟也有个XML Test Node ,我就图个简单,在原来的case中直接修改,添加我们自己的seedkey 代码
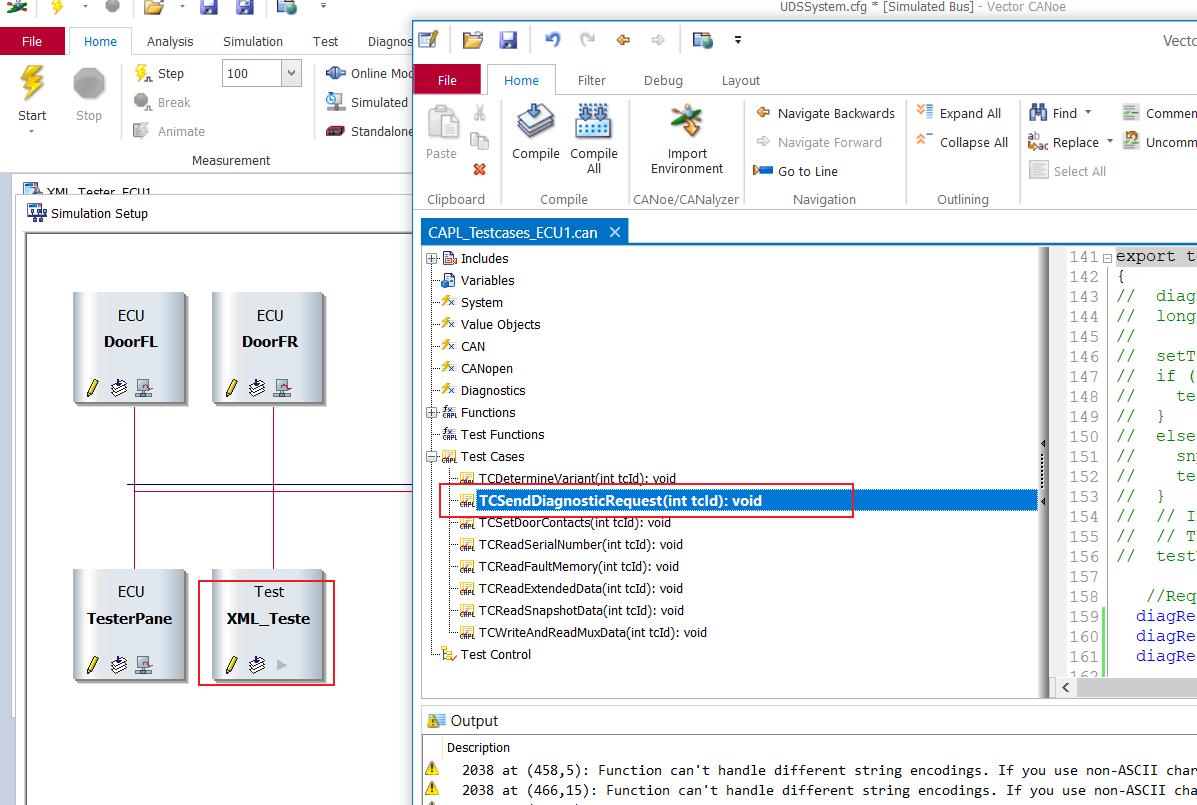
② 添加的seedkey 代码如下,也添加一些打印信息,方便理解
export testcase TCSendDiagnosticRequest(int tcId)
{

  diagRequest DoorFL.SeedLevel_0x01_Request  rqRequestSeed;
  diagRequest  DoorFL.ExtendedDiagnosticSession_Start reqExtSession;
  diagRequest DoorFL.KeyLevel_0x01_Send reqKeySend;

  word seed;
  word securityKey;
  byte seedArray[2];
  byte keyArray[2];
  dword keyActualSizeOut;
  char gECU[20]="DoorFL";
  dword keyArraySize;

  DiagSendRequest(reqExtSession);
  TestWaitForDiagResponse(reqExtSession,100);

  rqRequestSeed.SendRequest();
  TestWaitForDiagResponse(rqRequestSeed,100);
  seed = diagGetRespParameter (rqRequestSeed,"SecuritySeed");
  write("*********Get Response seed :%x *********",seed);

  seedArray[0]=(seed>>8)&0xFF;
  seedArray[1]=seed&0xFF;
  diagGenerateKeyFromSeed(gECU,seedArray, 2, 1, "", "", keyArray, 2, keyArraySize); // Use 2-byte random value as seed
  securityKey=keyArray[0];
  securityKey=(securityKey<<8) + keyArray[1];
  write("*********create key :%x *********",securityKey);

  reqKeySend.SetParameter("SecurityKey", securityKey);
  // Checking on return values indicating an error when sending the requests or when receiving the responses was omitted here to simplify the example
  reqKeySend.SendRequest();

}
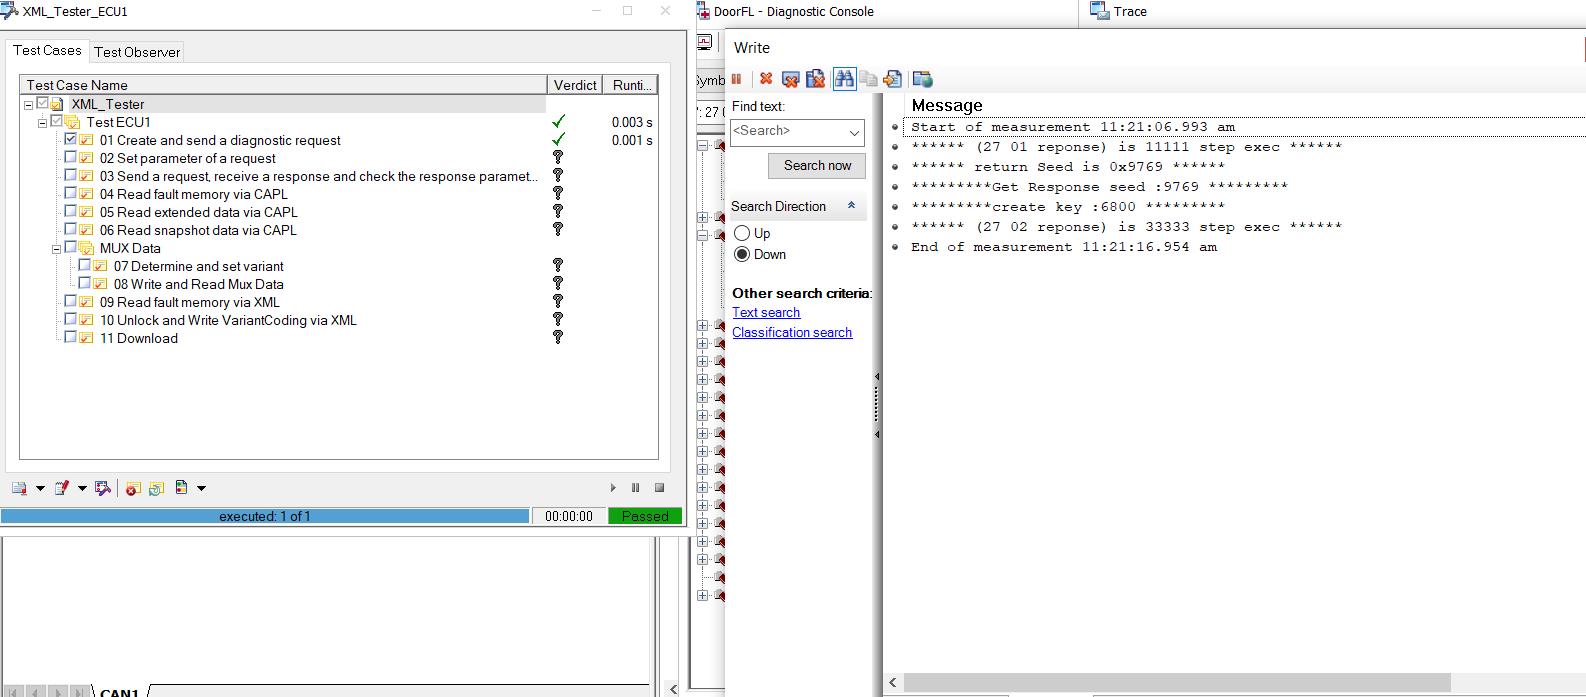
③,观察打印结果

总结
这一节内容较多,多点耐心,有时间的自己动手试试,有时候看着简单,不自己尝试下,就不深刻。


- 要有最朴素的生活,最遥远的梦想,即使明天天寒地冻,路遥马亡!
- 如果这篇博客对你有帮助,请 “点赞” “评论”“收藏”一键三连 哦!码字不易,大家的支持就是我坚持下去的动力。

以上是关于CANoe DLL编程——SendKey DLL的CANoe应用的主要内容,如果未能解决你的问题,请参考以下文章