Vue3.0+TS+Element-plus实现(若依版后台管理系统)
Posted _花花世界
tags:
篇首语:本文由小常识网(cha138.com)小编为大家整理,主要介绍了Vue3.0+TS+Element-plus实现(若依版后台管理系统)相关的知识,希望对你有一定的参考价值。
附上源码地址: Vue3.0+TS+Element-plus 后台管理系统模板
准备工作
安装vue3.0,npm create vue3-project
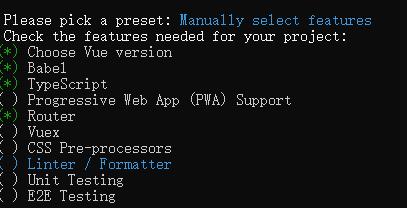
选中这几项即可,不需要vuex, 我们自己封装状态管理。
setup函数使用
在.vue文件中, script 标签下代码都必须带有lang=“ts”。关于setup函数调用时间是在vue2的create之前触发,关于其他的生命周期相信大家都有所了解,这里就不做赘述了。setup有两种写法 ,
常规写法
<script lang="ts">
import { defineComponent } from 'vue'

export default defineComponent({
  name: 'home',
  setup() {
    return {}
  }
})
</script>
需要在模板html中使用到的变量及方法名必须全部 return
简捷写法
<script lang='ts' setup>
import navbar from '@/components/Navbar'
</script>
无需 return 包括components,只要定义或引入后即可直接在html中使用,弊端是name无法定义,如果用到 name, 须:
<script lang="ts">
import { defineComponent } from 'vue'

export default defineComponent({
  name: 'home',
})
</script>

<script lang='ts' setup>
import navbar from '@/components/Navbar'
// 此处编写业务代码 .......
</script>
此两种写法本人在项目中都有用到,我认为最好的使用场景是 components组件中使用第一种,views页面中使用第二种。原因是由于组件中会常用到props, emit,如此在第二种写法中就不太方便了,必须
import { defineProps, defineEmits } from 'vue'
状态管理Store
vue3.0是支持vuex的,而且vuex 是一个比较完善的状态管理库。它很简单,并与 Vue 集成的非常好。不使用vuex的原因是vue3 版本重新编写了底层的响应式系统(reactive,ref),并介绍了构建应用程序的新方法。新的响应式系统非常强大,它可以直接用于集中的状态管理,既然自身已经具备这样的功能,何必还要单独安装vuex舍近求远呢。于是我自定义了一套store。用法我结合了es6的class,具体实现项目中查阅更详细!
import { reactive, readonly } from 'vue'

export abstract class Store<T extends Object> {
  protected state: T

  constructor() {
    const data = this.data()
    this.setup(data)
    this.state = reactive(data) as T
  }

  public getState(): T {
    return readonly(this.state) as T
  }

  protected abstract data(): T

  protected setup(data: T): void { }
}
动态缓存(keep-alive)
在vue2中
<transition name="fade-transform" mode="out-in">
  <keep-alive :include="cachedViews">
    <router-view class="app-container" :key="key" />
  </keep-alive>
</transition>
在vue3中
<router-view class="app-container" v-slot="{ Component, route }">
  <transition name="fade-transform" mode="out-in">
    <keep-alive :include="cachedViews" :max="10">
      <component :is="Component" :key="route.path" />
    </keep-alive>
  </transition>
</router-view>
Element Plus
全局汉化
在element-plus中, 默认是英文版的我们需要加一个汉化:
import ElementPlus from 'element-plus'
import 'element-plus/dist/index.css'
import locale from 'element-plus/lib/locale/lang/zh-cn'
// 注册ElementPlus
app.use(ElementPlus, {
  locale, // 语言设置
  size: Cookies.get('size') || 'medium' // 尺寸设置
})
主题风格
// 主题颜色风格逻辑引入
import theme from '@/utils/theme'
import { getSetting } from '@/utils/setting'
// 主题颜色风格初始化
theme(getSetting('theme'))
关于 theme 以及 getSetting 方法, git中有详细代码, 这里只说明重要代码
注意
关于菜单接口数据格式以下为例
{
	children: [{
		alwaysShow: null
		children: []
		component: "systemManagement/menuManage"
		hidden: false
		meta: {title: "菜单管理", icon: "", noCache: false}
		name: "menuManage"
		path: "menuManage"
		redirect: ""
	}]
	component: "Layout"
	hidden: false
	meta: { title: "系统管理", icon: "international", noCache: false }
	icon: "international"
	noCache: false
	title: "系统管理"
	name: "systemManagement"
	path: "/systemManagement"
	redirect: "noRedirect"
}
感谢阅读~~
本篇文章及项目代码参考vue2.0版若依系统,特此说明并致谢!
如果对您有所帮助,请点个star,谢谢!
以上是关于Vue3.0+TS+Element-plus实现(若依版后台管理系统)的主要内容,如果未能解决你的问题,请参考以下文章