java web012——Spring核心
Posted 江州益彤
tags:
篇首语:本文由小常识网(cha138.com)小编为大家整理,主要介绍了java web012——Spring核心相关的知识,希望对你有一定的参考价值。
一、Spring简介——什么是Spring?
Spring是分层的JavaSE/EE full-stack 轻量级开源框架,以IoC(Inverse of Control控制反转)和AOP(Aspect Oriented Programming 面向切面编程)为内核,使用基本的JavaBean来完成以前只可能由EJB完成的工作,取代了EJB的臃肿、低效的开发模式。
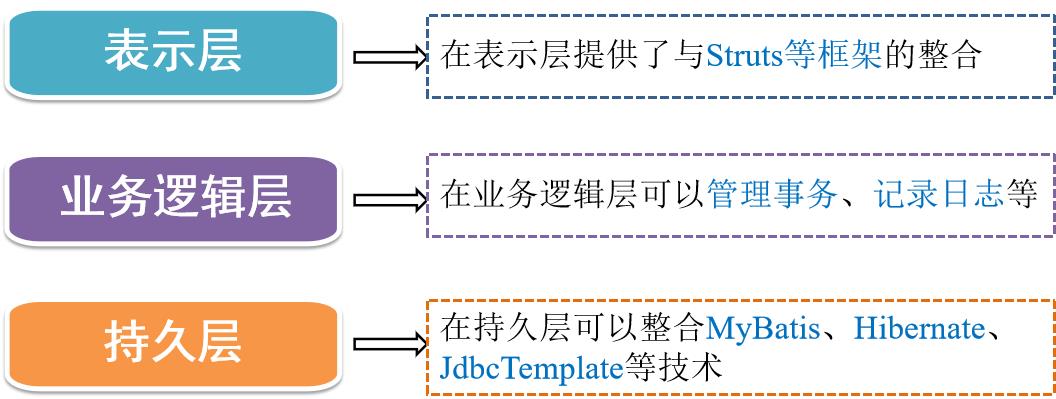
在实际开发中,通常在服务器端采用三层体系架构,分别为表示层(Web)、业务逻辑层(Service)、持久层(Dao), Spring对每一层都提供了技术支持。
1.1、Spring的体系结构
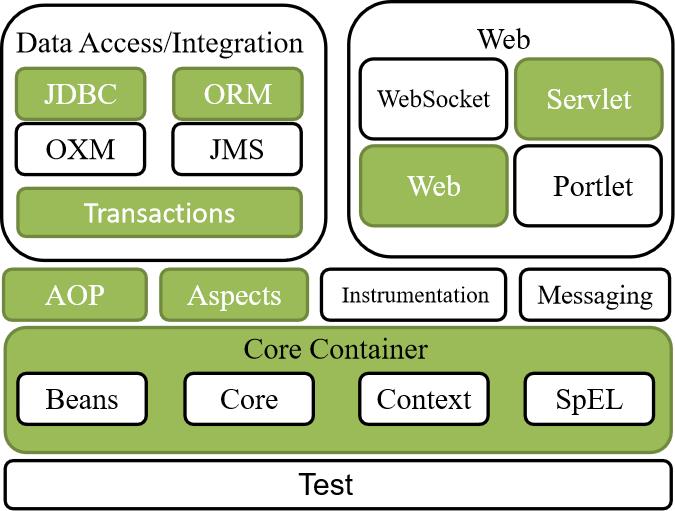
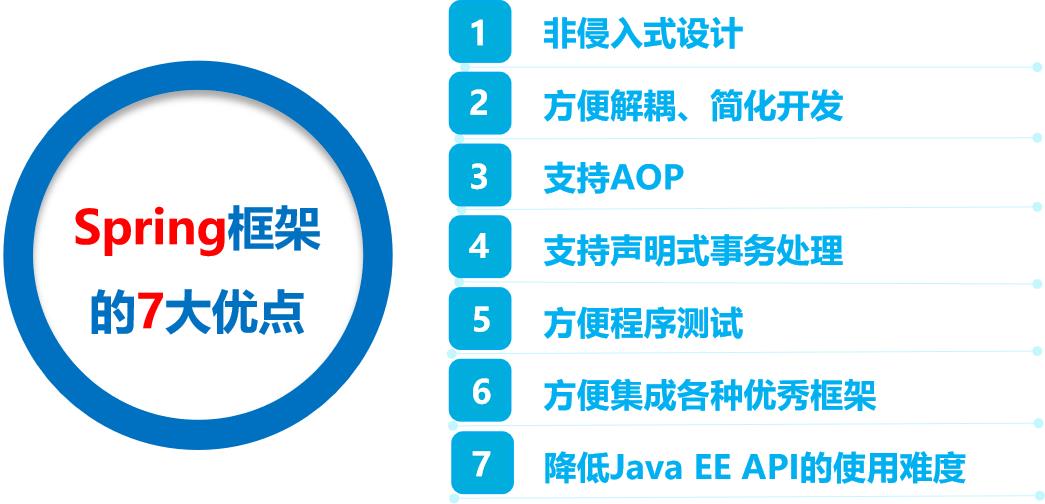
1.2、Spring框架的优点
Spring具有简单、可测试和松耦合等特点。Spring不仅可以用于服务器端开发,也可以应用于任何Java应用的开发中。
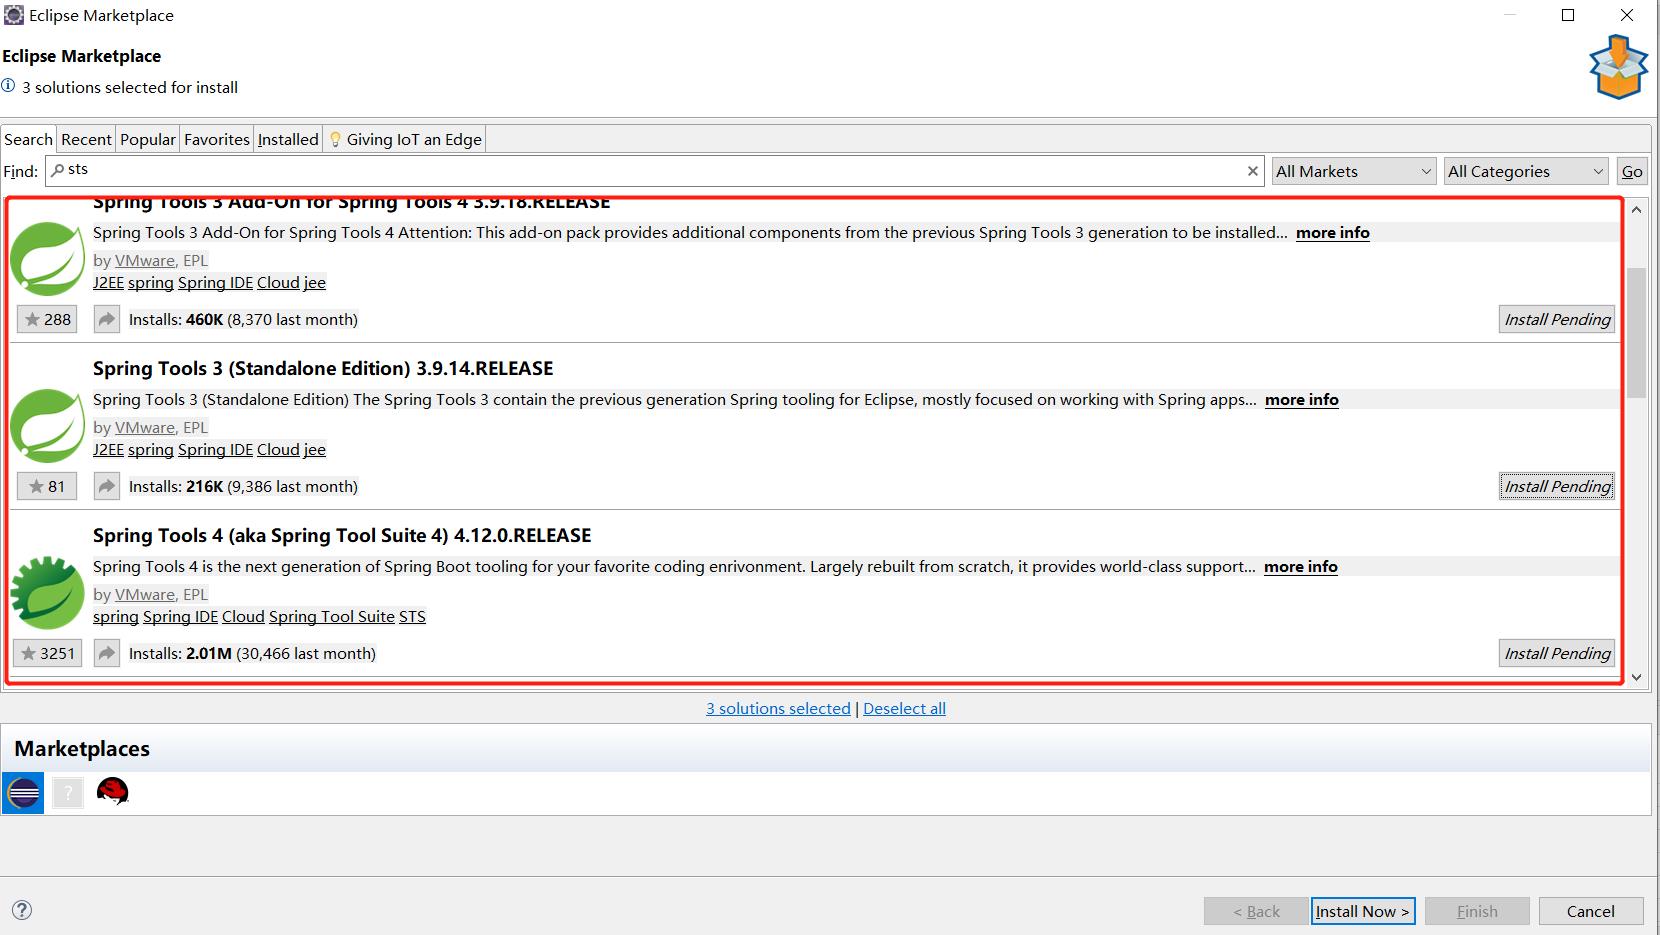
二、Spring开发环境配置
说明:不知道需要哪个,所以都安装了
三、Spring HelloWorld(测试环境配置是否成功)
新建动态web工程
导入jar包
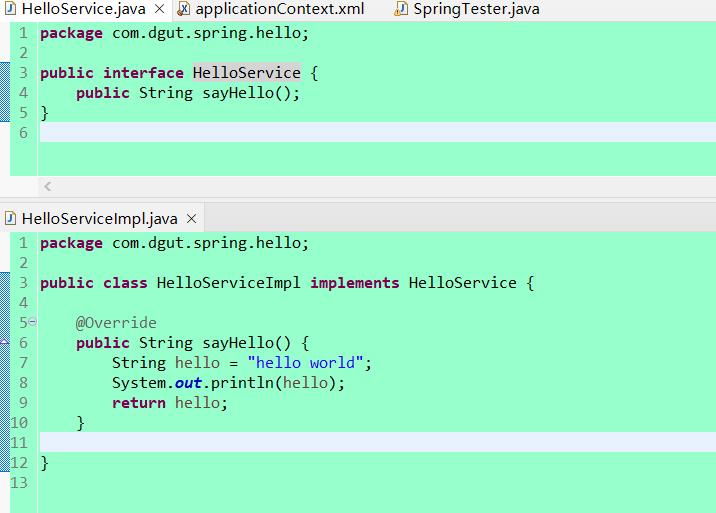
编写HelloService及HelloServiceImpl
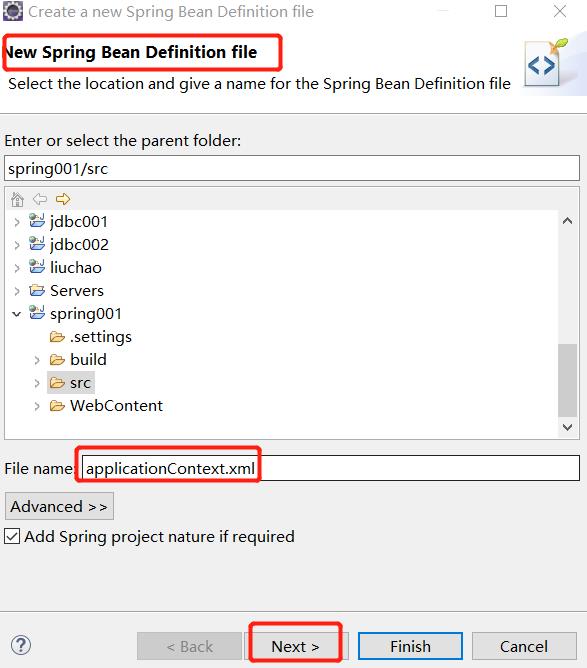
在classpath创建applicationContext.xml
配置Bean
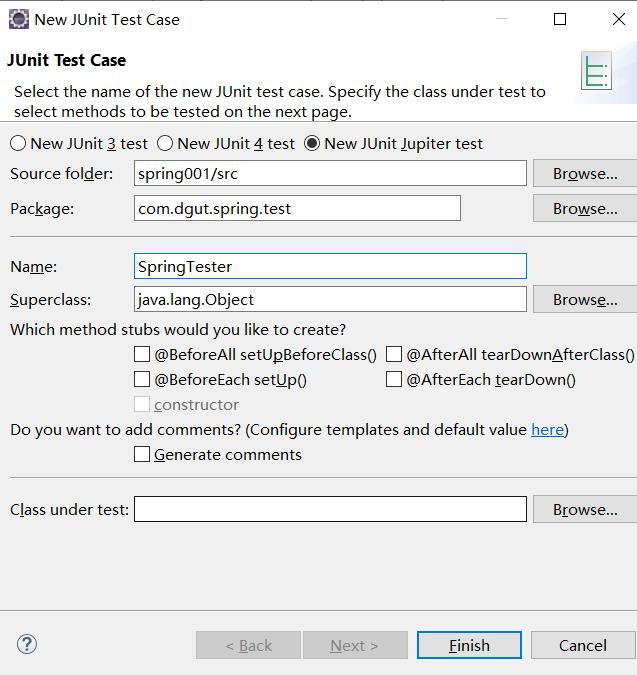
测试
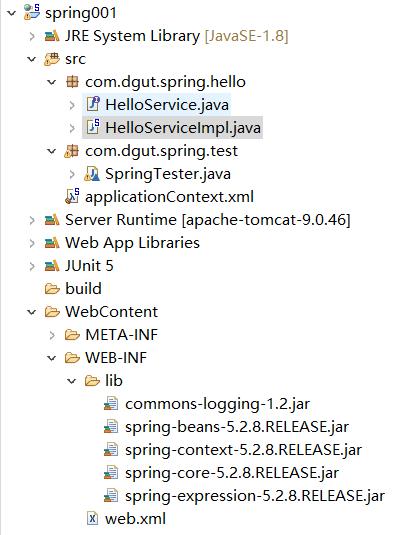
3.1、新建动态web工程,导入jar包,编写HelloService及HelloServiceImpl
3.2、在classpath(src下)创建applicationContext.xml
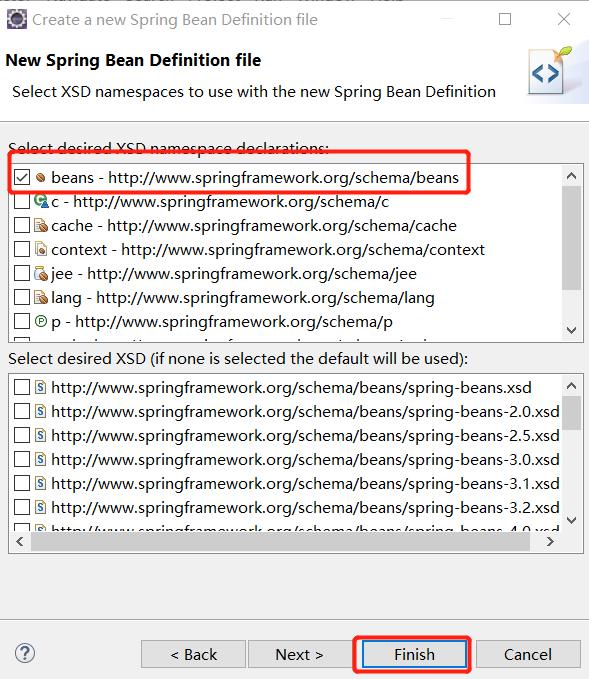
3.3、在applicationContext.xml中配置Bean
<?xml version="1.0" encoding="UTF-8"?>
<beans xmlns="http://www.springframework.org/schema/beans"
	xmlns:xsi="http://www.w3.org/2001/XMLSchema-instance"
	xsi:schemaLocation="http://www.springframework.org/schema/beans http://www.springframework.org/schema/beans/spring-beans.xsd">
	<!-- 创建com.dgut.spring.hello.HelloServiceImpl类的一个对象,id为helloImpl -->
	<bean id="helloImpl" class="com.dgut.spring.hello.HelloServiceImpl">
	</bean>
</beans>
3.4、使用junit测试
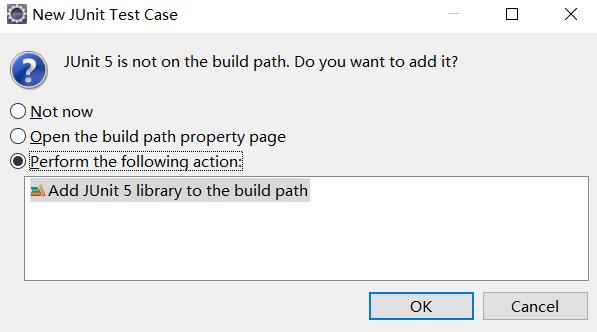
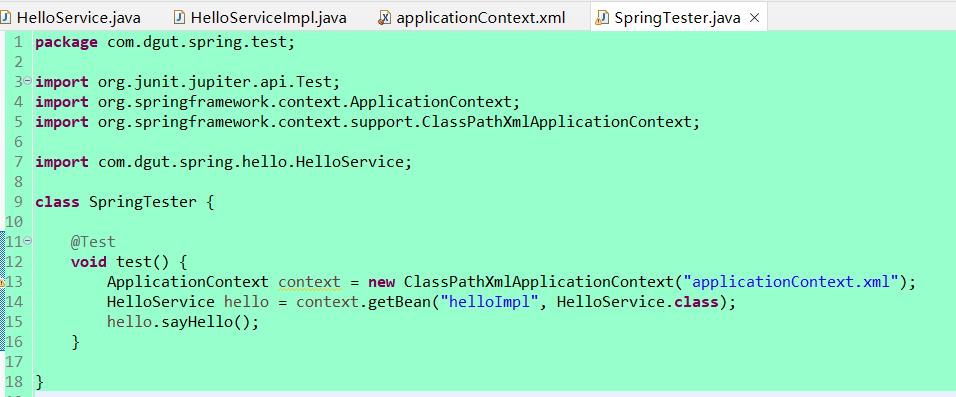
3.5、结果

四、web环境下的HelloWorld(在Spring HelloWorld(测试环境配置是否成功)的基础上)
4.1、导入jar包
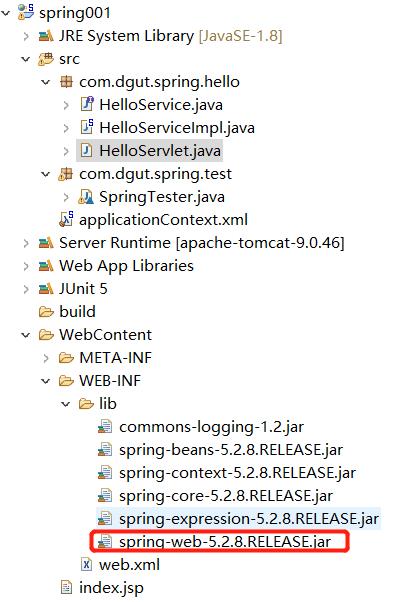
4.2、配置web.xml(ALT+/快速操作)
<?xml version="1.0" encoding="UTF-8"?>
<web-app xmlns:xsi="http://www.w3.org/2001/XMLSchema-instance" xmlns="http://xmlns.jcp.org/xml/ns/javaee" xsi:schemaLocation="http://xmlns.jcp.org/xml/ns/javaee http://xmlns.jcp.org/xml/ns/javaee/web-app_4_0.xsd" id="WebApp_ID" version="4.0">
  <display-name>spring001</display-name>
  <!-- 配置使web项目启动就去找applicationContext.xml配置文件 -->
	<context-param>
	    <param-name>contextConfigLocation</param-name>
	    <param-value>classpath:applicationContext.xml</param-value>
	</context-param>

	<!-- 监听器,tomcat服务启动的时候,自动加载spring的核心容器 -->
	<listener>
	    <listener-class>org.springframework.web.context.ContextLoaderListener</listener-class>
	</listener>

</web-app>
4.3、新建serlevt
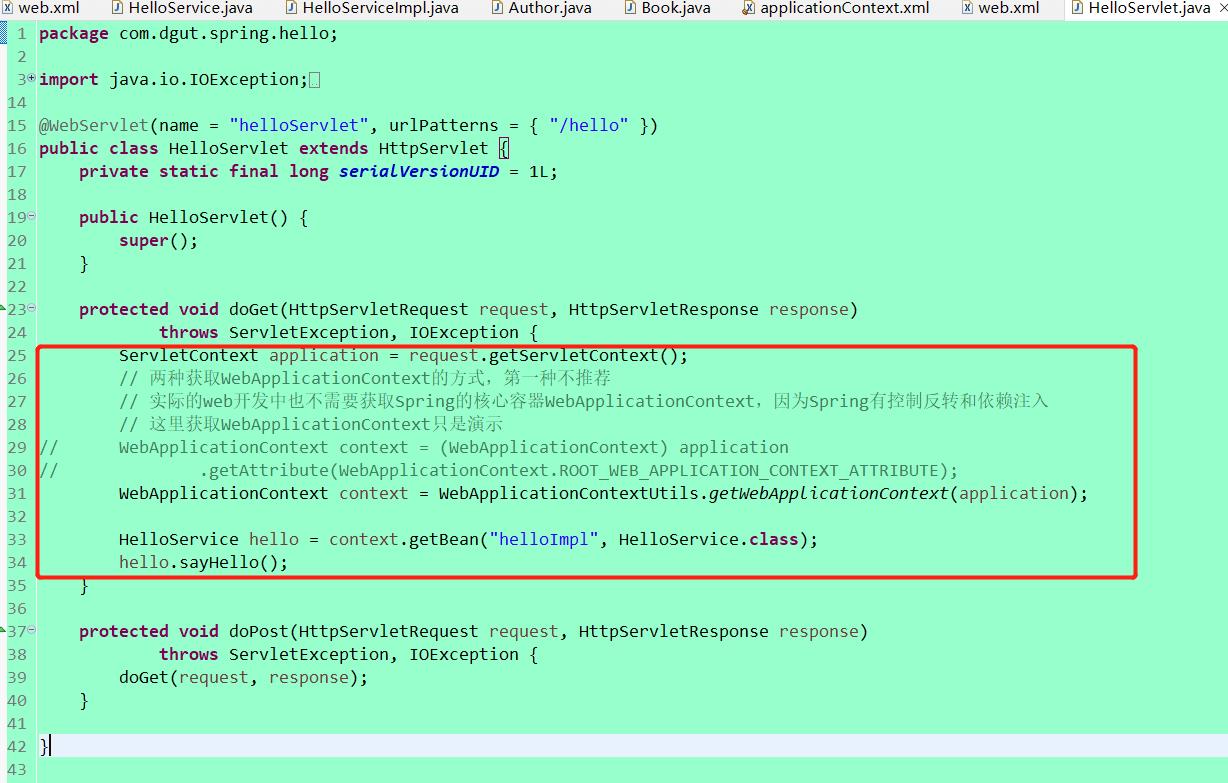
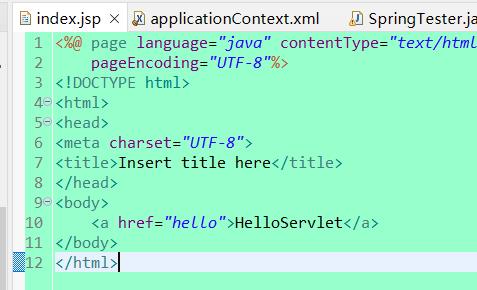
4.4、新建jsp
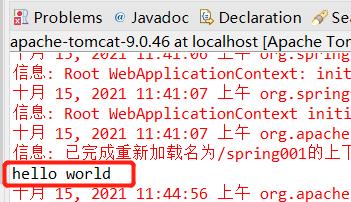
4.5、结果
五、依赖注入(以下部分未涉及web,即没有配置wen.xml ,使用的是junit测试)
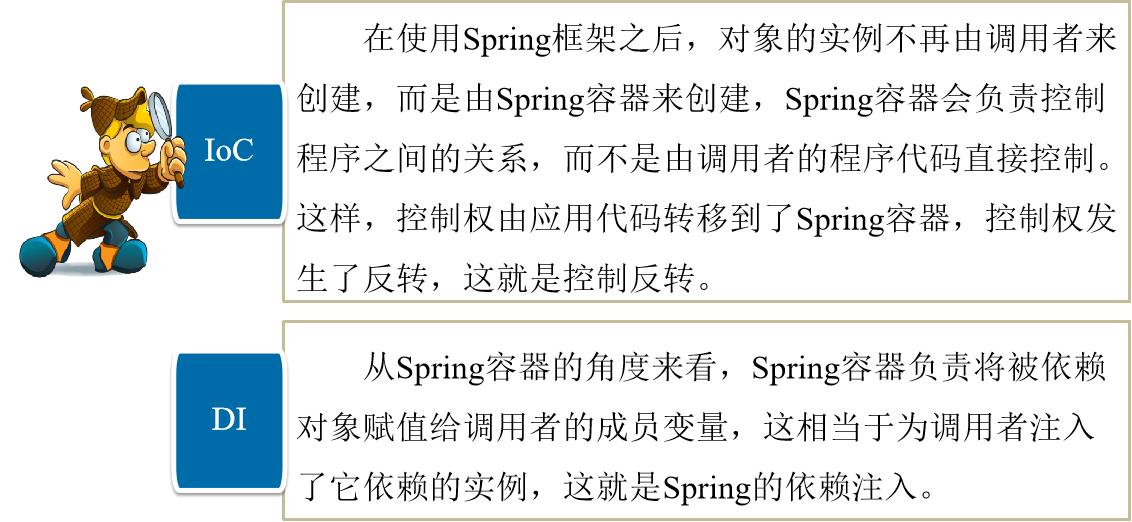
5.1、依赖注入的概念
DI的全称是Dependency Injection,中文称之为依赖注入。它与控制反转(IoC)的含义相同,只不过这两个称呼是从两个角度描述的同一个概念。
5.2、依赖注入的方式
1、在Spring中实现IoC容器的方法是依赖注入,依赖注入的作用是在使用Spring框架创建对象时,动态地将其所依赖的对象(如属性值)注入Bean组件中。Spring框架的依赖注入通常有两种实现方式:一种是构造方法注入,另一种是属性setter方法注入。
2、Bean的属性由方法决定
3、使用构造器注入时,可以用index确定参数的顺序。index从0开始。
4、Spring容器加载Bean的时机(容器创建的时候就已经加载好了)
5、使用value子标签及<![CDATA[]]>处理特殊属性值。
6、引用其他Bean及内部Bean
7、Bean的属性为集合类型:Array, List, Set, Map
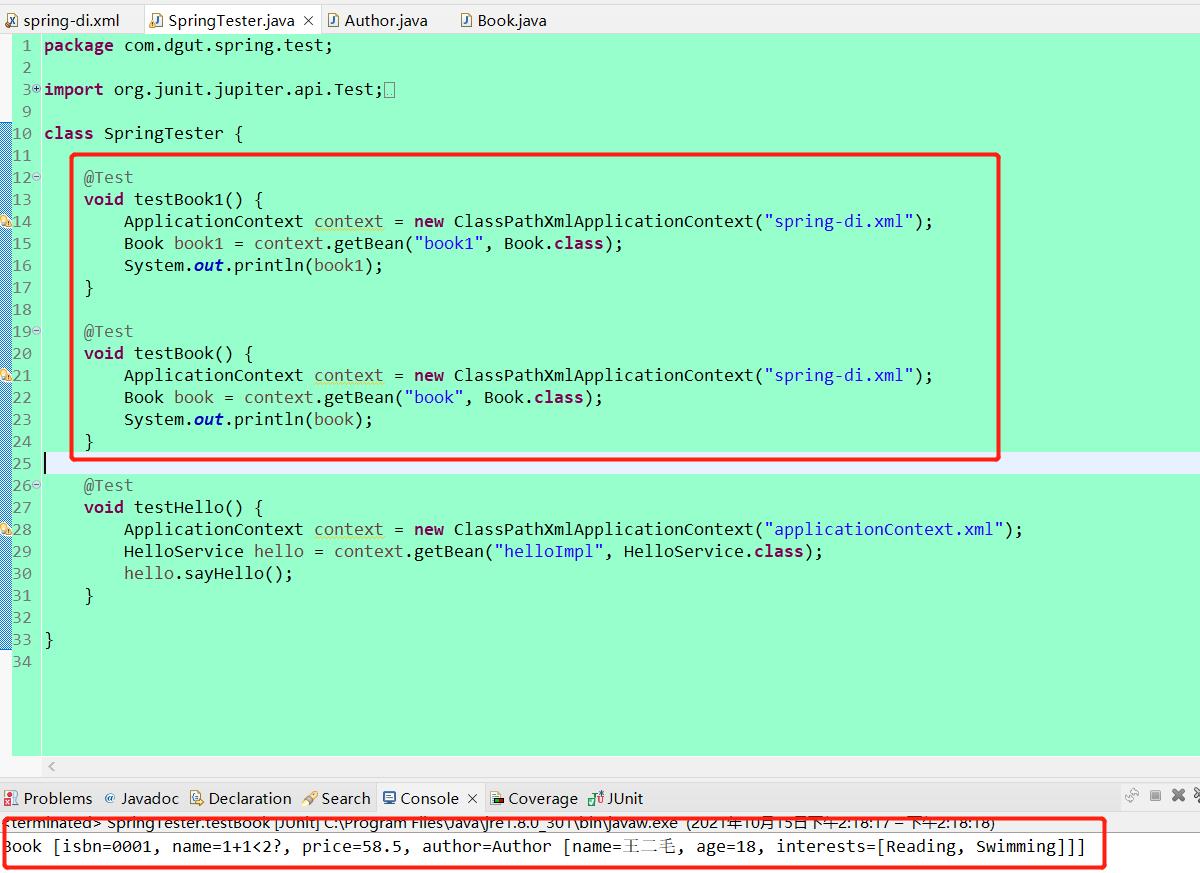
8、集合Bean
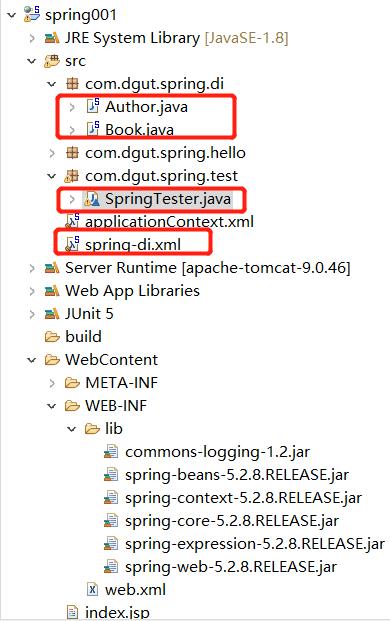
5.2.1、实例
Author.java
package com.dgut.spring.di;
import java.util.List;

public class Author {
	private String name;
	private Integer age;
	private List<String> interests;

	public List<String> getInterests() {
		return interests;
	}

	public void setInterests(List<String> interests) {
		this.interests = interests;
	}

	public Author() {
		super();
	}

	public Author(String name, Integer age, List<String> interests) {
		super();
		this.name = name;
		this.age = age;
		this.interests = interests;
	}

	public String getName() {
		return name;
	}

	public void setName(String name) {
		this.name = name;
	}

	public Integer getAge() {
		return age;
	}

	public void setAge(Integer age) {
		this.age = age;
	}

	@Override
	public String toString() {
		return "Author [name=" + name + ", age=" + age + ", interests=" + interests + "]";
	}

}
Book.java
package com.dgut.spring.di;

public class Book {
	private String isbn;// 成员变量
	private String name;
	private String price;
	private Author author;

	public Book(String isbn, String name, String price, Author author) {
		super();
		this.isbn = isbn;
		this.name = name;
		this.price = price;
		this.author = author;
	}

	public Author getAuthor() {
		return author;
	}

	public void setAuthor(Author author) {
		this.author = author;
	}

	@Override
	public String toString() {
		return "Book [isbn=" + isbn + ", name=" + name + ", price=" + price + ", author=" + author + "]";
	}

	// bean的属性由get和set方法决定,而不是成员变量名决定
	public String getIsbn() {
		return isbn;
	}

	public void setIsbn(String isbn) {
		this.isbn = isbn;
	}

	public String getName() {
		return name;
	}

	public void setName(String name) {
		this.name = name;
	}

	public String getPrice() {
		return price;
	}

	public void setPrice(String price) {
		this.price = price;
	}

	public Book() {
		super();
	}

}
spring-di.xml
<?xml version="1.0" encoding="UTF-8"?>
<beans xmlns="http://www.springframework.org/schema/beans"
	xmlns:xsi="http://www.w3.org/2001/XMLSchema-instance"
	xmlns:util="http://www.springframework.org/schema/util"
	xsi:schemaLocation="http://www.springframework.org/schema/beans http://www.springframework.org/schema/beans/spring-beans.xsd
		http://www.springframework.org/schema/util http://www.springframework.org/schema/util/spring-util-4.3.xsd">
<!--====================================================-->
	<!-- 1、用<property>标签 相当于使用setter方法注入方式,调用bean中的set方法注入属性的值 -->
	<bean id="book" class="com.dgut.spring.di.Book">
		<!-- 给bean的属性设置值 -->
		<property name="isbn" value="0001"></property>
		<property name="name">
			<!-- 5、使用value子标签处理特殊字符 -->
			<value><![CDATA[1+1<2?]]></value>
		</property>
		<property name="price" value="58.5"></property>
		<!-- 6、引用其他Bean及内部Bean ,使用ref引用下面的author资源 -->
		<property name="author" ref="author"></property>
		<!-- 使用内部类直接设置bean的属性值
		<property name="author">
			<bean class="com.dgut.spring.di.Author">
				 给bean的属性设置值
				<property name="name" value="王二毛"></property>
				<property name="age" value="18"></property>
			</bean>
		</property>-->
	</bean>
<!--====================================================-->
	<bean id="author" class="com.dgut.spring.di.Author">
		<!-- 给bean的属性设置值 -->
		<property name="name" value="王二毛"></property>
		<property name="age" value="18"></property>
		<property name="interests" ref="interestsList">
			<!-- 7、Bean的属性为集合类型:Array, List, Set, Map -->
			<!-- <list>
				<value>Reading</value>
				<value>Wrting</value>
			</list> -->
		</property>
	</bean>
<!--====================================================-->
	<!-- 8、集合Bean -->
	<util:list id="interestsList">
		<value>Reading</value>
		<value>Swimming</value>
	</util:list>
<!--====================================================-->
	<!-- 2、使用构造方法注入方式,调用bean中带参的构造器进行属性注入 -->
	<bean id="book1" class="com.dgut.spring.di.Book">
		<!-- 给bean的属性设置值,3、使用index保证和构造器的参数顺序一致 -->
		<constructor-arg value="0002" index="0"></constructor-arg>
		<constructor-arg value="58.5" index="2"></constructor-arg>
		<constructor-arg value="python" index="1"></constructor-arg>
		<constructor-arg ref="author" index="3"></constructor-arg>
	</bean>
</beans>
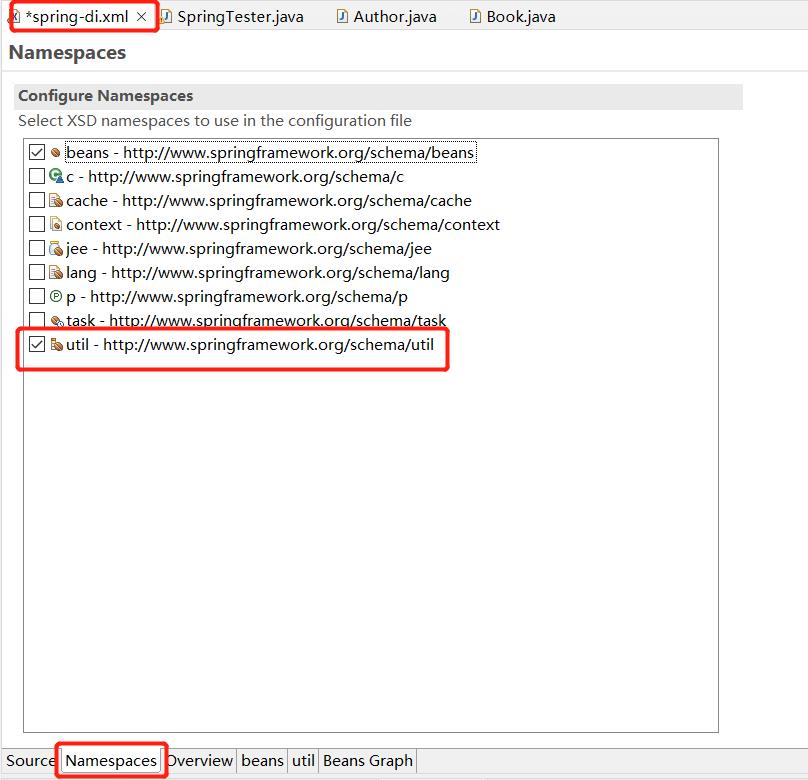
通过使用集合Bean,要引进util
六、Bean的实例化方法
在面向对象的程序中,想要使用某个对象,就需要先实例化这个对象。同样,在Spring中,要想使用容器中的Bean,也需要实例化Bean。实例化Bean有三种方式,分别为构造器实例化、静态工厂方式实例化和实例工厂方式实例化(其中最常用的是构造器实例化)。
小提示:在前面的例子中都是使用构造器实例化
注;构造器实例化实例化在前面已经介绍
6.1、静态工厂方式实例化
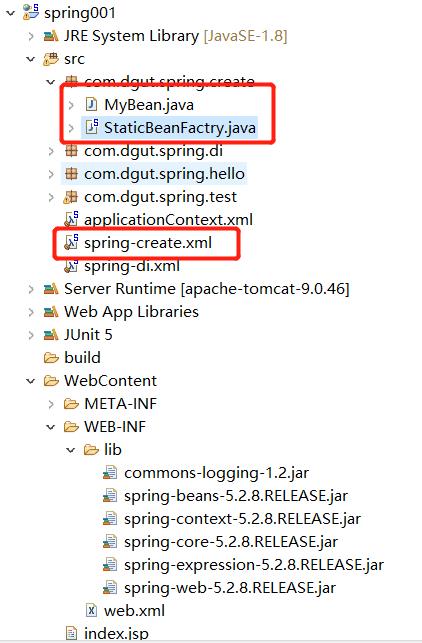
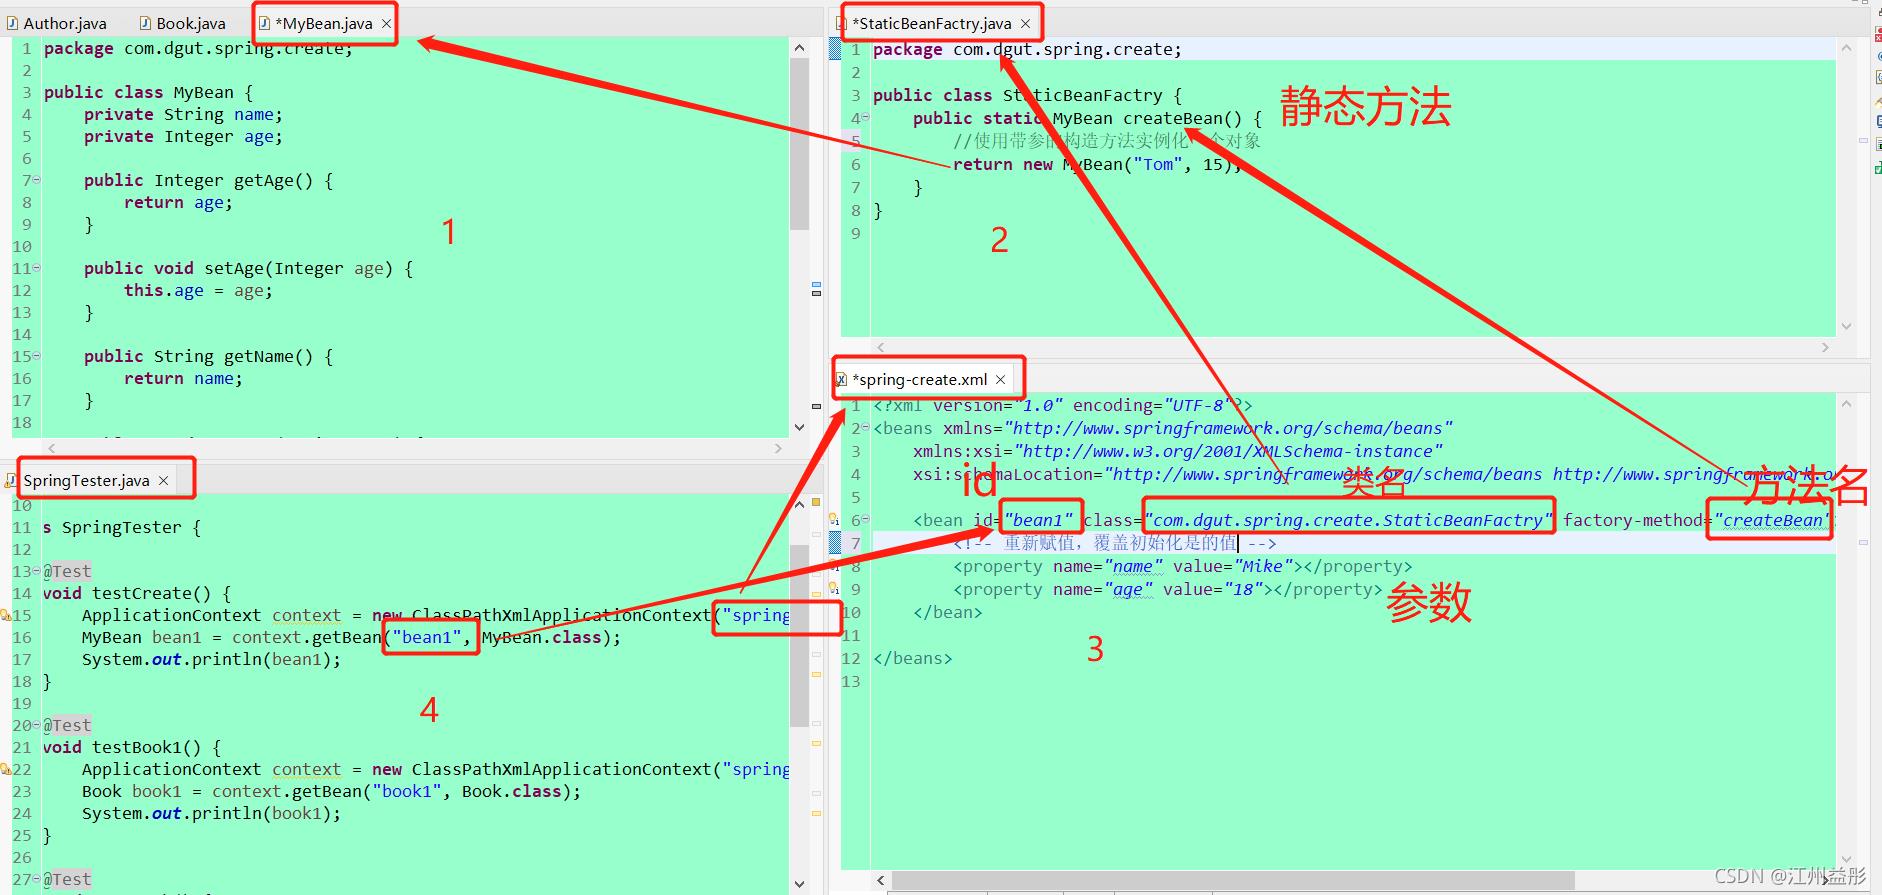
静态工厂是实例化Bean的另一种方式。该方式要求自己创建一个静态工厂的方法来创建Bean的实例。

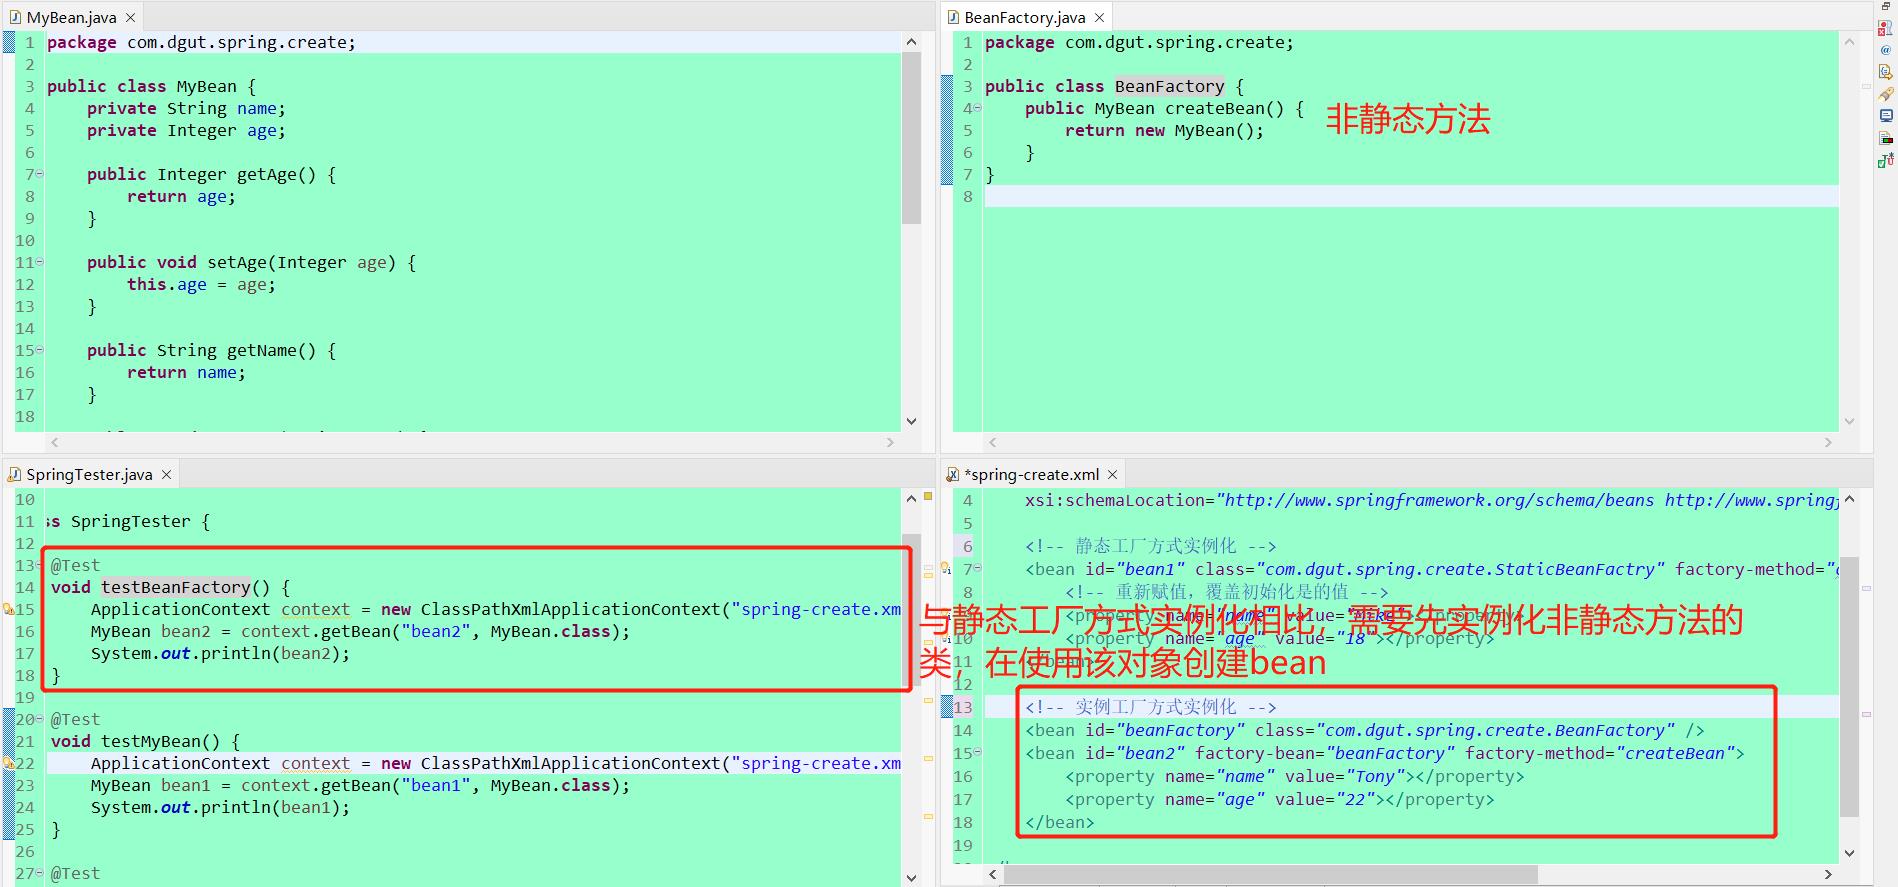
6.2、实例工厂方式实例化
实例工厂是采用直接创建Bean实例的方式,在配置文件中,通过factory-bean属性配置一个实例工厂,然后使用factory-method属性确定使用工厂中的哪个方法。接下来演示实例工厂实例化的使用:

七、Bean的作用域
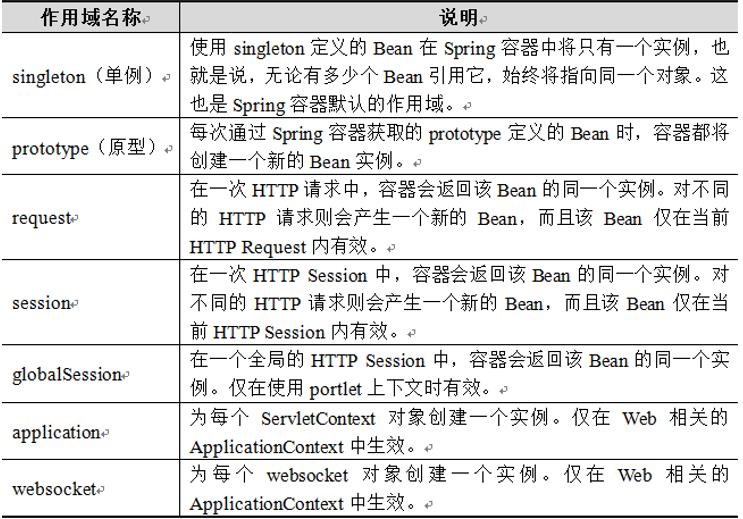
注意:在上表7种作用域中,singleton和prototype是最常用的两种作用域。
7.1、singleton作用域
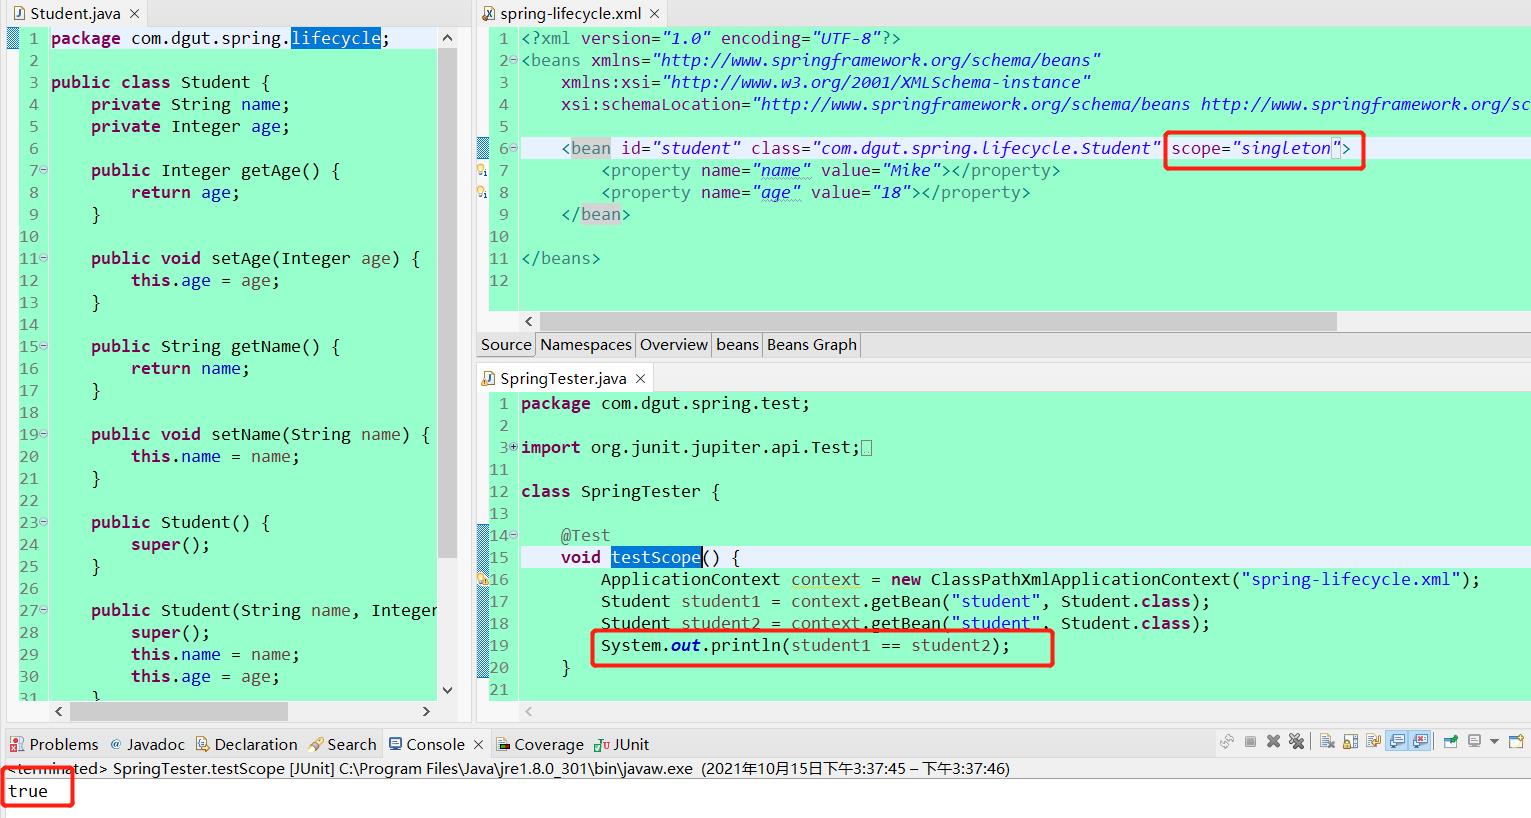
singleton是Spring容器默认的作用域,当Bean的作用域为singleton时,Spring容器就只会存在一个共享的Bean实例。singleton作用域对于无会话状态的Bean(如Dao 组件、Service组件)来说,是最理想的选择。
在Spring配置文件中,可以使用<bean>元素的scope属性,将Bean的作用域定义成singleton。
<bean id="scope" class="com.itheima.scope.Scope" scope="singleton"/>
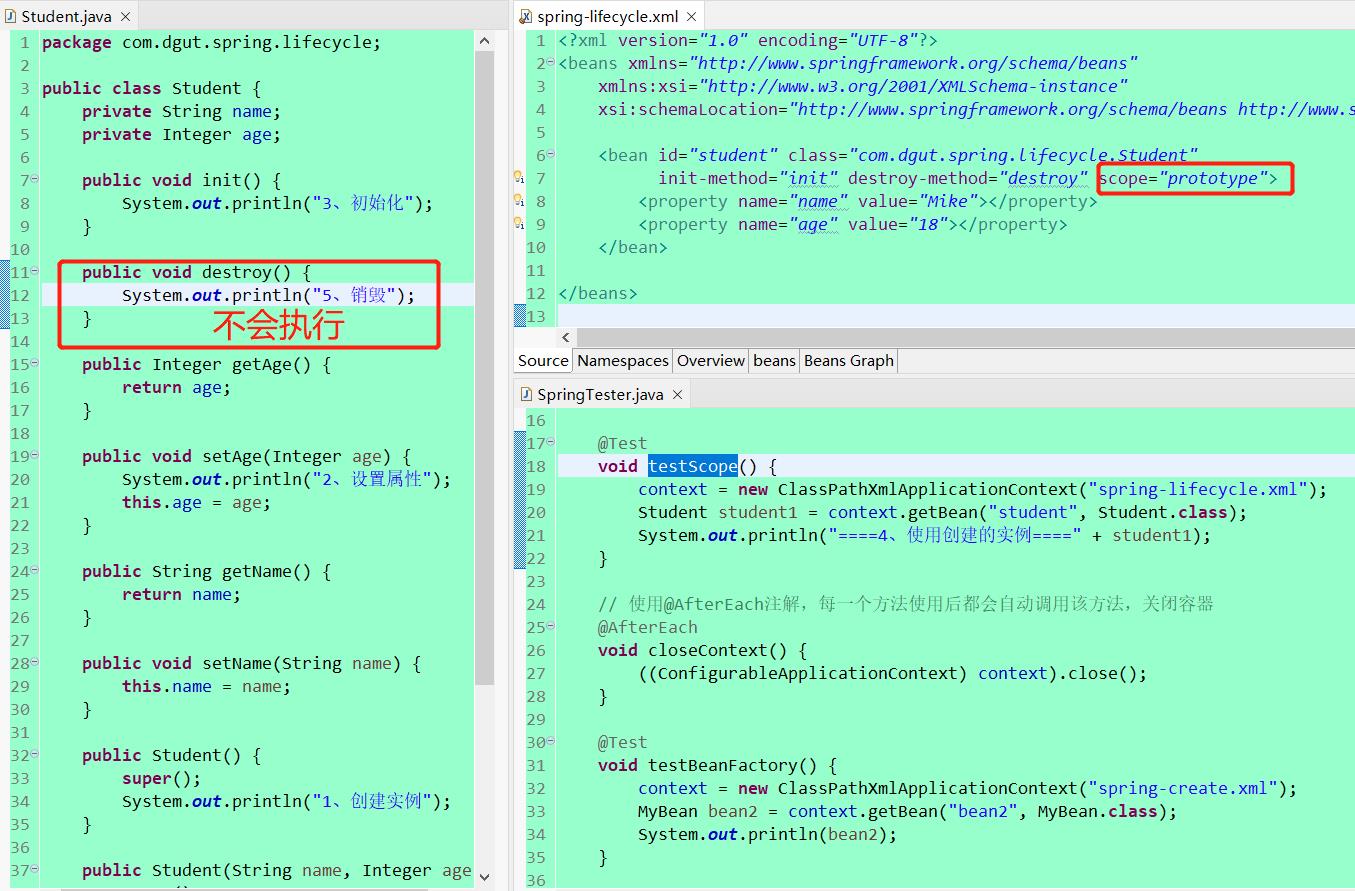
7.2、prototype作用域
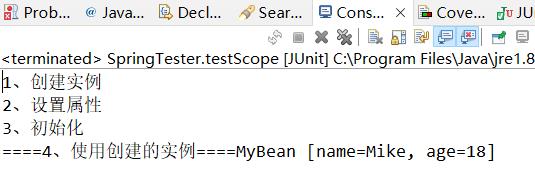
对需要保持会话状态的Bean(如Struts 2的Action类)应该使用prototype作用域。在使用prototype作用域时,Spring容器会为每个对该Bean的请求都创建一个新的实例。
在Spring配置文件中,同样使用<bean>元素的scope属性,将Bean的作用域定义成prototype 。
<bean id="scope" class="com.itheima.scope.Scope" scope=" prototype "/>
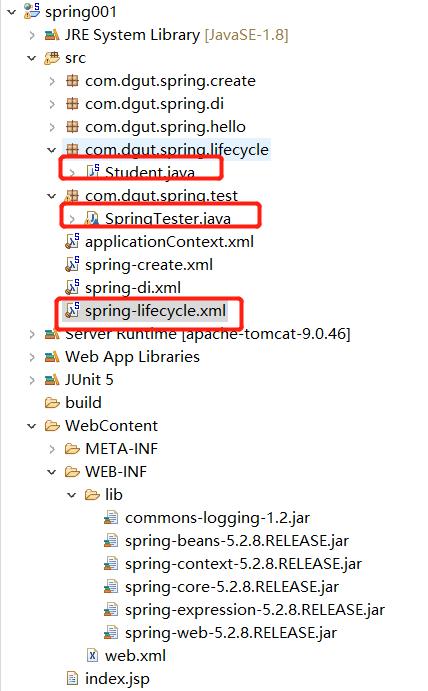
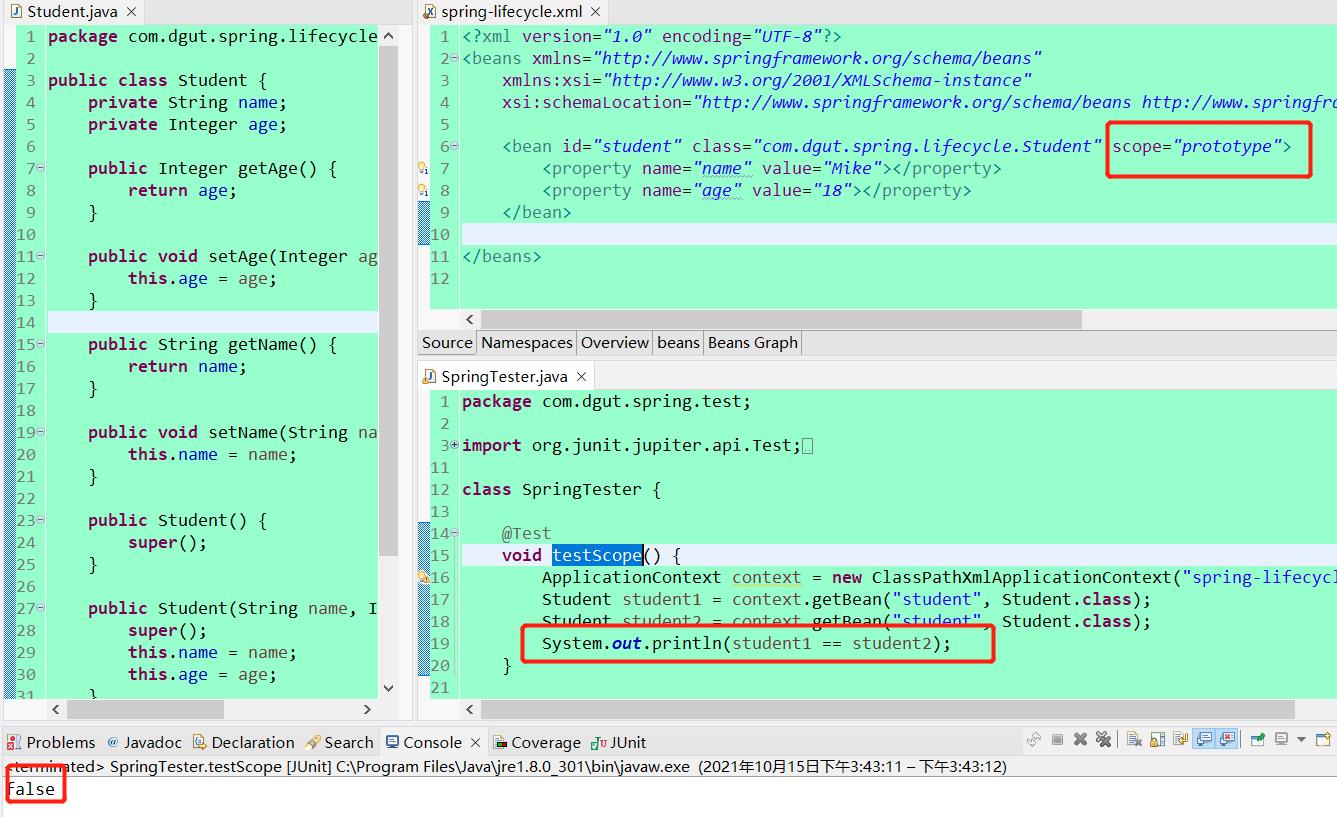
八、Bean的生命周期
了解Spring中Bean的生命周期的意义就在于,可以利用Bean在其存活期间的特定时刻完成一些相关操作。这种时刻可能有很多,但一般情况下,常会在Bean的初始化和销毁执行一些相关操作。
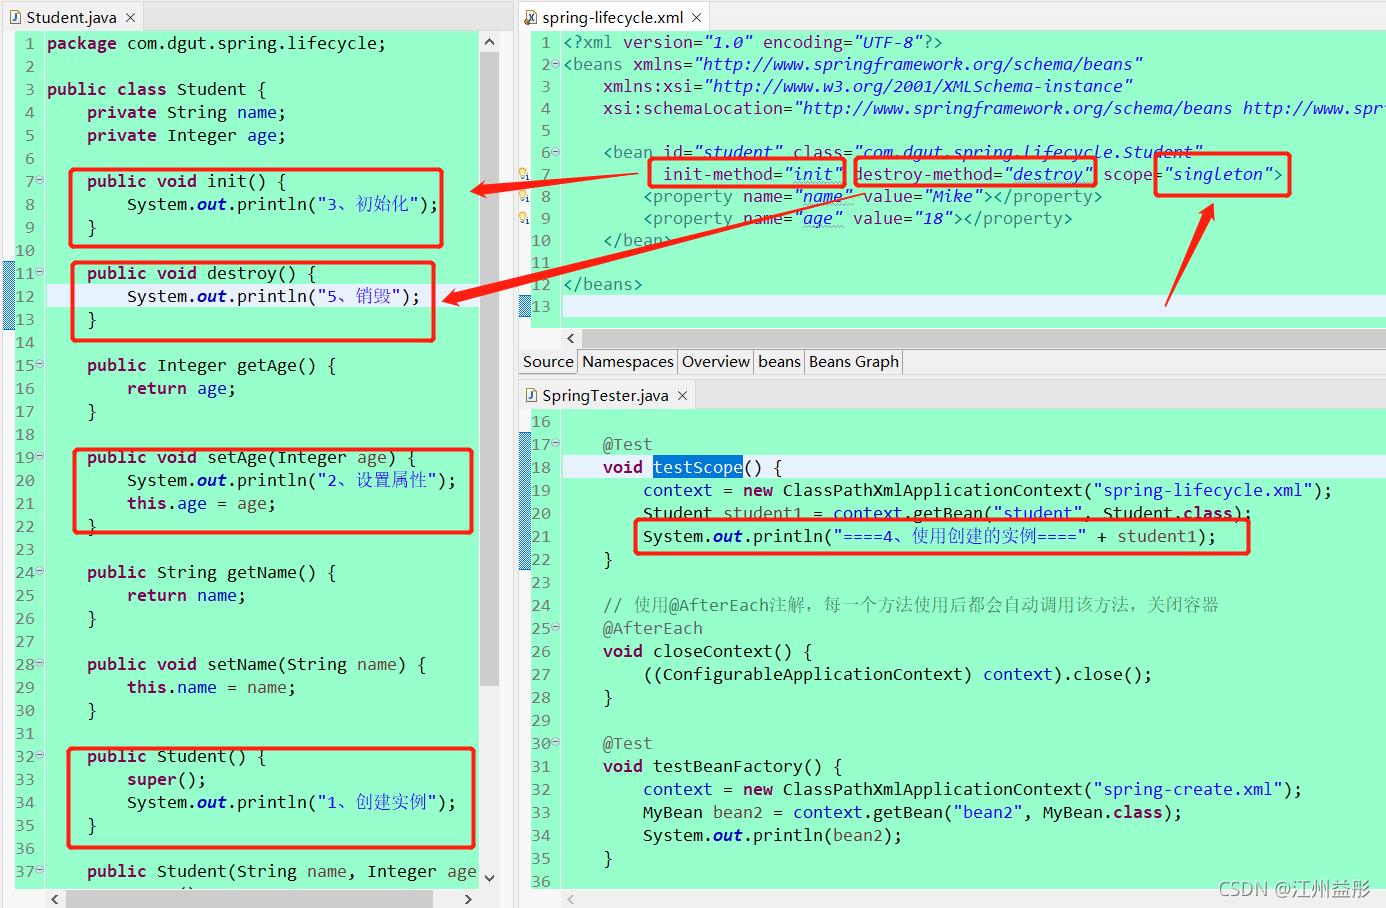
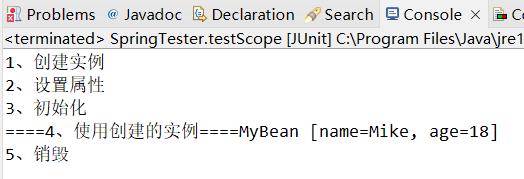
8.1、Spring IOC容器对bean的生命周期进行管理的过程:
① 通过构造器或工厂方法创建bean实例
② 为bean的属性设置值和对其他bean的引用
③ 调用bean的初始化方法
④ bean可以使用了
⑤ 当容器关闭时,调用bean的销毁方法
8.2、Bean的生命周期管理
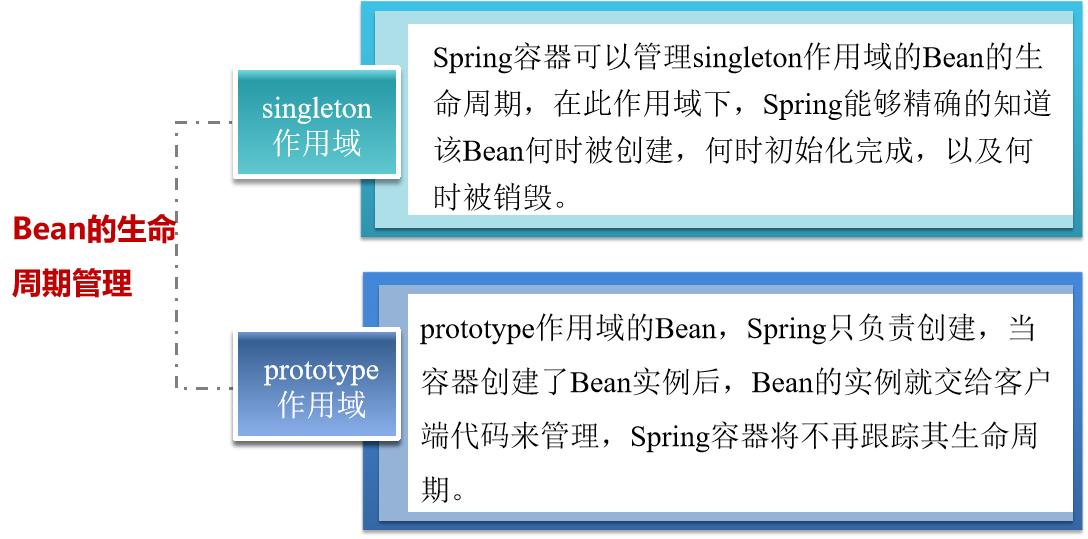
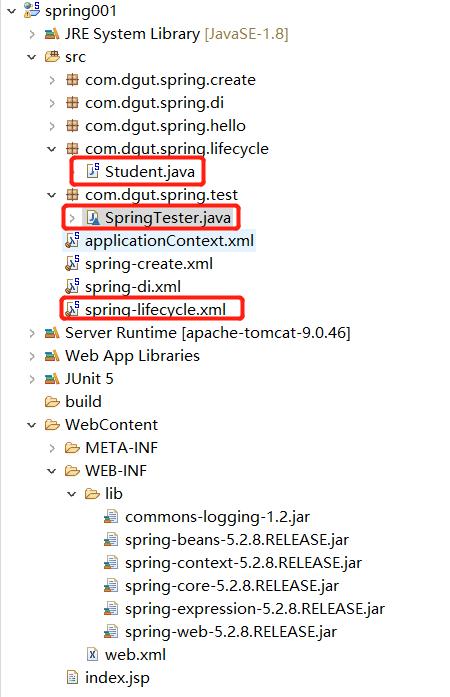
8.3、singleton作用域
8.4、prototype作用域
九、Bean的装配方式
Bean的装配可以理解为依赖关系注入,Bean的装配方式即Bean依赖注入的方式。Spring容器支持多种形式的Bean的装配方式,如
1、手动装配和2、自动装配;3、基于XML的装配和4、基于注解(Annotation)的装配。
9.1、手动装配
以value或ref的方式明确指定属性值都是手动装配
9.2、自动装配
根据指定的装配规则,不需要明确指定,Spring自动将匹配的属性值注入bean中。
注意:自动装配只能装配引用类型(ref方式)
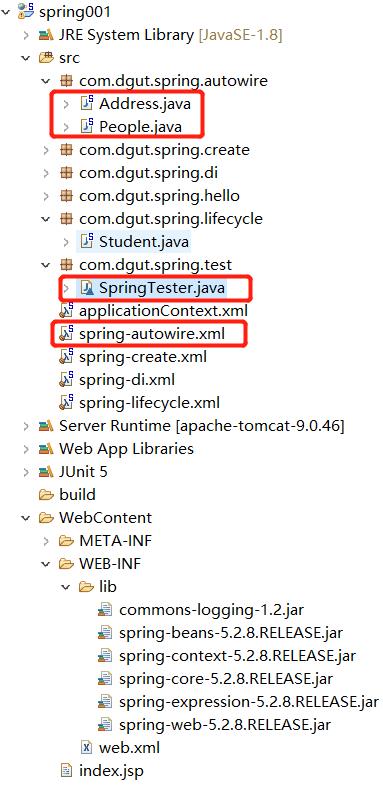
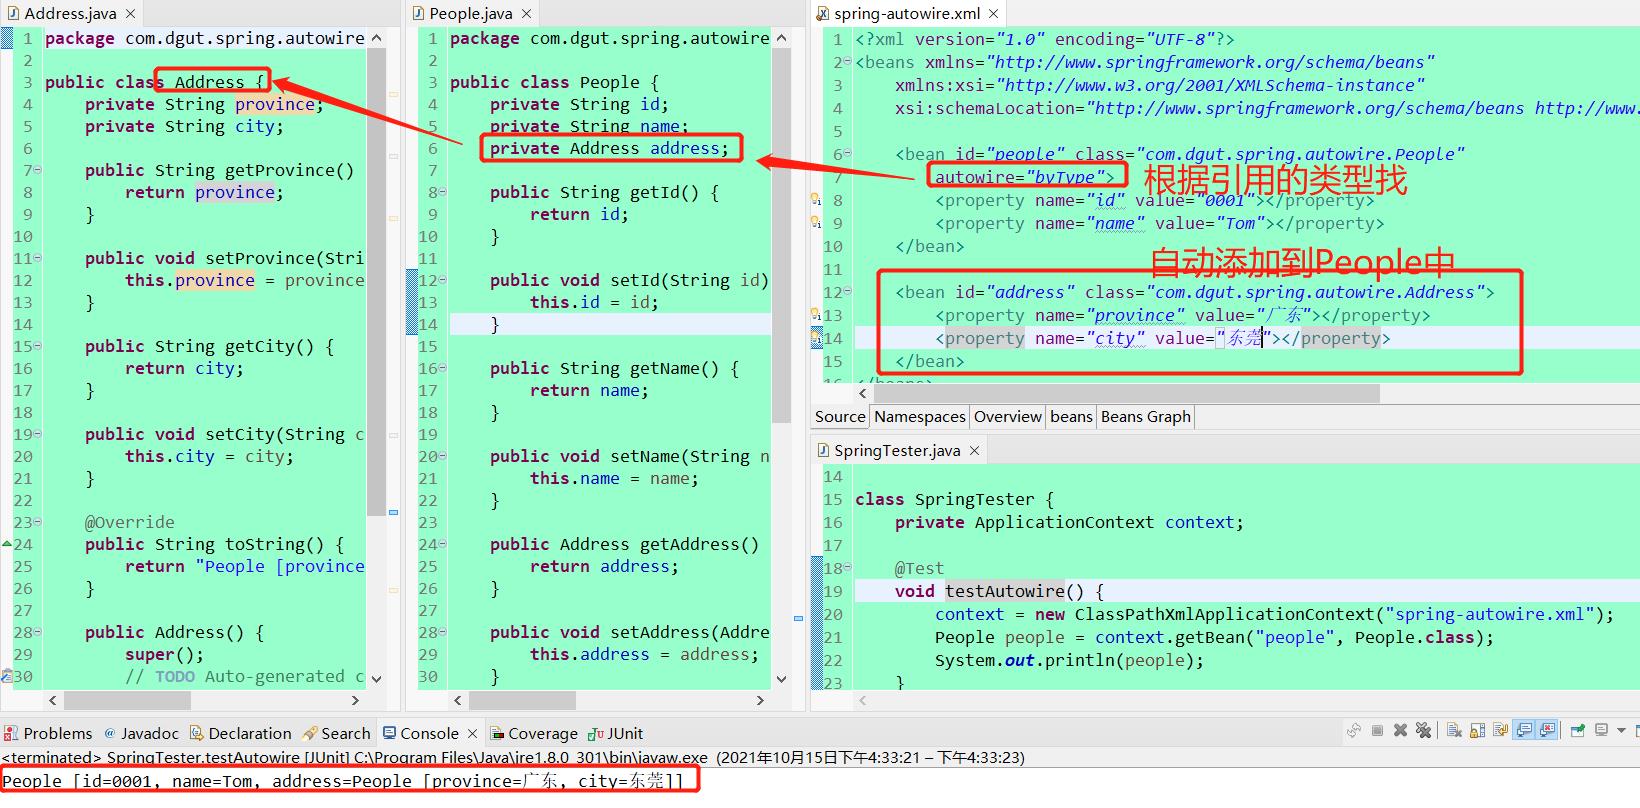
1、根据类型自动装配:将类型匹配的bean作为属性注入到另一个bean中。
——若IOC容器中有多个与目标bean类型一致的bean,Spring将无法判定哪个bean最合适该属性,所以不能执行自动装配
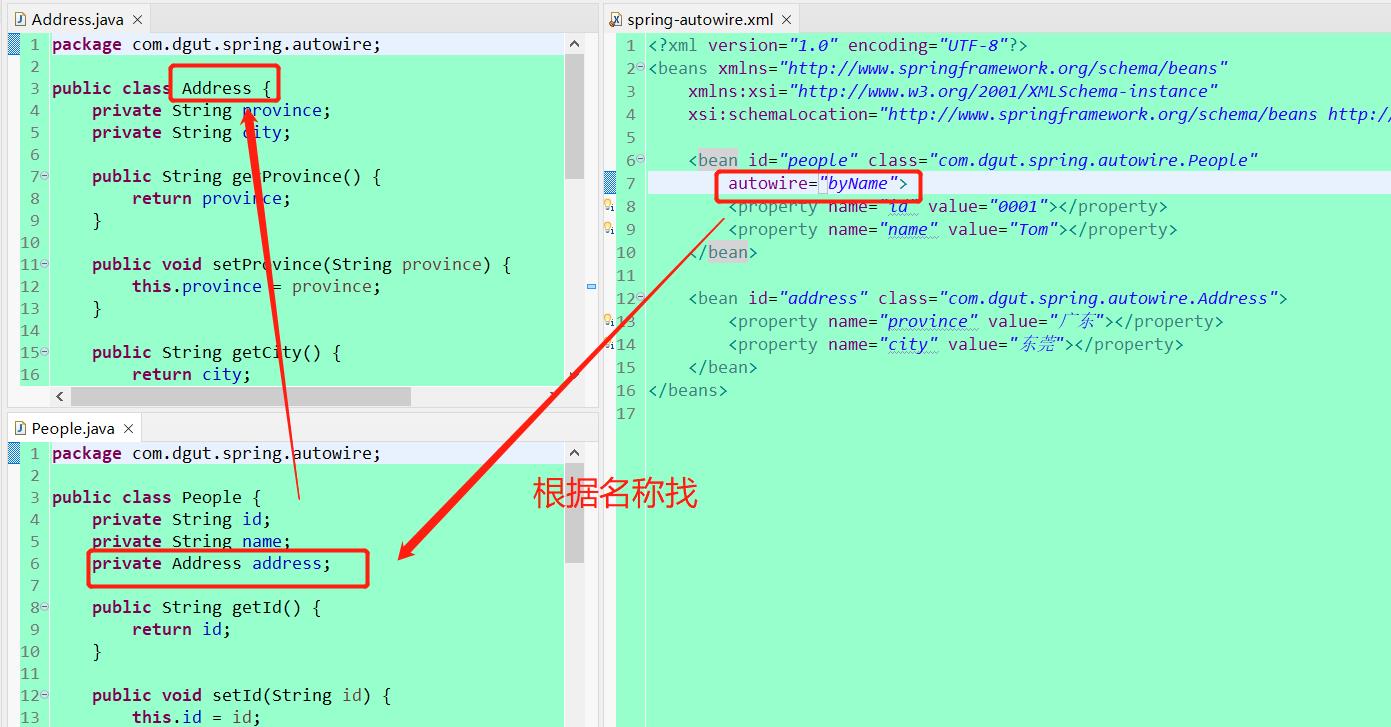
2、根据名称自动装配:必须将目标bean的名称和属性名设置的完全相同。
9.2.1、基于XML的自动装配
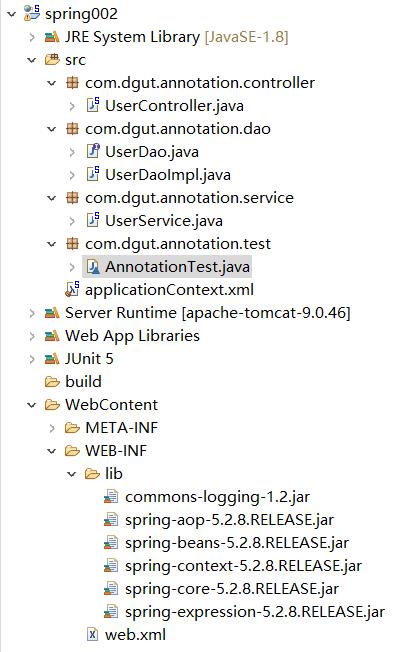
9.2.2、基于注解(Annotation)的装配
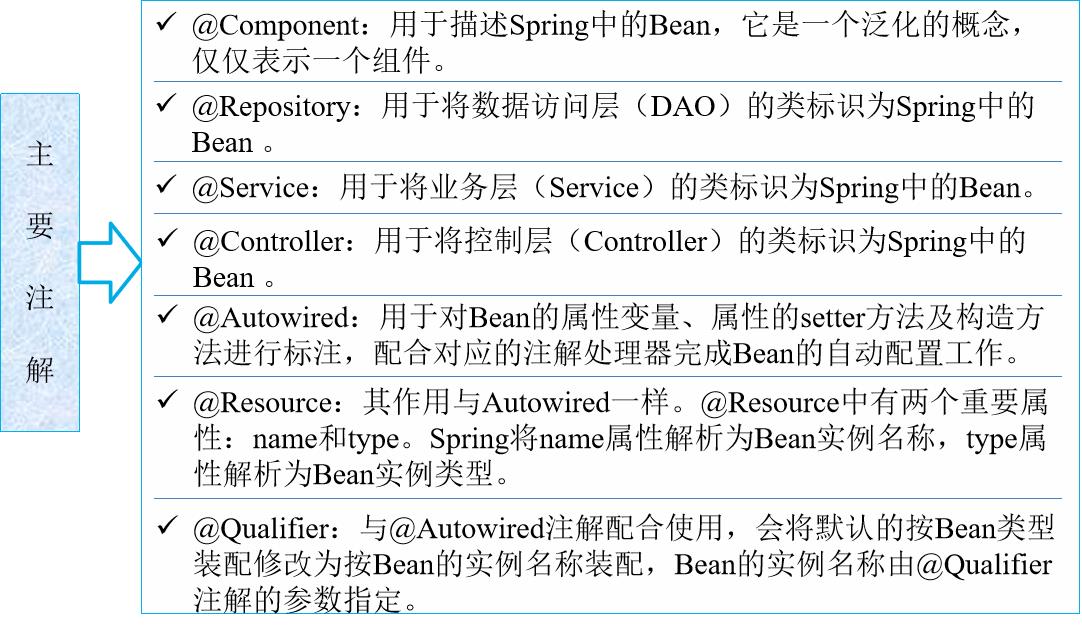
基于XML的装配可能会导致XML配置文件过于臃肿,给后续的维护和升级带来一定的困难。为此,Spring提供了对Annotation(注解)技术的全面支持。
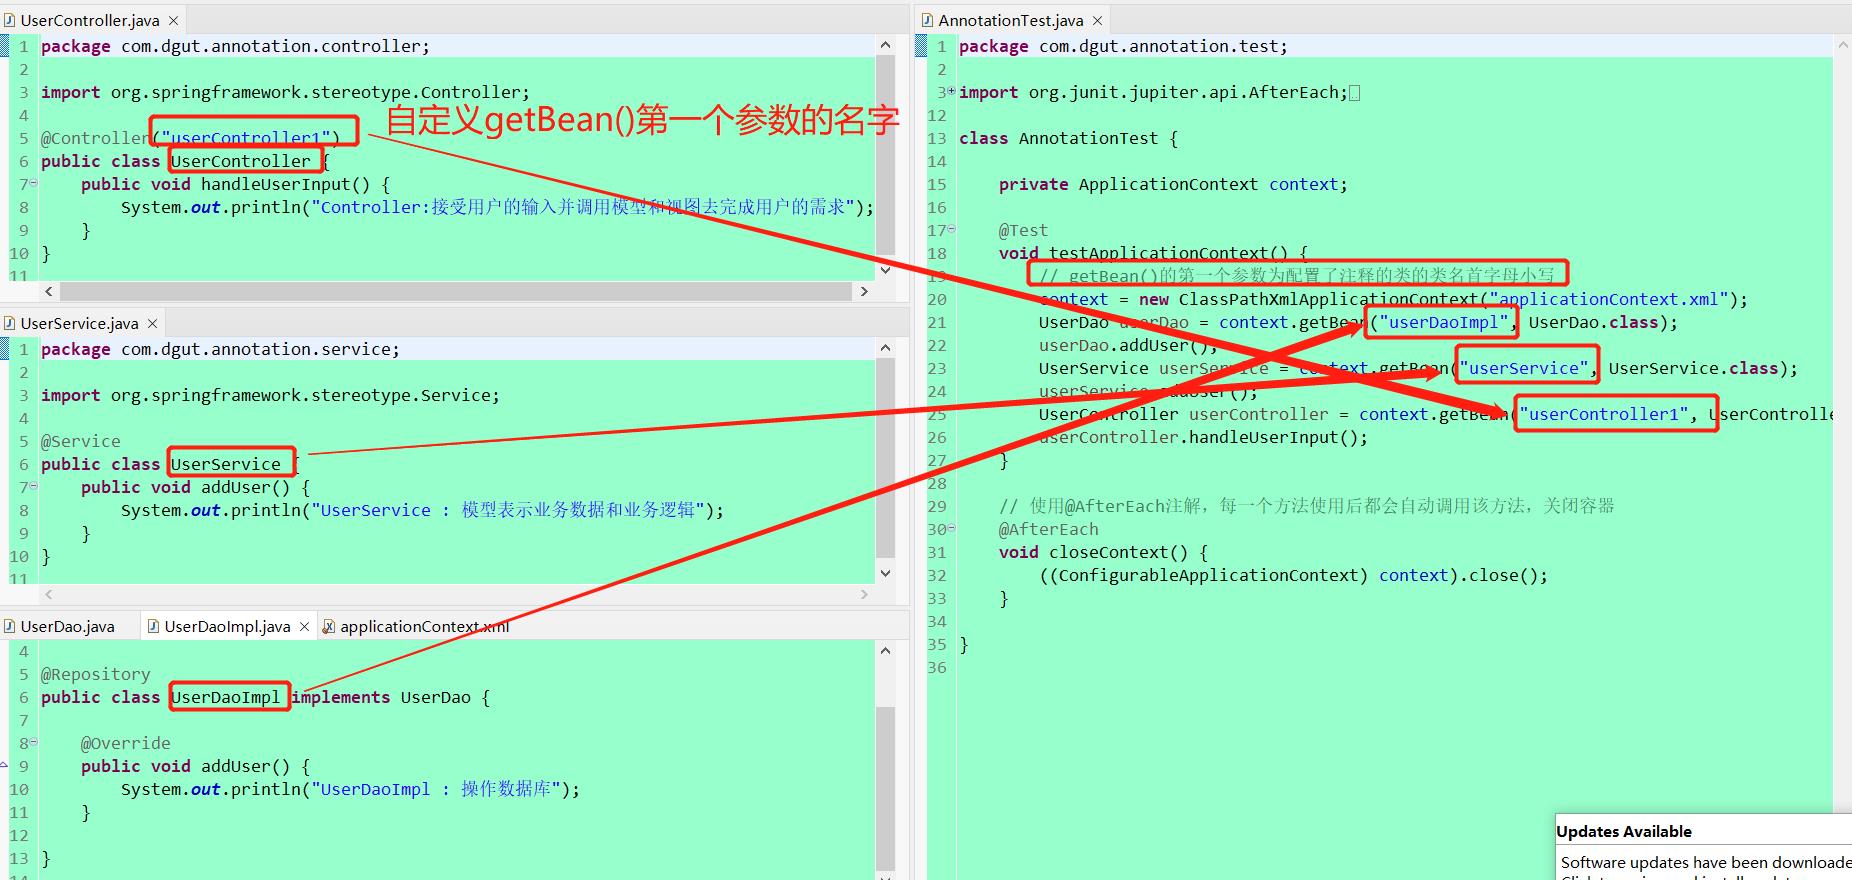
组件命名规则
默认情况:使用组件的简单类名首字母小写后得到的字符串作为bean的id
使用组件注解的value属性指定bean的id
Spring并没有能力识别一个组件到底是不是它所标记的类型,即使将@Respository注解用在一个表述层控制器组件上面也不会产生任何错误,所以@Respository、@Service、@Controller这几个注解仅仅是为了让开发人员自己明确当前的组件扮演的角色。
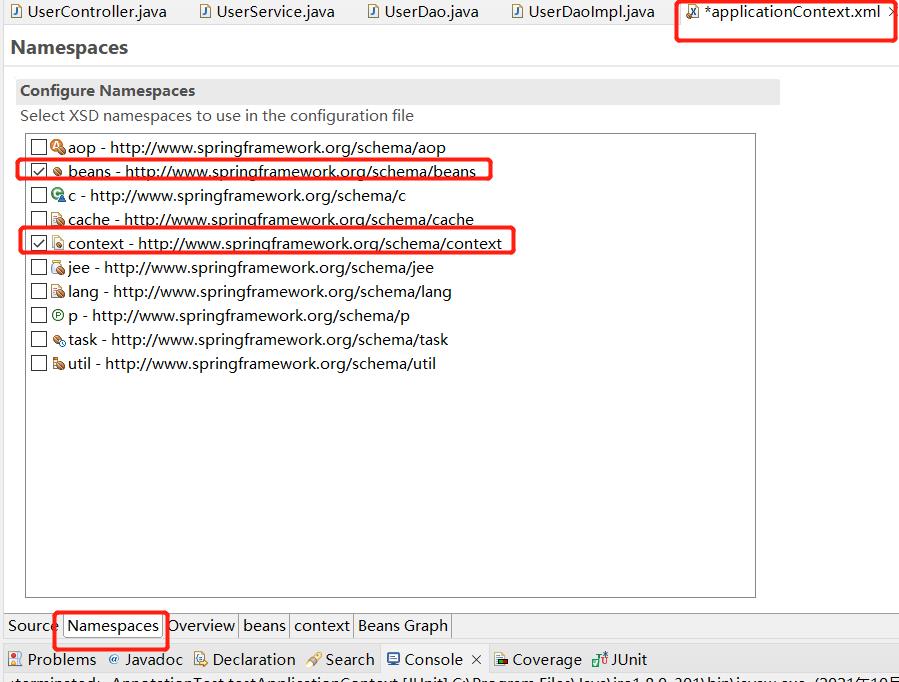
组件被上述注解标识后还需要通过Spring进行扫描才能够侦测到。
包含与排除
<context:exclude-filter>子节点表示要排除在外的目标类
<context:include-filter>子节点表示要包含的目标类
需要与use-default-filters属性配合使用才能够达到效果
<?xml version="1.0" encoding="UTF-8"?>
<beans xmlns="http://www.springframework.org/schema/beans"
	xmlns:xsi="http://www.w3.org/2001/XMLSchema-instance"
	xmlns:context="http://www.springframework.org/schema/context"
	xsi:schemaLocation="http://www.springframework.org/schema/beans http://www.springframework.org/schema/beans/spring-beans.xsd
		http://www.springframework.org/schema/context http://www.springframework.org/schema/context/spring-context-4.3.xsd">

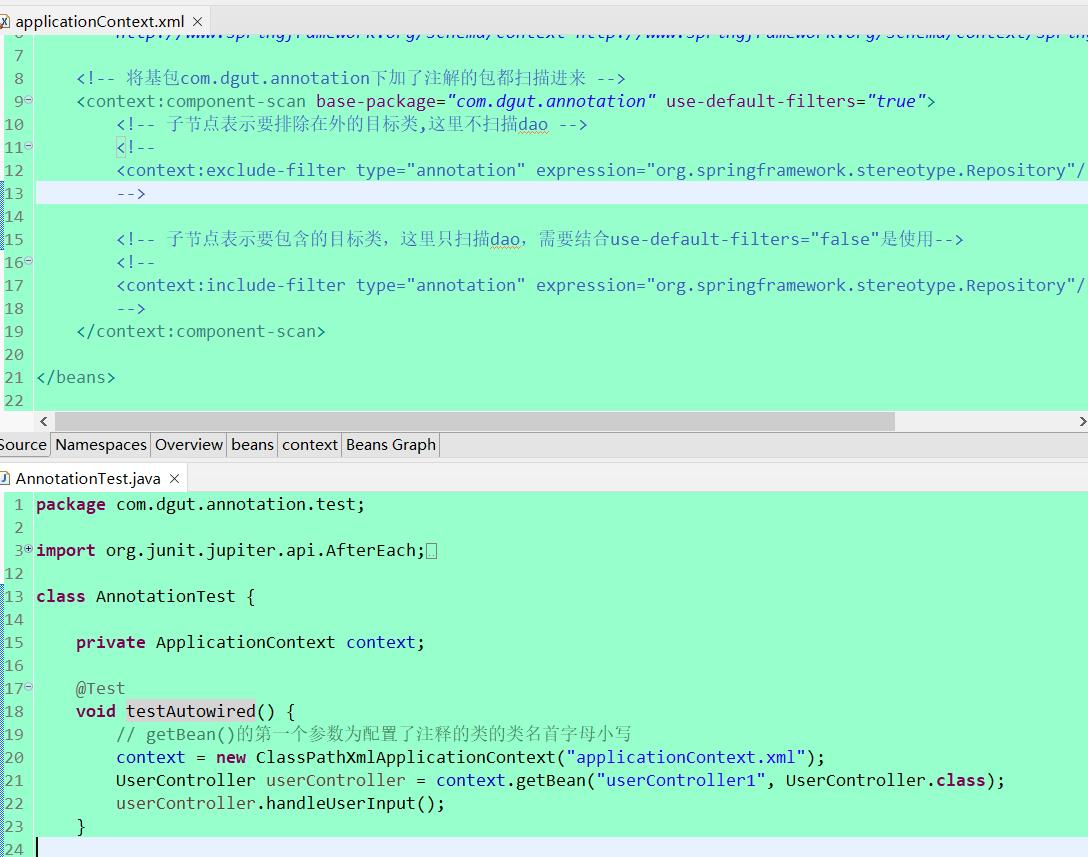
	<!-- 将基包com.dgut.annotation下加了注解的包都扫描进来 -->
	<context:component-scan base-package="com.dgut.annotation" use-default-filters="true">
		<!-- 子节点表示要排除在外的目标类,这里不扫描dao -->
		<!--
		<context:exclude-filter type="annotation" expression="org.springframework.stereotype.Repository"/>
		-->

		<!-- 子节点表示要包含的目标类,这里只扫描dao,需要结合use-default-filters="false"是使用-->
		<!--
		<context:include-filter type="annotation" expression="org.springframework.stereotype.Repository"/>
		-->
	</context:component-scan>

</beans>

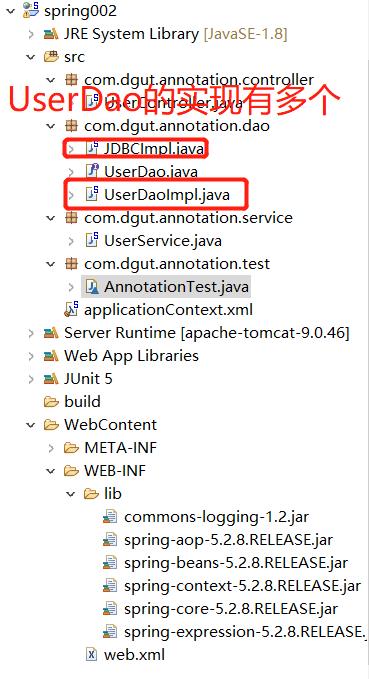
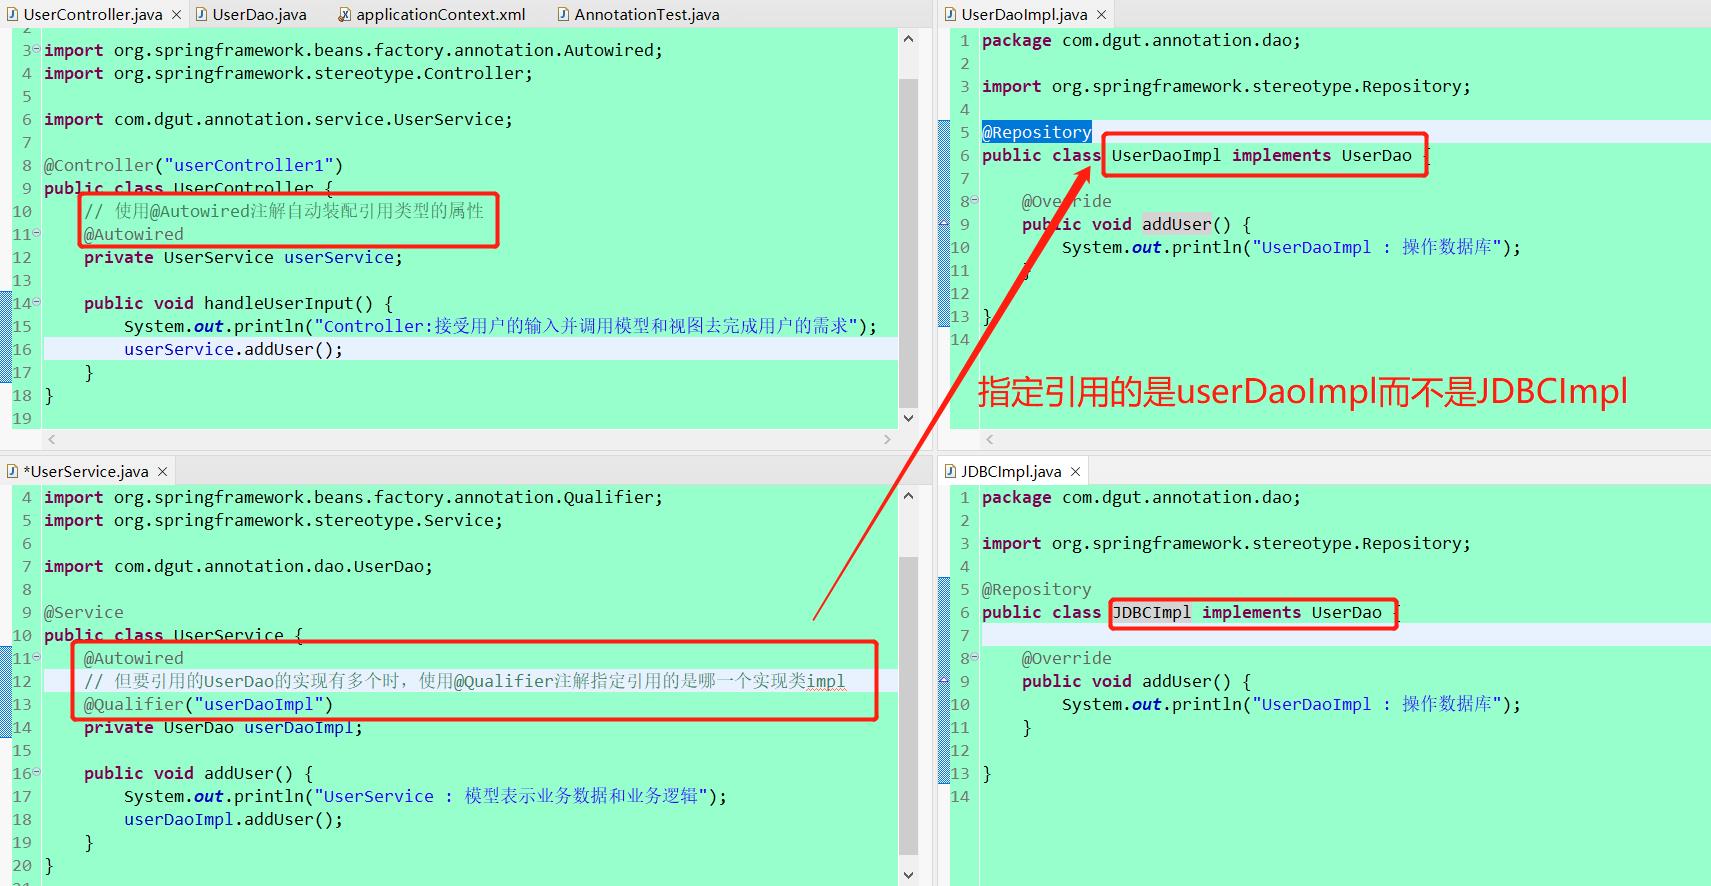
@Autowire工作机制:
首先使用byType的方式自动装配,如果唯一匹配则装配成功;
如果匹配到多个兼容的Bean,再根据byName的方式进行唯一性确定,如果唯一确定则装配成功;
否则装配失败
@Qualifiter可以辅助@Autowire确定需要装配的Bean的id
