springboot自定义starter-《Springboot编程思想》
Posted Fire king
tags:
篇首语:本文由小常识网(cha138.com)小编为大家整理,主要介绍了springboot自定义starter-《Springboot编程思想》相关的知识,希望对你有一定的参考价值。
很多时候,我们希望将一些功能封装到一个工具类里面保证代码的可重用,这时候就会写很多很多的工具类,我们不妨把这写生成一个依赖,需要使用的时候直接引入不香吗?因此《Springboot编程思想》实现了这个操作,原书中的实践流程如下:
实现步骤:
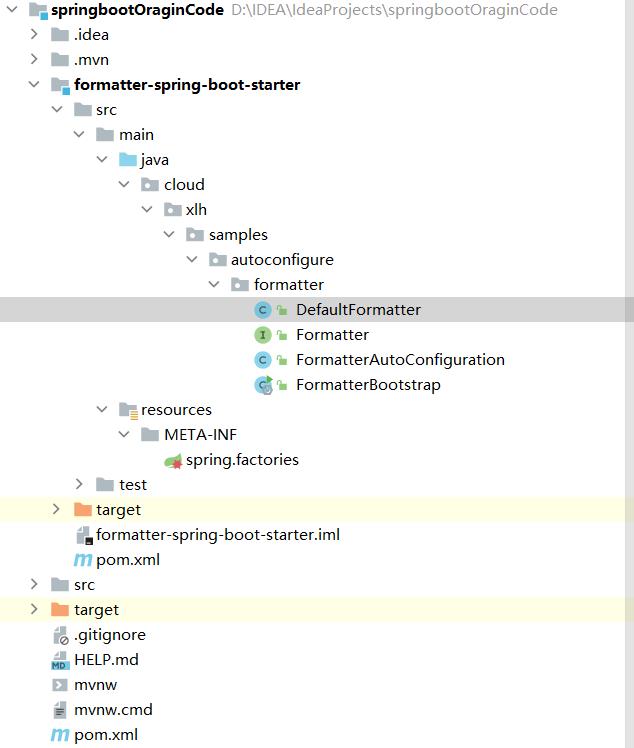
- 1.整个项目结构
- 2.新建一个springboot工程,空空的那种哟
- 3.新建一个formatter-spring-boot-starter 模块
- 4.在formatter-spring-boot-starte建包
- 5.编写formatter接口
- 6.编写实现类DefaultFormatter
- 7.编写自动配置类FormatterAutoConfiguration生成bean交给spring管理
- 8.最重要的一点,新建spring.factories文件
- 9.编写引导类FormatterBootstrap
- 10.在工程总的pom.xml加上启动器依赖
- 11.install一下formatter-spring-boot-starter
- 12.运行引导类即可
- 13.将自定义的启动器打包
- 14.安装jar包到本地仓库
1.整个项目结构

2.新建一个springboot工程,空空的那种哟
如图中的springbootOraginCode
3.新建一个formatter-spring-boot-starter 模块
如图中的formatter-spring-boot-starter,这个的名字将作为依赖的artifactId
4.在formatter-spring-boot-starte建包
前面四级不变,为基本包,后面那个包就与接口名字一样,也就是artifactId的第一个词。
5.编写formatter接口
注意包名
package cloud.xlh.samples.autoconfigure.formatter;

public interface Formatter {
    String format(Object Object);
}
6.编写实现类DefaultFormatter
package cloud.xlh.samples.autoconfigure.formatter;

public class DefaultFormatter implements Formatter {
    @Override
    public String format(Object Object) {
        return String.valueOf(Object);
    }
}
7.编写自动配置类FormatterAutoConfiguration生成bean交给spring管理
package cloud.xlh.samples.autoconfigure.formatter;

import org.springframework.context.annotation.Bean;
import org.springframework.context.annotation.Configuration;

@Configuration
public class FormatterAutoConfiguration {

    @Bean
    public Formatter defaultFormatter() {
        return new DefaultFormatter();
    }
}
8.最重要的一点,新建spring.factories文件
在类路径即resource目录下建一个META-INF目录,在此基础下建一个spring.factories文件,写上
//固定
org.springframework.boot.autoconfigure.EnableAutoConfiguration=\\
//配置类的全限定类名
cloud.xlh.samples.autoconfigure.formatter.FormatterAutoConfiguration
9.编写引导类FormatterBootstrap
package cloud.xlh.samples.autoconfigure.formatter;

import org.springframework.boot.WebApplicationType;
import org.springframework.boot.autoconfigure.EnableAutoConfiguration;
import org.springframework.boot.builder.SpringApplicationBuilder;
import org.springframework.context.ConfigurableApplicationContext;

import java.util.HashMap;

@EnableAutoConfiguration
public class FormatterBootstrap {
    public static void main(String[] args) {
        ConfigurableApplicationContext context = new SpringApplicationBuilder(FormatterBootstrap.class).web(WebApplicationType.NONE)
                .run(args);
        HashMap<String, Object> data = new HashMap<>();
        data.put("name","小马哥");
        Formatter formatter = context.getBean(Formatter.class);
        System.out.println( formatter.format(data));
        context.close();
    }
}
10.在工程总的pom.xml加上启动器依赖
 			 <dependency>
                <groupId>org.springframework.boot</groupId>
                <artifactId>spring-boot-autoconfigure</artifactId>
                <version>2.3.0.RELEASE</version>
            </dependency>
            <dependency>
                <groupId>cloud.xlu</groupId>
                <artifactId>formatter-spring-boot-starter</artifactId>
                <version>0.0.1-SNAPSHOT</version>
            </dependency>
11.install一下formatter-spring-boot-starter
12.运行引导类即可
注意:运行后要找到8080的java.exe占用端口杀掉pid,否则运行其他端口为8080的springboot项目会爆端口占用的错误,同时,每次install才能运行引导类。
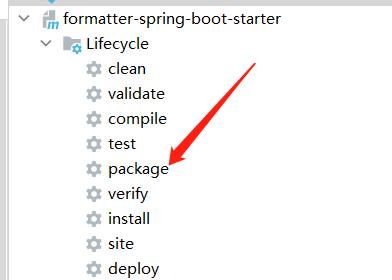
13.将自定义的启动器打包
idea右边maven侧边栏打开
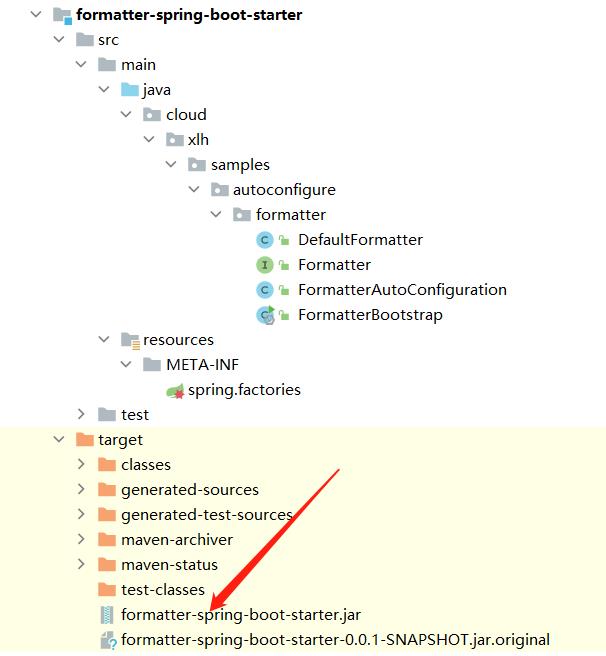
成功之后

14.安装jar包到本地仓库
找到jar目录,cmd进去,如我的
编写pom.xml文件对应的参数(groupId,artifactId、version等)
mvn install:install-file
-Dfile=jar文件所在路径(这里使用绝对路径)
-DgroupId=包名
-DartifactId=项目名
-Dversion=版本号
-Dpackaging=jar
command:
D:\\IDEA\\IdeaProjects\\springbootOraginCode\\formatter-spring-boot-starter\\target>mvn install:install-file -Dfile=formatter-spring-boot-starter.jar -DgroupId=cloud.xlh -DartifactId=formatter-spring-boot-starter -Dversion=1.0.0 -Dpackaging=jar
-Dfile=formatter-spring-boot-starter.jar 中的值只要与磁盘中jar包名字对应即可,其他的参数其实可以随便,但为了符合规范就使用规范:最终引入的效果:
 <dependency>
            <groupId>cloud.xlh</groupId>
            <artifactId>formatter-spring-boot-starter</artifactId>
            <version>1.0.0</version>
        </dependency>

以上是关于springboot自定义starter-《Springboot编程思想》的主要内容,如果未能解决你的问题,请参考以下文章