8. Netty中线程处理 - NioEventLoopGroup,NioEventLoop
Posted Leo Han
tags:
篇首语:本文由小常识网(cha138.com)小编为大家整理,主要介绍了8. Netty中线程处理 - NioEventLoopGroup,NioEventLoop相关的知识,希望对你有一定的参考价值。
通过之前关于Netty的分析,我们已经了解到,一般我们在Netty服务端启动的时候会传入boss线程组和worker线程组,这节结合之前我们的分析,来聊聊Netty中的线程处理。
我们知道,Netty是一个高性能的网络框架,针对网络中,我们一般常见处理是网络的连接的建立、消息读写等。这些在Netty中线程模型是怎样的。
首先说一下一个结论,在Netty中每个Channel都会在全局运行的时候绑定到一个线程中去,不管是ServerChannel还是ClientChannel。
首先一般的Netty服务端启动程序如下:
public static void main(String[] args) {
        EventLoopGroup boss = new NioEventLoopGroup();
        EventLoopGroup worker = new NioEventLoopGroup();
        ServerBootstrap bootstrap = new ServerBootstrap();
        bootstrap.group(boss, worker)
                .channel(NioserverSocketChannel.class)
                .childHandler(new ChannelInitializer<SocketChannel>() {
                    @Override
                    protected void initChannel(SocketChannel socketChannel) throws Exception {
                        socketChannel.pipeline().addLast("hello world hanlder", new HelloWorldHandler());
                    }
                });
        try {
            ChannelFuture channelFuture = bootstrap.bind(8080).sync();
            channelFuture.channel().closeFuture().sync();
        } catch (InterruptedException e) {
            e.printStackTrace();
        } finally {
            boss.shutdownGracefully();
            worker.shutdownGracefully();
        }
    }
或者也可以这样:
public static void main(String[] args) {
        EventLoopGroup worker = new NioEventLoopGroup();
        ServerBootstrap bootstrap = new ServerBootstrap();
        bootstrap.group(worker)
                .channel(NioServerSocketChannel.class)
                .childHandler(new ChannelInitializer<SocketChannel>() {
                    @Override
                    protected void initChannel(SocketChannel socketChannel) throws Exception {
                        socketChannel.pipeline().addLast("hello world hanlder", new HelloWorldHandler());
                    }
                });
        try {
            ChannelFuture channelFuture = bootstrap.bind(8080).sync();
            channelFuture.channel().closeFuture().sync();
        } catch (InterruptedException e) {
            e.printStackTrace();
        } finally {
            boss.shutdownGracefully();
            worker.shutdownGracefully();
        }
    }
这里需要强调的一点是,第一种方式中,boss线程组如果没有绑定多个端口的情况下,建议手动指定线程个数为1,因为如果不指定线程数的话,Netty中默认线程组中线程的数量是CPU*2,而Netty中对于Server的Channel来说,是根据端口号来绑定线程的,当然了,这样指定也是可以的,只不过,只有一个线程会运行,其他的线程只是创建了,并未运行。
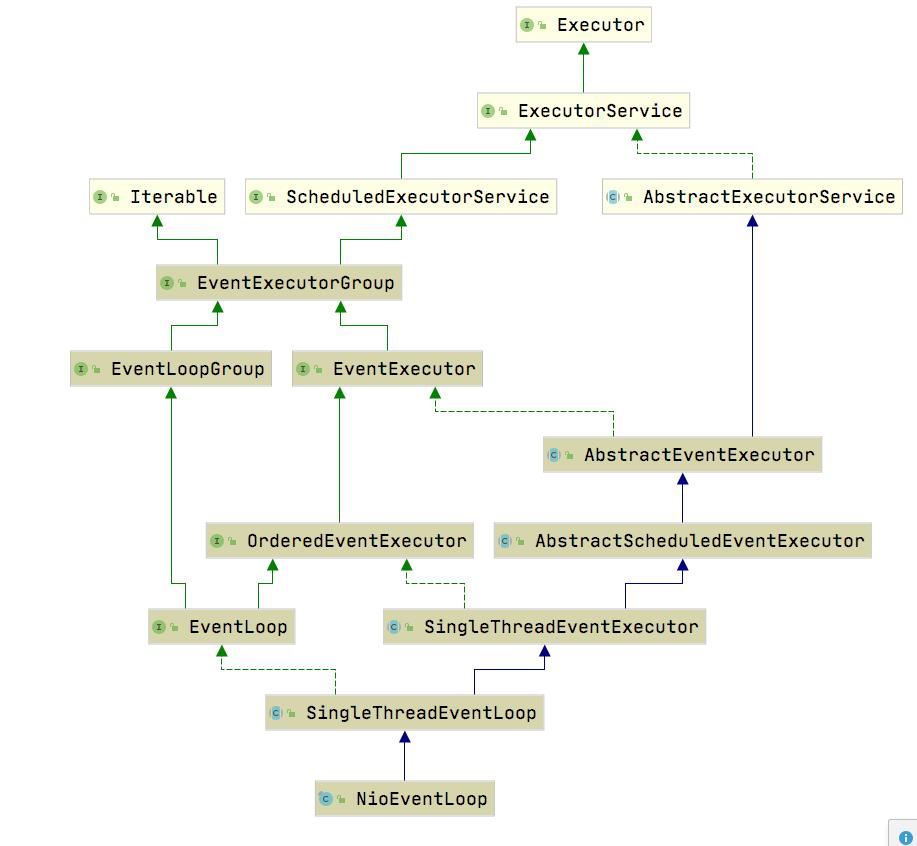
在Netty中我们常用的线程组就是NioEventLoopGroup,而其中的线程为NioEventLoop,二者的类继承结构如下:


这里说下,上面这两段代码的区别,第一种就是我们常见的,一个worker线程,一个boss线程,第二种,其实也很好理解,我们看下其方法实现就全明白了:
    super.group(parentGroup);
        if (this.childGroup != null) {
            throw new IllegalStateException("childGroup set already");
        }
        this.childGroup = ObjectUtil.checkNotNull(childGroup, "childGroup");
        return this;
    }
public ServerBootstrap group(EventLoopGroup group) {
        return group(group, group);
    }
其实说白了,第二种方式就是worker线程组既充当了boss线程组又充当了woker线程组,仅此而已,没有什么特别的,因为Netty中是每个Channel绑定到一个线程上去的,和具体的线程池关系不大。
首先我们看下NioEventLoopGroup是怎么进行初始化的,在父类MultithreadEventExecutorGroup中,进行了如下处理:
protected MultithreadEventExecutorGroup(int nThreads, Executor executor,
                                            EventExecutorChooserFactory chooserFactory, Object... args) {
        if (nThreads <= 0) {
            throw new IllegalArgumentException(String.format("nThreads: %d (expected: > 0)", nThreads));
        }
        if (executor == null) {
            executor = new ThreadPerTaskExecutor(newDefaultThreadFactory());
        }
        children = new EventExecutor[nThreads];
        for (int i = 0; i < nThreads; i ++) {
            boolean success = false;
            try {
                children[i] = newChild(executor, args);
                success = true;
            } catch (Exception e) {
                throw new IllegalStateException("failed to create a child event loop", e);
            } finally {
                if (!success) {
                    for (int j = 0; j < i; j ++) {
                        children[j].shutdownGracefully();
                    }

                    for (int j = 0; j < i; j ++) {
                        EventExecutor e = children[j];
                        try {
                            while (!e.isTerminated()) {
                                e.awaitTermination(Integer.MAX_VALUE, TimeUnit.SECONDS);
                            }
                        } catch (InterruptedException interrupted) {
                            Thread.currentThread().interrupt();
                            break;
                        }
                    }
                }
            }
        }

        chooser = chooserFactory.newChooser(children);

    }
首先这里的nThreads就是我们在构造NioEventLoopGroup传入的,如果没有指定,Netty首先会从系统变量io.netty.eventLoopThreads获取,如果没有,则取CPU*2
这里需要注意的一个逻辑:
executor = new ThreadPerTaskExecutor(newDefaultThreadFactory());
这个地方是生成了一个执行器,里面会调用线程工厂生成新的线程去执行任务
protected ThreadFactory newDefaultThreadFactory() {
        return new DefaultThreadFactory(getClass());
    }
public final class ThreadPerTaskExecutor implements Executor {
    private final ThreadFactory threadFactory;

    public ThreadPerTaskExecutor(ThreadFactory threadFactory) {
        this.threadFactory = ObjectUtil.checkNotNull(threadFactory, "threadFactory");
    }

    @Override
    public void execute(Runnable command) {
        threadFactory.newThread(command).start();
    }
}
而在Netty中,默认的线程工厂是DefaultThreadFactory:
protected Thread newThread(Runnable r, String name) {
        return new FastThreadLocalThread(threadGroup, r, name);
    }
public class FastThreadLocalThread extends Thread {...}
在Netty中使用的线程是封装过的FastThreadLocalThread,继承Thread。
对于MultithreadEventExecutorGroup的属性EventExecutor[] children调用newChild生成,在NioEventLoopGroup中实现如下:
   protected EventLoop newChild(Executor executor, Object... args) throws Exception {
        EventLoopTaskQueueFactory queueFactory = args.length == 4 ? (EventLoopTaskQueueFactory) args[3] : null;
        return new NioEventLoop(this, executor, (SelectorProvider) args[0],
            ((SelectStrategyFactory) args[1]).newSelectStrategy(), (RejectedExecutionHandler) args[2], queueFactory);
    }
在这里就把ThreadPerTaskExecutor传递给NioEventLoop了。
通过之前Netty中Server端的启动分析我们知道,最后都是调用了NioEventLoop.execute方法去执行具体的事情,我们看下这个方法是什么逻辑,其实现在其父类SingleThreadEventExecutor:
 public void execute(Runnable task) {
        ObjectUtil.checkNotNull(task, "task");
        execute(task, !(task instanceof LazyRunnable) && wakesUpForTask(task));
    }
private void execute(Runnable task, boolean immediate) {
        boolean inEventLoop = inEventLoop();
        addTask(task);
        if (!inEventLoop) {
            startThread();
            if (isShutdown()) {
                boolean reject = false;
                try {
                    if (removeTask(task)) {
                        reject = true;
                    }
                } catch (UnsupportedOperationException e) {
                }
                if (reject) {
                    reject();
                }
            }
        }
        if (!addTaskWakesUp && immediate) {
            wakeup(inEventLoop);
        }
    }
这里首先是会将当前的任务放入到一个queue队列中,具体为LinkedBlockingQueue,
然后会判断是否在EventLoop线程中,这里判断很简单,就是判断当前线程和SingleThreadEventExecutor持有的一个线程实例是否是同一个对象:
public boolean inEventLoop() {
        return inEventLoop(Thread.currentThread());
    }
接下来,就是启动线程了,会调用上面我们说的ThreadPerTaskExecutor去创建一个新的线程执行任务,然后在新线程中循环执行:
private void startThread() {
        if (state == ST_NOT_STARTED) {
            if (STATE_UPDATER.compareAndSet(this, ST_NOT_STARTED, ST_STARTED)) {
                boolean success = false;
                try {
                    doStartThread();
                    success = true;
                } finally {
                    if (!success) {
                        STATE_UPDATER.compareAndSet(this, ST_STARTED, ST_NOT_STARTED);
                    }
                }
            }
        }
    }
    // 只保留了部分代码
private void doStartThread() {
        assert thread == null;
        executor.execute(new Runnable() {
            @Override
            public void run() {
                thread = Thread.currentThread();
                if (interrupted) {
                    thread.interrupt();
                }
                boolean success = false;
                updateLastExecutionTime();
                try {
                    SingleThreadEventExecutor.this.run();
                    success = true;
                } catch (Throwable t) {
                    logger.warn("Unexpected exception from an event executor: ", t);
                } finally {
                    for (;;) {
                        int oldState = state;
                        if (oldState >= ST_SHUTTING_DOWN || STATE_UPDATER.compareAndSet(
                                SingleThreadEventExecutor.this, oldState, ST_SHUTTING_DOWN)) {
                            break;
                        }
                    }
        });
    }
可以看到,这里executor.execute在执行的时候回调用上面ThreadPerTaskExecutor去创建一个具体的线程去执行,然后执行的时候,第一步就是将新线程指向当前NioEventLoop只有的线程变量上,这样就完成了线程和当前NioEventLoop的绑定,然后会执行SingleThreadEventExecutor.this.run(),这个实现在NioEventLoop里面,在之前的章节也分析过,就是一个无限for循环,即生成的线程永远不会退出,一直在执行。
另外,我们需要注意的是,这里excute添加任务的时候,是会判断当NioEventLoop的线程状态,只有在需要的时候才会创建,并不是每次都会创建
这里如果我们想执行任务,就可以调用NioEventLoop.execute添加一个新的任务,可以看到往NioEventLoop添加任务只是添加到了一个队列中,并不会立即执行。NioEventLoop最核心的逻辑就是在run方法中:
protected void run() {
int selectCnt = 0;
for (;;) {
try {
int strategy;
try {
strategy = selectStrategy.calculateStrategy(selectNowSupplier, hasTasks());
switch (strategy) {
case SelectStrategy.CONTINUE:
continue;
case SelectStrategy.BUSY_WAIT:
case SelectStrategy.SELECT:
long curDeadlineNanos = nextScheduledTaskDeadlineNanos();
if (curDeadlineNanos == -1L) {
curDeadlineNanos = NONE; // nothing on the calendar
}
nextWakeupNanos.set(curDeadlineNanos);
try {
if (!hasTasks()) {
strategy = select(curDeadlineNanos);
}
} finally {
nextWakeupNanos.lazySet(AWAKE);
}
default:
}
} catch (IOException e) {
rebuildSelector0();
selectCnt = 0;
handleLoopException(e);
continue;
}
selectCnt++;
cancelledKeys = 0;
needsToSelectAgain = false;
final int ioRatio = this.ioRatio;
boolean ranTasks;
if (ioRatio == 100) {
try {
if (strategy > 0) {
processSelectedKeys();
}
} finally {
ranTasks = runAllTasks();
}
} else if (strategy > 0) {
final long ioStartTime = System.nanoTime();
try {
processSelectedKeys();
} finally {
final long ioTime = System.nanoTime() - ioStartTime;
ranTasks = runAllTasks(ioTime * (100 - ioRatio) / ioRatio);
}
} else {
ranTasks = runAllTasks(0);
}
if (ranTasks || strategy > 0) {
if (selectCnt > MIN_PREMATURE_SELECTOR_RETURNS && logger.isDebugEnabled()) {
}
selectCnt = 0;
} else if (unexpectedSelectorWakeup(selectCnt)) { // Unexpected wakeup (unusual case)
selectCnt = 0;
}
} catch (CancelledKeyException e) {
} catch (Throwable t) {
handleLoopException(t);
}
try {
if (isShuttingDown()) {
closeAll();
if (confirmShutdown()) {
return