基于PCA和PLS的近红外光谱建模
Posted Echo_Code
tags:
篇首语:本文由小常识网(cha138.com)小编为大家整理,主要介绍了基于PCA和PLS的近红外光谱建模相关的知识,希望对你有一定的参考价值。
系列文章目录
近红外光谱分析技术属于交叉领域,需要化学、计算机科学、生物科学等多领域的合作。为此,在(北邮邮电大学杨辉华老师团队)指导下,近期准备开源传统的PLS,SVM,ANN,RF等经典算和SG,MSC,一阶导,二阶导等预处理以及GA等波长选择算法以及CNN、AE等最新深度学习算法,以帮助其他专业的更容易建立具有良好预测能力和鲁棒性的近红外光谱模型。
文章目录
前言
NIRS是介于可见光和中红外光之间的电磁波,其波长范围为(1100∼2526 nm。 由于近红外光谱区与有机分子中含氢基团(OH、NH、CH、SH)振动的合频和 各级倍频的吸收区一致,通过扫描样品的近红外光谱,可以得到样品中有机分子含氢 基团的特征信息,常被作为获取样本信息的一种有效的载体。 基于NIRS的检测方法具有方便、高效、准确、成本低、可现场检测、不 破坏样品等优势,被广泛应用于各类检测领域。但 近红外光谱存在谱带宽、重叠较严重、吸收信号弱、信息解析复杂等问题,与常用的 化学分析方法不同,仅能作为一种间接测量方法,无法直接分析出被测样本的含量或 类别,它依赖于化学计量学方法,在样品待测属性值与近红外光谱数据之间建立一个 关联模型(或称校正模型,Calibration Model) ,再通过模型对未知样品的近红外光谱 进行预测来得到各性质成分的预测值。现有近红外建模方法主要为经典建模 (预处理+波长筛选进行特征降维和突出,再通过pls、svm算法进行建模)以及深度学习方法(端到端的建模,对预处理、波长选择等依赖性很低)本篇主要讲述基于基于PCA和PLS的近红外光谱建模方法,
一、数据来源
使用开源玉米数据集,共80个样本,下载地址
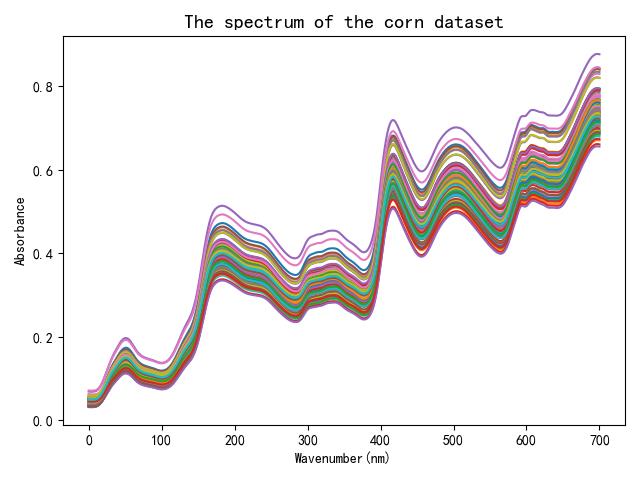
图片如下:
二、代码解读
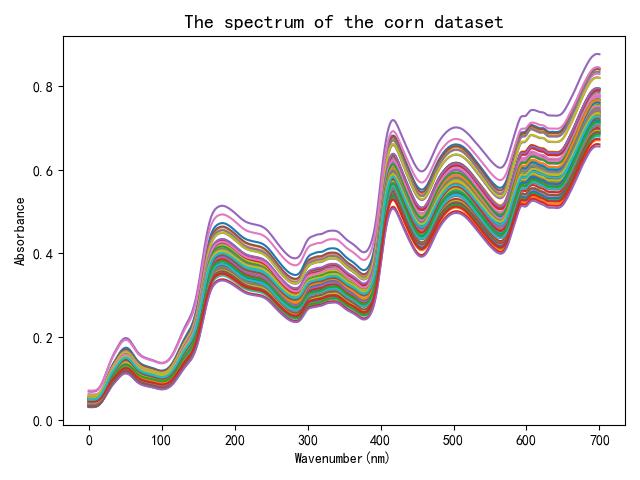
1.读取数据并显示光谱曲线
#载入数据
data_path = './/data//m5.csv' #数据
label_path = './/data//label.csv' #标签(反射率)

data = np.loadtxt(open(data_path, 'rb'), dtype=np.float64, delimiter=',', skiprows=0)
label = np.loadtxt(open(label_path, 'rb'), dtype=np.float64, delimiter=',', skiprows=0)

# 绘制原始后图片
plt.figure(500)
x_col = np.linspace(0,len(data[0,:]),len(data[0,:]))  #数组逆序
y_col = np.transpose(data)
plt.plot(x_col, y_col)
plt.xlabel("Wavenumber(nm)")
plt.ylabel("Absorbance")
plt.title("The spectrum of the corn dataset",fontweight= "semibold",fontsize='x-large')
plt.savefig('.//Result//MSC.png')
plt.show()
2.划分训练集和测试集
#随机划分数据集
x_data = np.array(data)
y_data = np.array(label[:,2])

test_ratio = 0.2
X_train,X_test,y_train,y_test = train_test_split(x_data,y_data,test_size=test_ratio,shuffle=True,random_state=2)
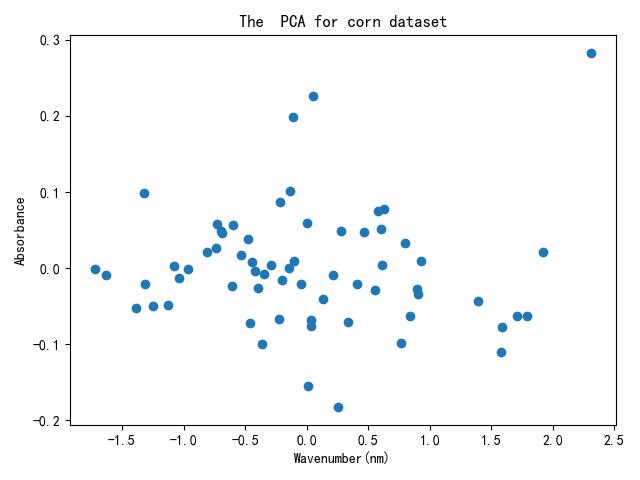
3.PCA降维并显示
#载入数据
#PCA降维到10个维度,测试该数据最好
pca=PCA(n_components=10)  #只保留2个特征
pca.fit(X_train)
X_train_reduction = pca.transform(X_train)
X_test_reduction = pca.transform(X_test)

# PCA降维后图片绘制
plt.figure(100)
plt.scatter(X_train_reduction[:, 0], X_train_reduction[:, 1],marker='o')
plt.xlabel("Wavenumber(nm)")
plt.ylabel("Absorbance")
plt.title("The  PCA for corn dataset",fontweight= "semibold",fontsize='large')
plt.savefig('.//Result//PCA.png')
plt.show()
PCA降维后的数据分布:
4.建立校正模型(数据拟合)
#pls预测
pls2 = PLSRegression(n_components=3)
pls2.fit(X_train_reduction, y_train)

train_pred = pls2.predict(X_train_reduction)
pred = pls2.predict(X_test_reduction)
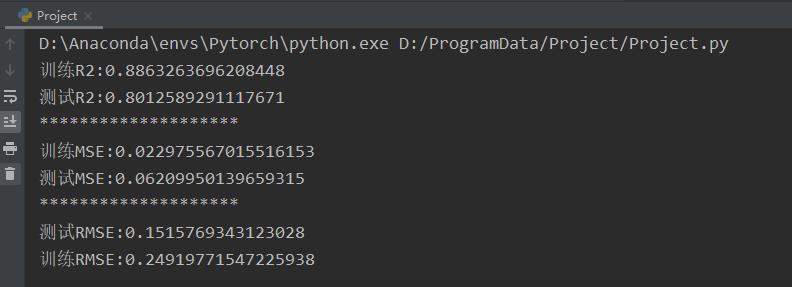
5.模型评估(使用R2、RMSE、MSE指标)
#计算R2
train_R2 = r2_score(train_pred,y_train)
R2 = r2_score(y_test,pred) #Y_true, Pred
print('训练R2:{}'.format(train_R2))
print('测试R2:{}'.format(R2))
#计算MSE
print('********************')
x_MSE = mean_squared_error(train_pred,y_train)
t_MSE = mean_squared_error(y_test,pred)
print('训练MSE:{}'.format(x_MSE))
print('测试MSE:{}'.format(t_MSE))

#计算RMSE
print('********************')
print('测试RMSE:{}'.format(sqrt(x_MSE)))
print('训练RMSE:{}'.format(sqrt(t_MSE)))
模型评估结果:
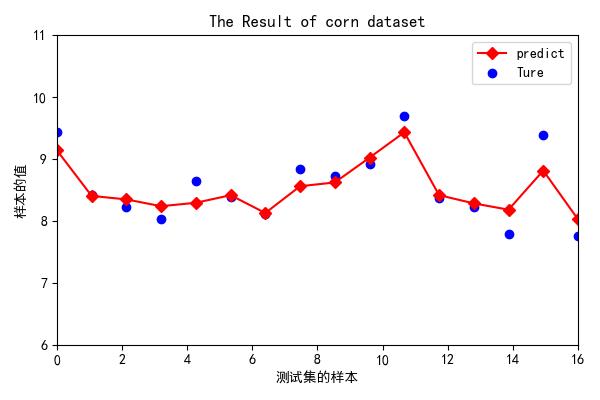
6.绘制拟合差异曲线图
#绘制拟合图片
plt.figure(figsize=(6,4))
x_col = np.linspace(0,16,16)  #数组逆序
# y = [0,10,20,30,40,50,60,70,80]
# x_col = X_test
y_test = np.transpose(y_test)
ax = plt.gca()
ax.set_xlim(0,16)
ax.set_ylim(6,11)
# plt.yticks(y)
plt.scatter(x_col, y_test,label='Ture', color='blue')
plt.plot(x_col, pred,label='predict', marker='D',color='red')
plt.legend(loc='best')
plt.xlabel("测试集的样本")
plt.ylabel("样本的值")
plt.title("The Result of corn dataset",fontweight= "semibold",fontsize='large')
plt.savefig('.//Result//Reslut.png')
plt.show()
结果如图:
总结
完整代码可从获得GitHub仓库
代码仅供学术使用,如需问题,联系方式:QQ:1427950662,微信:Fu_siry
以上是关于基于PCA和PLS的近红外光谱建模的主要内容,如果未能解决你的问题,请参考以下文章