编程艺术剖析 darknet parse_network_cfg 接口
Posted 极智视界
tags:
篇首语:本文由小常识网(cha138.com)小编为大家整理,主要介绍了编程艺术剖析 darknet parse_network_cfg 接口相关的知识,希望对你有一定的参考价值。
欢迎关注我的公众号 [极智视界],回复001获取Google编程规范
O_o >_< o_O O_o ~_~ o_O
本文分析和介绍一下 darknet parse_network_cfg 接口,这个接口比较硬核,主要做模型结构的加载与算子的实现。
1、darknet 数据加载例程
之前的文章《【编程艺术】剖析 darknet read_data_cfg 接口》已经介绍了一下 darknet 目标检测的数据加载流程,并介绍了.data 和 .names 的加载实现。
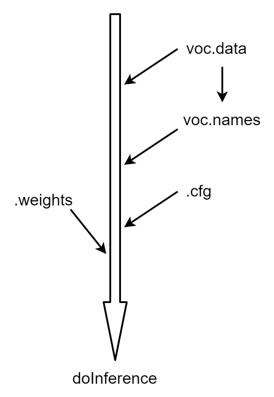
接下来这里 parse_network_cfg 接口主要做 .cfg 模型结构的加载,里面涉及的东西稍微多一些。
2、parse_network_cfg 接口
来看一下 parse_network_cfg 的实现:
network parse_network_cfg(char *filename)
{
    return parse_network_cfg_custom(filename, 0, 0);
}
可以看到里面调用了 parse_network_cfg_custom 函数,这是主要的功能实现函数,也是这里重点要剖析的。这个函数的实现有 451 行,这里就不直接贴了,挑选一些比较关键的地方拿出来说一下。
首先是读 cfg:
list *sections = read_cfg(filename);
读 cfg 采用 read_cfg 接口,先需要说一下 darknet 里存网络结构的数据结构:整个网络采用链表进行存储,链表的值域为 section 块,section 块存放 [net]、[convolution]、[yolo]… 这些结构,来看一下 section 的定义就很清晰了,其中 type 就是记录块的类别,即 [net] 或 [convolution] 或 [yolo] 等字符串。
typedef struct{
    char *type;
    list *options;
}section;
来看一下 read_cfg:
list *read_cfg(char *filename)
{
    FILE *file = fopen(filename, "r");
    if(file == 0) file_error(filename);
    char *line;
    int nu = 0;
    list *sections = make_list();
    section *current = 0;
    while((line=fgetl(file)) != 0){                             // 逐行读
        ++ nu;
        strip(line);
        switch(line[0]){                                        // 取每行的第一个字符
            case '[':                                           // 若是'[', 说明是一个块
                current = (section*)xmalloc(sizeof(section));   // 用current section来存储这个块
                list_insert(sections, current);                 // 将块插入网络结构链表
                current->options = make_list();                 // 块里面的链表存储块内结构
                current->type = line;                           // 块类型即为[net]、[convolution]...
                break;                                          // 块存储完及新赋值type后即跳出
            case '\\0':
            case '#':
            case ';':
                free(line);
                break;
            default:
                if(!read_option(line, current->options)){        // 读块内结构,存储到块内链表
                    fprintf(stderr, "Config file error line %d, could parse: %s\\n", nu, line);
                    free(line);
                }
                break;
        }
    }
    fclose(file);
    return sections;                                            // 返回网络结构链表
}
以上完成了网络结构读入到链表存储,接下来要做的是把链表里的网络结构转换为 network 数据结构,network 是个结构体:
// network.h
typedef struct network {
    int n;
    int batch;
    uint64_t *seen;
    float *badlabels_reject_threshold;
    float *delta_rolling_max;
    float *delta_rolling_avg;
    float *delta_rolling_std;
    int weights_reject_freq;
    int equidistant_point;
	...;                       // 有很多很多参
}
构建一下 network:
network net = make_network(sections->size - 1);
这里其实只是做了一些内存开辟及初始化的工作:
network make_network(int n)
{
    network net = {0};
    net.n = n;
    net.layers = (layer*)xcalloc(net.n, sizeof(layer));
    net.seen = (uint64_t*)xcalloc(1, sizeof(uint64_t));
    net.cuda_graph_ready = (int*)xcalloc(1, sizeof(int));
    net.badlabels_reject_threshold = (float*)xcalloc(1, sizeof(float));
    net.delta_rolling_max = (float*)xcalloc(1, sizeof(float));
    net.delta_rolling_avg = (float*)xcalloc(1, sizeof(float));
    net.delta_rolling_std = (float*)xcalloc(1, sizeof(float));
    net.cur_iteration = (int*)xcalloc(1, sizeof(int));
    net.total_bbox = (int*)xcalloc(1, sizeof(int));
    net.rewritten_bbox = (int*)xcalloc(1, sizeof(int));
    *net.rewritten_bbox = *net.total_bbox = 0;
#ifdef GPU
    net.input_gpu = (float**)xcalloc(1, sizeof(float*));
    net.truth_gpu = (float**)xcalloc(1, sizeof(float*));

    net.input16_gpu = (float**)xcalloc(1, sizeof(float*));
    net.output16_gpu = (float**)xcalloc(1, sizeof(float*));
    net.max_input16_size = (size_t*)xcalloc(1, sizeof(size_t));
    net.max_output16_size = (size_t*)xcalloc(1, sizeof(size_t));
#endif
    return net;
}
接下来是获取网络配置参数:
node *n = sections->front;                   // 指向网络链表头节点
section *s = (section *)n->val;              // 获取头节点的值域setion
list *options = s->options;                  // 获取头节点的指针域

parse_net_options(options, &net);            // 给net设置网络配置参数,[net]里的参数
来看一下 parse_net_options:
/// 太多了,截取了部分
void parse_net_options(list *options, network *net)
{
    net->max_batches = option_find_int(options, "max_batches", 0);
    net->batch = option_find_int(options, "batch",1);
    net->learning_rate = option_find_float(options, "learning_rate", .001);
    net->learning_rate_min = option_find_float_quiet(options, "learning_rate_min", .00001);
    net->batches_per_cycle = option_find_int_quiet(options, "sgdr_cycle", net->max_batches);
    net->batches_cycle_mult = option_find_int_quiet(options, "sgdr_mult", 2);
    net->momentum = option_find_float(options, "momentum", .9);
    net->decay = option_find_float(options, "decay", .0001);
    int subdivs = option_find_int(options, "subdivisions",1);
    net->time_steps = option_find_int_quiet(options, "time_steps",1);
    net->track = option_find_int_quiet(options, "track", 0);
    net->augment_speed = option_find_int_quiet(options, "augment_speed", 2);
    net->init_sequential_subdivisions = net->sequential_subdivisions = option_find_int_quiet(options, "sequential_subdivisions", subdivs);
    if (net->sequential_subdivisions > subdivs) net->init_sequential_subdivisions = net->sequential_subdivisions = subdivs;
    net->try_fix_nan = option_find_int_quiet(options, "try_fix_nan", 0);
    net->batch /= subdivs;          // mini_batch
    const int mini_batch = net->batch;
    net->batch *= net->time_steps;  // mini_batch * time_steps
    net->subdivisions = subdivs;    // number of mini_batches
	...;
}
其实获取的就是下面这些东西:
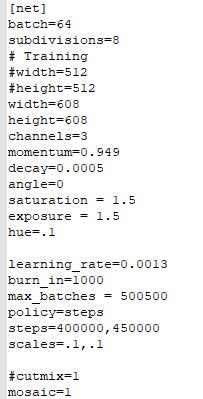
接下来会进行网络结构的加载,首先将头节点往后偏移一个节点,即到算子节点:
n = n->next;
然后是比较关键的:
/// 这里省略了很多层实现,不然篇幅太长
while(n){
    params.train = old_params_train;
    if (count < last_stop_backward) params.train = 0;

    params.index = count;
    fprintf(stderr, "%4d ", count);
    s = (section *)n->val;
    options = s->options;
    layer l = { (LAYER_TYPE)0 };
    LAYER_TYPE lt = string_to_layer_type(s->type);          // 将层type提取出来,转换为枚举类型的TYPE
    if(lt == CONVOLUTIONAL){                                // 开始搭积木了
        l = parse_convolutional(options, params);           // 添加卷积层
    }else if(lt == LOCAL){
        l = parse_local(options, params);
    }else if(lt == ACTIVE){
        l = parse_activation(options, params);
    }else if(lt == RNN){
        l = parse_rnn(options, params);
    }else if(lt == GRU){
        l = parse_gru(options, params);
    }else if(lt == LSTM){
        l = parse_lstm(options, params);
    }else if (lt == CONV_LSTM) {
        l = parse_conv_lstm(options, params);
    }else if (lt == HISTORY) {
        l = parse_history(options, params);
    }else if(lt == CRNN){
        l = parse_crnn(options, params);
    }else if(lt == CONNECTED){
        l = parse_connected(options, params);
    }else if(lt == CROP){
        l = parse_crop(options, params);
    }else if(lt == COST){
        l = parse_cost(options, params);
        l.keep_delta_gpu = 1;
    }else if(lt == REGION){
        l = parse_region(options, params);
        l.keep_delta_gpu = 1;
    }else if (lt == YOLO) {
        l = parse_yolo(options, params);
        l.keep_delta_gpu = 1;}
    ...;
}
以上搭积木中对应的每个算子的 darknet 实现 make_layer_xxx 是精华,这里限于篇幅不展开赘述了,后续会陆续有相关介绍文章进行介绍。
千里之行始于足下,读源码是个好习惯。
【公众号传送】
扫描下方二维码即可关注我的微信公众号【极智视界】,获取更多AI经验分享,让我们用极致+极客的心态来迎接AI !

以上是关于编程艺术剖析 darknet parse_network_cfg 接口的主要内容,如果未能解决你的问题,请参考以下文章