Linux网络服务01——Linux网络基础设置
Posted
tags:
篇首语:本文由小常识网(cha138.com)小编为大家整理,主要介绍了Linux网络服务01——Linux网络基础设置相关的知识,希望对你有一定的参考价值。
Linux网络服务01——Linux网络基础设置
一、查看及测试网络
1、使用ifconfig命令查看网络接口
(1)查看活动的网络接口
ifconfig命令
[[email protected] ~]# ifconfig
eth0 Link encap:Ethernet HWaddr 00:0C:29:D5:3A:FA
inet addr:192.168.200.100 Bcast:192.168.200.255 Mask:255.255.255.0
inet6 addr: fe80::20c:29ff:fed5:3afa/64 Scope:Link
UP BROADCAST RUNNING MULTICAST MTU:1500 Metric:1
RX packets:3510 errors:0 dropped:0 overruns:0 frame:0
TX packets:2254 errors:0 dropped:0 overruns:0 carrier:0
collisions:0 txqueuelen:1000
RX bytes:320405 (312.8 KiB) TX bytes:294293 (287.3 KiB)
lo Link encap:Local Loopback
inet addr:127.0.0.1 Mask:255.0.0.0
inet6 addr: ::1/128 Scope:Host
UP LOOPBACK RUNNING MTU:16436 Metric:1
RX packets:34 errors:0 dropped:0 overruns:0 frame:0
TX packets:34 errors:0 dropped:0 overruns:0 carrier:0
collisions:0 txqueuelen:0
RX bytes:2312 (2.2 KiB) TX bytes:2312 (2.2 KiB)
(2)查看所有网络接口
ifconfig -a命令
[[email protected] ~]# ifconfig -a
eth0 Link encap:Ethernet HWaddr 00:0C:29:D5:3A:FA
inet addr:192.168.200.100 Bcast:192.168.200.255 Mask:255.255.255.0
inet6 addr: fe80::20c:29ff:fed5:3afa/64 Scope:Link
UP BROADCAST RUNNING MULTICAST MTU:1500 Metric:1
RX packets:3558 errors:0 dropped:0 overruns:0 frame:0
TX packets:2280 errors:0 dropped:0 overruns:0 carrier:0
collisions:0 txqueuelen:1000
RX bytes:324735 (317.1 KiB) TX bytes:298245 (291.2 KiB)
lo Link encap:Local Loopback
inet addr:127.0.0.1 Mask:255.0.0.0
inet6 addr: ::1/128 Scope:Host
UP LOOPBACK RUNNING MTU:16436 Metric:1
RX packets:34 errors:0 dropped:0 overruns:0 frame:0
TX packets:34 errors:0 dropped:0 overruns:0 carrier:0
collisions:0 txqueuelen:0
RX bytes:2312 (2.2 KiB) TX bytes:2312 (2.2 KiB)
(3)查看指定的网络接口(不论该网络接口是否处于激活状态)
ifconfig 设备名
[[email protected] ~]# ifconfig eth0
eth0 Link encap:Ethernet HWaddr 00:0C:29:D5:3A:FA
inet addr:192.168.200.100 Bcast:192.168.200.255 Mask:255.255.255.0
inet6 addr: fe80::20c:29ff:fed5:3afa/64 Scope:Link
UP BROADCAST RUNNING MULTICAST MTU:1500 Metric:1
RX packets:3621 errors:0 dropped:0 overruns:0 frame:0
TX packets:2317 errors:0 dropped:0 overruns:0 carrier:0
collisions:0 txqueuelen:1000
RX bytes:330471 (322.7 KiB) TX bytes:303395 (296.2 KiB)
(4)ifconfig命令包含的信息:
Link encap:Ethernet以太网 HWaddr:物理地址(MAC地址)
inet addr:IPv4地址 Bcast:广播地址 Mask:子网掩码
inet6 addr:IPv6地址
MTU:最大传输单元(Maximum Transmission Unit) Metric:跳跃点
RX packets:接收数据包 errors:错误 dropped:丢弃 overruns:过载 frame:帧数
TX packets:发送数据包 errors:错误 dropped:丢弃 overruns:过载 carrier:载波
collisions:冲撞 txqueuelen:发送列队长度
RX bytes:接收字节数 TX bytes:发送字节数
2、使用ip、ethtool命令查看网络接口
(1)查看网络接口的数据链路层信息
ip link命令
[[email protected] ~]# ip link
1: lo: <LOOPBACK,UP,LOWER_UP> mtu 16436 qdisc noqueue state UNKNOWN
link/loopback 00:00:00:00:00:00 brd 00:00:00:00:00:00
2: eth0: <BROADCAST,MULTICAST,UP,LOWER_UP> mtu 1500 qdisc pfifo_fast state UP qlen 1000
link/ether 00:0c:29:d5:3a:fa brd ff:ff:ff:ff:ff:ff
(2)查看网络接口的网络层信息
ip a(ip address)命令
[[email protected] ~]# ip a
1: lo: <LOOPBACK,UP,LOWER_UP> mtu 16436 qdisc noqueue state UNKNOWN
link/loopback 00:00:00:00:00:00 brd 00:00:00:00:00:00
inet 127.0.0.1/8 scope host lo
inet6 ::1/128 scope host
valid_lft forever preferred_lft forever
2: eth0: <BROADCAST,MULTICAST,UP,LOWER_UP> mtu 1500 qdisc pfifo_fast state UP qlen 1000
link/ether 00:0c:29:d5:3a:fa brd ff:ff:ff:ff:ff:ff
inet 192.168.200.100/24 brd 192.168.200.255 scope global eth0
inet 192.168.1.101/24 brd 192.168.1.255 scope global eth0
inet6 fe80::20c:29ff:fed5:3afa/64 scope link
valid_lft forever preferred_lft forever
(3)查看指定网络接口速率、模式等信息
ethtool命令
[[email protected] ~]# ethtool eth0
Settings for eth0:
Supported ports: [ TP ]
Supported link modes: 10baseT/Half 10baseT/Full
100baseT/Half 100baseT/Full
1000baseT/Full
Supported pause frame use: No
Supports auto-negotiation: Yes
Advertised link modes: 10baseT/Half 10baseT/Full
100baseT/Half 100baseT/Full
1000baseT/Full
Advertised pause frame use: No
Advertised auto-negotiation: Yes
Speed: 1000Mb/s
Duplex: Full
Port: Twisted Pair
PHYAD: 0
Transceiver: internal
Auto-negotiation: on
MDI-X: Unknown
Supports Wake-on: d
Wake-on: d
Current message level: 0x00000007 (7)
drv probe link
Link detected: yes
3、查看主机名、路由表
(1)hostname命令查看主机名称
[[email protected] ~]# hostname
crushlinux.bt.com
(2)查看路由表
1>使用route命令查看路由表
[[email protected] ~]# route
Kernel IP routing table
Destination Gateway Genmask Flags Metric Ref Use Iface
192.168.3.0 192.168.200.2 255.255.255.0 UG 0 0 0 eth0
192.168.2.0 192.168.200.2 255.255.255.0 UG 0 0 0 eth0
192.168.1.0 * 255.255.255.0 U 0 0 0 eth0
192.168.200.0 * 255.255.255.0 U 0 0 0 eth0
link-local * 255.255.0.0 U 1002 0 0 eth0
default 192.168.200.2 0.0.0.0 UG 0 0 0 eth0
default 192.168.200.2 0.0.0.0 UG 0 0 0 eth0
2>使用netstat -r命令查看路由表
[[email protected] ~]# netstat -r
Kernel IP routing table
Destination Gateway Genmask Flags MSS Window irtt Iface
192.168.3.0 192.168.200.2 255.255.255.0 UG 0 0 0 eth0
192.168.2.0 192.168.200.2 255.255.255.0 UG 0 0 0 eth0
192.168.1.0 * 255.255.255.0 U 0 0 0 eth0
192.168.200.0 * 255.255.255.0 U 0 0 0 eth0
link-local * 255.255.0.0 U 0 0 0 eth0
default 192.168.200.2 0.0.0.0 UG 0 0 0 eth0
default 192.168.200.2 0.0.0.0 UG 0 0 0 eth0
-n:不执行DNS反向查找,直接显示数字形式的IP地址
[[email protected] ~]# route -n
Kernel IP routing table
Destination Gateway Genmask Flags Metric Ref Use Iface
192.168.3.0 192.168.200.2 255.255.255.0 UG 0 0 0 eth0
192.168.2.0 192.168.200.2 255.255.255.0 UG 0 0 0 eth0
192.168.1.0 0.0.0.0 255.255.255.0 U 0 0 0 eth0
192.168.200.0 0.0.0.0 255.255.255.0 U 0 0 0 eth0
169.254.0.0 0.0.0.0 255.255.0.0 U 1002 0 0 eth0
0.0.0.0 192.168.200.2 0.0.0.0 UG 0 0 0 eth0
0.0.0.0 192.168.200.2 0.0.0.0 UG 0 0 0 eth0
[[email protected] ~]# netstat -rn
Kernel IP routing table
Destination Gateway Genmask Flags MSS Window irtt Iface
192.168.3.0 192.168.200.2 255.255.255.0 UG 0 0 0 eth0
192.168.2.0 192.168.200.2 255.255.255.0 UG 0 0 0 eth0
192.168.1.0 0.0.0.0 255.255.255.0 U 0 0 0 eth0
192.168.200.0 0.0.0.0 255.255.255.0 U 0 0 0 eth0
169.254.0.0 0.0.0.0 255.255.0.0 U 0 0 0 eth0
0.0.0.0 192.168.200.2 0.0.0.0 UG 0 0 0 eth0
0.0.0.0 192.168.200.2 0.0.0.0 UG 0 0 0 eth0
4、查看网络连接情况 netstat命令
(1)常用选项:
-a:显示当前主机中所有活动的网络连接信息
-n:以数字的形式显示相关信息
-r:显示路由表信息
-t:显示TCP协议相关的信息
-u:显示UDP协议相关的信息
-p:显示与网络连接相关的进程号、进程名称信息(需要root权限)
(2)示例:
[[email protected] ~]# netstat -anpt
Active Internet connections (servers and established)
Proto Recv-Q Send-Q Local Address Foreign Address State PID/Program name
tcp 0 0 0.0.0.0:111 0.0.0.0:* LISTEN 1285/rpcbind
tcp 0 0 0.0.0.0:21 0.0.0.0:* LISTEN
[[email protected] ~]# netstat -anpu
Active Internet connections (servers and established)
Proto Recv-Q Send-Q Local Address Foreign Address State PID/Program name
udp 0 0 0.0.0.0:111 0.0.0.0:* 1285/rpcbind
udp 0 0 0.0.0.0:631 0.0.0.0:*
[[email protected] ~]# netstat -anptu
Active Internet connections (servers and established)
Proto Recv-Q Send-Q Local Address Foreign Address State PID/Program name
tcp 0 0 0.0.0.0:111 0.0.0.0:* LISTEN 1285/rpcbind
tcp 0 0 0.0.0.0:21 0.0.0.0:* LISTEN 1656/vsftpd
tcp 0 0 0.0.0.0:22 0.0.0.0:* LISTEN
5、ping、traceroute、nslookup命令
(1)测试网络连通性 ping命令
1>常用选项:
-c:指定发送数据包的个数
-i:当ping通时,指定间隔多少秒发送下一个数据包
-w:当ping不通时,指定发送的每个数据包的超时时间,单位秒
-s:指定数据包大小
2>示例:
[[email protected] ~]# ping 192.168.200.100
PING 192.168.200.100 (192.168.200.100) 56(84) bytes of data.
64 bytes from 192.168.200.100: icmp_seq=1 ttl=64 time=0.019 ms
64 bytes from 192.168.200.100: icmp_seq=2 ttl=64 time=0.023 ms
64 bytes from 192.168.200.100: icmp_seq=3 ttl=64 time=0.048 ms
^X64 bytes from 192.168.200.100: icmp_seq=4 ttl=64 time=0.046 ms
^C
--- 192.168.200.100 ping statistics ---
4 packets transmitted, 4 received, 0% packet loss, time 3174ms
rtt min/avg/max/mdev = 0.019/0.034/0.048/0.013 ms
[[email protected] ~]# ping -c 2 192.168.200.100
PING 192.168.200.100 (192.168.200.100) 56(84) bytes of data.
64 bytes from 192.168.200.100: icmp_seq=1 ttl=64 time=0.048 ms
64 bytes from 192.168.200.100: icmp_seq=2 ttl=64 time=0.025 ms
--- 192.168.200.100 ping statistics ---
2 packets transmitted, 2 received, 0% packet loss, time 1014ms
rtt min/avg/max/mdev = 0.025/0.036/0.048/0.013 ms
[[email protected] ~]# ping -c 4 -i 0.1 192.168.200.100
PING 192.168.200.100 (192.168.200.100) 56(84) bytes of data.
64 bytes from 192.168.200.100: icmp_seq=1 ttl=64 time=0.015 ms
64 bytes from 192.168.200.100: icmp_seq=2 ttl=64 time=0.023 ms
64 bytes from 192.168.200.100: icmp_seq=3 ttl=64 time=0.030 ms
64 bytes from 192.168.200.100: icmp_seq=4 ttl=64 time=0.040 ms
--- 192.168.200.100 ping statistics ---
4 packets transmitted, 4 received, 0% packet loss, time 319ms
rtt min/avg/max/mdev = 0.015/0.027/0.040/0.009 ms
[[email protected] ~]# ping -c 2 -w 2 192.168.2.2
PING 192.168.2.2 (192.168.2.2) 56(84) bytes of data.
--- 192.168.2.2 ping statistics ---
2 packets transmitted, 0 received, 100% packet loss, time 2000ms
(2)跟踪数据包的路由途径 traceroute命令
-n:不执行DNS反向查找,直接显示数字形式的IP地址
[[email protected] ~]# traceroute -n www.baidu.com
traceroute to www.baidu.com (192.168.200.100), 30 hops max, 60 byte packets
1 192.168.200.100 0.016 ms 0.003 ms 0.003 ms
【课外补充】
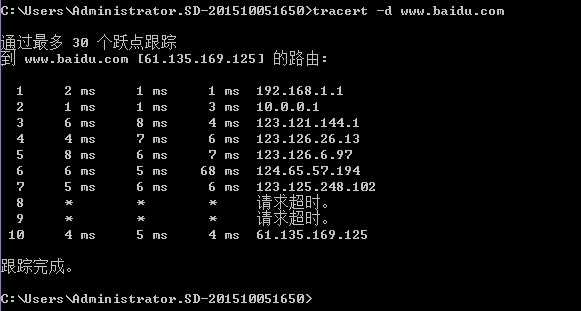
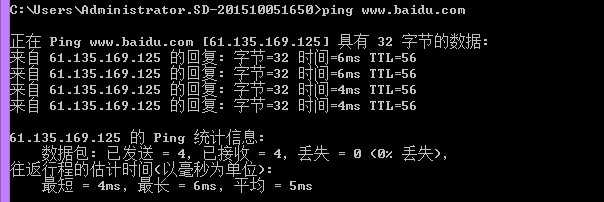
1、windows中的tracert命令
在dos中输入tracert -d(-d 不将地址解析成主机名)
2、常见的TTL(Time To Live)生存周期值:
windows:128
linux:64
unix:255
cisco:255
(3)测试DNS域名解析 nslookup命令

二、设置网络地址参数
1、临时修改网络配置
(1)方法一:ifconfig 网络设备 IP地址/短格式子网掩码
(2)方法二:ifconfig 网络设备 IP地址 netmask 子网掩码
(3)示例:

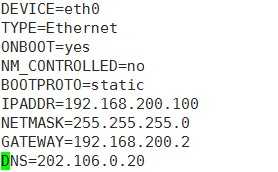
2、固定修改网络配置
(1)配置文件:/etc/sysconfig/network-scripts/目录下的ifcfg-对应网络设备名称,默认第一块网卡为eth0
(2)编辑配置文件:前面带#表示非必要配置内容
DEVICE=eth0 设备名
HWADDR=00:0C:29:8F:D8:E0 物理地址(MAC地址)
TYPE=Ethernet 类型(以太网)
UUID=da840b8c-a2d8-4a09-83a8-50d5437c3ba3 UUID号
ONBOOT=yes 是否开机自动启用
NM_CONTROLLED=no 图形化管理控制,是network manger的参数
#BOOTPROTO=dhcp 自动获取;BOOTPROTO=static 手动配置
BOOTPROTO=static 引导协议(dhcp:自动获取;static/none:手动配置)
IPADDR=192.168.1.108 IPv4协议的IP地址
NETMASK=255.255.255.0 子网掩码
GATEWAY=192.168.1.1 网关
#USERCTL=no 是否允许非root用户控制该设备
#IPV6INIT=no 是否启用IPv6协议
#DNS1=202.106.46.151 DNS域名解析服务
(3)示例:
3、临时设置网卡子接口
(1)方法:ifconfig 网络设备:子接口名称 IP地址/短格式子网掩码
(2)示例:
[[email protected] ~]# ifconfig eth0:0 192.168.200.102/24
[[email protected] ~]# ifconfig eth0:sec 192.168.100.102/24
[[email protected] ~]# ifconfig
eth0 Link encap:Ethernet HWaddr 00:0C:29:D5:3A:FA
inet addr:192.168.200.100 Bcast:192.168.200.255 Mask:255.255.255.0
inet6 addr: fe80::20c:29ff:fed5:3afa/64 Scope:Link
UP BROADCAST RUNNING MULTICAST MTU:1500 Metric:1
RX packets:5105 errors:0 dropped:0 overruns:0 frame:0
TX packets:3252 errors:0 dropped:0 overruns:0 carrier:0
collisions:0 txqueuelen:1000
RX bytes:469740 (458.7 KiB) TX bytes:431874 (421.7 KiB)
eth0:0 Link encap:Ethernet HWaddr 00:0C:29:D5:3A:FA
inet addr:192.168.200.102 Bcast:192.168.200.255 Mask:255.255.255.0
UP BROADCAST RUNNING MULTICAST MTU:1500 Metric:1
eth0:sec Link encap:Ethernet HWaddr 00:0C:29:D5:3A:FA
inet addr:192.168.100.102 Bcast:192.168.100.255 Mask:255.255.255.0
UP BROADCAST RUNNING MULTICAST MTU:1500 Metric:1
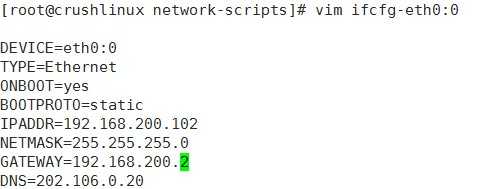
4、永久设置网卡子接口
(1)方法:需要在/etc/sysconfig/network-scrips/目录下手动添加配置文件
(2)示例:
[[email protected] ~]# cd /etc/sysconfig/network-scripts/
[[email protected] network-scripts]# cp ifcfg-eth0 ifcfg-eth0:0

5、临时修改网卡的状态
(1)方法:ifconfig 网络设备 up/down
(2)示例:
[[email protected] ~]# ifconfig eth1 up
[[email protected] ~]# ifconfig eth0:0 down
6、重新加载网络配置文件
(1)重启网络服务以实现重新读取配置文件的目的
1>方法:/etc/init.d/network restart
2>示例:

(2)修改某块网卡配置后,仅重启该网卡
1>格式:ifdown 网络设备;ifup 网络设备
2>示例

三、修改主机名
1、临时修改主机名
(1)方法:
hostname 新的主机名
bash
(2)示例:

2、永久修改主机名
(1)方法:vi编辑/etc/sysconfig/network配置文件,重启后生效
(2)示例:

[[email protected] ~]# reboot
四、配置路由
1、临时配置路由
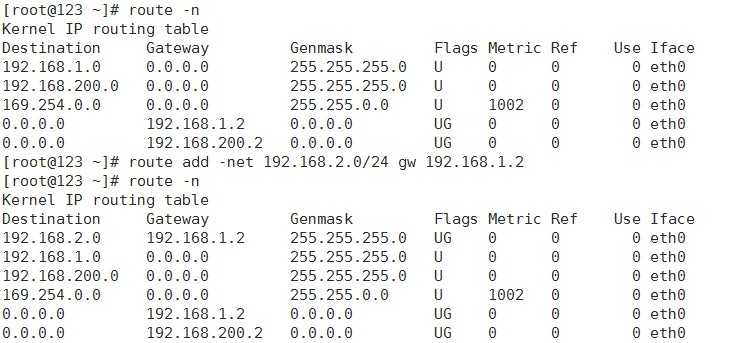
(1)临时添加、删除指定网段的路由记录
1>方法:route add -net 网段/短格式子网掩码 gw 网关地址
route del -net网段/短格式子网掩码
2>示例:
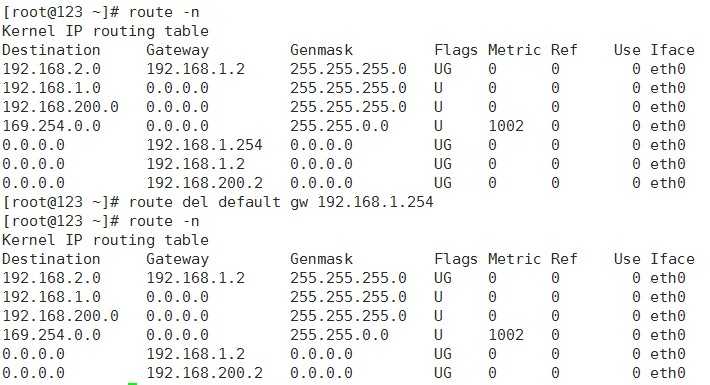
(2)临时添加、删除默认网关记录
1>方法:route add default gw 网关地址
route del default gw 网关地址
2>示例:
【添加默认网关记录】

【删除默认网关记录】
2、永久配置路由
(1)方法一:在/etc/rc.local中添加
示例:

保存退出,重启
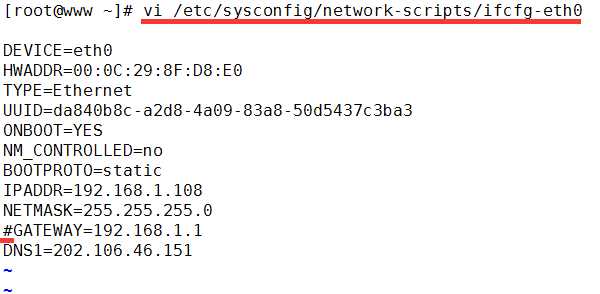
(2)方法二:在/etc/sysconfig/network中添加到末尾
注意:网卡的配置文件中如果有设置了网关,该文件优先级高于此配置文件
示例:


(3)方法三:修改/etc/sysconfig/static-routes配置文件(没有该文件手动建立)
示例:


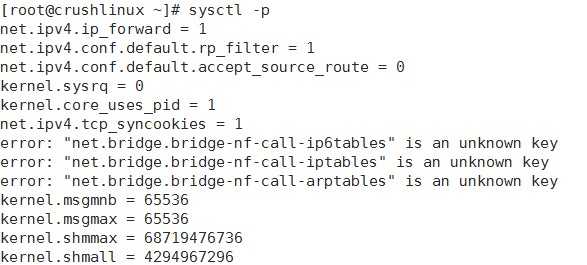
(4)方法四:开启IP转发(路由功能)
1> echo “1”>/proc/sys/net/ipv4/ip_forward (临时开启)
2> vi /etc/sysctl.conf 将net.ipv4.ip_forward=0改为1(永久开启)
sysctl -p (使sysctl.conf文件立即生效)
示例:
【临时开启IP转发功能】

【永久开启IP转发功能】

使sysctl.conf配置文件立即生效:
五、设置DNS域名解析
1、设置DNS域名解析
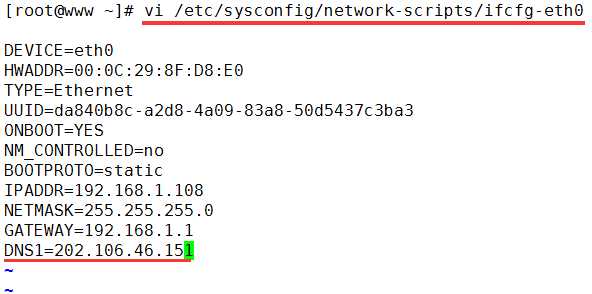
(1)方法一:vi编辑/etc/sysconfig/network-scripts/目录下网络设备的配置文件
示例:
(2)方法二:vi编辑/etc/resolv.conf文件
示例:
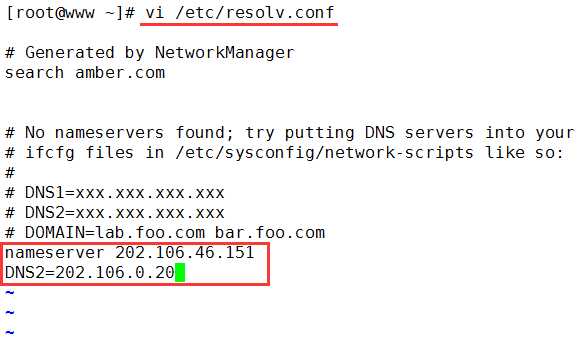
保存退出,此文件修改后立即生效。
2、域名解析本地主机映射文件
(1)方法:vi编辑/etc/hosts文件
(2)说明:/etc/hosts文件优先于DNS域名解析服务,也就是说,如果一个域名在hosts文件中已存在映射关系,将不再通过DNS服务器进行域名解析。hosts文件中一个ip地址可以对应多个域名或者别名。
(3)示例:


原本可以ping通的www.baidu.com,现在ping不同了
以上是关于Linux网络服务01——Linux网络基础设置的主要内容,如果未能解决你的问题,请参考以下文章