Spring-Ioc
Posted Al_tair
tags:
篇首语:本文由小常识网(cha138.com)小编为大家整理,主要介绍了Spring-Ioc相关的知识,希望对你有一定的参考价值。
Spring Framework
大家好!我是小笙!通过对狂神说学spring视频后自己所的一些笔记和代码分享,全部内容纯手打!对spring-Ioc的控制反转有了更深的理解!但是由于个人能力有限。现阶段还只能照猫画虎的形式进行练习,输出有限!
一. 初识Spring Framework
Spring 春天 迎来了程序员的春天!
- 历史由来:Spring框架即以interface21框架为基础,经过重新设计,并不断丰富其内涵,于2004年3月24日,发布了1.0正式版。
- 开发者:该框架最初由 Rod Johnson 以及 Juergen Hoeller 等人开发
- 概念:Spring 又称 Spring Framework 是java平台上免费开源的全栈应用程序框架和控制反转的容器实现,换句话来说就是Spring Framework 建立在java平台上,并为其使用者提供了应用程序框架(类似于房屋的整体架构)以及一系列底层容器。
-
目的:解决企业应用开发的复杂性
-
官网:Spring Framework Github:网址
-
maven>>Spring Core » 5.3.10:
<!-- https://mvnrepository.com/artifact/org.springframework/spring-core --> <dependency> <groupId>org.springframework</groupId> <artifactId>spring-core</artifactId> <version>5.3.10</version> </dependency> -
特征: 轻量 面向切面(AOP) 控制反转(IOC) 容器 框架 MVC
-
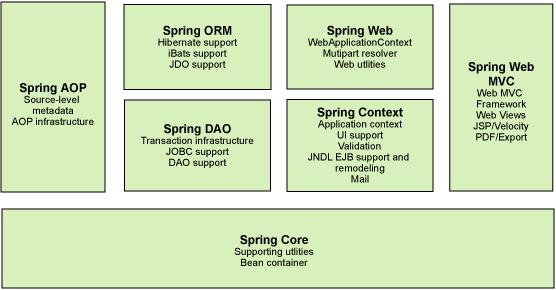
组成:Spring Framework Runtime
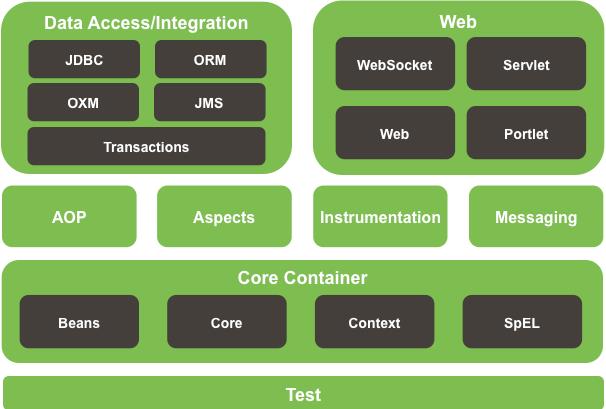
Spring七大模块
-
优点:
二. Spring IoC Container 和 Bean 简单介绍
2.1 IoC是什么
Inversion of Control 即 “ 控制反转 ” is also known as dependency injection 即 " 依赖注入" ,是一种设计思想,它能够将你设计好的对象交给容器控制,而不是传统的在你的对象内部直接控制
-
控制反转,控制?反转?
获得依赖对象的过程反转了
-
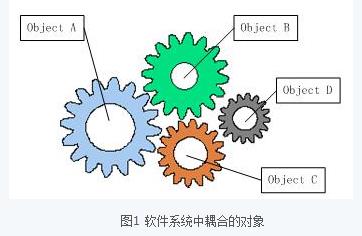
软件系统在没有引入IOC容器之前,如图1所示,对象A依赖于对象B,那么对象A在初始化或者运行到某一点的时候,自己必须主动去创建对象B或者使用已经创建的对象B。无论是创建还是使用对象B,控制权都在自己手上。
-
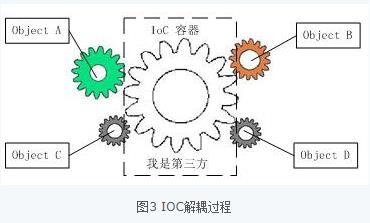
软件系统在引入IOC容器之后,这种情形就完全改变了,如图3所示,由于IOC容器的加入,对象A与对象B之间失去了直接联系,所以,当对象A运行到需要对象B的时候,IOC容器会主动创建一个对象B注入到对象A需要的地方。
-
通过前后的对比,我们不难看出来:对象A获得依赖对象B的过程,由主动行为变为了被动行为,控制权颠倒过来了,这就是“控制反转”这个名称的由来。
-
-
那么实现依赖注入这种设计思想方式有哪些呢?
- constructor arguments(构造函数参数注入)
- arguments to a factory method (工厂方法参数注入)
笙式解读工厂方法:主要目的就是创建对象;创建对象原理:构造方法常常被设置为私有方法,工厂方法通常作为静态方法,定义在方法所实例化的类中,易于供外界调用(类名.工厂方法名),类似于包装了构造函数
class Complex { public static Complex fromCartesianFactory(double real, double imaginary) { return new Complex(real, imaginary); } public static Complex fromPolarFactory(double modulus, double angle) { return new Complex(modulus * cos(angle), modulus * sin(angle)); } private Complex(double a, double b) { //... } } Complex product = Complex.fromPolarFactory(1, pi);- properties that are set on the object instance after it is constructed or returned from a factory method.(在对象被创建或者来自工厂方法的返回参数之后,对象实例设置属性注入)
2.2 Bean 是什么
在 Spring 中,构成应用程序主干并由 Spring IoC 容器管理的对象 ; bean 是由 Spring IoC 容器实例化、组装和管理的对象
下图显示了 Spring 如何工作的高级视图。您的应用程序类与配置元数据相结合,因此,在ApplicationContext创建和初始化之后,您就有了一个完全配置且可执行的系统或应用程序。
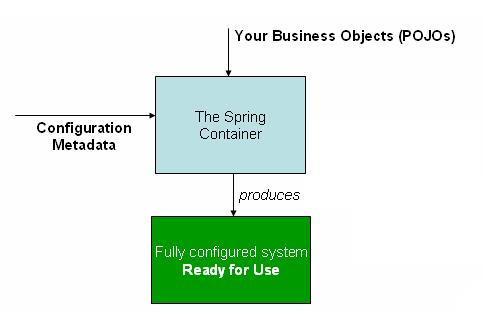
基于 XML 的配置元数据的基本结构: ( Bean 以及它们之间的依赖关系反映在容器使用的配置元数据中 )
<?xml version="1.0" encoding="UTF-8"?>
<beans xmlns="http://www.springframework.org/schema/beans"
    xmlns:xsi="http://www.w3.org/2001/XMLSchema-instance"
    xsi:schemaLocation="http://www.springframework.org/schema/beans
        https://www.springframework.org/schema/beans/spring-beans.xsd">

    <!--
		bean 对象
		id 对象名   class d所在的地址(索引)
         ref:引用Spring容器中创建好的对象
         value :具体的值,基本数据类型
	-->
    <bean id="..." class="...">
        <!-- collaborators and configuration for this bean go here -->
    </bean>

    <bean id="..." class="...">
        <!-- collaborators and configuration for this bean go here -->
    </bean>

    <!-- more bean definitions go here -->

</beans>
三.IoC创建对象的方式
3.1无参构造函数注入
<?xml version="1.0" encoding="UTF-8"?>
<beans xmlns="http://www.springframework.org/schema/beans"
       xmlns:xsi="http://www.w3.org/2001/XMLSchema-instance"
       xsi:schemaLocation="http://www.springframework.org/schema/beans
        https://www.springframework.org/schema/beans/spring-beans.xsd">

    <!-- 当该对象无无参构造函数,将报错 -->
    <bean id="user" class="com.Al_tair.user.User">
        <property name="name" value="lns"/>
    </bean>


</beans>
public class User {
    String name;

    public User(String name){
        this.name = name;
    }
    public void setName(String name) {
        this.name = name;
    }

    public String getName() {
        return name;
    }

    @Override
    public String toString() {
        return "User{" +
                "name='" + name + '\\'' +
                '}';
    }
}
无参构造函数无法找到报错
[外链图片转存失败,源站可能有防盗链机制,建议将图片保存下来直接上传(img-vMFbCm2u-1636018416578)(Spring.assets/image-20211026205041393.png)]
3.2有参构造函数
- 下标赋值
<bean id="user" class="com.Al_tair.user.User">
    <constructor-arg index="0" value="lns"/>
</bean>
- 类型赋值
<bean id="user" class="com.Al_tair.user.User">
    <constructor-arg type="java.lang.String" value="罗念笙"/>
</bean>
- 直接通过参数赋值
<bean id="user" class="com.Al_tair.user.User">
    <constructor-arg name="name" value="lns"/>
</bean>
The ApplicationContext lets you read bean definitions and access them, as the following example shows:
// create and configure beans 创建和配置bean
ApplicationContext context = new ClassPathXmlApplicationContext("services.xml", "daos.xml");

// retrieve configured instance 接受配置实例
PetStoreService service = context.getBean("petStore", PetStoreService.class);

// use configured instance 使用配置实例
List<String> userList = service.getUsernameList();
总结:在配置文件在创建和配置的时候,容器中的对象已经初始化了!
四. Spring配置说明
-
别名 alias:可以用另外一个name代替原id名
<bean id="user" class="com.Al_tair.user.User"></bean> <alias name="user" alias="user2"/> -
Bean配置
<!-- id bean的唯一标识符 可以被认为是对象名 class bean对象所对应的全限定名:包名+类名 name 别名 作用比alias还强大 可以取多个别名(中间可以用空格 or , or ;等隔开) --> <bean id="SpringName2" class="com.Al_tair.helloSpring.HelloSpring" name="SpringName3 SpringName4"> <property name="name" value="HelloSpring"/> </bean> -
导入import
<!-- 创建applicationContext xml文件
         导入beans.xml && beans2.xml文件
    -->
<import resource="beans.xml"/>
<import resource="beans2.xml"/>
五.详细讲解依赖注入
5.1构造器注入
回顾第三节我已经实现了无参构造函数和有参构造函数的注入
5.2Set方式注入(重点)
测试场景:学生类
// set get toString 方法省略
public class Address {
    public String Address;
}

public class Student {
    private String name;
    private Address address;
    private String[] books;
    private List<String> hobby;
    private Map<String,String> cards;
    private Set<String> games;
    private String son;
    private Properties info;
}
配置文件
<?xml version="1.0" encoding="UTF-8"?>
<beans xmlns="http://www.springframework.org/schema/beans"
       xmlns:xsi="http://www.w3.org/2001/XMLSchema-instance"
       xsi:schemaLocation="http://www.springframework.org/schema/beans
        https://www.springframework.org/schema/beans/spring-beans.xsd">

    <!-- 创建address对象 -->
    <bean name="address" class="com.Al_tair.pojo.Address">
        <property name="address" value="西安"/>
    </bean>


    <bean name="students" class="com.Al_tair.pojo.Student">
        <!-- 直接赋值 -->
        <property name="name" value="罗念笙"/>

        <!-- 对象赋值 -->
        <property name="address" ref="address"/>

        <!-- array -->
        <property name="books">
            <array>
                <value>梦里花落知多少</value>
                <value>懦弱的勇气</value>
                <value>朝花夕拾</value>
                <value>童年</value>
            </array>
        </property>

        <!-- list -->
        <property name="hobby">
            <list>
                <value>运动</value>
                <value>java</value>
                <value>嵌入式</value>
            </list>
        </property>

        <!-- map -->
        <property name="cards">
            <map>
                <entry key="ID" value="1234567"/>
                <entry key="bankId" value="789456123"/>
            </map>
        </property>

        <!-- Set -->
        <property name="games">
            <set>
                <value>LOL</value>
                <value>王者荣耀</value>
                <value>QQ飞车</value>
                <value>哈利波特</value>

            </set>
        </property>

        <!-- null -->
        <property name="son">
            <value>null</value>
        </property>


        <!-- properties -->
        <property name="info">
            <props>
                <prop key="user">root</prop>
                <prop key="password">123456</prop>
            </props>
        </property>
    </bean>
</beans>
5.3拓展方式注入
namespace方式
<beans xmlns="http://www.springframework.org/schema/beans"
    xmlns:xsi="http://www.w3.org/2001/XMLSchema-instance"
    // p命名空间
    xmlns:p="http://www.springframework.org/schema/p"
    // c命名空间
    xmlns:c="http://www.springframework.org/schema/c"
    xsi:schemaLocation="http://www.springframework.org/schema/beans
        https://www.springframework.org/schema/beans/spring-beans.xsd">
</beans>
namespace实现代码
测试类
public class TestCP {
    private String name;
    private int age;
    public TestCP(){
        System.out.println("无参构造函数");
    }

    public TestCP(String name,int age){
        System.out.println("有参构造函数");
        this.age = age;
        this.name = name;
    }

    public void setName(String name) {
        this.name = name;
    }

    public void setAge(int age) {
        this.age = age;
    }
}
配置文件
    <!-- c命名空间,有参构造函数注入: construct-args -->
    <bean id="user2" class="com.Al_tair.test.TestCP" c:name="罗念笙" c:age="18"/>

    <!-- p命名空间,无参构造函数注入 :property -->
    <bean id="user" class="com.Al_tair.test.TestCP" p:name="罗念笙" p:age="18"/>
5.4 Bean作用域
| Scope | Description information |
|---|---|
| singleton | (默认)将单个 bean 定义范围限定为每个 Spring IoC 容器的单个对象实例 |
| prototype | 将单个 bean 定义范围限定为任意数量的对象实例 |
| request | 将单个 bean 定义范围限定为单个 HTTP 请求的生命周期 |
| session | 将单个 bean 定义范围限定为 HTTP 的生命周期Session |
| application | 将单个 bean 定义范围限定为ServletContext |
| websocket | 将单个 bean 定义范围限定为WebSocket |
5.41The Singleton Scope(默认作用域)
Only one shared instance of a singleton bean is managed, and all requests for beans with an ID or IDs that match that bean definition result in that one specific bean instance being returned by the Spring container
总结来说就是如果您在单个 Spring 容器中为特定类定义一个 bean,则 Spring 容器会创建该 bean 定义定义的类的一个且仅一个实例
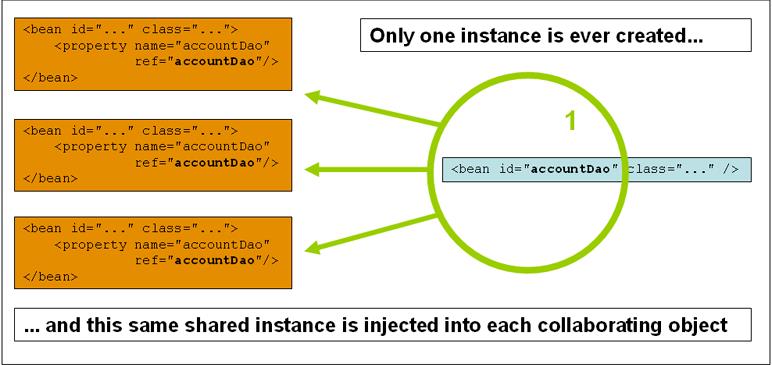
以下两种形式效果一样,因为Singleton作为默认作用域
<bean id="accountService" class="com.something.DefaultAccountService"/>

<!-- the following is equivalent, though redundant (singleton scope is the default) -->
<bean id="accountService" class="com.something.DefaultAccountService" scope="singleton"/>
5.42The Prototype Scope
The non-singleton prototype scope of bean deployment results in the creation of a new bean instance every time a request for that specific bean is made
bean 部署的非单一原型作用域导致每次对特定 bean 发出请求时都会创建一个新的 bean 实例
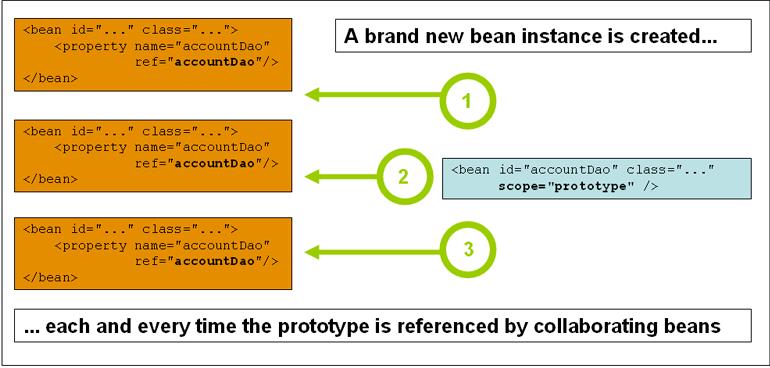
The following example defines a bean as a prototype in XML:
<bean id="accountService" class="com.something.DefaultAccountService" scope="prototype"/>
5.43其余的request,session,application这些只能在web开发中使用到!
六.Bean的自动装配
Spring中的三种的装配方式
- 在xml中显示的配置(如上文)
- 在java中显示的配置
- 隐式的自动装配(下文即将讲述)
测试环境: 一个人拥有两个宠物(猫和狗)
package com.Al_tair.Pojo;
/**
 * @author Al_tair
 * @date 2021/10/29-11:52
 */
public class People {
    private Dog dog;
    private Cat cat;
    private String name;

 以上是关于Spring-Ioc的主要内容,如果未能解决你的问题,请参考以下文章