Spring Cloud Gateway实战之三:动态路由
Posted 程序员欣宸
tags:
篇首语:本文由小常识网(cha138.com)小编为大家整理,主要介绍了Spring Cloud Gateway实战之三:动态路由相关的知识,希望对你有一定的参考价值。
欢迎访问我的GitHub
这里分类和汇总了欣宸的全部原创(含配套源码):https://github.com/zq2599/blog_demos
本篇概览
- 本文是《Spring Cloud Gateway实战》系列的第三篇,前文介绍了多种路由配置方式,它们存在一个共同问题:路由配置变更后必须重启Gateway应用才能生效,聪明的您一下就看出了问题关键:这样不适合生产环境!
- 如何让变动后的路由立即生效,而无需重启应用呢?这就是今天的主题:动态路由
设计思路
- 这里提前将设计思路捋清楚,总的来说就是将配置放在nacos上,写个监听器监听nacos上配置的变化,将变化后的配置更新到Gateway应用的进程内:
- 上述思路体现在代码中就是下面三个类:
- 将操作路由的代码封装到名为RouteOperator的类中,用此类来删除和增加进程内的路由
- 做一个配置类RouteOperatorConfig,可以将RouteOperator作为bean注册在spring环境中
- 监听nacos上的路由配置文件,一旦有变化就取得最新配置,然后调用RouteOperator的方法更新进程内的路由,这些监听nacos配置和调用RouteOperator的代码都放RouteConfigListener类中
-
在本次实战中,一共涉及三个配置文件,其中bootstrap.yml + gateway-dynamic-by-nacos是大家熟悉的经典配置,bootstrap.yml 在本地,里面是nacos的配置,gateway-dynamic-by-nacos在naocs上,里面是整个应用所需的配置(例如服务端口号、数据库等),还有一个配置文件在nacos上,名为gateway-json-routes,是JSON格式的,里面是路由配置,之所以选择JSON格式,是因为JSON比yml格式更易于解析和处理;
-
最终,整个微服务架构如下图所示:

-
思路已清晰,开始编码
源码下载
- 本篇实战中的完整源码可在GitHub下载到,地址和链接信息如下表所示(https://github.com/zq2599/blog_demos):
| 名称 | 链接 | 备注 |
|---|---|---|
| 项目主页 | https://github.com/zq2599/blog_demos | 该项目在GitHub上的主页 |
| git仓库地址(https) | https://github.com/zq2599/blog_demos.git | 该项目源码的仓库地址,https协议 |
| git仓库地址(ssh) | git@github.com:zq2599/blog_demos.git | 该项目源码的仓库地址,ssh协议 |
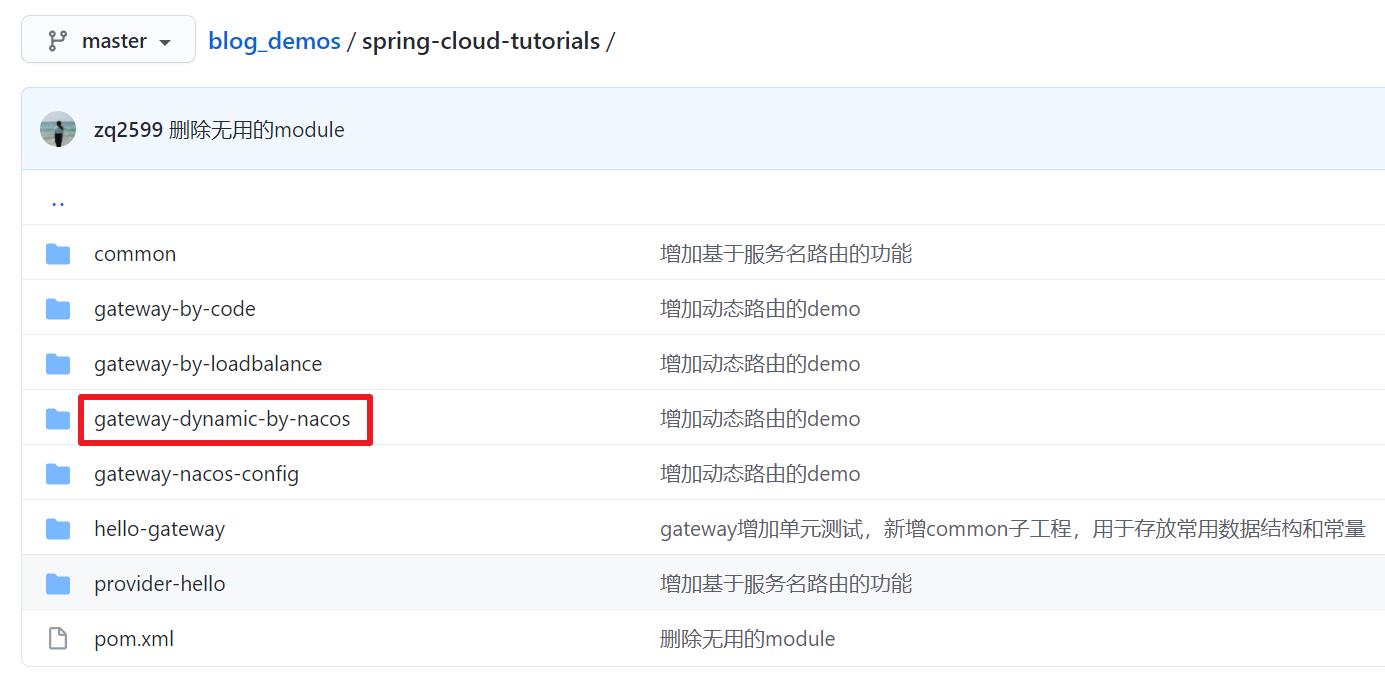
- 这个git项目中有多个文件夹,本篇的源码在spring-cloud-tutorials文件夹下,如下图红框所示:

- spring-cloud-tutorials是父工程,下属多个子工程,今天的实战的代码是gateway-dynamic-by-nacos,如下图所示:

编码
- 新增名为gateway-dynamic-by-nacos的工程,其pom.xml内容如下,注意中文注释的说明:
<?xml version="1.0" encoding="UTF-8"?>
<project xmlns="http://maven.apache.org/POM/4.0.0"
         xmlns:xsi="http://www.w3.org/2001/XMLSchema-instance"
         xsi:schemaLocation="http://maven.apache.org/POM/4.0.0 http://maven.apache.org/xsd/maven-4.0.0.xsd">
    <parent>
        <artifactId>spring-cloud-tutorials</artifactId>
        <groupId>com.bolingcavalry</groupId>
        <version>1.0-SNAPSHOT</version>
    </parent>
    <modelVersion>4.0.0</modelVersion>

    <artifactId>gateway-dynamic-by-nacos</artifactId>

    <dependencies>
        <dependency>
            <groupId>com.bolingcavalry</groupId>
            <artifactId>common</artifactId>
            <version>${project.version}</version>
        </dependency>

        <dependency>
            <groupId>org.springframework.cloud</groupId>
            <artifactId>spring-cloud-starter-gateway</artifactId>
        </dependency>

        <dependency>
            <groupId>io.projectreactor</groupId>
            <artifactId>reactor-test</artifactId>
            <scope>test</scope>
        </dependency>

        <dependency>
            <groupId>org.springframework.boot</groupId>
            <artifactId>spring-boot-starter-test</artifactId>
            <scope>test</scope>
        </dependency>

        <!-- 把springboot内容断点暴露出去 -->
        <dependency>
            <groupId>org.springframework.boot</groupId>
            <artifactId>spring-boot-starter-actuator</artifactId>
        </dependency>

        <!-- 使用bootstrap.yml的时候,这个依赖一定要有 -->
        <dependency>
            <groupId>org.springframework.cloud</groupId>
            <artifactId>spring-cloud-starter-bootstrap</artifactId>
        </dependency>

        <!-- 路由策略使用lb的方式是,这个依赖一定要有 -->
        <dependency>
            <groupId>org.springframework.cloud</groupId>
            <artifactId>spring-cloud-starter-loadbalancer</artifactId>
        </dependency>

        <!--nacos:配置中心-->
        <dependency>
            <groupId>com.alibaba.cloud</groupId>
            <artifactId>spring-cloud-starter-alibaba-nacos-config</artifactId>
        </dependency>

        <!--nacos:注册中心-->
        <dependency>
            <groupId>com.alibaba.cloud</groupId>
            <artifactId>spring-cloud-starter-alibaba-nacos-discovery</artifactId>
        </dependency>
    </dependencies>

    <build>
        <plugins>
            <!-- 如果父工程不是springboot,就要用以下方式使用插件,才能生成正常的jar -->
            <plugin>
                <groupId>org.springframework.boot</groupId>
                <artifactId>spring-boot-maven-plugin</artifactId>
                <configuration>
                    <mainClass>com.bolingcavalry.gateway.GatewayApplication</mainClass>
                </configuration>
                <executions>
                    <execution>
                        <goals>
                            <goal>repackage</goal>
                        </goals>
                    </execution>
                </executions>
            </plugin>
        </plugins>
    </build>
</project>
- 配置文件bootstrap.yml,上面只有nacos,可见其他配置信息还是来自naocs:
spring:
  application:
    name: gateway-dynamic-by-nacos
  cloud:
    nacos:
      config:
        server-addr: 127.0.0.1:8848
        file-extension: yml
        group: DEFAULT_GROUP
- 负责处理进程内路由配置的类是RouteOperator,如下所示,可见整个配置是字符串类型的,用了Jackson的ObjectMapper进行反序列化(注意,前面的实战中配置文件都是yml格式,但本例中是JSON,稍后在nacos上配置要用JSON格式),然后路由配置的处理主要是RouteDefinitionWriter类型的bean完成的,为了让配置立即生效,还要用applicationEventPublisher发布进程内消息:
package com.bolingcavalry.gateway.service;

import com.fasterxml.jackson.core.JsonProcessingException;
import com.fasterxml.jackson.core.type.TypeReference;
import com.fasterxml.jackson.databind.ObjectMapper;
import lombok.extern.slf4j.Slf4j;
import org.springframework.cloud.gateway.event.RefreshRoutesEvent;
import org.springframework.cloud.gateway.route.RouteDefinition;
import org.springframework.cloud.gateway.route.RouteDefinitionWriter;
import org.springframework.context.ApplicationEventPublisher;
import org.springframework.util.StringUtils;
import reactor.core.publisher.Mono;
import java.util.ArrayList;
import java.util.List;

@Slf4j
public class RouteOperator {
    private ObjectMapper objectMapper;

    private RouteDefinitionWriter routeDefinitionWriter;

    private ApplicationEventPublisher applicationEventPublisher;

    private static final List<String> routeList = new ArrayList<>();

    public RouteOperator(ObjectMapper objectMapper, RouteDefinitionWriter routeDefinitionWriter, ApplicationEventPublisher applicationEventPublisher) {
        this.objectMapper = objectMapper;
        this.routeDefinitionWriter = routeDefinitionWriter;
        this.applicationEventPublisher = applicationEventPublisher;
    }

    /**
     * 清理集合中的所有路由,并清空集合
     */
    private void clear() {
        // 全部调用API清理掉
        routeList.stream().forEach(id -> routeDefinitionWriter.delete(Mono.just(id)).subscribe());
        // 清空集合
        routeList.clear();
    }

    /**
     * 新增路由
     * @param routeDefinitions
     */
    private void add(List<RouteDefinition> routeDefinitions) {

        try {
            routeDefinitions.stream().forEach(routeDefinition -> {
                routeDefinitionWriter.save(Mono.just(routeDefinition)).subscribe();
                routeList.add(routeDefinition.getId());
            });
        } catch (Exception exception) {
            exception.printStackTrace();
        }
    }

    /**
     * 发布进程内通知,更新路由
     */
    private void publish() {
        applicationEventPublisher.publishEvent(new RefreshRoutesEvent(routeDefinitionWriter));
    }

    /**
     * 更新所有路由信息
     * @param configStr
     */
    public void refreshAll(String configStr) {
        log.info("start refreshAll : {}", configStr);
        // 无效字符串不处理
        if (!StringUtils.hasText(configStr)) {
            log.error("invalid string for route config");
            return;
        }

        // 用Jackson反序列化
        List<RouteDefinition> routeDefinitions = null;

        try {
            routeDefinitions = objectMapper.readValue(configStr, new TypeReference<List<RouteDefinition>>(){});
        } catch (JsonProcessingException e) {
            log.error("get route definition from nacos string error", e);
        }

        // 如果等于null,表示反序列化失败,立即返回
        if (null==routeDefinitions) {
            return;
        }

        // 清理掉当前所有路由
        clear();

        // 添加最新路由
        add(routeDefinitions);

        // 通过应用内消息的方式发布
        publish();

        log.info("finish refreshAll");
    }
}
- 做一个配置类RouteOperatorConfig.java,将实例化后的RouteOperator注册到spring环境中:
package com.bolingcavalry.gateway.config;

import com.bolingcavalry.gateway.service.RouteOperator;
import com.fasterxml.jackson.databind.ObjectMapper;
import org.springframework.cloud.gateway.route.RouteDefinitionWriter;
import org.springframework.context.ApplicationEventPublisher;
import org.springframework.context.annotation.Bean;
import org.springframework.context.annotation.Configuration;

@Configuration
public class RouteOperatorConfig {
    @Bean
    public RouteOperator routeOperator(ObjectMapper objectMapper,
                                       RouteDefinitionWriter routeDefinitionWriter,
                                       ApplicationEventPublisher applicationEventPublisher) {

        return new RouteOperator(objectMapper,
                routeDefinitionWriter,
                applicationEventPublisher);
    }
}
- 最后是nacos的监听类RouteConfigListener,可见关键技术点是ConfigService.addListener,用于添加监听,里面就是配置发生变化后更新路由的逻辑,另外还有很重要的一步:立即调用getConfig方法取得当前配置,刷新当前进程的路由配置:
package com.bolingcavalry.gateway.service;

import com.alibaba.nacos.api.NacosFactory;
import com.alibaba.nacos.api.config.ConfigService;
import com.alibaba.nacos.api.config.listener.Listener;
import com.alibaba.nacos.api.exception.NacosException;
import lombok.extern.slf4j.Slf4j;
import org.springframework.beans.factory.annotation.Autowired;
import org.springframework.beans.factory.annotation.Value;
import org.springframework.stereotype.Component;
import javax.annotation.PostConstruct;
import java.util.concurrent.Executor;

@Component
@Slf4j
public class RouteConfigListener {

    private String dataId = "gateway-json-routes";

    private String group = "DEFAULT_GROUP";

    @Value("${spring.cloud.nacos.config.server-addr}")
    private String serverAddr;

    @Autowired
    RouteOperator routeOperator;

    @PostConstruct
    public void dynamicRouteByNacosListener() throws NacosException {

        ConfigService configService = NacosFactory.createConfigService(serverAddr);

        // 添加监听,nacos上的配置变更后会执行
        configService.addListener(dataId, group, new Listener() {

            public void receiveConfigInfo(String configInfo) {
                // 解析和处理都交给RouteOperator完成
                routeOperator.refreshAll(configInfo);
            }

            public Executor getExecutor() {
                return null;
            }
        });

        // 获取当前的配置
        String initConfig = configService.getConfig(dataId, group, 5000);

        // 立即更新
        routeOperator.refreshAll(initConfig);
    }
}
- RouteConfigListener.java中还有一处要记下来,那就是dataId变量的值gateway-json-routes,这是nacos上配置文件的名字,稍后咱们在nacos上配置的时候会用到
- 最后是平淡无奇的启动类:
package com.bolingcavalry.gateway;

import org.springframework.boot.SpringApplication;
import org.springframework.boot.autoconfigure.SpringBootApplication;

@SpringBootApplication
public class GatewayApplication {
    public static void main(String[] args) {
        SpringApplication.run(GatewayApplication.class,args);
    }
}
- 编码完成了,接下来在nacos上增加两个配置;
- 第一个配置名为gateway-dynamic-by-nacos,内容如下:
server:
  port: 8086

# 暴露端点
management:
  endpoints:
    web:
      exposure:
        include: '*'
  endpoint:
    health:
      show-details: always
- 第二个配置名为gateway-json-routes,格式要选择JSON,可见只有一个路由(IP+端口那个),另一个用服务名作为URL的路由先不配上去,稍后用来验证动态增加能不能立即生效:
[
    {
        "id": "path_route_addr",
        "uri": "http://127.0.0.1:8082",
        "predicates":[
            {
                "name": "Path",
                "args": {
                    "pattern": "/hello/**"
                }
            }
        ]
    }
]
- 至此,咱们已经完成了开发工作,接下来验证动态路由是否能达到预期效果,我这里用的客户端工具是postman
验证
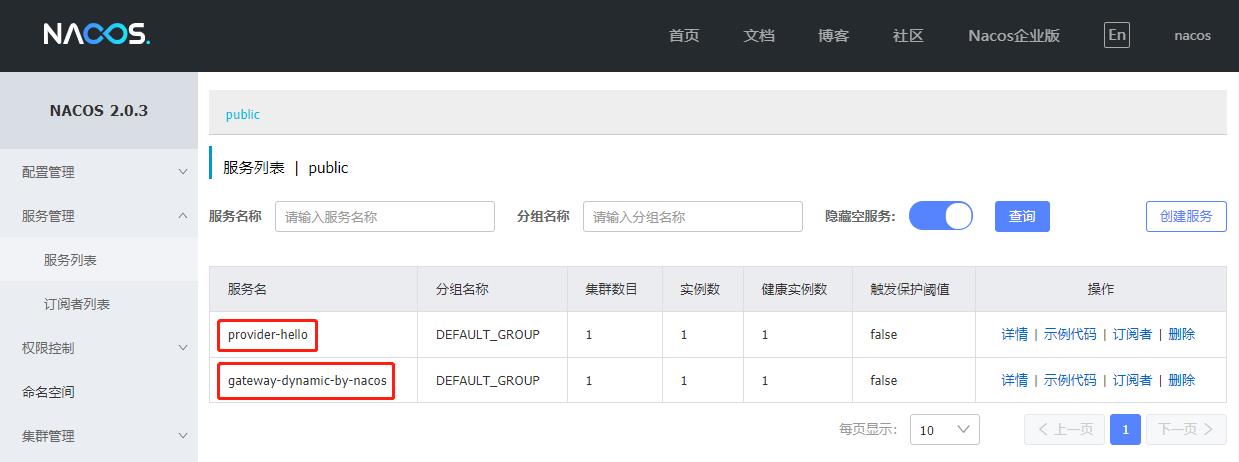
- 确保nacos、provider-hello、gateway-dynamic-by-nacos等服务全部启动:

- 用postman访问http://127.0.0.1:8086/hello/str,可以正常访问到,证明Gateway应用已经从nacos顺利下载了路由:

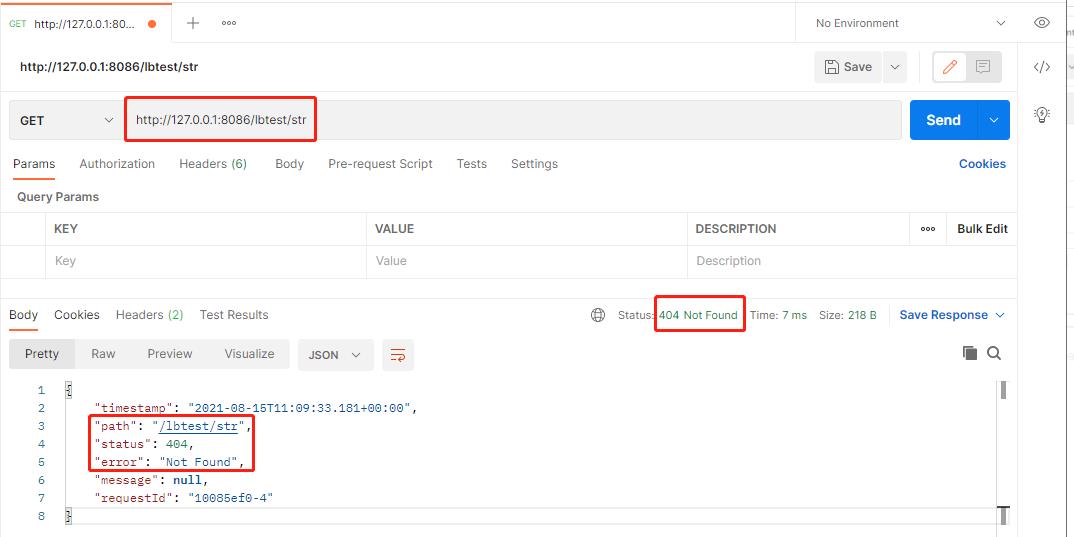
- 此时如果用访问http://127.0.0.1:8086/lbtest/str应该会失败,因为nacos上还没有配置这个path的路由,如下图,果然失败了:

- 在nacos上修改配置项gateway-json-routes的内容,增加名为path_route_lb的路由配置,修改后完整的配置如下:
[
    {
        "id": "path_route_addr",
        "uri": "http://127.0.0.1:8082",
        "predicates":[
            {
                "name": "Path",
                "args": {
                    "pattern": "/hello/**"
                }
            }
        ]
    }
    ,
    {
        以上是关于Spring Cloud Gateway实战之三:动态路由的主要内容,如果未能解决你的问题,请参考以下文章