B站学习springboot笔记
Posted 小智RE0
tags:
篇首语:本文由小常识网(cha138.com)小编为大家整理,主要介绍了B站学习springboot笔记相关的知识,希望对你有一定的参考价值。
学习来源–>B站 传送门–> 【狂神说Java】SpringBoot最新教程IDEA版通俗易懂
springboot:javaweb的开发框架;基于 Spring 开发;约定大于配置;默认配置了很多框架的使用方式
1.第一个springboot程序
个人使用版本 ;
maven: 3.8.3
Javajdk 8版本
数据库->mysql8.0版本
tomcat:->9.0.48版本
1.1两种创建项目方式
有两种开发方式,
方式1:官方网站提供的自动开发网站方式
本次学习考虑使用
2.5.6版本

首先;进入springboot官网—>https://spring.io/projects/spring-boot#overview
找到快速开发位置;

即–>https://start.spring.io/
进入页面后,简易选择相应的开发需求;下载即可;
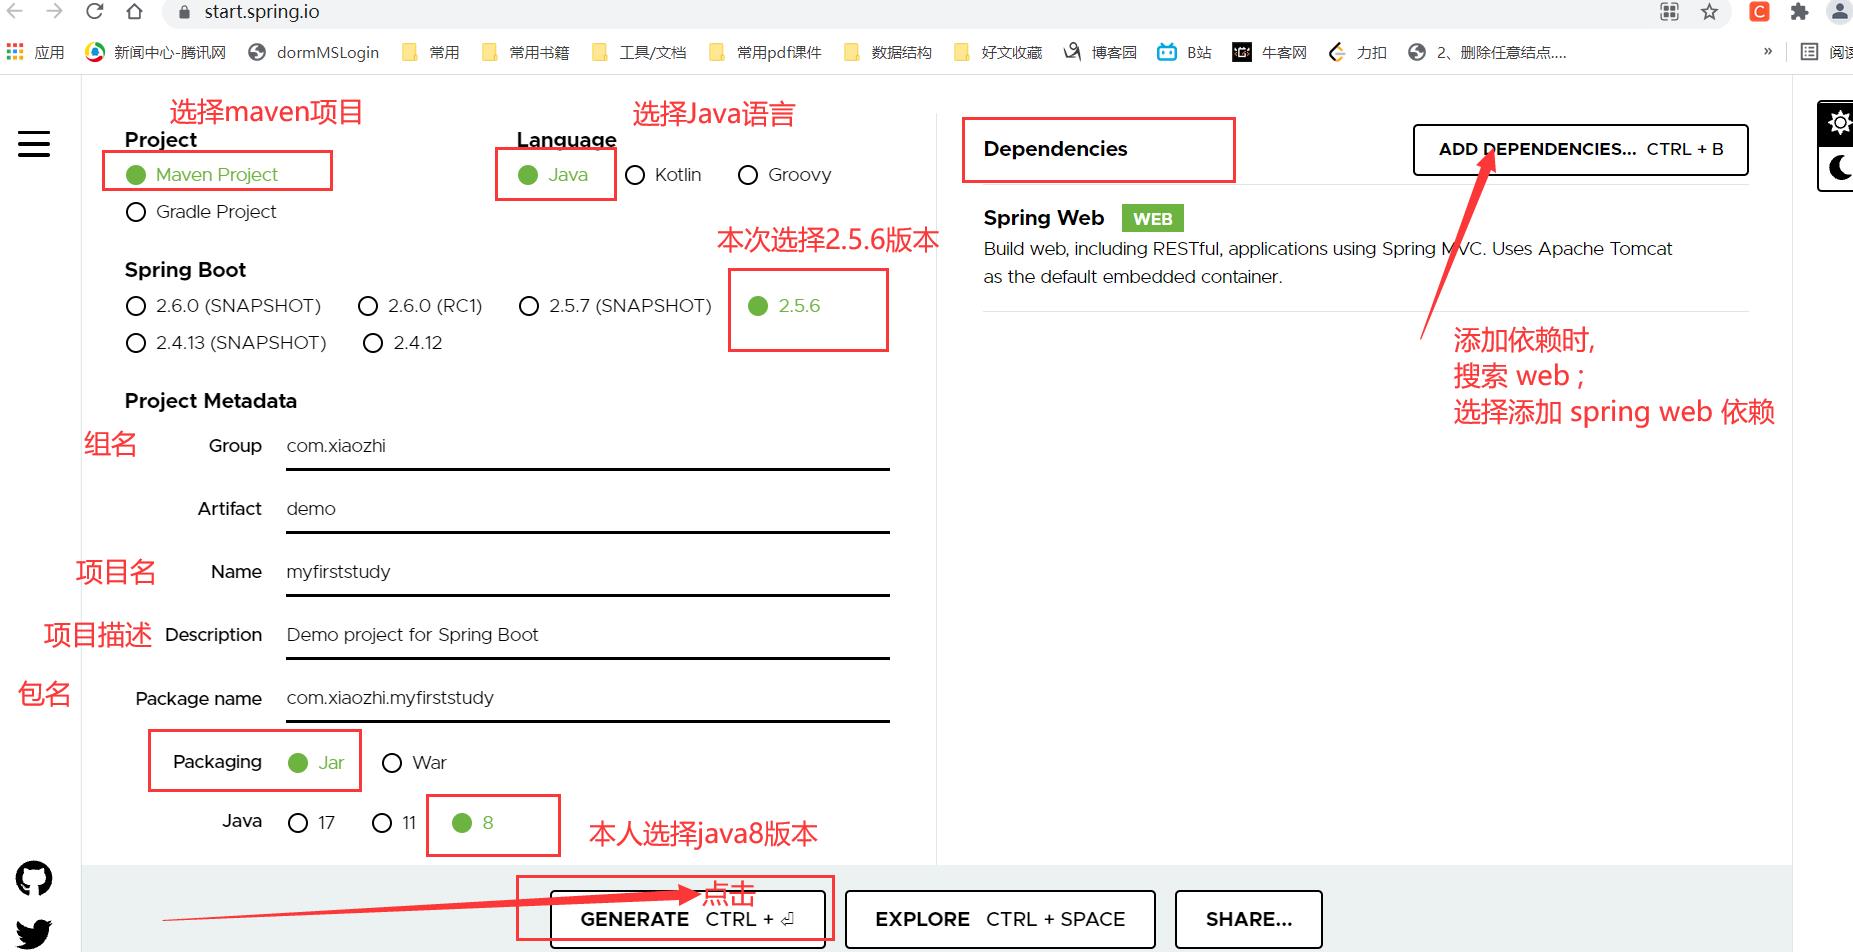
下载到本地;

项目解压后
用IDEA打开项目文件夹;
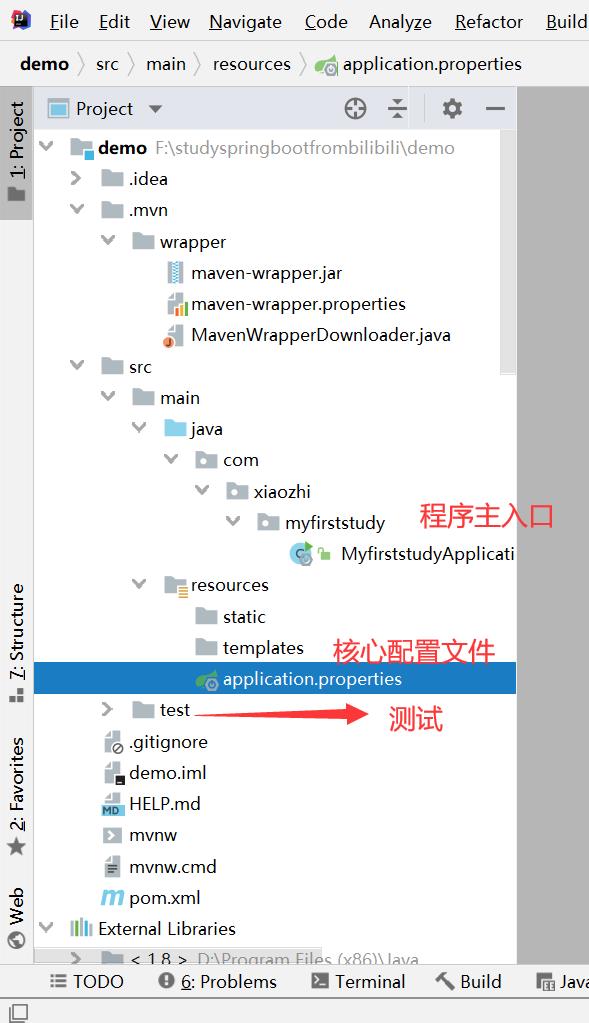
生成的pom.xml配置文件
<?xml version="1.0" encoding="UTF-8"?>
<project xmlns="http://maven.apache.org/POM/4.0.0" xmlns:xsi="http://www.w3.org/2001/XMLSchema-instance"
	xsi:schemaLocation="http://maven.apache.org/POM/4.0.0 https://maven.apache.org/xsd/maven-4.0.0.xsd">
	<modelVersion>4.0.0</modelVersion>
	<!--它的父级项目-->
	<parent>
		<groupId>org.springframework.boot</groupId>
		<artifactId>spring-boot-starter-parent</artifactId>
		<version>2.5.6</version>
		<relativePath/> <!-- lookup parent from repository -->
	</parent>
	<!--坐标-->
	<groupId>com.xiaozhi</groupId>
	<artifactId>demo</artifactId>
	<version>0.0.1-SNAPSHOT</version>
	<name>myfirststudy</name>
	<description>Demo project for Spring Boot</description>
	<properties>
		<java.version>1.8</java.version>
	</properties>
	<dependencies>
		<!--web开发依赖,包含springmvc,内嵌tomcat, xml配置-->
		<dependency>
			<groupId>org.springframework.boot</groupId>
			<artifactId>spring-boot-starter-web</artifactId>
		</dependency>
		<!--测试包-->
		<dependency>
			<groupId>org.springframework.boot</groupId>
			<artifactId>spring-boot-starter-test</artifactId>
			<scope>test</scope>
		</dependency>
	</dependencies>

	<build>
		<plugins>
			<!--项目打包插件-->
			<plugin>
				<groupId>org.springframework.boot</groupId>
				<artifactId>spring-boot-maven-plugin</artifactId>
			</plugin>
		</plugins>
	</build>
</project>
启动项目试试;

可看到,实际是启动了8080端口的本地服务器;
在浏览器访问http://localhost:8080/

之前的项目模块创建时,都放在一个包下;
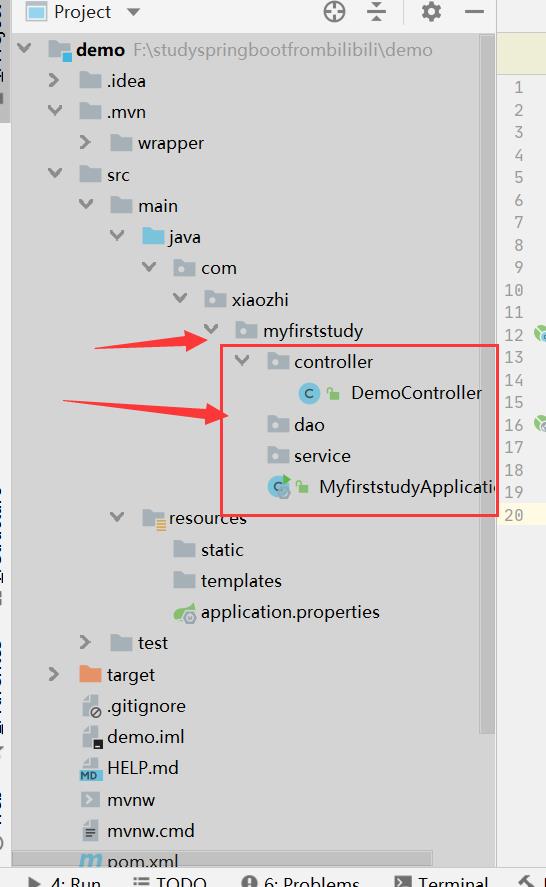
创建DemoController类,简易编写;
package com.xiaozhi.myfirststudy.controller;
import org.springframework.web.bind.annotation.RequestMapping;
import org.springframework.web.bind.annotation.RestController;
/**
 * @author by CSDN@小智RE0
 * @date 2021-10-22 17:33
 */
//声明为控制层;
@RestController
public class DemoController {
    //请求;
    @RequestMapping("/demo")
    public String Demo(){
        return "demo";
    }
}
无需进行配置,这是底层自动装配的;
启动MyfirststudyApplication;
访问http://localhost:8080/demo

项目打包;使用maven的package命令打包项目为jar包;
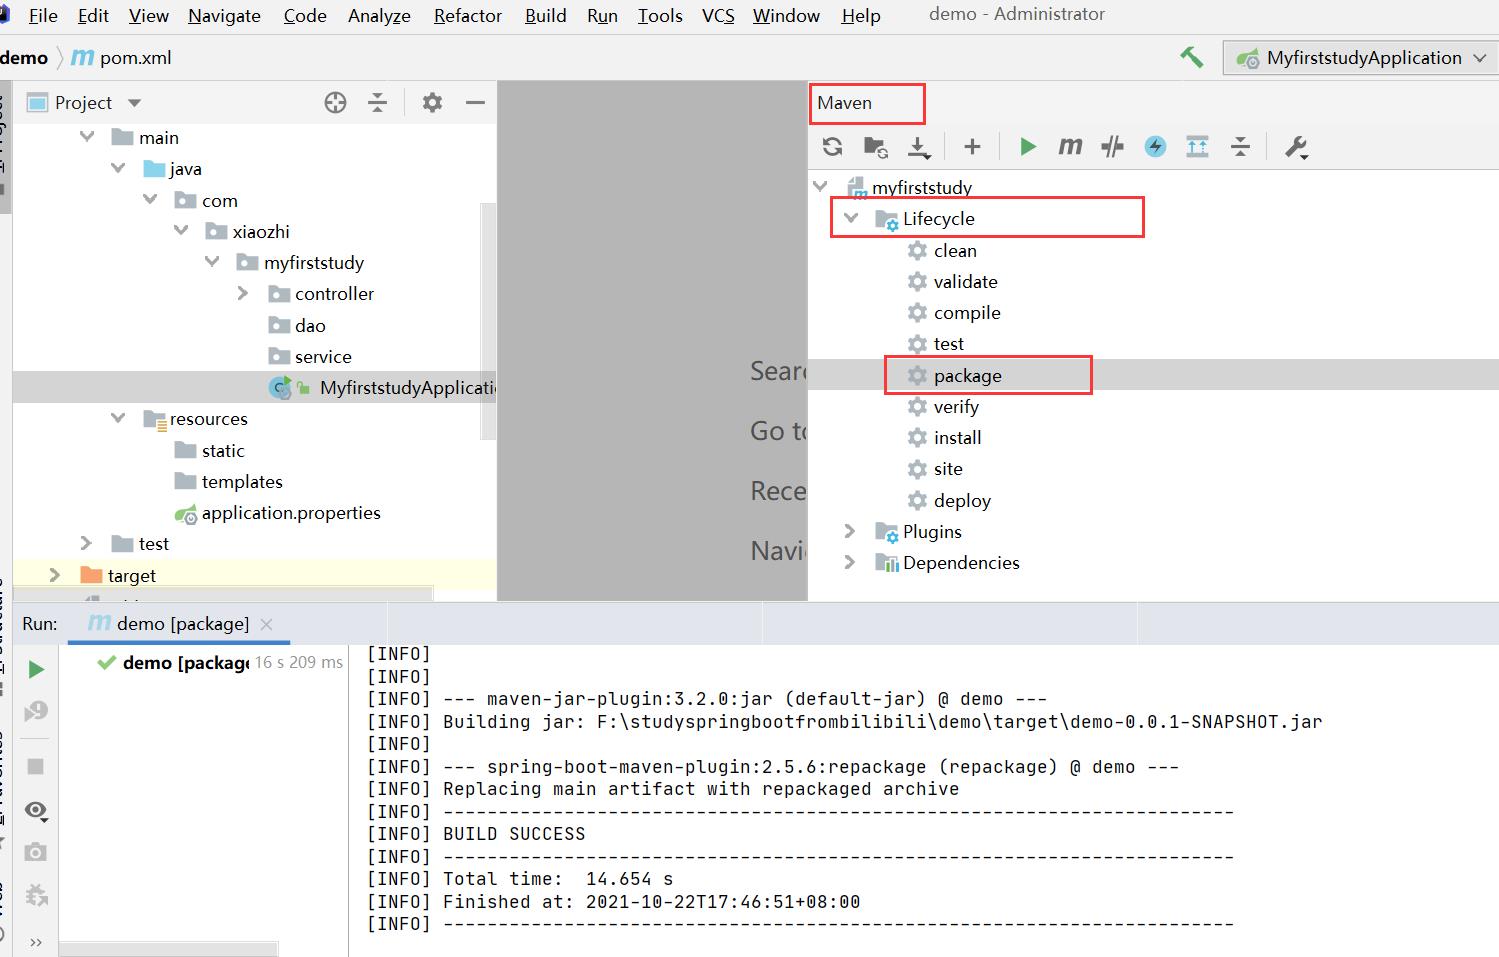

这个jar包启动后即可直接使用;
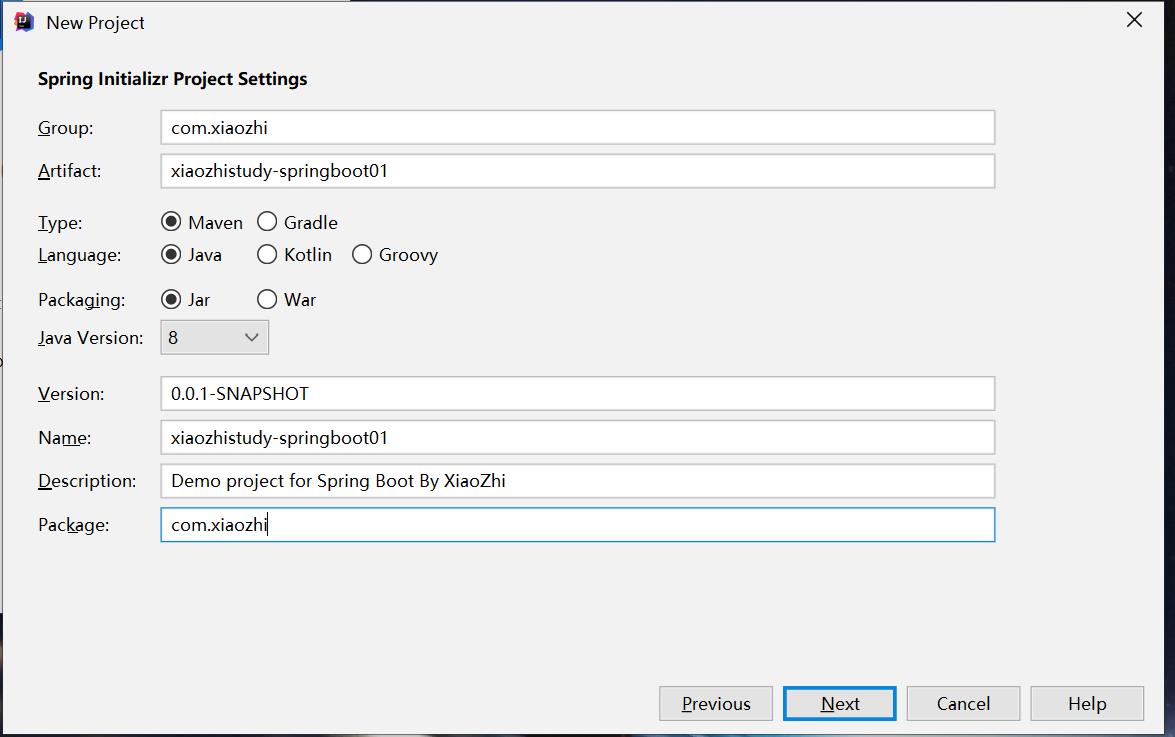
方式2:直接使用IDEA自动集成的springboot,进行项目创建;
实际上,这样的开发方式还是类似于默认与官网的一样
1.

2.
设置对应的版本,项目名,描述,包名…等
3.
这一步,可以不选择依赖;之后自己可以去pom.xml文件配置;

4.
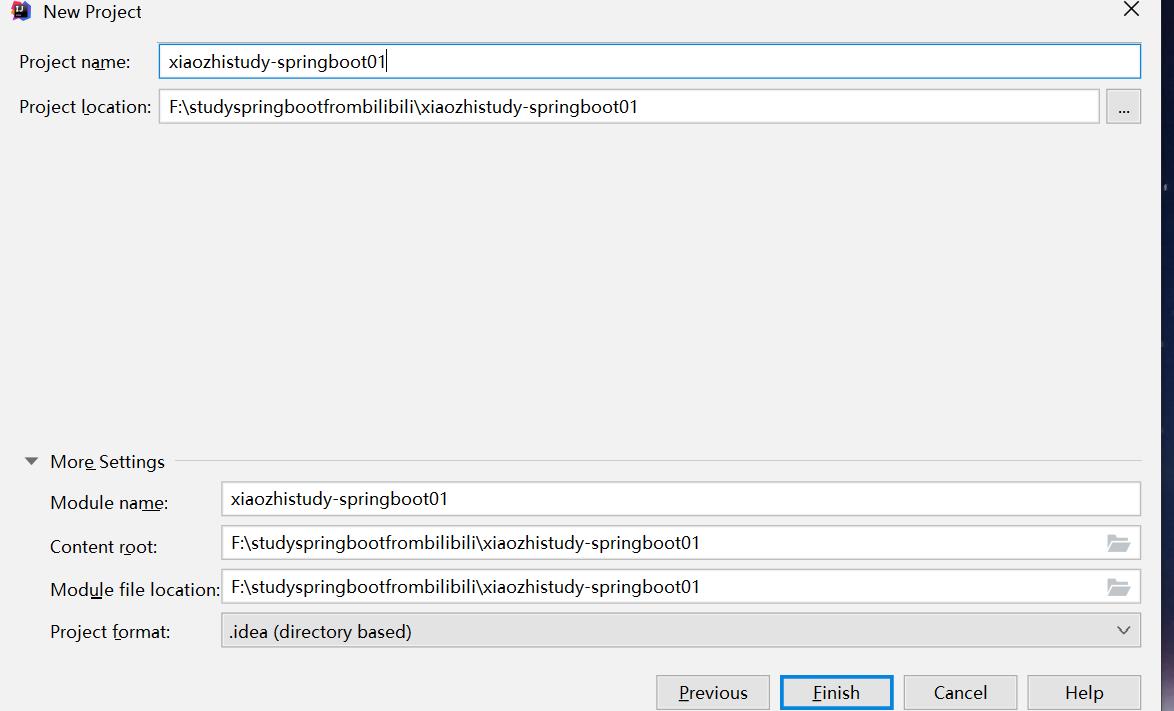
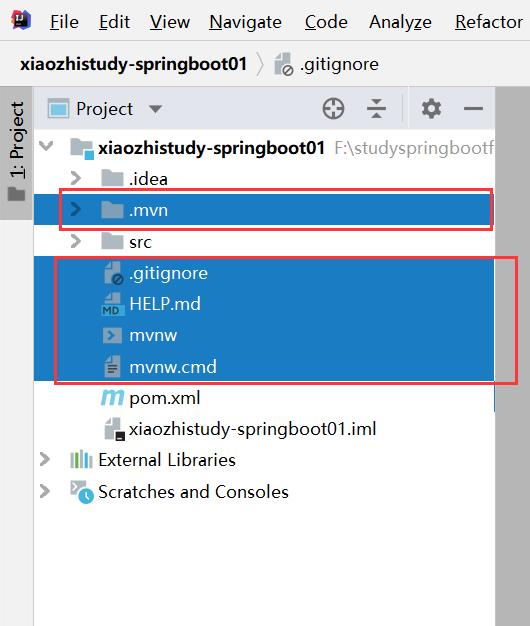
5.
删除这些目录及文件;
这样直接运行; 项目直接中断了,
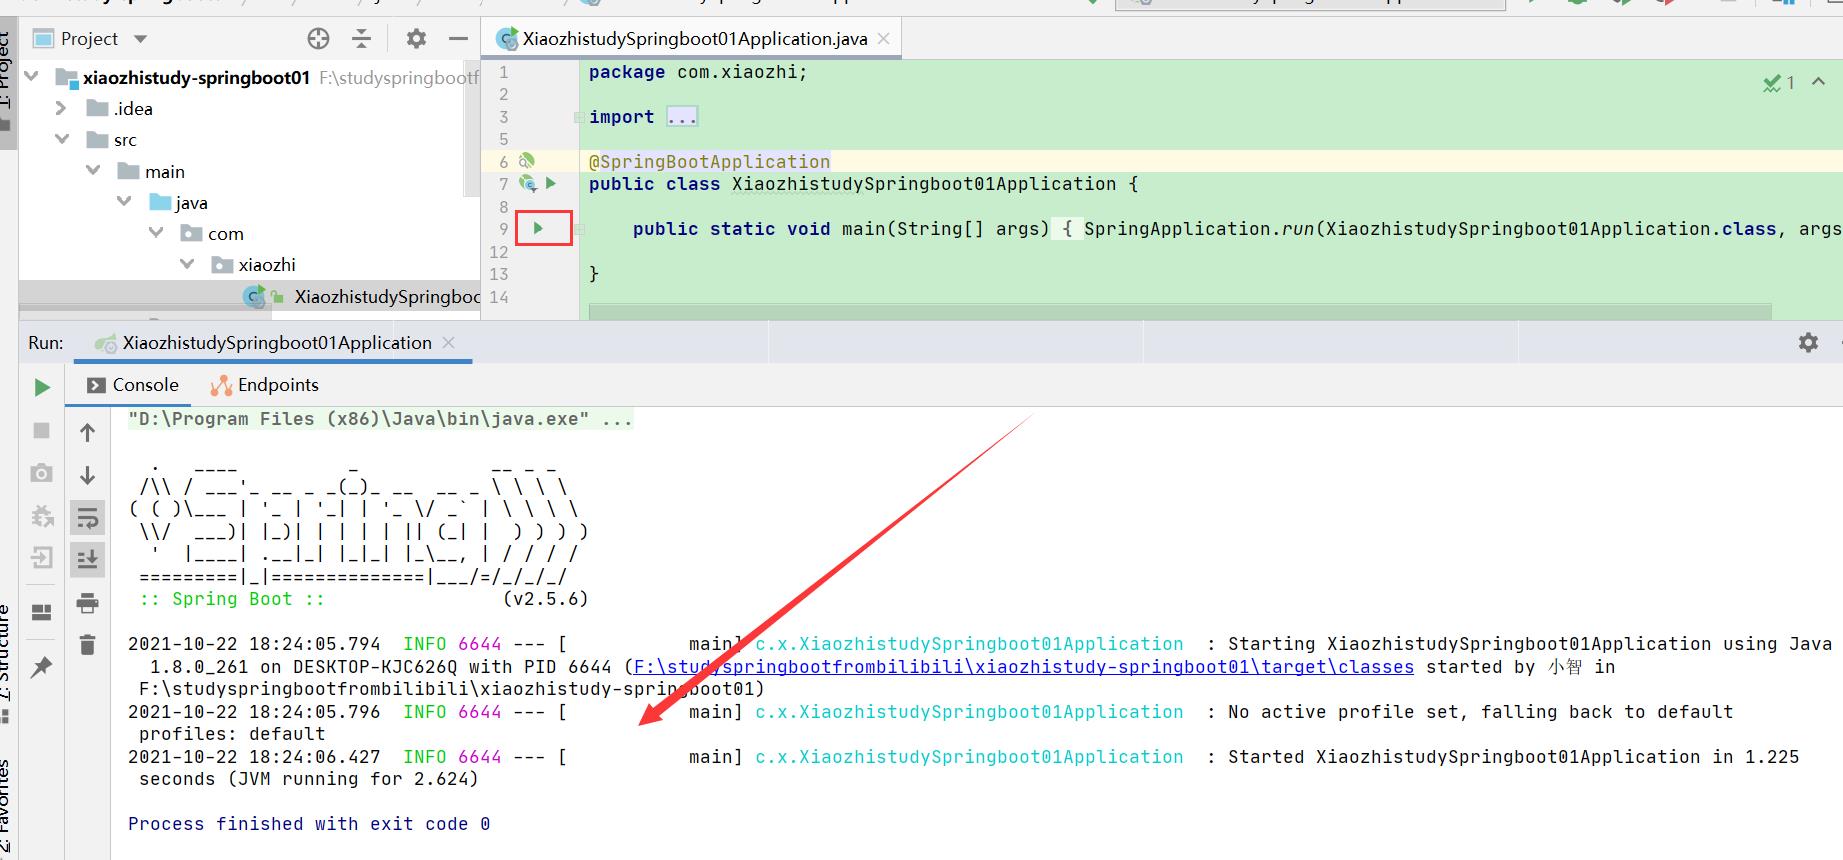
还需要在pom.xml文件中添加配置,即导入web的依赖;
<!--导入web依赖-->
<dependency>
    <groupId>org.springframework.boot</groupId>
    <artifactId>spring-boot-starter-web</artifactId>
</dependency>
再次启动项目;即可运行;
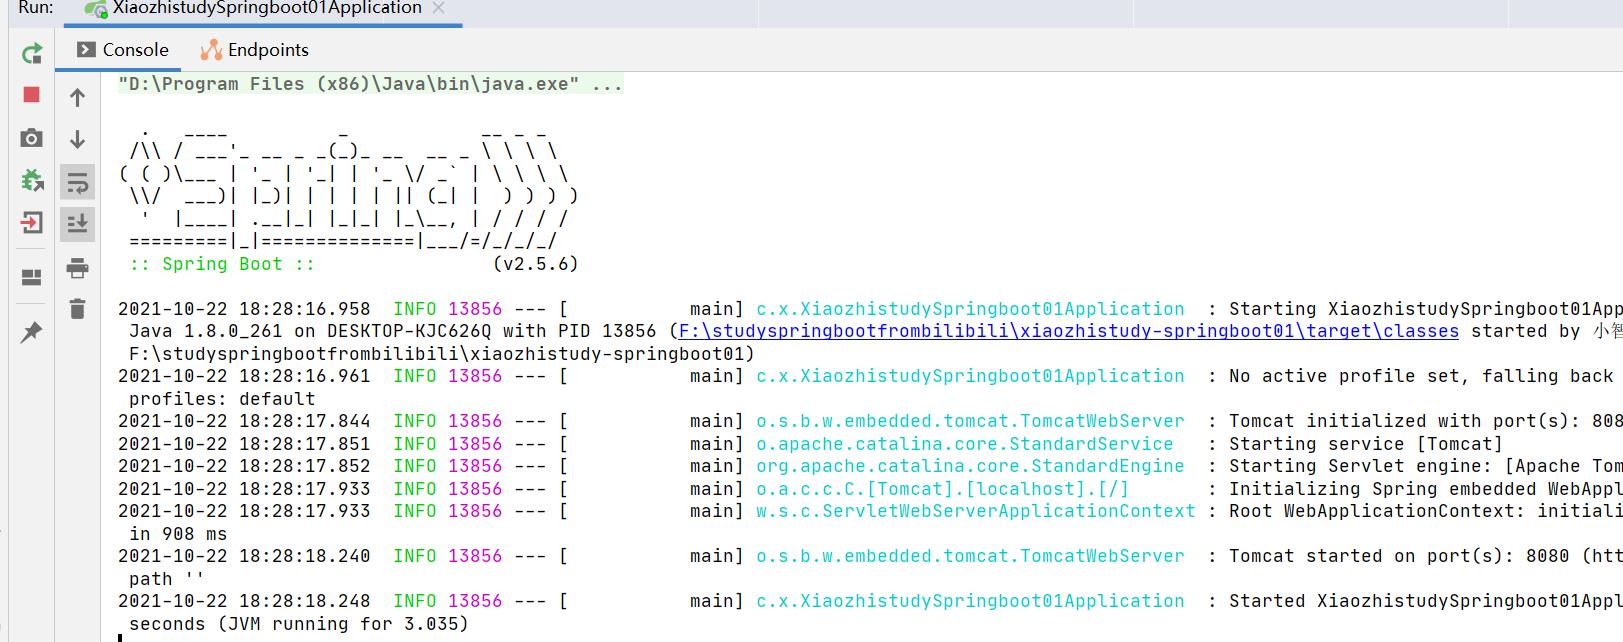
测试使用;
在xiaozhi目录下创建controller目录,创建DemoController;
package com.xiaozhi.controller;

import org.springframework.stereotype.Controller;
import org.springframework.web.bind.annotation.GetMapping;
import org.springframework.web.bind.annotation.RequestMapping;
import org.springframework.web.bind.annotation.ResponseBody;
/**
 * @author by CSDN@小智RE0
 * @date 2021-10-22 18:31
 */
@Controller
@RequestMapping("/demo")
public class DemoController {

    @GetMapping("/test")
    @ResponseBody
    public String test(){
        return "testDemo01";
    }
}
访问http://localhost:8080/demo/test

1.2在配置文件application.properties中进行相关的配置
打开在resources目录下的application.properties的文件;
##更改服务端口
server.port=5277
再次启动时;端口已更新为5277

1.3在resources目录下创建banner.txt文件,更改生成的标识;
___   ___  __       ___       ______    ________   __    __   __  .______       _______   ___
\\  \\ /  / |  |     /   \\     /  __  \\  |       /  |  |  |  | |  | |   _  \\     |   ____| / _ \\
 \\  V  /  |  |    /  ^  \\   |  |  |  | `---/  /   |  |__|  | |  | |  |_)  |    |  |__   | | | |
  >   <   |  |   /  /_\\  \\  |  |  |  |    /  /    |   __   | |  | |      /     |   __|  | | | |
 /  .  \\  |  |  /  _____  \\ |  `--'  |   /  /----.|  |  |  | |  | |  |\\  \\----.|  |____ | |_| |
/__/ \\__\\ |__| /__/     \\__\\ \\______/   /________||__|  |__| |__| | _| `._____||_______| \\___/
启动项目

2.springboot的自动装配
首先看看核心文件POM.XML
在它的核心配置文件pom.xml中,有显示它的父工程
spring-boot-starter-parent
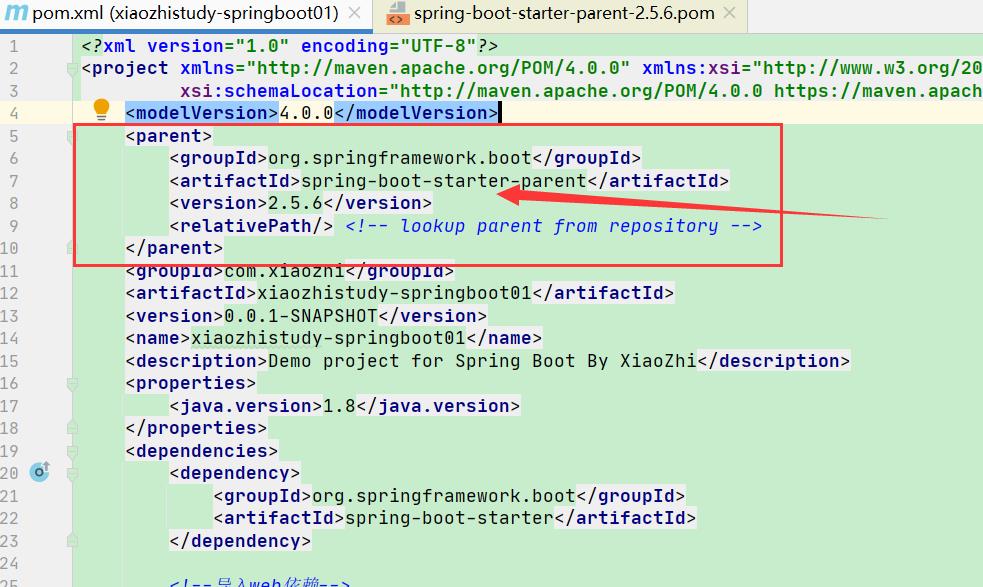
按住crtl,点进去;可看到它已经自动配置了资源文件的过滤配置操作;

它的父工程也存在一个上级父工程;spring-boot-dependencies
来管理所有的依赖配置;
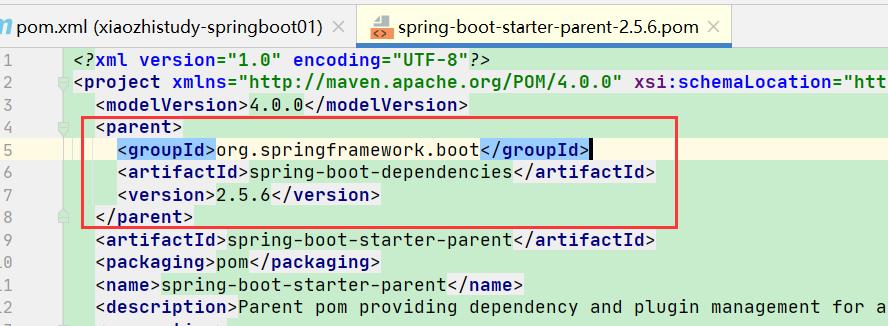
同样地,按住
ctrl键,点进去;可看到,它装配了各种依赖的属性资源,的默认版本号;

关于启动器;
比如说自动生成的这个依赖,都带有starter ;即可理解为启动器,而且这些依赖都不需要去写它的版本号;因为在他的父级的父级有默认的版本号定义.
启动器即自动的应用开发场景
<!--web开发依赖,包含springmvc,内嵌tomcat, xml配置-->
<dependency>
	<groupId>org.springframework.boot</groupId>
	<artifactId>spring-boot-starter-web</artifactId>
</dependency>
<!--测试包-->
<dependency>
	<groupId>org.springframework.boot</groupId>
	<artifactId>spring-boot-starter-test</artifactId>
	<scope>test</scope>
</dependency>
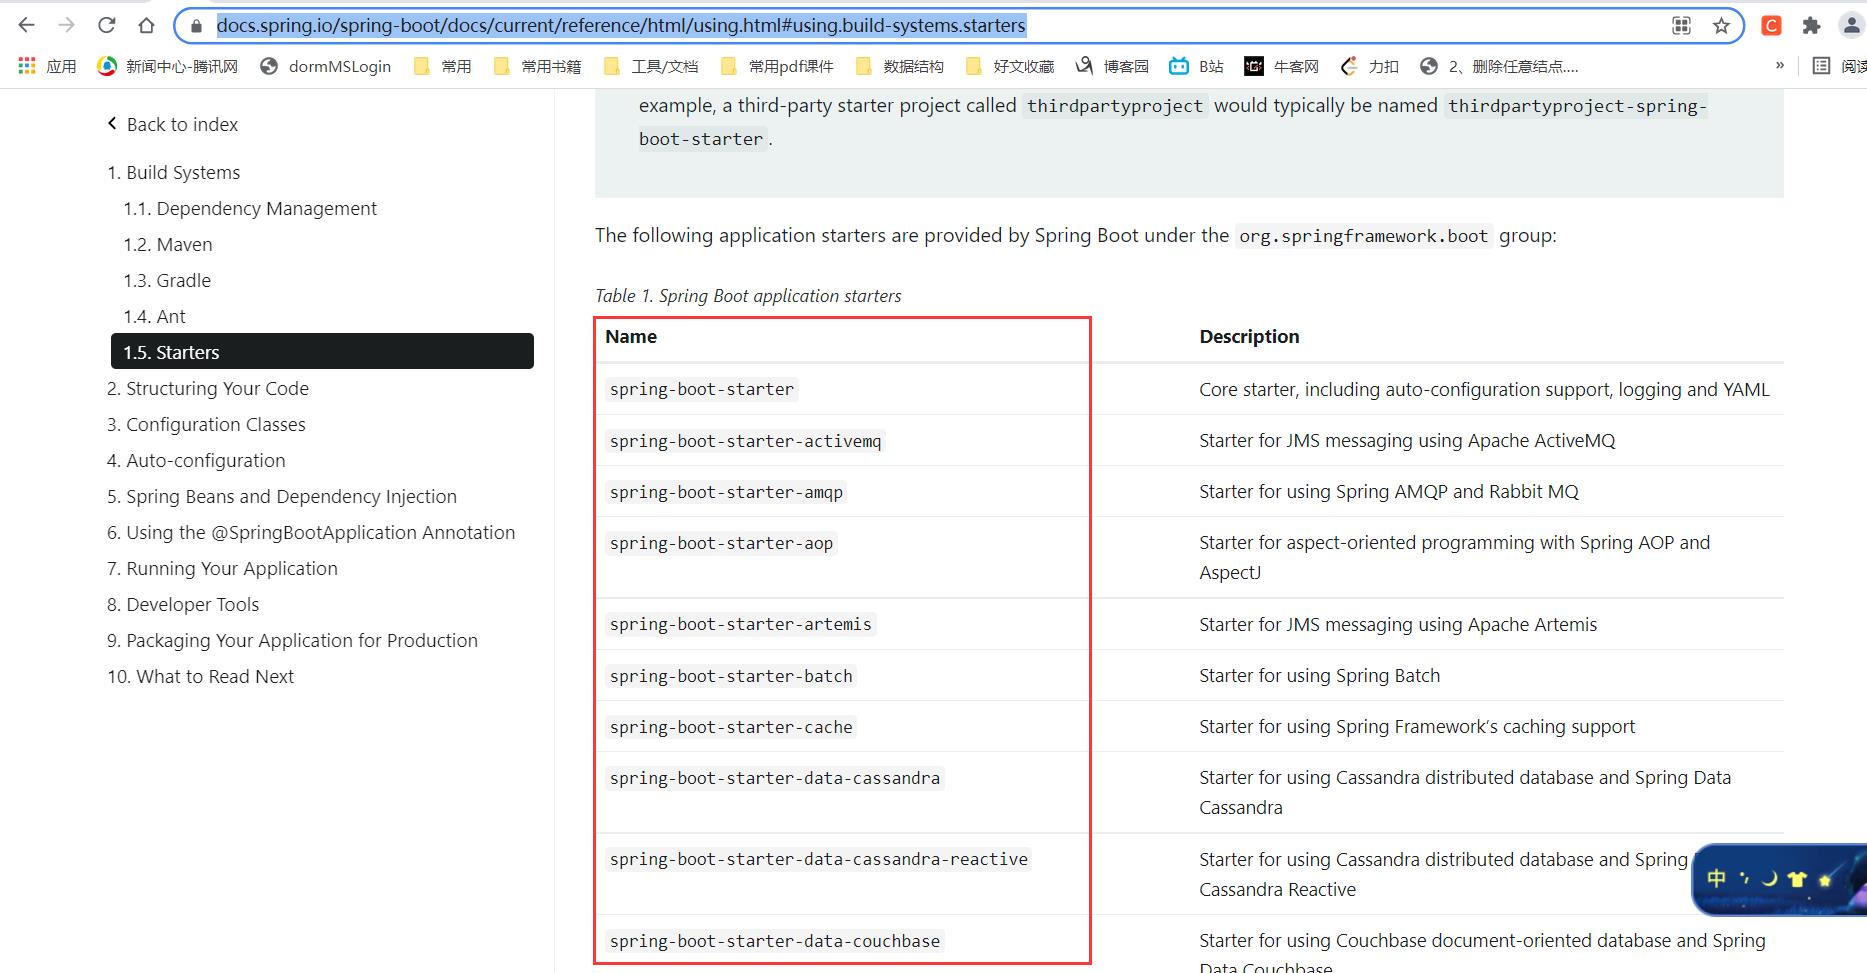
可以在官方文档2.5.6版本的api文档中,看看有哪些启动器;—>springboot–2.5.6的文档
关于启动的主程序
写在前面;(摘自<<offer来了>>中对于启动类的解释)
启动类是spring boot的入口,应用程序通过在类上设置一个启动类所在的包以及它的子包中的所有类的注解,并且将其加载到spring boot 的容器中进行管理,只需要在main( )方法中执行SpringApplication.run(SpringApplication.class, args),即完成了启动类的定义.
package com.xiaozhi;

import org.springframework.boot.SpringApplication;
import org.springframework.boot.autoconfigure.SpringBootApplication;

@SpringBootApplication
public class XiaozhistudySpringboot01Application {

    public static void main(String[] args) {
        //主要启动处;
        SpringApplication.run(XiaozhistudySpringboot01Application.class, args);
    }
}
(1)找到这个注解
@SpringBootApplication;点进去使用;
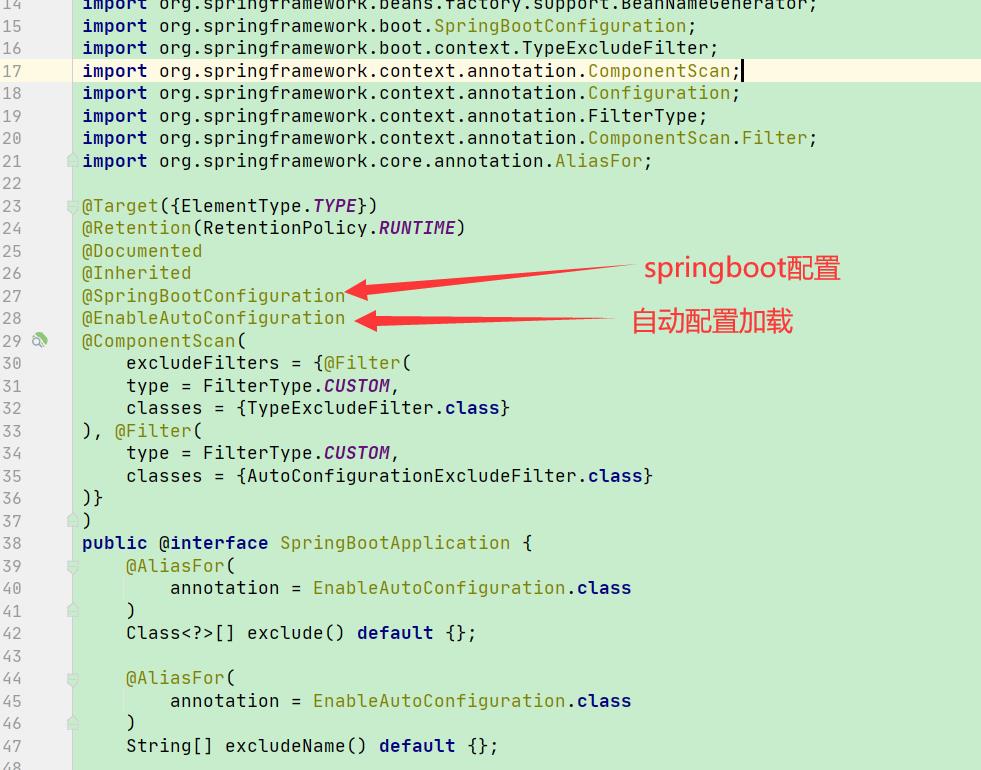
(2)找到注解
@EnableAutoConfiguration;
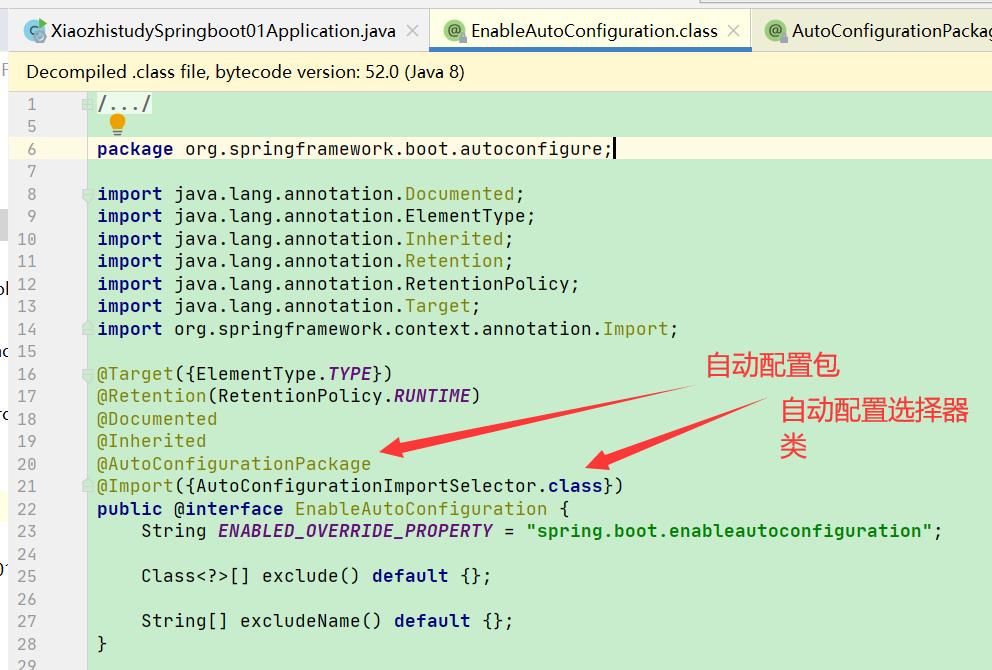
(3)而注解``的定义中使用了注解
@Import({Registrar.class});引用注册类;
(4)对于自动装配选择类
AutoConfigurationImportSelector;这里导入有多个选择的配置;

使用该方法,获取所有的配置;
List<String> configurations = this.getCandidateConfigurations(annotationMetadata, attributes);

(5)这里使用的方法是
getCandidateConfigurations();
protected List<String> getCandidateConfigurations(AnnotationMetadata metadata, AnnotationAttributes attributes) {
        List<String> configurations = SpringFactoriesLoader.loadFactoryNames(this.getSpringFactoriesLoaderFactoryClass(), this.getBeanClassLoader());
        Assert.notEmpty(configurations, "No auto configuration classes found in META-INF/spring.factories. If you are using a custom packaging, make sure that file is correct.");
        return configurations;
    }
(6)调用方法
getSpringFactoriesLoaderFactoryClass()时,内部是加载了EnableAutoConfiguration注解接口;
而这个注解@EnableAutoConfiguration又是被@SpringBootApplication注解所继承.

(7)根据提示的核心文件
META-INF/spring.factories;
在引用的jar包中查找;这个配置文件;

(8)自动装配的导入文件;
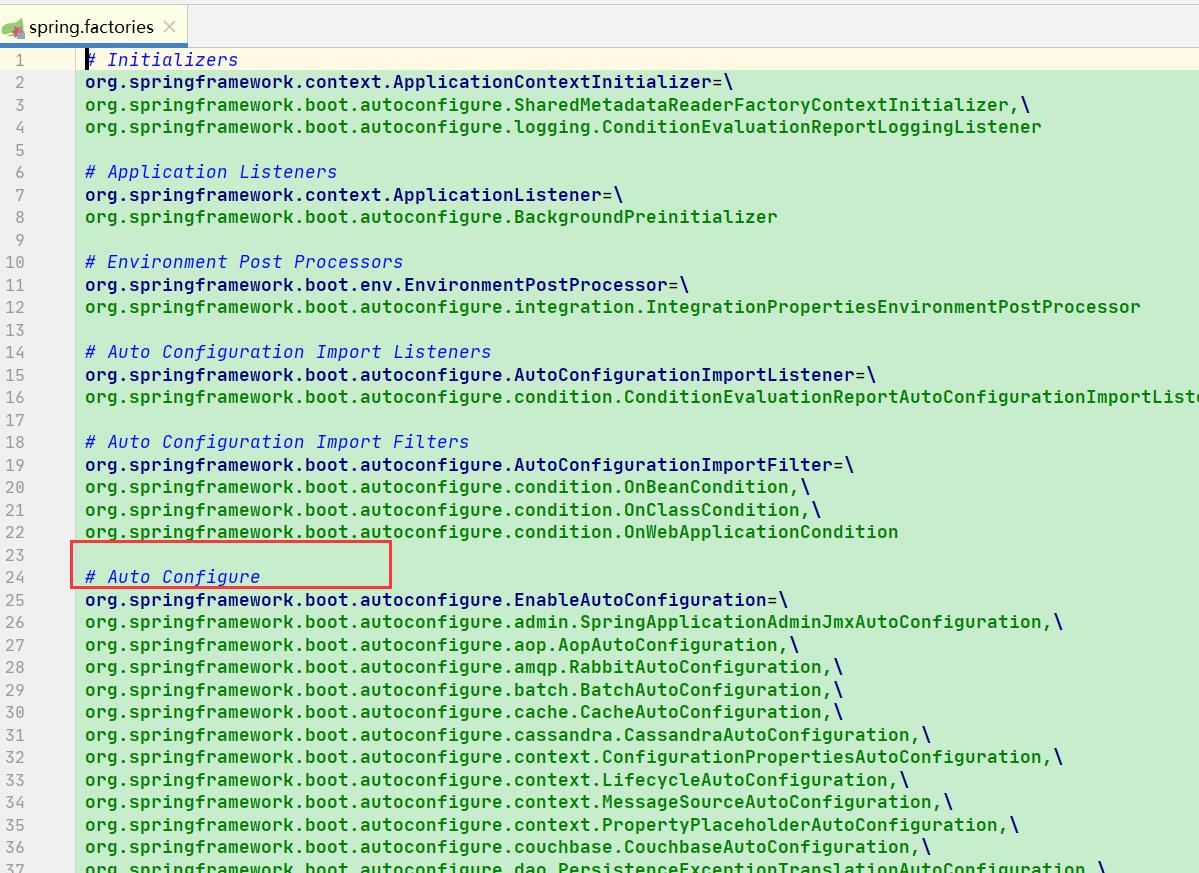
(9)刚才是根据提示配置文件查看,现在继续回到方法
getCandidateConfigurations( );
找到其中的loadFactoryNames( )方法;

 public static List<String> loadFactoryNames(Class<?> factoryType, @Nullable ClassLoader classLoader) {
        //获取类加载器;
        ClassLoader classLoaderToUse = classLoader;
        if (classLoader == null) {
            //最终还是加载资源文件 META-INF/spring.factories
            classLoaderToUse = SpringFactoriesLoader.class.getClassLoader();
        }

        String factoryTypeName = factoryType.getName();
        //加载资源文件;
        return (List)loadSpringFactories(classLoaderToUse).getOrDefault(factoryTypeName, Collections.emptyList());
    }
在
配置文件spring.factories中虽然自动导入装配了许多的配置包;
但是不一定都被应用过来了,那么就必须在pom.xml文件中进行配置启动包的坐标,才会被装配使用;
3.主要启动程序的运行过程
SpringApplication.run(XiaozhistudySpringboot01Application.class, args);
这一段需要分为两步
SpringApplication类 与 run( )方法.
run方法运行
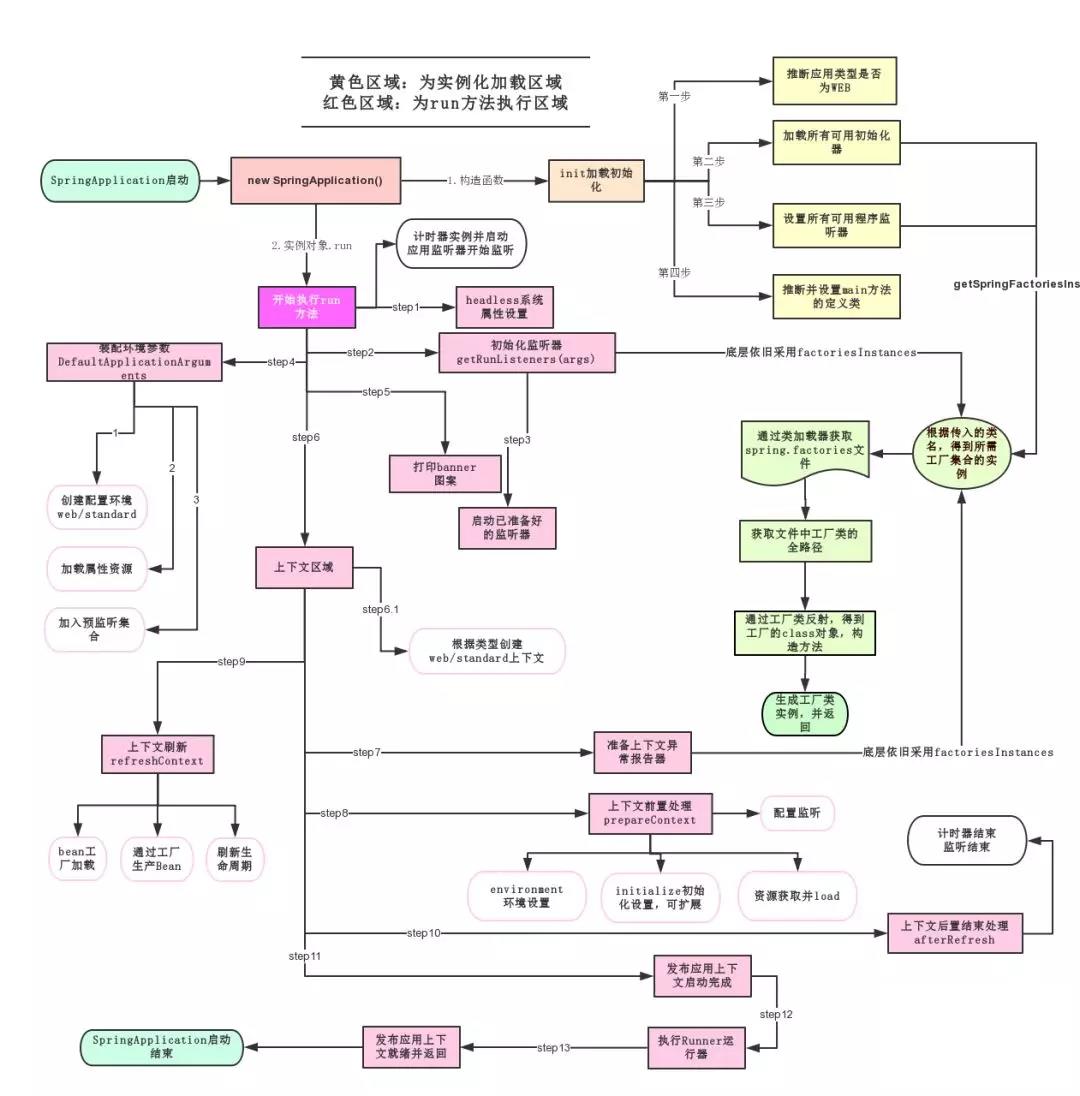
SpringApplication类 的构造方法,

在启动时,首先会判断这是普通项目还是web项目;
然后查找并加载所有可用初始化器 , 设置到initializers属性;
找出所有的应用程序监听器,设置到listeners属性;
然后推断使用的当前类下的main方法,寻找运行的主类;
然后在为其装配spring相关的配置;
4.yaml配置文件的基本语法
之前使用application.properties的写法;
#配置修改端口;
server.port=3699
#单个数据
person = demo

#对象写法;
user.name=lzq
user.age=22
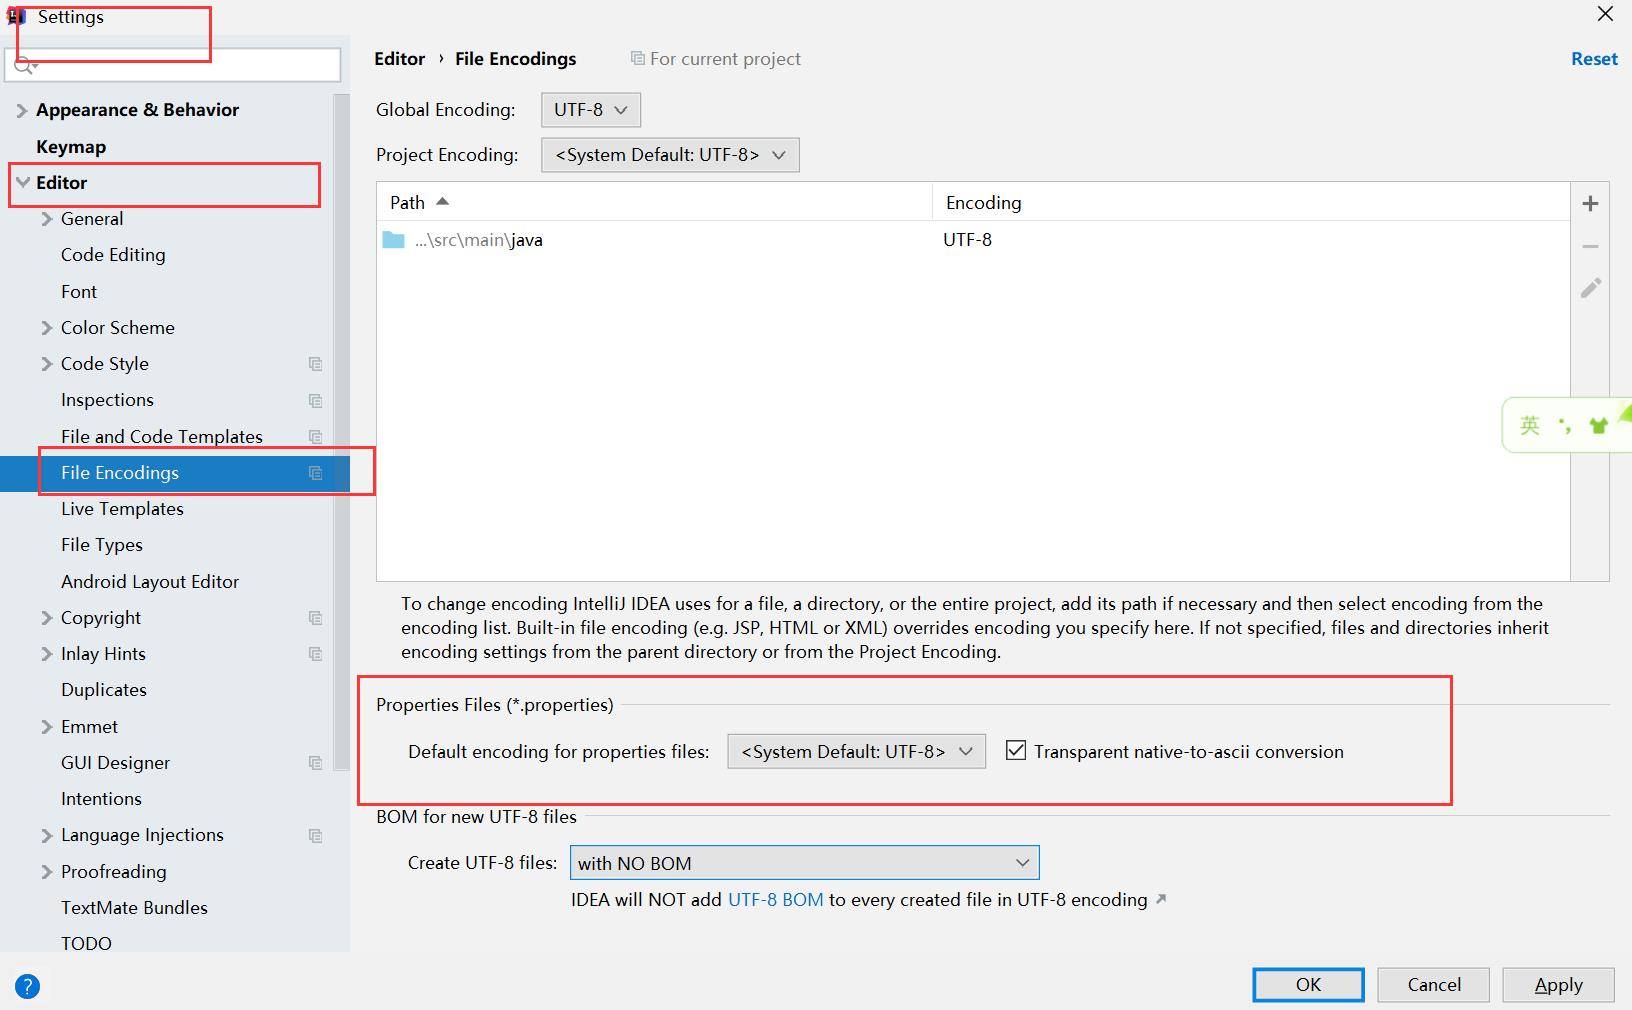
注意:properties配置文件在写中文的时候,会有乱码;可以设置为utf-8
application.yaml
而使用yaml文件的语法书写时,键值之间用冒号隔开,且赋值时需要在冒号后加空格;
而对于一个对象进行赋值时,需要层级之间的划分;
# 单个数据;冒号后加个空格;
person : iampeople

# 对象;注意层级;
user:
  name: lzq
  age: 22

# 行内写法;
 user: {name : lzq,age: 22}

#数组;
car:
  - baoma
  - aodi
  - dazhong

#数组行内写法
    car: [baoma,aodi,dazhong]
为属性赋值的几种方式
方式1::直接用注解赋值
先写个用户实体类
package com.xiaozhi.pojo;

import org.springframework.beans.factory.annotation.Value;
import org.springframework.stereotype.Component;

/**
 * @author by CSDN@小智RE0
 * @date 2021-10-25 18:34
 * 用户实体类;
 */
//使用注解,将它注入spring;
@Component
public class User {
    //直接用注解赋值;
    @Value("小智RE0")
    private String account;
    @Value("123456")
    private String password;

    //构造方法;
    public User() {

    }

    public User(String account, String password) {
        this.account = account;
        this.password = password;
    }

    //get,set;
    public String getAccount() {
        return account;
    }

    public void setAccount(String account) {
        this.account = account;
    }

    public String getPassword() {
        return password;
    }

    public void setPassword(String password) {
        this.password = password;
    }

    //toString方法
    @Override
    public String toString() {
        return "User{" +
                "account='" + account + '\\'' +
                ", password='" + password + '\\'' +
                '}';
    }
}
在测试类中使用;
package com.xiaozhi;

import com.xiaozhi.pojo.User;
import org.junit.jupiter.api.Test;
import org.springframework.beans.factory.annotation.Autowired;
import org.springframework.boot.test.context.SpringBootTest;

@SpringBootTest
class StudySpringboot02ApplicationTests {

    //自动装配类;
    @Autowired
    private User user;

    @Test
    void contextLoads() {
        System.out.println(user);
    }
}

方式2:在yaml配置文件中赋值;
首先去pom.xml中配置文件处理依赖的jar坐标;然后,重启IDEA
<dependency>
    <groupId>org.springframework.boot</groupId>
    <artifactId>spring-boot-configuration-processor</artifactId>
    <optional>true</optional>
</dependency>
先写个汽车实体类
package com.xiaozhi.pojo;
import java.util.Date;
import java.util.List;
import java.util.Map;
/**
* @author by CSDN@小智RE0
* @date 2021-10-26 13:00
* 汽车实体类;
*/
//注入spring容器
@Component
//配置读取配置文件 中car下的属性
@ConfigurationProperties(prefix = "car")
public class Car {
//属性
private String color;
private String size;
private Date start;
private List<Object> lists;
private Map<String,Object> maps;
private Boolean good;
//这里还用到了User用户对象;
private User user;
//构造方法;
public Car() {
}
public Car(String color, String size, Date start,
List<Object> lists, Map<