手把手教你做一个电子相册
Posted HaaS技术社区
tags:
篇首语:本文由小常识网(cha138.com)小编为大家整理,主要介绍了手把手教你做一个电子相册相关的知识,希望对你有一定的参考价值。

1、概述
首先介绍下什么是HaaS:2020年9月17日,在云栖大会上阿里云IoT团队正式发布了HaaS(Hardware as a Servie)。HaaS是一种物联网设备云端一体开发框架,它的目的是通过数量收敛的硬件积木(比如主控板:HaaS100,HaaS eduk1, wifi+BT模组;比如各种认证的传感器)和丰富、标准的软件积木(包括各种组件、云端服务以及钉钉公版小程序)持续降低物联网开发门槛,让用户(包括c/c++,JS,Python用户)可以快速用我们提供的软硬件积木搭建应用,并且不用关心任何硬件调试,只需要关注“云端钉”的业务逻辑代码即可。
本用例会分两篇文章介绍如何实现一个云端一体化可升级的电子相册(这个电子相册不但能播放图片,还要能通过云端随时更新图片),此篇文章主要介绍如何基于HaaS eduk1把图片显示出来;
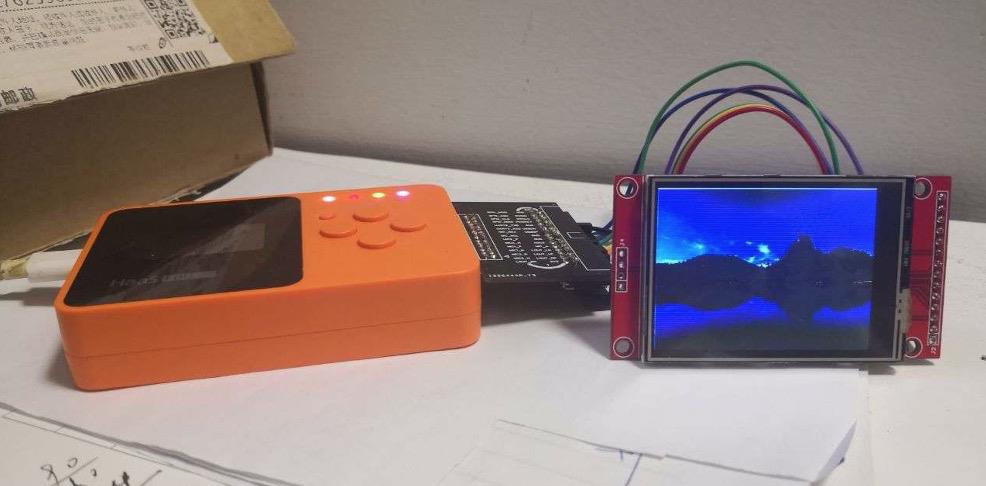
硬件:HaaS eduk1开发板,ili9341 lcd屏;
软件:AliOS Things 3.3 版本;
2、步骤
2.1、硬件连接
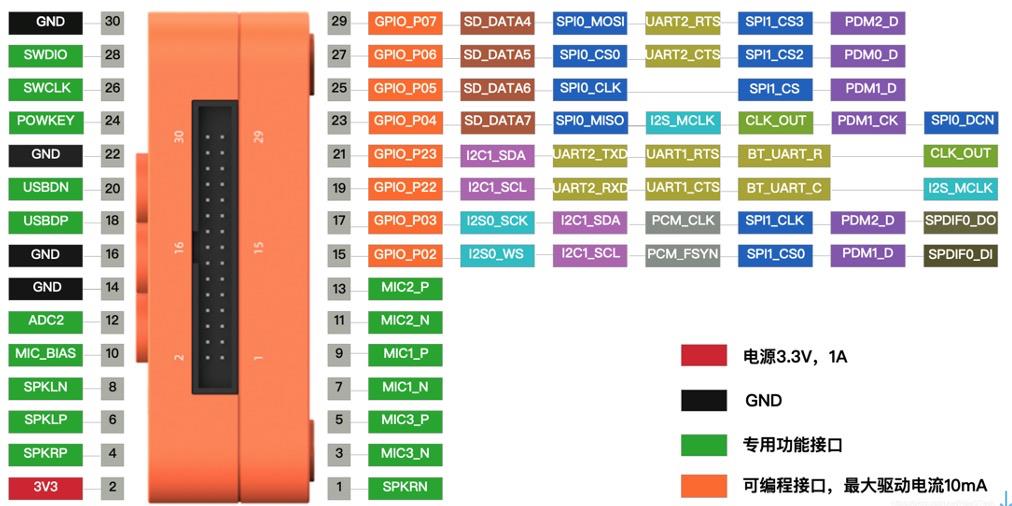
如下图为HaaS eduk1 的扩展口:
如下图为ili9341的扩展脚:
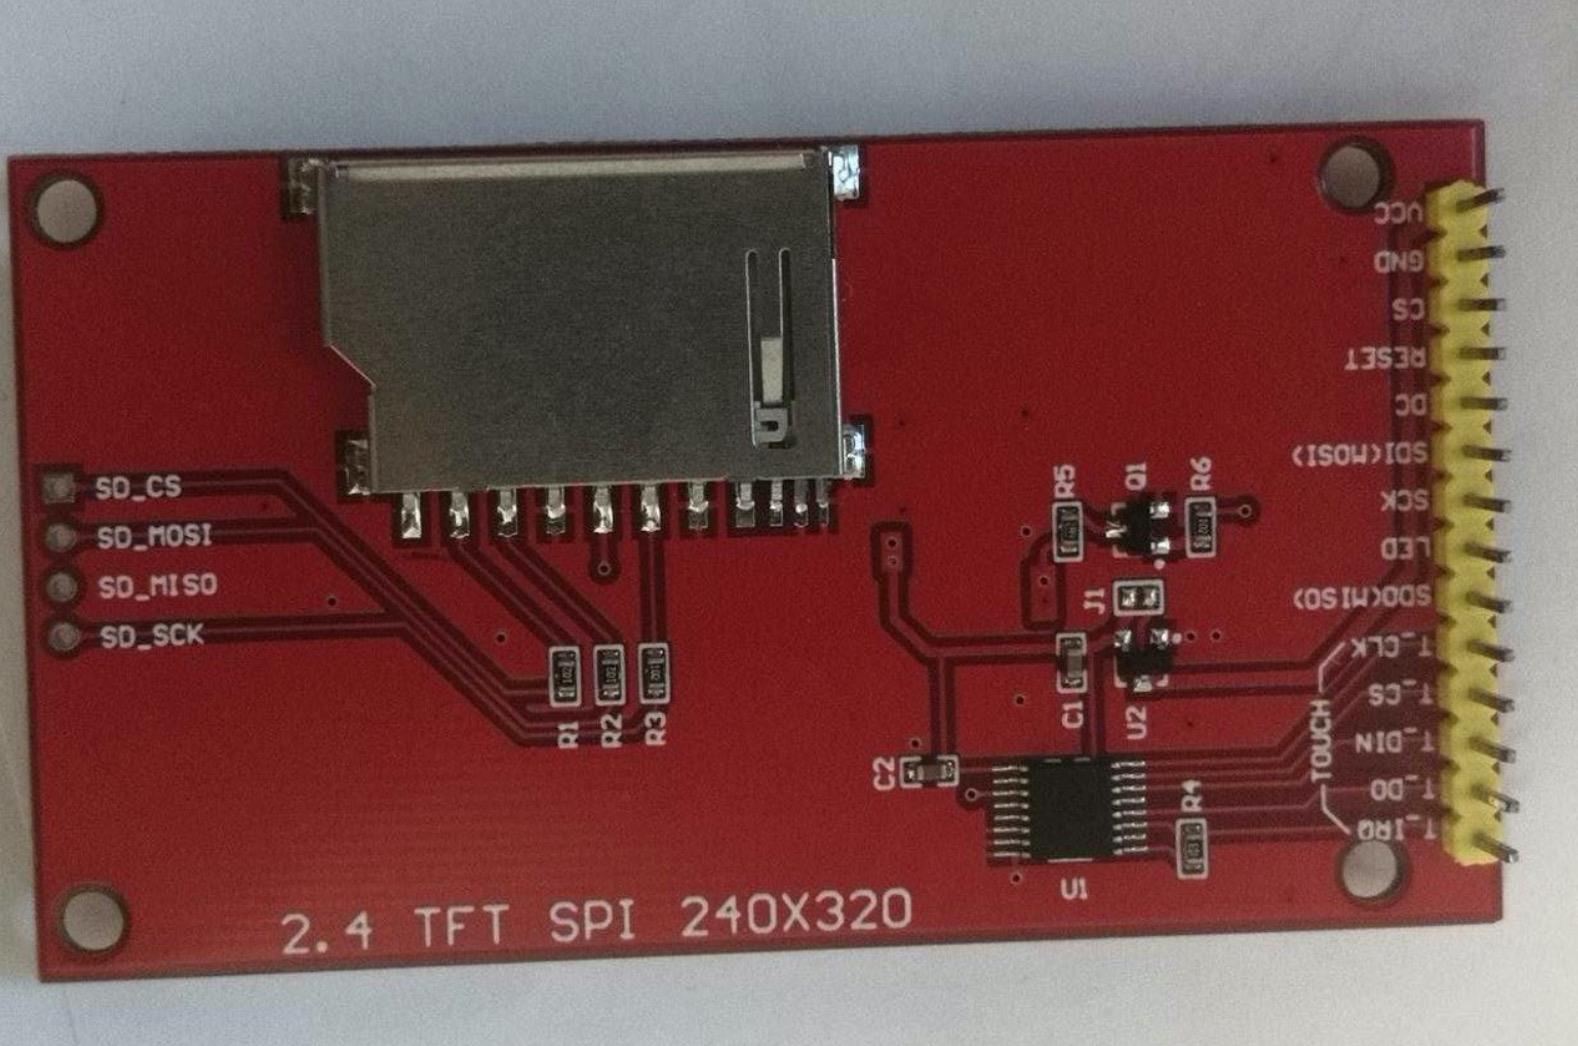
选择eduk1 的spi0 驱动ili9341,对应连线关系为:
| eduk1 | ili9341 |
| GPIO_P07 | SDI(MOSI) |
| GPIO_P06 | CS |
| GPIO_P05 | SCK |
| GPIO_P04 | SDO(MISO) |
| GPIO_P22 | LED |
| GPIO_P03 | DC |
| GPIO_P02 | RESET |
| GND | GND |
| 3V3 | VCC |
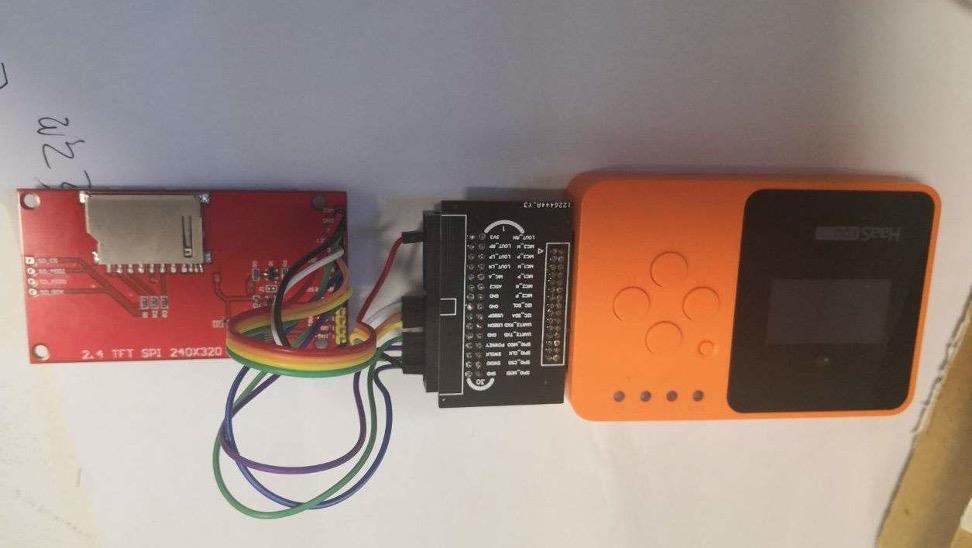
按照上表接完线如下图:
2.2、初始化ili9341
步骤2.1完成了硬件的连接,接下来对ili9341进行软件初始化;首先需要选择一个solution,这里选择ota_demo,以此用例进行开发,把ili9341的显示能力集成到这个用例里,选择此用例的原因是后面需要借助OTA的能力对相册的图片进行升级;软件的用例选择和环境搭建请参考《HaaS EDU k1_day1_硬件介绍及开发环境搭建》 ;Alios Things 3.3已经支持了对ili9341的驱动,具体细节可参考 components/drivers/external_device/ili9341/README.md,调用相关函数可实现画点画线等;根据步骤1的接线图,重新初始化ili9341,代码如下:
void user_ili9341_hw_init()
{
    user_ili9341.spi_port = 0;  //选择spi0
    user_ili9341.spi_freq = 26000000;
    user_ili9341.gpio_bgl_id = HAL_GPIO_PIN_P2_2; //GPIO_22 控制背光灯
    user_ili9341.gpio_dc_id = HAL_GPIO_PIN_P0_3;
    user_ili9341.gpio_reset_id = HAL_GPIO_PIN_P0_2;

    ili9341_hw_init(&user_ili9341);
    return;
}
2.3、解析bmp文件
AliOS Things 3.3 已经集成了ili9341驱动,但还不能直接显示一幅图片,本文介绍如何显示bmp格式的图片,ili9341 spi lcd支持的是16位色深的图片,所以我们需要将24位色深的bmp格式的图片转成16位的然后再送显;简单介绍下bmp格式的图片:BMP(全称Bitmap)是Windows操作系统中的标准图像文件格式,使用非常广。它采用位映射存储格式,除了图像深度可选以外,不采用其他任何压缩,因此,BMP文件所占用的空间很大。BMP文件的图像深度可选lbit、4bit、8bit及24bit。BMP文件存储数据时,图像的扫描方式是按从左到右、从下到上的顺序。其数据存储方式:
1.在windows中,颜色顺序为:B G R;
2.BMP的存储行顺序和图像显示顺序是上下颠倒的,即BMP存储的最后一行是真实图片显示的第一行;
另外BMP的组成为:位图信息+实际的图像数据;如下数据结构为bmp的图片信息头:
typedef struct {             // BMP文件头结构
  char magic[2];           // 位图文件的类型(BM)。
  unsigned int size;       // 位图文件的大小,以字节为单位
  short reserved1;         // 位图文件保留字(0)
  short reserved2;         // 位图文件保留字(0)
  unsigned int offset;     // 位图数据的起始位置,以相对于位图
} bmp_file_head_t;

typedef struct {               //图像信息区
  unsigned int info_size;    //本结构体所占用字节数(40bytes)
  int width;                 // 位图的宽度,以像素为单位,像素数量是4字节对齐的
  int height;                // 位图的高度,以像素为单位
  unsigned short planes;     // 目标设备的级别,必须为1
  unsigned short count;      // 每个像素所需的位数,必须是1(双色)// 4(16色),8(256色)或24(真彩色)之一
  unsigned int compression;  // 位图压缩类型,必须是 0(不压缩),// 1(BI_RLE8压缩类型)或2(BI_RLE4压缩类型)之一
  unsigned int image_size;   // 位图的大小,以字节为单位
  unsigned int xmeter;       // 位图水平分辨率,每米像素数
  unsigned int ymeter;       // 位图垂直分辨率,每米像素数
  unsigned int cused;         // 位图实际使用的颜色表中的颜色数
  unsigned int cimportant;    // 位图显示过程中重要的颜色数
} bmp_attr_info_t;
2.4、将24位RGB值转成16位RGB值
通过步骤2.3了解到BMP图片的构成,可根据上面的数据结构获取图片的色深,长和宽等信息,本文介绍的方案只支持320 * 240的图片,如下代码:
void pic_display(char *pic_path)
{
    int fd = 0;
    int i = 0;
    int ret = 0;
    memset(pic_frame, 0x00, sizeof(pic_frame));
    memset(tmp_buf, 0x00, sizeof(tmp_buf));
    if(pic_path == NULL) {
        printf("pic path is null!\\r\\n");
        return;
    }
    fd = aos_open(pic_path, O_RDONLY);
    if (fd < 0) {
        printf("open bmp %s failed\\r\\n", pic_path);
    }
    else {
        bmp_file_head_t bmp_head;
        bmp_attr_info_t bmp_attr;
        uint8_t tmp_color_r = 0;
        uint8_t tmp_color_g = 0;
        uint8_t tmp_color_b = 0;
        uint16_t color = 0;
        uint16_t tmp = 0;
        int line = 0;
        int column = 0;
        printf("open bmp success!\\r\\n");
        ret = aos_read(fd, tmp_buf, 54);
        if (ret < 0) {
            printf("read file failed\\r\\n");
        }
        bmp_head.magic[0] = tmp_buf[0];
        bmp_head.magic[1] = tmp_buf[1];
        bmp_head.size = EXTRACT_U32(&tmp_buf[2]);
        bmp_head.reserved1 = EXTRACT_U16(&tmp_buf[6]);
        bmp_head.reserved2 = EXTRACT_U16(&tmp_buf[8]);
        bmp_head.offset = EXTRACT_U32(&tmp_buf[10]);
        printf("bmp magic = %c%c\\r\\n", bmp_head.magic[0], bmp_head.magic[1]);
        printf("bmp size = %d\\r\\n", bmp_head.size);
        printf("bmp offset = %d\\r\\n", bmp_head.offset);
        memcpy(&bmp_attr, &tmp_buf[14], sizeof(bmp_attr));
        printf("bmp w = %d, h = %d\\r\\n", bmp_attr.width, bmp_attr.height);
        printf("bmp count = %d\\r\\n", bmp_attr.count);
        printf("bmp body size = %d\\r\\n", bmp_attr.image_size);
        if ((bmp_head.magic[0] != 'B') || (bmp_head.magic[1] != 'M')) {
            printf("pic isn't bmp!\\r\\n");
        } else {
            if((bmp_attr.count == 24) && (bmp_attr.width <= 320) && (bmp_attr.height <=240)) {
                memset(src_pic_frame, 0x00, sizeof(src_pic_frame));
                ret = aos_read(fd, src_pic_frame, bmp_attr.image_size);
                if (ret < 0) {
                    printf("read bmp body failed\\r\\n");
                } else {
                    i = 0;
                    for (line = 239; line > 0; line--) {
                        for (column = line * 960; column < (line * 960 + 959);) {
                            tmp_color_b = src_pic_frame[column];
                            tmp_color_g = src_pic_frame[column + 1];
                            tmp_color_r = src_pic_frame[column + 2];
                            column = column + 3;
                            tmp = (tmp_color_r >> 3) & 0xff;
                            tmp = tmp << 11;
                            color = tmp;
                            tmp = (tmp_color_g >> 2) & 0xff;
                            tmp = tmp << 5;
                            color |= tmp;
                            tmp = (tmp_color_b >> 3) & 0xff;
                            color |= tmp;
                            if (i < 320 * 240) {
                                pic_frame[i++] = color;
                            }
                            else {
                                printf("color numb err, column = %d\\r\\n", column);
                            }
                        }
                    }
                }
            }
        }
        aos_close(fd);
    }
    ili9341_draw_frame(user_ili9341, pic_frame);
    printf("nano entry here!\\r\\n");
}
先打开bmp图片获取图片的信息,判断图片是否为BMP图片以及图片的规格,默认只支持24位的图片;函数解析图片为24位bmp图片后,会按照从低向上的顺序读取图片数据,并按照B R G的顺序将颜色数据转换成16位色深的数据保存在frame 缓存中,然后送显。
2.5、编译运行
2.5.1、将bmp图片制作和导入文件系统
从网上下载任意图片,然后用window自带的画图工具将图片打开,选择重新调整大小 ---> 调整图片为320 * 240 ----> 图片另存为bmp 24位图片;这样就完成了bmp图片的制作,然后将制作好的图片copy到AliOS Things代码的 hardware/chip/haas1000/prebuild/data中,这样当HaaS eduk1 运行时可以通过“/data/”路径下获取对应的图片;
2.5.2、代码添加
了解以上的步骤后,将本文的附件中的代码copy到一个单独的C文件中,比如bmp_parse.c,然后在 solutions/ota_demo/package.yaml 中增加 - ili9341: dev_aos 组件和 - "bmp_parse.c" 源文件;
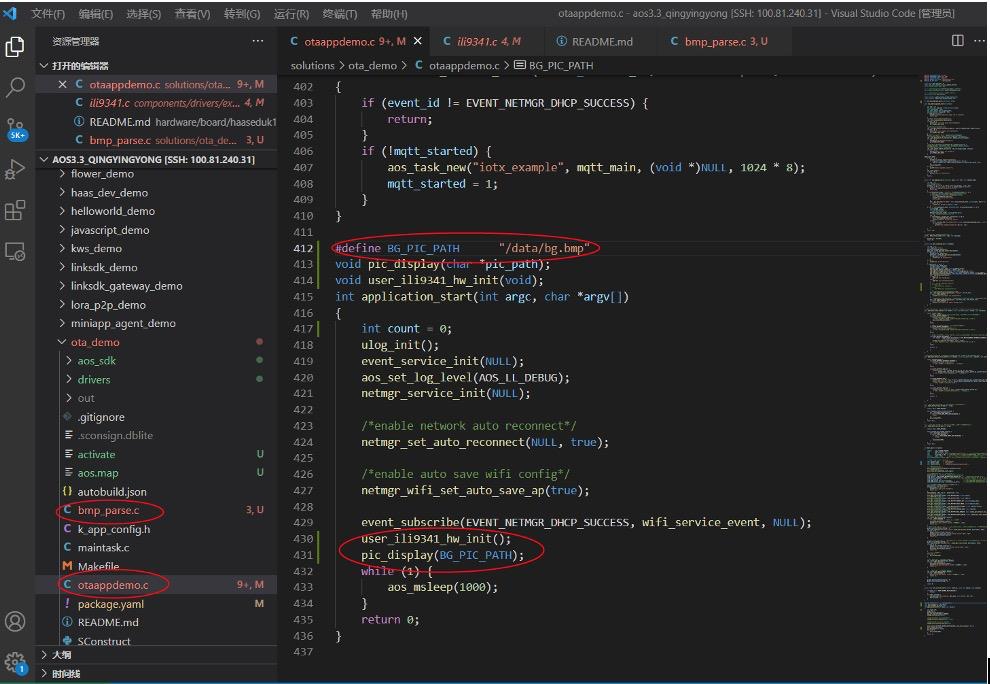
接下来将bmp_parse.c中的函数 user_ili9341_hw_init() 和 pic_display(char pic_path) 在otaappdemo.c里的 application_start调用即可,其中pic_display(char pic_path) 的参数pic_path为bmp图片的存储路径即1中/data/xxx.bmp;如下图:
2.5.3、编译
完成以上所有步骤后,既可以编译和下载固件,具体参考《HaaS EDU k1_day1_硬件介绍及开发环境搭建》 ;
3、效果
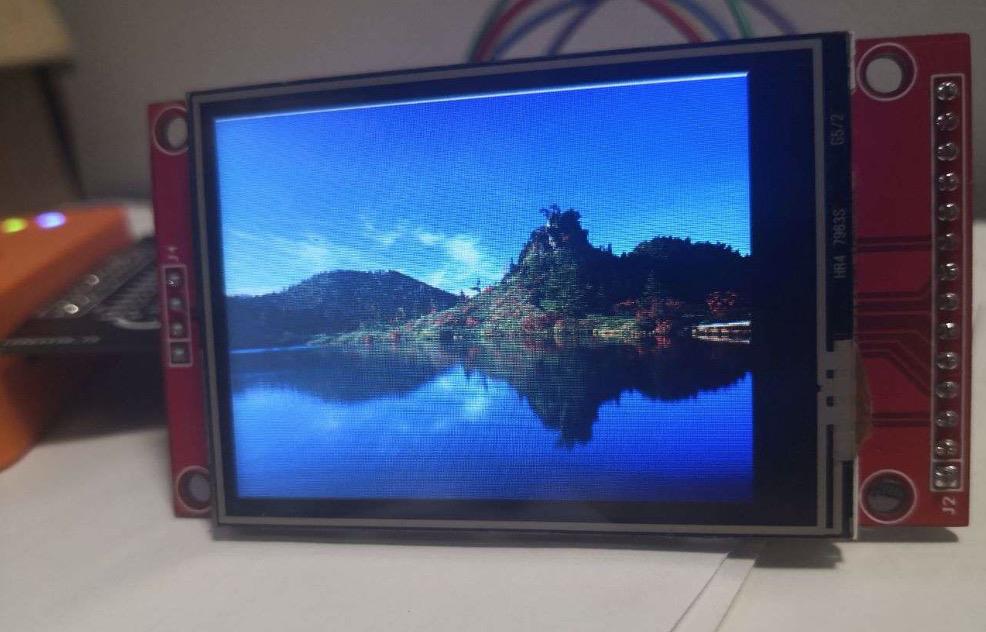
运行起来的实际效果如下图:

4、附件
代码如下
#include <fcntl.h>
#include "ili9341.h"
#include "hal_iomux_haas1000.h"

#define COLOR_RED         (0xF800)
#define COLOR_BREEN       (0x07E0)
#define COLOR_BLUE        (0x001F)

typedef struct {             // BMP文件头结构
  char magic[2];           // 位图文件的类型(BM)。
  unsigned int size;       // 位图文件的大小,以字节为单位
  short reserved1;         // 位图文件保留字(0)
  short reserved2;         // 位图文件保留字(0)
  unsigned int offset;     // 位图数据的起始位置,以相对于位图
} bmp_file_head_t;

typedef struct {               //图像信息区
  unsigned int info_size;    //本结构体所占用字节数(40bytes)
  int width;                 // 位图的宽度,以像素为单位,像素数量是4字节对齐的
  int height;                // 位图的高度,以像素为单位
  unsigned short planes;     // 目标设备的级别,必须为1
  unsigned short count;      // 每个像素所需的位数,必须是1(双色)// 4(16色),8(256色)或24(真彩色)之一
  unsigned int compression;  // 位图压缩类型,必须是 0(不压缩),// 1(BI_RLE8压缩类型)或2(BI_RLE4压缩类型)之一
  unsigned int image_size;   // 位图的大小,以字节为单位
  unsigned int xmeter;       // 位图水平分辨率,每米像素数
  unsigned int ymeter;       // 位图垂直分辨率,每米像素数
  unsigned int cused;         // 位图实际使用的颜色表中的颜色数
  unsigned int cimportant;    // 位图显示过程中重要的颜色数
} bmp_attr_info_t;

typedef struct {
    bmp_file_head_t bmp_header;
    bmp_attr_info_t bmp_info;
} bmp_file_info_t;


#define EXTRACT_U16(d) (*((unsigned char *)(d)) | (*((unsigned char *)(d) + 1) << 8))
#define EXTRACT_U32(d)                                              \\
    (*((unsigned char *)(d)) | (*((unsigned char *)(d) + 1) << 8) | \\
    (*((unsigned char *)(d) + 2) << 16) | (*((unsigned char *)(d) + 3) << 24))

uint16_t pic_frame[320 * 240];
uint8_t src_pic_frame[320 * 240 * 3];
uint8_t tmp_buf[100];
ili9341_dev_t user_ili9341 = {0};

void user_ili9341_hw_init()
{
    user_ili9341.spi_port = 0;
    user_ili9341.spi_freq = 26000000;
    user_ili9341.gpio_bgl_id = HAL_GPIO_PIN_P2_2;
    user_ili9341.gpio_dc_id = HAL_GPIO_PIN_P0_3;
    user_ili9341.gpio_reset_id = HAL_GPIO_PIN_P0_2;

    ili9341_hw_init(&user_ili9341);
    return;
}

void pic_display(char *pic_path)
{
    int fd = 0;
    int i = 0;
    int ret = 0;
    memset(pic_frame, 0x00, sizeof(pic_frame));
    memset(tmp_buf, 0x00, sizeof(tmp_buf));
    if(pic_path == NULL) {
        printf("pic path is null!\\r\\n");
        return;
    }
    fd = aos_open(pic_path, O_RDONLY);
    if (fd < 0) {
        printf("open bmp %s failed\\r\\n", pic_path);
    }
    else {
        bmp_file_head_t bmp_head;
        bmp_attr_info_t bmp_attr;
        uint8_t tmp_color_r = 0;
        uint8_t tmp_color_g = 0;
        uint8_t tmp_color_b = 0;
        uint16_t color = 0;
        uint16_t tmp = 0;
        int line = 0;
        int column = 0;
        printf("open bmp success!\\r\\n");
        ret = aos_read(fd, tmp_buf, 54);
        if (ret < 0) {
            printf("read file failed\\r\\n");
        }
        bmp_head.magic[0] = tmp_buf[0];
        bmp_head.magic[1] = tmp_buf[1];
        bmp_head.size = EXTRACT_U32(&tmp_buf[2]);
        bmp_head.reserved1 = EXTRACT_U16(&tmp_buf[6]);
        bmp_head.reserved2 = EXTRACT_U16(&tmp_buf[8]);
        bmp_head.offset = EXTRACT_U32(&tmp_buf[10]);
        printf("bmp magic = %c%c\\r\\n", bmp_head.magic[0], bmp_head.magic[1]);
        printf("bmp size = %d\\r\\n", bmp_head.size);
        printf("bmp offset = %d\\r\\n", bmp_head.offset);
        memcpy(&bmp_attr, &tmp_buf[14], sizeof(bmp_attr));
        printf("bmp w = %d, h = %d\\r\\n", bmp_attr.width, bmp_attr.height);
        printf("bmp count = %d\\r\\n", bmp_attr.count);
        printf("bmp body size = %d\\r\\n", bmp_attr.image_size);
        if ((bmp_head.magic[0] != 'B') || (bmp_head.magic[1] != 'M')) {
            printf("pic isn't bmp!\\r\\n");
        } else {
            if((bmp_attr.count == 24) && (bmp_attr.width <= 320) && (bmp_attr.height <=240)) {
                memset(src_pic_frame, 0x00, sizeof(src_pic_frame));
                ret = aos_read(fd, src_pic_frame, bmp_attr.image_size);
                if (ret < 0) {
                    printf("read bmp body failed\\r\\n");
                } else {
                    i = 0;
                    for (line = 239; line > 0; line--) {
                        for (column = line * 960; column < (line * 960 + 959);) {
                            tmp_color_b = src_pic_frame[column];
                            tmp_color_g = src_pic_frame[column + 1];
                            tmp_color_r = src_pic_frame[column + 2];
                            column = column + 3;
                            tmp = (tmp_color_r >> 3) & 0xff;
                            tmp = tmp << 11;
                            color = tmp;
                            tmp = (tmp_color_g >> 2) & 0xff;
                            tmp = tmp << 5;
                            color |= tmp;
                            tmp = (tmp_color_b >> 3) & 0xff;
                            color |= tmp;
                            if (i < 320 * 240) {
                                pic_frame[i++] = color;
                            }
                            else {
                                printf("color numb err, column = %d\\r\\n", column);
                            }
                        }
                    }
                }
            }
        }
        aos_close(fd);
    }
    ili9341_draw_frame(user_ili9341, pic_frame);
    printf("nano entry here!\\r\\n");
}
开发者支持
如需更多技术支持,可加入钉钉开发者群,或者关注微信公众号。

更多技术与解决方案介绍,请访问HaaS官方网站https://haas.iot.aliyun.com。
以上是关于手把手教你做一个电子相册的主要内容,如果未能解决你的问题,请参考以下文章