SpringBoot web&基本请求处理
Posted HUTEROX
tags:
篇首语:本文由小常识网(cha138.com)小编为大家整理,主要介绍了SpringBoot web&基本请求处理相关的知识,希望对你有一定的参考价值。
文章目录
项目构建
这里我们直接使用IDEA提供的SpringBoot的构建器,自动帮助我们导入依赖以及web场景。
环境:IDEA 2021
SpringBoot版本:2.5.5
Java 版本 :1.8
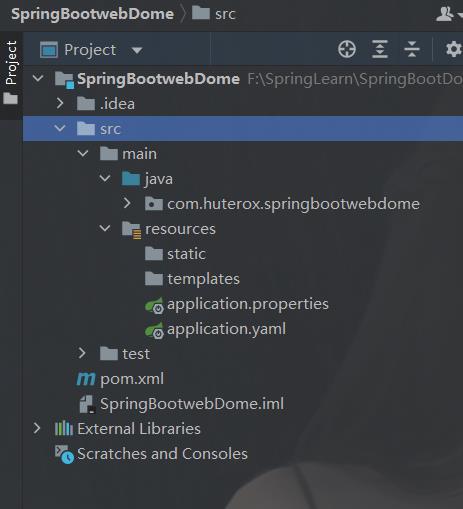
项目预览

我们这边统一使用yaml进行配置
静态资源请求
看到static 和 templates不要太熟悉了
首先static和django一样也是可以自己定义的,spring boot 里面是有几个默认的静态文件的。
只要静态资源放在类路径下: called /static (or /public or /resources or /META-INF/resources
访问 : 当前项目根路径/ + 静态资源名
再这几个目录里面是可以进行静态资源访问的。
并且默认是可以直接访问的,你只需要/资源名 就能访问。但是这边也是可以设置的就和Django一样
spring:
  mvc:
    static-path-pattern: /static/**
这样一来就需要这样访问
/static/hello.jpg
假设的static下面有这个文件
那么其他的就不用多说了。
然后就是这种规则,首先 请求是先进入 Controller 然后如果那里面没有@RequestMapping可以处理的话,就会进入
resources/** 这个路由,也就是进入静态文件。
所以基于这个我们可以指定一个静态文件,也就是定义自己的静态文件,并且默认的会失效。
同样这个传入数组那么可以定义多个
spring:
  mvc:
    static-path-pattern: /static/**
  web:
    resources:
      static-locations: [classpath:/Image/]
此时就只有这个static是我们的静态资源文件夹了。(2.5x版本的配置)
那么此时所有文件放在项目目录下的Image下面才会正常访问
/static/hello.jpg
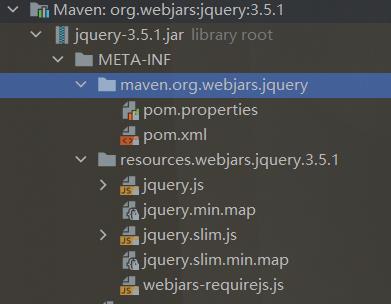
此外,springboot在自动会映射webjar的东西
这个webjar就是一些打包好的例如juery的一些资源,这个是Django没有的,你要弄还得自己放到静态文件里面。但是这个怎么说呢有好有坏,我可能不太会去用这个。
先导入依赖吧
<dependency>
    <groupId>org.webjars</groupId>
    <artifactId>jquery</artifactId>
    <version>3.5.1</version>
</dependency>

由于是自动映射所以我们直接访问就好了

/webjars/jquery/3.5.1/jquery.js
原因很简单他自己放到jar包下的resources里面去了。
在SpringBoot里面的自动配置里面在spring config这个jar包下面,我们找到mvc的自动配置里面慢慢找能找到一个好玩的

这个就是为啥默认的是静态资源是那几个。这里再说一遍我的spring boot版本是2.5x不同版本之间的代码结构差别挺大的。
但是我可能还是会自己去安排相关的资源,好管理。
之后就是关于favicon的问题了,这个好像在2.3x版本是直接拖到static里面就会显示图标了。但是现在2.5x好像不行,我试了也是不行的,而且好像Django也没有这个功能,都需要自己手动在html里面加入。
具体的话我还得去看看他是怎么搞得,应该是有的只是配置默认禁止了。
<!DOCTYPE html>
<html lang="en">
<head>
    <meta charset="UTF-8">
    <title>Title</title>
    <link rel="icon" href="/static/Favicon.ico" type="image/x-icon"/>

    <link rel="bookmark" href="/static/Favicon.ico" type="image/x-icon"/>
</head>
<body>
 <h1>首页</h1>
</body>
</html>
资源处理的默认规则
这个还是得看到那个自动配置代码
这里直接说结论
spring:
  mvc:
    static-path-pattern: /static/**
  web:
    resources:
      add-mappings: false #false禁止静态资源加载了
      cache:
        period: 100 #秒,缓存,静态资源缓存
请求
首先我们最先看到的请求方式是
@requestMapping
我们可以通过Mapping来指定请求的路径和请求的方式。
例如
@RestController
public class indexContoller {
    @RequestMapping(value = "/hello",method = RequestMethod.GET)
    public String handle01(){
        return "Hello, Spring Boot 2!";
    }
}
Rest表单风格
但是和Django不同的是这里还有一个方式叫做Rest风格,其实就是对同一个路径发送不同的请求方式从而实现不同的逻辑操作。原来在HTML里面我们通过表单可以发送post/get方式的请求,但是现在我们可以自定义让它发送Put,Delete等等请求从而实现对应的操作,而不再需要通过传递参数来指定不同的处理方式(在Django里面)
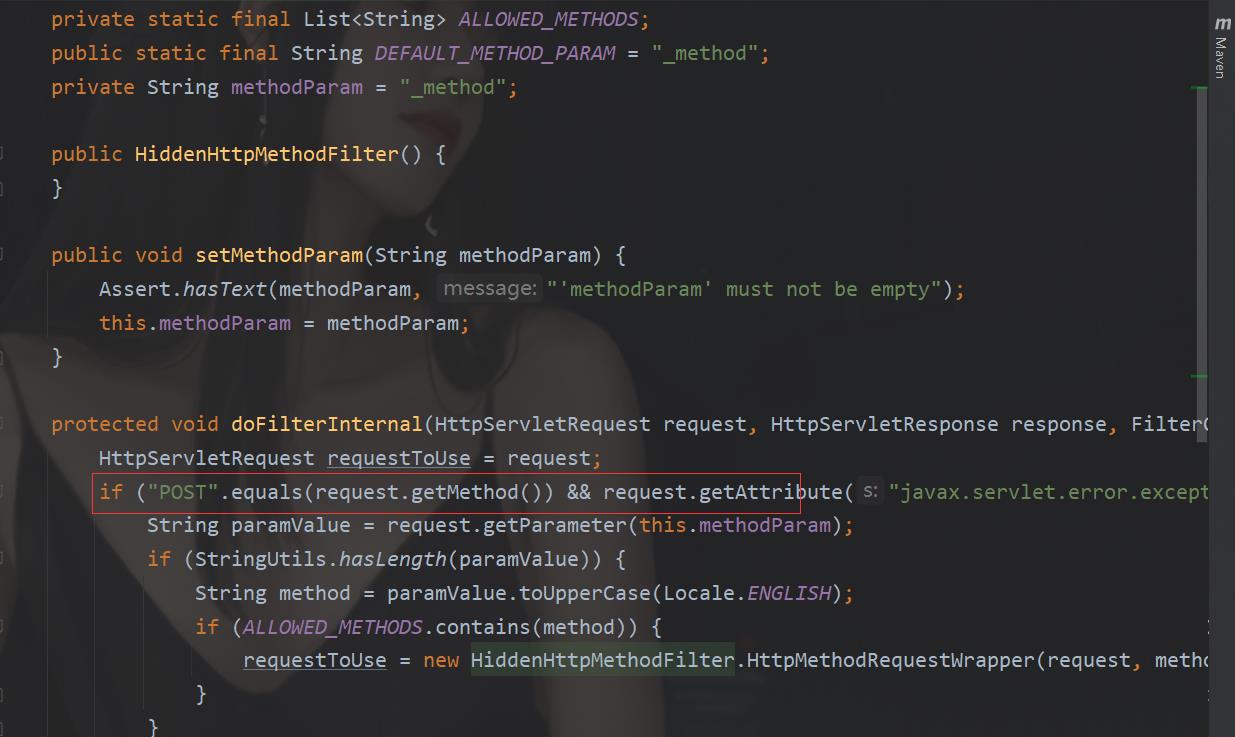
首先确定一下这个功能是给表单用的,并且表单的请求方式必须显示POST,原因如下:
这个下面有一个过滤器,它的规则是这样的。

HiddenHttpMethodFilter
crtl + n
自行查看。
并且这玩意默认是关闭的,我们需要先开启这个功能。
下面是一个例子:
开启配置
spring:
  mvc:
    hiddenmethod:
      filter:
        enabled: true
index.html
<!DOCTYPE html>
<html lang="en">
<head>
    <meta charset="UTF-8">
    <title>Title</title>
</head>
<body>
<div>
    <form action="/hello" method="post">
        <input name="_method" type="hidden" value="delete">
        <button>提交</button>
    </form>
</div>

</body>
</html>
然后回到我们的代码
@RestController
public class indexContoller {
    @RequestMapping(value = "/hello",method = RequestMethod.DELETE)
    public String handle01(){
        return "Hello, Spring Boot 2! by Delete";
    }

}
结果

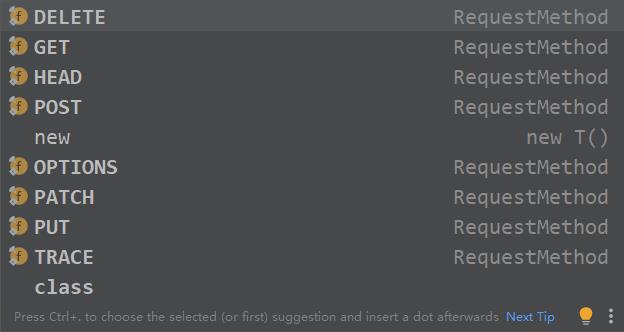
支持的风格

注意点
这个玩意前面演示的只是争对HTML表单的,因为表单只能发送get/post两个请求,但是争对其他的客户端工具是ok的,也就是说
spring:
  mvc:
    hiddenmethod:
      filter:
        enabled: true
选择性开启,而且人家默认都不开。
此外
@GetMapping("/hello")
@RequestMapping(value = "/hello",method = RequestMethod.GET)
等价,所以you know what i maining
自定义_method
这个其实没啥太大作用,就是
现在我想要name="_m"也能访问成功
那么我们就需要做到一定的自定义配置。这个也是用HiddenHttpMethodFilter提供的一些方法去做,我们自己定义一个配置类。
@Configuration(proxyBeanMethods = false)
public class Myconfig {
    @Bean
    public HiddenHttpMethodFilter hiddenHttpMethodFilter(){
        HiddenHttpMethodFilter hiddenHttpMethodFilter = new HiddenHttpMethodFilter();
        hiddenHttpMethodFilter.setMethodParam("_m");
        return hiddenHttpMethodFilter;
    }
}
然后就好了。
这样直接做就好了的原因也很简单。
@SpringBootApplication
等同于
@SpringBootConfiguration
@EnableAutoConfiguration
@ComponentScan("com.xxx.xxx")
这个玩意会自动装配扫描,所以我们直接怼就好了。
请求参数处理
Get请求
终于开始回到熟悉的步骤了。
这一块的话对比Django的正则来说简单的多多了。
先前在Django里面你得现在路由里面写好
r"^image/(?P<username>\\d+)/(?P<password>\\d+)/
然后
def images(request,username,password):
	pass
现在你这样做
@GetMapping(value = "/Get/{name}/{id}")
public String handle02(@PathVariable("id") int id,@PathVariable("name") String name){
    return "Hello";
}
搞定收工,那么除此之外还能这样玩。
@GetMapping(value = "/Get/{name}/{id}")
public String handle02(@PathVariable Map<String,String>  pv ){
    return "Hello";
}
那么这个时候你得到的值是这样的
{“name":“xxxx”,“id”:“123”}这种类型
@RequestHeader
这玩意可以帮助我们直接拿到Header请求头
@GetMapping(value = "/Get/{name}/{id}")
public String handle02(@RequestHeader("xxx") String header ){
    return "Hello";
}
这表示只拿到一个 xxx给header
@GetMapping(value = "/Get/{name}/{id}")
public String handle02(@RequestHeader Map<String,String> headers ){
    return "Hello";
}
表示获取所有被的Header然后返回一个map也就是python里面的字典。
@RequestParam
这个主要就是获取请求的参数
/hello?age=19
@RequestParam("age") int age
然后呢就不用多说了
同样的
@RequestParam Map<String,String> parames
表示获取所有的请求参数
@ CookieValue
这个是啥那就是获取Cookie的值
同样的
@CookieValue("xx") String xxx
表示获取cookie某个字段的值然后个xxx
@CookieValue Map<String,String> cookies
获取全部的
那么这里不太一样的是
@CookieValue("xx") Cookie cookie
这里还有Cookie对象
cookie.getName()
cookie.getValue()
Post 请求
咱们这只要说一个玩意
那就是获取post表单参数。
@RestController
public class HelloController {
    @PostMapping("/hello")
    public String hello(@RequestParam("name") String name,
                        @RequestParam("age") Integer age) {
        return "name:" + name + "\\nage:" + age;
    }
}
或者你这样
@RestController
public class HelloController {
    @PostMapping("/hello")
    public String hello(@RequestParam Map<String,Object> params) {
        return "name:" + params.get("name") + "\\nage:" + params.get("age");
    }
}
然后的话你用这个也可以用 @RequestBody
这个东西很厉害的,@RequestBody直接以String接收前端传过来的json数据:
@Data
@ToString
//@Comonpent加了这个要取消单例呀,所以就不加了

public User{
    private String name;
    private int age;
}
此时假设前端返回的数据是这样的
{”name“:“hly”,age:19}
那么
@RestController
public class HelloController {
    @PostMapping("/hello")
    public String hello(@RequestBody User user) {
        return user.toString();
    }
}
User就会组装实例。
当然
@RestController
public class HelloController {
    @PostMapping("/hello")
    public String hello(User user) {
        return user.toString();
    }
}
也可以,只是那个多了对Json的支持(具体的还是后面再说)
这里补充一下 from表单提交的数据格式是这样的(默认:Content-Type: application/x-www-form-urlencoded;charset=utf-8)
title=test&sub%5B%5D=1&sub%5B%5D=2&sub%5B%5D=3
Cookie设置
这个还是用到response这个神奇的玩意
@GetMapping("/change-username")
public String setCookie(HttpServletResponse response) {
    // 创建一个 cookie对象
    Cookie cookie = new Cookie("username", "Jovan");
    cookie.setMaxAge(7 * 24 * 60 * 60); // 7天过期
    cookie.setSecure(true);  //Https 安全cookie 只通过https传输

    //将cookie对象加入response响应
    response.addCookie(cookie);

    return "Username is changed!";
}
获取cookie
获取的话还是@CookieValue这个注解来获取或者使用request
@GetMapping("/all-cookies")
public String readAllCookies(HttpServletRequest request) {

    Cookie[] cookies = request.getCookies();
    if (cookies != null) {
        return Arrays.stream(cookies)
                .map(c -> c.getName() + "=" + c.getValue())
                .collect(Collectors.joining(", "));
    }

    return "No cookies";
}
删除Cookie
若要删除cookie,请将Max-Age指令设置为0并取消其值的设置。您还必须传递用于设置它的相同的其他cookie属性。不要将Max-Age指令值设置为-1。否则,浏览器将把它视为会话cookie。
换句话来说
你的一个cookie是这样的
Cookie cookie = new Cookie("username", "Jovan");
cookie.setMaxAge(7 * 24 * 60 * 60); // 7天过期
cookie.setSecure(true);  //Https 安全cookie 只通过https传输
现在删除,你要这样做
Cookie cookie = new Cookie("username",null);
cookie.setMaxAge(0);
cookie.setSecure(true);  //Https 安全cookie 只通过https传输
response.addCookie(cookie);
request 属性设置
这个玩意其实就是可以帮助我们使用页面跳转时传递参数。
这一点很重要,并且对于很敏感的请求路径直接用session处理。
那么这个东西其实就是给request带点参数,方面下面跳转到的页面进行进行参数接收到。
页面跳转
@Controller
public class TestController {

    @RequestMapping(value = "/test")
    public String go(HttpServletRequest request)
    {
        request.setAttribute("msg","success");
        request.setAttribute("code",250);
        return "forward:/success";
    }

    @ResponseBody
    @RequestMapping(value = "/success")
    public Map test(HttpServletRequest request)
    {
        String msg = request.getAttribute("msg").toString();
        Integer code = (Integer)request.getAttribute("code");
        Map <String,Integer> map = new HashMap<>();
        map.put(msg,code);
        return map;
    }
}
这里有个注意点我们这里用的是@Controller
原因是我们要跳转
如果用@RestController的话它等价于(@ResponseBody 加 @Controller)意味着我们的"forward:/success" 被当作字符串,而不是跳转命令。
同时你也可以这样接收
    @ResponseBody
    @RequestMapping(value = "/success")
    public Map test(@RequestAttribute("msg") String msg,@RequestAttribute("code") Integer code)
    {
        Map <String,Integer> map = new HashMap<>();
        map.put(msg,code);
        return map;
    }
以上是关于SpringBoot web&基本请求处理的主要内容,如果未能解决你的问题,请参考以下文章