Glide 自我修养系列 1
Posted 不会写代码的丝丽
tags:
篇首语:本文由小常识网(cha138.com)小编为大家整理,主要介绍了Glide 自我修养系列 1相关的知识,希望对你有一定的参考价值。
参考
Android主流三方库源码分析(三、深入理解Glide源码)
本章节注重整体运行流程,而非面面俱到。
源码版本为:'com.github.bumptech.glide:glide:4.12.0'
硬件位图
android O有一个技术点叫硬件位图。
Glide支持了硬件位图这一个特性可以防止我们图片OOM.更详细的介绍您可以Glide或者google官方介绍。
硬件位图
硬件位图的概念:
原本我们一张图片的显示会存在两份内存,一份在GPU,而另一份在我们的RAM(内存)中,且进行栅格化的时候会把我们的内存中的图片信息上传到GPU中

启用硬件位图后:

我们来看一个实际的例子
未启用硬件位图:
   var list = mutableListOf<Any?>()

        viewBinding.btn.setOnClickListener {

            for (i in 0..20) {
                val options = BitmapFactory.Options()
//                options.inPreferredConfig = Bitmap.Config.HARDWARE
                options.inPreferredConfig = Bitmap.Config.ARGB_8888

                var b = BitmapFactory.decodeResource(resources, R.drawable.main, options)
                list.add(b)
            }

        }

启用硬件位图:
   var list = mutableListOf<Any?>()

        viewBinding.btn.setOnClickListener {

            for (i in 0..20) {
                val options = BitmapFactory.Options()
                options.inPreferredConfig = Bitmap.Config.HARDWARE

                var b = BitmapFactory.decodeResource(resources, R.drawable.main, options)
                list.add(b)
            }

        }

差距之大让我们汗颜,在当前版本中Glide 已经或根据条件自动是否启用硬件位图。
硬件位图的坏处:
很难读取Bitmap的数据,多数Bitmap的API将直接奔溃.举个例子:
     val options = BitmapFactory.Options()
     options.inPreferredConfig = Bitmap.Config.HARDWARE
     var b = BitmapFactory.decodeResource(resources, R.drawable.main, options)
     b.getPixel(0,0)//直接crush
Glide一些额外说明:
Glide仅在一些情况下才会启用硬件位图,否则使用ARGB-8888- 1 启用格式化类别为
DecodeFormat.PREFER_ARGB_8888 - 2 没有进行
transform操作 - 3
HardwareConfigState.isHardwareConfigAllowedByAppState为true - 4
Downsampler.ALLOW_HARDWARE_CONFIG为true - 5 长和宽在一定范围内,具体为
HardwareConfigState.minHardwareDimension - 6 文件描述符小于
HardwareConfigState.getMaxFdCount()(每个硬件位图占用一个文件描述符,文件描述是linux基础知识) - 7 等
具体你可以查看
HardwareConfigState.isHardwareConfigAllowed函数
public final class HardwareConfigState {

	//...略
	//返回当前硬件位图是否可用
	public boolean isHardwareConfigAllowed(
	      int targetWidth,
	      int targetHeight,
	      boolean isHardwareConfigAllowed,
	      boolean isExifOrientationRequired) {
	    if (!isHardwareConfigAllowed) {
	      if (Log.isLoggable(TAG, Log.VERBOSE)) {
	        Log.v(TAG, "Hardware config disallowed by caller");
	      }
	      return false;
	    }
	    if (!isHardwareConfigAllowedByDeviceModel) {
	      if (Log.isLoggable(TAG, Log.VERBOSE)) {
	        Log.v(TAG, "Hardware config disallowed by device model");
	      }
	      return false;
	    }
	    if (!HARDWARE_BITMAPS_SUPPORTED) {
	      if (Log.isLoggable(TAG, Log.VERBOSE)) {
	        Log.v(TAG, "Hardware config disallowed by sdk");
	      }
	      return false;
	    }
	    if (areHardwareBitmapsBlockedByAppState()) {
	      if (Log.isLoggable(TAG, Log.VERBOSE)) {
	        Log.v(TAG, "Hardware config disallowed by app state");
	      }
	      return false;
	    }
	    if (isExifOrientationRequired) {
	      if (Log.isLoggable(TAG, Log.VERBOSE)) {
	        Log.v(TAG, "Hardware config disallowed because exif orientation is required");
	      }
	      return false;
	    }
	    if (targetWidth < minHardwareDimension) {
	      if (Log.isLoggable(TAG, Log.VERBOSE)) {
	        Log.v(TAG, "Hardware config disallowed because width is too small");
	      }
	      return false;
	    }
	    if (targetHeight < minHardwareDimension) {
	      if (Log.isLoggable(TAG, Log.VERBOSE)) {
	        Log.v(TAG, "Hardware config disallowed because height is too small");
	      }
	      return false;
	    }
	    // Make sure to call isFdSizeBelowHardwareLimit last because it has side affects.
	    if (!isFdSizeBelowHardwareLimit()) {
	      if (Log.isLoggable(TAG, Log.VERBOSE)) {
	        Log.v(TAG, "Hardware config disallowed because there are insufficient FDs");
	      }
	      return false;
	    }

	    return true;
	  }
}
笔者实际发现使用中并没有Glide转化过硬件位图,而且我在源码中发现一些问题,这些条件跟没有代码设置为true
比如
//必须为false的时候才能能启用硬件位图
 private boolean areHardwareBitmapsBlockedByAppState() {
    return BLOCK_HARDWARE_BITMAPS_WHEN_GL_CONTEXT_MIGHT_NOT_BE_INITIALIZED
        && !isHardwareConfigAllowedByAppState.get();
  }
我们仔细查看isHardwareConfigAllowedByAppState
class HardwareConfigState{
 private final AtomicBoolean isHardwareConfigAllowedByAppState = new AtomicBoolean(false);

//必须调用unblockHardwareBitmaps才能硬件位图生效
  public void unblockHardwareBitmaps() {
    Util.assertMainThread();
    isHardwareConfigAllowedByAppState.set(true);
  }
}
而你搜索整个Gradle工程中你会发现仅有一处代码调用
public class Glide implements ComponentCallbacks2 {

  /**
   * Allows hardware Bitmaps to be used prior to the first frame in the app being drawn as soon as
   * this method is called.
   *
   * <p>If you use this method in non-test code, your app will experience native crashes on some
   * versions of Android if you try to decode a hardware Bitmap. This method is only useful for
   * testing.
   */
  @VisibleForTesting
  public static void enableHardwareBitmaps() {
    HardwareConfigState.getInstance().unblockHardwareBitmaps();
  }
}
而enableHardwareBitmaps实际并没有被其他调用.所以Glide硬件位图笔者并没有在实际开发中遇到过。
不过以下代码可以让您可以破选硬件位图,请勿使用transform操作
  HardwareConfigState.getInstance().unblockHardwareBitmaps();

  Glide.with(this)
       .asBitmap()
       .load(url)
       .format(DecodeFormat.PREFER_ARGB_8888)
       .set(Downsampler.ALLOW_HARDWARE_CONFIG, true)
       .into(viewBinding.iv)
with
首先看一个最简单的例子来说明:
Glide
	.with(this)
	.load(url)
	.into(viewBinding.iv)
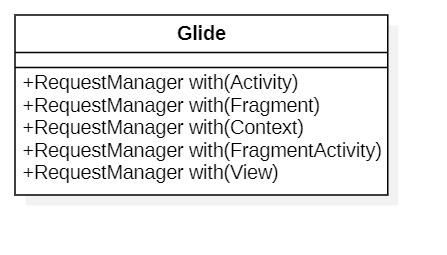
我们本小节仅说明with,其函数重载如下:

- 为什么需要这么多重载?
用于管控图像的生命周期
我们在一个activity界面的onCreate时启用Glide去加载一张图,但是用户突然把这个界面关了?你觉得Glide是否有必要还需要继续加载流程?这里是一个非常明显的答案。with可以帮助我们自动的清理无效请求。
如果你需要手动清理当然也是可以的如下代码:
//var target: ViewTarget<ImageView!, Drawable!>
 var target=Glide
     .with(this)
     .load(url)
     .into(viewBinding.iv)
 //在合适的时候手动释放
 Glide.with(this).clear(target)
以下为函数体的重载
//Glide.java
  public static RequestManager with(@NonNull Context context) {
   //getRetriever(context) 返回RequestManagerRetriever
    return getRetriever(context).get(context);
  }


  public static RequestManager with(@NonNull Activity activity) {
  //getRetriever(context) 返回RequestManagerRetriever
    return getRetriever(activity).get(activity);
  }


  public static RequestManager with(@NonNull FragmentActivity activity) {
  //getRetriever(context) 返回RequestManagerRetriever
    return getRetriever(activity).get(activity);
  }


  public static RequestManager with(@NonNull Fragment fragment) {
  //getRetriever(context) 返回RequestManagerRetriever
    return getRetriever(fragment.getContext()).get(fragment);
  }


  public static RequestManager with(@NonNull android.app.Fragment fragment) {
  //getRetriever(context) 返回RequestManagerRetriever
    return getRetriever(fragment.getActivity()).get(fragment);
  }


  public static RequestManager with(@NonNull View view) {
  //getRetriever(context) 返回RequestManagerRetriever
    return getRetriever(view.getContext()).get(view);
  }
他们的共同点都是调用getRetriever函数,该函数比较单一就是返回一个RequestManagerRetriever
  private static RequestManagerRetriever getRetriever(@Nullable Context context) {
  	//Glide.get(context)获取单例对象,然后调用方法返回一个RequestManagerRetriever
    return Glide.get(context).getRequestManagerRetriever();
  }

   public static Glide get(@NonNull Context context) {
  	//如果对象是空的那么采用DCL单例模式创建
    if (glide == null) {
      GeneratedAppGlideModule annotationGeneratedModule =
          getAnnotationGeneratedGlideModules(context.getApplicationContext());
      synchronized (Glide.class) {
        if (glide == null) {
          //内部进行初始化操作和赋值,我们这里不必深究
          checkAndInitializeGlide(context, annotationGeneratedModule);
        }
      }
    }

    return glide;
  }
上面的代码最终会调用RequestManagerRetriever.get,这里会很多重载的版本

可见with的核心都是位于RequestManagerRetriever,同时他们不同重载决定了如何决定的生命周期监听。
我们假设我们传入的类型为FragmentActivity,我们看看与之对应的实现类:
//RequestManagerRetriever.java
  public RequestManager get(@NonNull FragmentActivity activity) {
    //Util.isOnBackgroundThread() 用于判断当前是否在子线程
    if (Util.isOnBackgroundThread()) {
      //如果在子线程那么走另一个get重载函数。换句话说生命周期的管控不遵循activity生命周期。除非你手动取消
      //否则哪怕你的activity被回收也依然进行下一步的操作
      return get(activity.getApplicationContext());
    } else {
   	  //这里获取fragmentmanager是用于创建一个不包含ui的fragment用于监听生命周期
      FragmentManager fm = activity.getSupportFragmentManager();
      //isActivityVisible函数用于判断当前activity是否被销毁,如果被销毁返回false,可用就返回true
      return supportFragmentGet(activity, fm, /*parentHint=*/ null, isActivityVisible(activity));
    }
  }
private RequestManager supportFragmentGet(
      Context context,
      FragmentManager fm,
      Fragment parentHint,//参数为空
      boolean isParentVisible //如果activities没有被销毁那么这个参数应该为true
      ) {
    //SupportRequestManagerFragment是一个fragment,
    //getSupportRequestManagerFragment用于判断当前是否放入过一个fragment进行监听生命周期
    //如果放入过就直接返回上次创建的对象,如果没有就放入一个新建的fragment监听。
    //可见SupportRequestManagerFragment 承担了监听生命周期的销毁的监听,销毁后直接取消请求
    SupportRequestManagerFragment current = getSupportRequestManagerFragment(fm, parentHint);

    //用于请求图片资源的类
    RequestManager requestManager = current.getRequestManager();

    if (requestManager == null) {
      //获取glide单例
      Glide glide = Glide.get(context);
      //用简单工厂构造一个对象
      //注意构建的requestManager对象会注册一个监听对象,在SupportRequestManagerFragment被回收的时候会回调
     //从而取消请求
      requestManager =
          factory.build(
              glide, current.getGlideLifecycle(), current.getRequestManagerTreeNode(), context);

      //onStart会恢复Glide之前暂停的请求以及加载新的请求
      //??为什么要在这一步就直接开始了?而不是into
      if (isParentVisible) {
        requestManager.onStart();
      }
      //关联请求
      current.setRequestManager(requestManager);
    }
    //返回对象结果
    return requestManager;
  }

 //一个函数判断  FragmentManager 是否加载过某个fragment,如果没有那么新建一个加载
 //这个fragment就是用于生命周期的监听
  private SupportRequestManagerFragment getSupportRequestManagerFragment(
    final FragmentManager fm, @Nullable Fragment parentHint) {
    //寻找是否已经加载器过一个fragment用于监听
    SupportRequestManagerFragment current =
        (SupportRequestManagerFragment) fm.findFragmentByTag(FRAGMENT_TAG);
    //没有加载过那么创建一个新的放入
    if (current == null) {
      //pendingSupportRequestManagerFragments是一个map结构,笔者猜测作用如下:
      //从map中寻找一个fragment,这里之所以存在这个map,用于防止多线程情况减少创建SupportRequestManagerFragment
      //假设有多个线程运行到current == null这行代码,必然会多次往下创建,如果有一个先创建了,那么可以从这个map拿取。
      //当然这里不保证绝对的单个对象的创建,只能保证减少创建。不理解也没关系,不影响全局流程
      current = pendingSupportRequestManagerFragments.get(fm);
      if (current == null) {
        //创建监听对象
        current = new SupportRequestManagerFragment();
        current.setParentFragmentHint(parentHint);
        //放入一个map结构中,方便多线程下的优化
        pendingSupportRequestManagerFragments.put(fm, current);
        //放入一个新的fragment到FragmentManager
        fm.beginTransaction().add(current, FRAGMENT_TAG).commitAllowingStateLoss();
        //这个消息主要目的是移除我们pendingSupportRequestManagerFragments加入的fm
        //因为它的主要重要是减少并发对象的创建,在主线程post后findFragmentByTag肯定可以找到对象了,所以map也就不需要了
        handler.obtainMessage(ID_REMOVE_SUPPORT_FRAGMENT_MANAGER, fm).sendToTarget();
      }
    }
    return current;
  }
我们在看下SupportRequestManagerFragment相关代码:
public class SupportRequestManagerFragment extends Fragment {

  //观察者模式的一个实现,可添加若干的监听对象
  private final ActivityFragmentLifecycle lifecycle;

  @Override
  public void onStart() {
    super.onStart();
    lifecycle.onStart();
  }

  @Override
  public void onStop() {
    super.onStop();
    lifecycle.onStop();
  }

  @Override
  public void onDestroy() {
    super.onDestroy();
    //回调所有监听对象,当前生命周期
    //还记的RequestManager 吗?它自然会被回调
    lifecycle.onDestroy();

  }

}
class ActivityFragmentLifecycle{
 //...
 //所有观察对象
   private final Set<LifecycleListener> lifecycleListeners =
      Collections.newSetFromMap(new WeakHashMap<LifecycleListener, Boolean>());
  void onDestroy() {
    isDestroyed = true;
     //获取集合 然后回调
     //Util.getSnapshot可忽略
    for (LifecycleListener lifecycleListener : Util.getSnapshot(lifecycleListeners)) {
      lifecycleListener.onDestroy();
    }
  }
}
我们总结上面的代码:
Glide.with作用:
- 初始化
Glide单例 - 根据传入的对象类别进行监听生命周期函数进而控制自动取消请求,如果在子线程调用生命周期将为application。
- 返回了一个
RequestManager
Activity生命周期控制方法:
构建一个无界面Fragment监听
对于Fragment生命周期相比你已经能猜到了,采用子fragment嵌套即可
load
load 函数的作用:为了给下一步封装请求对象.
 var requestManager:RequestManager=Glide.with(this)
 //url是一个图片地址
 var builder:RequestBuilder<Drawable>=requestManager.load(url)
class RequestManager{
  public RequestBuilder<Drawable> load(@Nullable String string) {
    return asDrawable().load(string);
  }
}
可见分成了两个步骤.我们首先分析asDrawable()
class RequestManager{
 public RequestBuilder<Drawable> asDrawable() {
    return as(Drawable.class);
  }
  public <ResourceType> RequestBuilder<ResourceType> as(
      @NonNull Class<ResourceType> resourceClass) {
    return new RequestBuilder<>(glide, this, resourceClass, context);
  }
}
我们首先不追究细节代码,只需要知道asDrawable返回了RequestBuilder<Drawable>即可,我们接着分析load(string).
class RequestBuilder{
public RequestBuilder一个前端程序猿的Sublime Text3的自我修养