Arduino ESP32 多任务运行(读取模拟量与闪灯)
Posted perseverance52
tags:
篇首语:本文由小常识网(cha138.com)小编为大家整理,主要介绍了Arduino ESP32 多任务运行(读取模拟量与闪灯)相关的知识,希望对你有一定的参考价值。
Arduino ESP32 多任务运行(读取模拟量与闪灯)
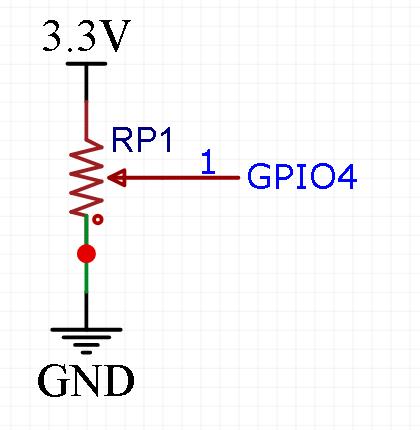
定位器接线示意图:
实例代码
/*
  多任务运行(读取模拟量与闪灯)
  接脚说明:2脚为板载LED,4脚接电位器OUT
*/

#if CONFIG_FREERTOS_UNICORE
#define ARDUINO_RUNNING_CORE 0
#else
#define ARDUINO_RUNNING_CORE 1
#endif

#ifndef LED_BUILTIN
#define LED_BUILTIN 2
#endif

// 为 Blink 和 AnalogRead 定义两个任务
void TaskBlink( void *pvParameters );
void TaskAnalogReadA3( void *pvParameters );

// the setup function runs once when you press reset or power the board
void setup() {

  // initialize serial communication at 115200 bits per second:
  Serial.begin(115200);

  // Now set up two tasks to run independently.
  xTaskCreatePinnedToCore(
    TaskBlink
    ,  "TaskBlink"   // 任务名
    ,  1024  // This stack size can be checked & adjusted by reading the Stack Highwater
    ,  NULL
    ,  2  // 任务优先级, with 3 (configMAX_PRIORITIES - 1) 是最高的,0是最低的.
    ,  NULL
    ,  ARDUINO_RUNNING_CORE);

  xTaskCreatePinnedToCore(
    TaskAnalogReadA3
    ,  "AnalogReadA3" //任务名
    ,  1024  // 栈大小
    ,  NULL
    ,  1  // 任务优先级
    ,  NULL
    ,  ARDUINO_RUNNING_CORE);

  //现在,接管单个任务调度控制的任务调度程序将自动启动。
}

void loop()
{
  // Empty. Things are done in Tasks.
}

/*--------------------------------------------------*/
/*---------------------- Tasks ---------------------*/
/*--------------------------------------------------*/

void TaskBlink(void *pvParameters)  // This is a task.
{
  (void) pvParameters;

/*
  Blink
  Turns on an LED on for one second, then off for one second, repeatedly.

  If you want to know what pin the on-board LED is connected to on your ESP32 model, check
  the Technical Specs of your board.
*/

  // initialize digital LED_BUILTIN on pin 13 as an output.
  pinMode(LED_BUILTIN, OUTPUT);

  for (;;) // A Task shall never return or exit.
  {
    digitalWrite(LED_BUILTIN, HIGH);   // turn the LED on (HIGH is the voltage level)
    vTaskDelay(1000);  // one tick delay (15ms) in between reads for stability
    digitalWrite(LED_BUILTIN, LOW);    // turn the LED off by making the voltage LOW
    vTaskDelay(1000);  // one tick delay (15ms) in between reads for stability
  }
}

void TaskAnalogReadA3(void *pvParameters)  // This is a task.
{
  (void) pvParameters;

/*
  AnalogReadSerial
  Reads an analog input on pin A4, prints the result to the serial monitor.
  Graphical representation is available using serial plotter (Tools > Serial Plotter menu)
  Attach the center pin of a potentiometer to pin A3, and the outside pins to +5V and ground.

  This example code is in the public domain.
*/

  for (;;)
  {
    // read the input on analog pin 4:
    int sensorValueA4 = analogRead(4);
    // print out the value you read:
    Serial.println(sensorValueA4);
    vTaskDelay(100);  // one tick delay (15ms) in between reads for stability
  }
}
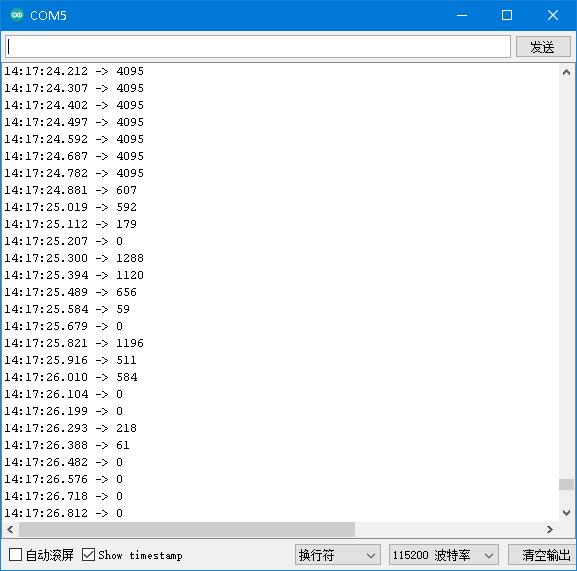
- 串口打印信息
以上是关于Arduino ESP32 多任务运行(读取模拟量与闪灯)的主要内容,如果未能解决你的问题,请参考以下文章