详细:tensorflow构建神经网络基础概念梳理
Posted ForLoveToFly
tags:
篇首语:本文由小常识网(cha138.com)小编为大家整理,主要介绍了详细:tensorflow构建神经网络基础概念梳理相关的知识,希望对你有一定的参考价值。
x = tf.compat.v1.placeholder(tf.float32, shape=[None, w, h, c], name='x')
y_ = tf.compat.v1.placeholder(tf.int32, shape=[None, ], name='y_')
placeholder函数定义如下:
tf.placeholder(dtype, shape=None, name=None),placeholder是占位符,在tensorflow中类似于函数参数,运行时必须传入值。
-
dtype:数据类型。常用的是tf.float32,tf.float64等数值类型。
-
shape:数据形状。默认是None,就是一维值,也可以是多维,比如[2,3], [None, 3]表示列是3,行不定, 此参数可以根据提供的数据推导得到,不一定要给出。。
-
name:名称, 比如常在上边的x, y_。
-
比如计算3*4=12

import tensorflow as tf
import numpy as np
input1 = tf.placeholder(tf.float32)
input2 = tf.placeholder(tf.float32)
output = tf.multiply(input1, input2)
with tf.Session() as sess:
    print sess.run(output, feed_dict = {input1:[3.], input2: [4.]})
计算矩阵相乘x*y import tensorflow as tf import numpy as np x = tf.placeholder(tf.float32, shape=(1024, 1024)) y = tf.matmul(x, x) with tf.Session() as sess: # print(sess.run(y)) # ERROR: x is none now rand_array = np.random.rand(1024, 1024) print(sess.run(y, feed_dict={x: rand_array})) # Will succeed.使用库函数进行矩阵运算 import tensorflow as tf # 定义placeholder input1 = tf.placeholder(tf.float32,shape=(1, 2),name="input-1") input2 = tf.placeholder(tf.float32,shape=(2, 1),name="input-2") # 定义矩阵乘法运算(注意区分matmul和multiply的区别:matmul是矩阵乘法,multiply是点乘) output = tf.matmul(input1, input2) # 通过session执行乘法运行 with tf.Session() as sess: # 执行时要传入placeholder的值 print sess.run(output, feed_dict = {input1:[1,2], input2:[3,4]}) # 最终执行结果 [11]2#:卷积和池化
-
卷积层

tf.nn.conv2d(input, filter, strides=, padding=, name=None)
计算给定4-D input和filter张量的2维卷积
	*
input:给定的输入张量,具有[batch, heigth, width, channel],类型为float32, 64
	*
filter:指定过滤器的大小,[filter_height, filter_width, in_channels, out_channels]. out_channels:窗口数量
	*
strides:strides = [1, stride, stride, 1],步长
	*
padding:“SAME”, “VALID”,使用的填充算法的类型,使用“SAME”。其中”VALID”表示滑动超出部分舍弃,“SAME”表示填充,使得变化后height, width一样大
新的激活函数-Reluf(x) = max(0, x) tf.nn.relu(features, name=None) features: 卷积后加上偏置的结果 return: 结果 1. 采用sigmoid等函数,反向传播求误差梯度时,计算量相对大,而采用Relu激活函数,整个过程的计算量节省很多 1. 对于深层网络,sigmoid函数反向传播时,很容易就会出现梯度消失的情况(求不出权重和偏置)池化层(Pooling)计算
-
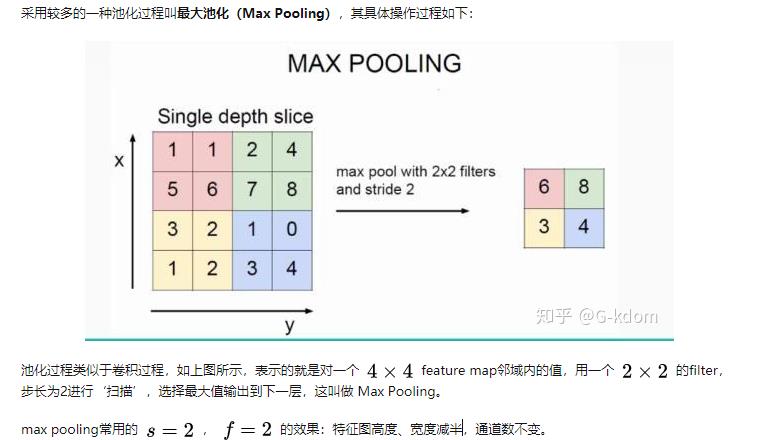
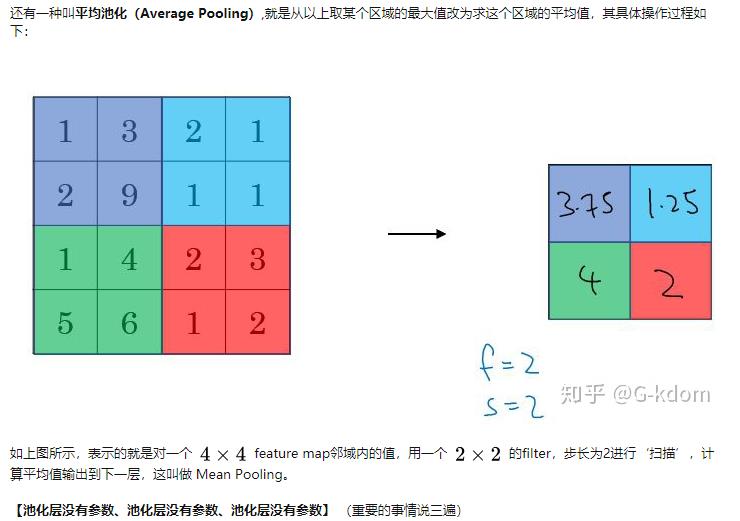
Pooling层主要的作用是特征提取,通过去掉Feature Map中不重要的样本,(这里如何确定什么参数不重要是个很难的问题,哪些样本不重要,这个是很不好判断的,)进一步减少参数数量。Pooling的方法很多,最常用的是Max Pooling。


tf.nn.max_pool(value, ksize=, strides=, padding=,name=None)

输入上执行最大池数
	*
value: 4-D Tensor形状[batch, height, width, channels]
	*
ksize: 池化窗口大小,[1, ksize, ksize, 1]
	*
strides:步长大小,[1, strides, strides, 1]
	*
padding: “SAME”, “VALID”,使用的填充算法的类型,使用“SAME”
Full Connected层(全连接层)
-
前面的卷积和池化相当于做特征工程,后面的全连接相当于做特征加权。最后的全连接层在整个卷积神经网络中起到“分类器”的作用。
函数的作用是将tensor变换为参数shape的形式。
其中shape为一个列表形式,特殊的一点是列表中可以存在-1。-1代表的含义是不用我们自己指定这一维的大小,函数会自动计算,但列表中只能存在一个-1。(当然如果存在多个-1,就是一个存在多解的方程了)
-
import tensorflow as tf
from tensorflow.examples.tutorials.mnist import input_data

# 输入层# 准备占位符with tf.variable_scope('data'):
    x = tf.placeholder(tf.float32, [None, 784])
    y_true = tf.placeholder(tf.float32, [None, 10])

# 卷积层# 卷积1with tf.variable_scope('conv1'):
    # 初始化权重 窗口3*3  步长1  32个窗口
    weight1 = tf.Variable(tf.random_normal(shape=[3, 3, 1, 32]))
    bias1 = tf.Variable(tf.constant(1.0, shape=[32]))
    x_reshaped = tf.reshape(x, [-1, 28, 28, 1])
    # x [None, 28, 28, 1] ----> [None, 28, 28, 32]
    conved1 = tf.nn.conv2d(input=x_reshaped, filter=weight1, strides=[1, 1, 1, 1], padding='SAME')
    print(conved1)
    relu1 = tf.nn.relu(conved1) + bias1
    print(relu1)# 池化1with tf.variable_scope('pool'):
    # 窗口2*2  步长2     x [None, 28, 28, 32] ----> [None, 14, 14, 32]
    pool1 = tf.nn.max_pool(value=relu1, ksize=[1, 2, 2, 1], strides=[1, 2, 2, 1], padding='SAME')
    print(pool1)

# 卷积2with tf.variable_scope('conv2'):
    # 窗口3*3  步长1   64个窗口
    weight2 = tf.Variable(tf.random_normal([3, 3, 32, 64]))
    bias2 = tf.Variable(tf.constant(1.0, shape=[64]))
    # x [None, 14, 14, 32] ----> [None, 14, 14, 64]
    conved2 = tf.nn.conv2d(input=pool1, filter=weight2, strides=[1, 1, 1, 1], padding='SAME')
    print(conved2)
    relu2 = tf.nn.relu(conved2) + bias2

# 池化2with tf.variable_scope('pool2'):
    # 窗口2*2  步长2     x [None, 14, 14, 64] ----> [None, 7, 7, 64]
    pool2 = tf.nn.max_pool(value=relu2, ksize=[1, 2, 2, 1], strides=[1, 2, 2, 1], padding='SAME')

# 全连接层  x[None, 7, 7, 64] -> x[None, 7*7*64] * ([7*7*64, 10]) ----> y[None, 10]with tf.variable_scope('full_coon'):
    x_fc = tf.reshape(pool2, [-1, 7*7*64])
    weight_fc = tf.Variable(tf.random_normal([7*7*64, 10]))
    bias_fc = tf.Variable(tf.constant(1.0, shape=[10]))
    y_predict = tf.matmul(x_fc, weight_fc) + bias_fc

# 交叉熵损失函数with tf.variable_scope('loss'):
    loss = tf.reduce_mean(tf.nn.softmax_cross_entropy_with_logits(labels=y_true, logits=y_predict))
    train_op = tf.train.GradientDescentOptimizer(0.001).minimize(loss)

# 计算准确度with tf.variable_scope('acc'):
    equal_list = tf.equal(tf.argmax(y_true, 1), tf.argmax(y_predict, 1))
    accuracy = tf.reduce_mean(tf.cast(equal_list, tf.float32))

init_var = tf.global_variables_initializer()

with tf.Session() as sess:
    sess.run(init_var)
    mnist = input_data.read_data_sets('./input_data', one_hot=True)
    for i in range(1000):
        image, label = mnist.train.next_batch(100)
        sess.run(train_op, feed_dict={x: image, y_true: label})
        print('第%s步,准确率为: %s' % (i, sess.run(accuracy, feed_dict={x: image, y_true: label})))
一个模型例子::: def model(input_tensor, train, regularizer): with tf.variable_scope('layer1-conv1'): # 定义一个作用域:layer1-conv1,在该作用域下面可以定义相同名称的变量(用于变量) conv1_weights = tf.get_variable("weight", [5, 5, 3, 32], initializer=tf.truncated_normal_initializer(stddev=0.1)) # 定义变量权重:weight,名称是weight;5,5代表卷积核的大小,3代表输入的信道数目,32代表输出的信道数目;initializer代表神经网络权重和卷积核的推荐初始值,生成截断正态分布随机数,服从标准差为0.1 conv1_biases = tf.get_variable("bias", [32], initializer=tf.constant_initializer(0.0)) # 定义变量偏置:bias,名称bias,[32]代表当前层的深度;initializer代表偏置的初始化,用函数tf.constant_initializer将其初始化为0,也可以初始化为tf.zeros_initializer或者tf.ones_initializer conv1 = tf.nn.conv2d(input_tensor, conv1_weights, strides=[1, 1, 1, 1], padding='SAME') # 上面为定义卷积层:input_tensor为当前层的节点矩阵;conv1_weights代表卷积层的权重;strides为不同方向上面的步长;padding标识填充,有两种方式,SAME表示用0填充,“VALID”表示不填充。 relu1 = tf.nn.relu(tf.nn.bias_add(conv1, conv1_biases)) # 定义激活函数:利用bias_add给每个节点都加上偏置项,然后利用relu函数去线性化 with tf.name_scope("layer2-pool1"): # 定义一个:layer2-pool1(用于op) # 池化层可以优先缩小矩阵的尺寸,从而减小最后全连接层当中的参数;池化层既可以加快计算速度,也可以防止过拟合。 pool1 = tf.nn.max_pool(relu1, ksize=[1, 2, 2, 1], strides=[1, 2, 2, 1], padding="VALID") # ksize代表pool窗口的尺寸,首尾两个数必须是1,ksize最常用[1,2,2,1]和[1,3,3,1];strides代表filter的步长,首尾两个数必须为1;padding代表填充方式; with tf.variable_scope("layer3-conv2"): # 定义作用域(用于变量) # 定义权重 conv2_weights = tf.get_variable("weight", [5, 5, 32, 64], initializer=tf.truncated_normal_initializer(stddev=0.1)) conv2_biases = tf.get_variable("bias", [64], initializer=tf.constant_initializer(0.0)) # 定义偏置 conv2 = tf.nn.conv2d(pool1, conv2_weights, strides=[1, 1, 1, 1], padding='SAME') # 定义卷积层 relu2 = tf.nn.relu(tf.nn.bias_add(conv2, conv2_biases)) # 定义激活函数 with tf.name_scope("layer4-pool2"): # 定义命名空间(用于op) pool2 = tf.nn.max_pool(relu2, ksize=[1, 2, 2, 1], strides=[1, 2, 2, 1], padding='VALID') # 定义池化层 with tf.variable_scope("layer5-conv3"): # 定义作用域 (用于变量) # 定义权重 conv3_weights = tf.get_variable("weight", [3, 3, 64, 128], initializer=tf.truncated_normal_initializer(stddev=0.1)) conv3_biases = tf.get_variable("bias", [128], initializer=tf.constant_initializer(0.0)) # 定义偏置 conv3 = tf.nn.conv2d(pool2, conv3_weights, strides=[1, 1, 1, 1], padding='SAME') # 定义卷积层 relu3 = tf.nn.relu(tf.nn.bias_add(conv3, conv3_biases)) # 定义激活函数 with tf.name_scope("layer6-pool3"): # 定义命名空间(用于op) pool3 = tf.nn.max_pool(relu3, ksize=[1, 2, 2, 1], strides=[1, 2, 2, 1], padding='VALID') # 定义池化层 with tf.variable_scope("layer7-conv4"): # 定义作用域(用于变量) # 定义权重 conv4_weights = tf.get_variable("weight", [3, 3, 128, 128], initializer=tf.truncated_normal_initializer(stddev=0.1)) conv4_biases = tf.get_variable("bias", [128], initializer=tf.constant_initializer(0.0)) # 定义偏置 conv4 = tf.nn.conv2d(pool3, conv4_weights, strides=[1, 1, 1, 1], padding='SAME') # 定义卷积层 relu4 = tf.nn.relu(tf.nn.bias_add(conv4, conv4_biases)) # 定义激活函数 with tf.name_scope("layer8-pool4"): # 定义命名空间(用于op) pool4 = tf.nn.max_pool(relu4, ksize=[1, 2, 2, 1], strides=[1, 2, 2, 1], padding='VALID') # 定义池化层 nodes = 6 * 6 * 128 reshaped = tf.reshape(pool4, [-1, nodes]) print("shape of reshaped:", reshaped.shape) # reshape函数将pool4的输出转化成向量 # 定义作用域: with tf.variable_scope('layer9-fc1'): # 定义全连接层的权重: fc1_weights = tf.get_variable("weight", [nodes, 1024], initializer=tf.truncated_normal_initializer(stddev=0.1)) if regularizer != None: tf.add_to_collection('losses', regularizer(fc1_weights)) # 给全连接层的权重添加正则项,tf.add_to_collection函数可以把变量放入一个集合,把很多变量变成一个列表 fc1_biases = tf.get_variable("bias", [1024], initializer=tf.constant_initializer(0.1)) # 定义全连接层的偏置: fc1 = tf.nn.relu(tf.matmul(reshaped, fc1_weights) + fc1_biases) # 定义激活函数: if train: fc1 = tf.nn.dropout(fc1, 0.5) # 针对训练数据,在全连接层添加dropout层,防止过拟合 with tf.variable_scope('layer10-fc2'): fc2_weights = tf.get_variable("weight", [1024, 512], initializer=tf.truncated_normal_initializer(stddev=0.1)) if regularizer != None: tf.add_to_collection('losses', regularizer(fc2_weights)) fc2_biases = tf.get_variable("bias", [512], initializer=tf.constant_initializer(0.1)) fc2 = tf.nn.relu(tf.matmul(fc1, fc2_weights) + fc2_biases) if train: fc2 = tf.nn.dropout(fc2, 0.5) with tf.variable_scope('layer11-fc3'): fc3_weights = tf.get_variable("weight", [512, 5], initializer=tf.truncated_normal_initializer(stddev=0.1)) if regularizer != None: tf.add_to_collection('losses', regularizer(fc3_weights)) fc3_biases = tf.get_variable("bias", [5], initializer=tf.constant_initializer(0.1)) logit = tf.matmul(fc2, fc3_weights) + fc3_biases return logitdef inference(input_tensor, train, regularizer): with tf.compat.v1.variable_scope('layer1-conv1'): # 定义变量权重:weight,名称是weight;5,5代表卷积核的大小,3代表输入的信道数目,32代表输出的信道数目; # initializer代表神经网络权重和卷积核的推荐初始值,生成截断正态分布随机数,服从标准差为0.1 conv1_weights = tf.compat.v1.get_variable("weight", [5, 5, 3, 32], initializer=tf.compat.v1.truncated_normal_initializer(stddev=0.1)) # 初始化偏置值为0 conv1_biases = tf.compat.v1.get_variable("bias", [32], initializer=tf.constant_initializer(0.0)) conv1 = tf.nn.conv2d(input_tensor, conv1_weights, strides=[1, 1, 1, 1], padding='SAME') relu1 = tf.nn.relu(tf.nn.bias_add(conv1, conv1_biases)) with tf.name_scope("layer2-pool1"): pool1 = tf.compat.v1.nn.max_pool(relu1, ksize=[1, 2, 2, 1], strides=[1, 2, 2, 1], padding="VALID") logging.info(f"First convolutional layer:{pool1}") with tf.compat.v1.variable_scope("layer3-conv2"): conv2_weights = tf.compat.v1.get_variable("weight", [5, 5, 32, 64], initializer=tf.compat.v1.truncated_normal_initializer(stddev=0.1)) conv2_biases = tf.compat.v1.get_variable("bias", [64], initializer=tf.compat.v1.constant_initializer(0.0)) conv2 = tf.compat.v1.nn.conv2d(pool1, conv2_weights, strides=[1, 1, 1, 1], padding='SAME') relu2 = tf.compat.v1.nn.relu(tf.nn.bias_add(conv2, conv2_biases)) with tf.name_scope("layer4-pool2"): pool2 = tf.compat.v1.nn.max_pool(relu2, ksize=[1, 2, 2, 1], strides=[1, 2, 2, 1], padding='VALID') logging.info(f"Second convolutional layer:{pool2}") with tf.compat.v1.variable_scope("layer5-conv3"): conv3_weights = tf.compat.v1.get_variable("weight", [3, 3, 64, 128], initializer=tf.compat.v1.truncated_normal_initializer(stddev=0.1)) conv3_biases = tf.compat.v1.get_variable("bias", [128], initializer=tf.compat.v1.constant_initializer(0.0)) conv3 = tf.compat.v1.nn.conv2d(pool2, conv3_weights, strides=[1, 1, 1, 1], padding='SAME') relu3 = tf.compat.v1.nn.relu(tf.nn.bias_add(conv3, conv3_biases)) with tf.compat.v1.name_scope("layer6-pool3"): pool3 = tf.compat.v1.nn.max_pool(relu3, ksize=[1, 2, 2, 1], strides=[1, 2, 2, 1], padding='VALID') logging.info(f"Third convolutional layer:{pool3}") with tf.compat.v1.variable_scope("layer7-conv4"): conv4_weights = tf.compat.v1.get_variable("weight", [3, 3, 128, 128], initializer=tf.compat.v1.truncated_normal_initializer(stddev=0.1)) conv4_biases = tf.compat.v1.get_variable("bias", [128], initializer=tf.compat.v1.constant_initializer(0.0)) conv4 = tf.compat.v1.nn.conv2d(pool3, conv4_weights, strides=[1, 1, 1, 1], padding='SAME') relu4 = tf.compat.v1.nn.relu(tf.nn.bias_add(conv4, conv4_biases)) with tf.compat.v1.name_scope("layer8-pool4"): pool4 = tf.compat.v1.nn.max_pool(relu4, ksize=[1, 2, 2, 1], strides=[1, 2, 2, 1], padding='VALID') logging.info(f"The fourth convolutional layer:{pool4}") nodes = 6 * 6 * 128 # 展开 reshaped = tf.compat.v1.reshape(pool4, [-1, nodes]) with tf.compat.v1.variable_scope('layer9-fc1'): fc1_weights = tf.compat.v1.get_variable("weight", [nodes, 1024], initializer=tf.compat.v1.truncated_normal_initializer(stddev=0.1)) if regularizer != None: tf.compat.v1.add_to_collection('losses', regularizer * tf.nn.l2_loss(fc1_weights)) fc1_biases = tf.compat.v1.get_variable("bias", [1024], initializer=tf.compat.v1.constant_initializer(0.1)) fc1 = tf.compat.v1.nn.relu(tf.compat.v1.matmul(reshaped, fc1_weights) + fc1_biases) logging.info(f"The first fully connected layer:{fc1}") if train: fc1 = tf.compat.v1.nn.dropout(fc1, 0.5) with tf.compat.v1.variable_scope('layer10-fc2'): fc2_weights = tf.compat.v1.get_variable("weight", [1024, 512], initializer=tf.compat.v1.truncated_normal_initializer(stddev=0.1)) if regularizer != None: tf.compat.v1.add_to_collection('losses', regularizer * tf.nn.l2_loss(fc2_weights)) fc2_biases = tf.compat.v1.get_variable("bias", [512], initializer=tf.compat.v1.constant_initializer(0.1)) fc2 = tf.compat.v1.nn.relu(tf.matmul(fc1, fc2_weights) + fc2_biases) if train: fc2 = tf.compat.v1.nn.dropout(fc2, 0.5) logging.info(f"The second fully connected layer:{fc2}") with tf.compat.v1.variable_scope('layer11-fc3'): fc3_weights = tf.compat.v1.get_variable("weight", [512, 5], initializer=tf.compat.v1.truncated_normal_initializer(stddev=0.1)) if regularizer != None: tf.compat.v1.add_to_collection('losses', regularizer * tf.nn.l2_loss(fc3_weights)) fc3_biases = tf.compat.v1.get_variable("bias", [5], initializer=tf.compat.v1.constant_initializer(0.1)) logit = tf.compat.v1.matmul(fc2, fc3_weights) + fc3_biases return logitconv1 = tf.nn.conv2d(input_tensor,conv1_weights,strides=[1,1,1,1],padding='SAME')
这是一个常见的卷积操作,其中strides=【1,1,1,1】表示滑动步长为1,padding=‘SAME’表示填0操作
当我们要设置步长为2时,strides=【1,2,2,1】,很多同学可能不理解了,这四个参数分别代表了什么,
strides在官方定义中是一个一维具有四个元素的张量,其规定前后必须为1。所以我们可以改的是中间两个数,中间两个数分别代表了水平滑动和垂直滑动步长值,于是就很好理解了。在卷积核移动逐渐扫描整体图时候,因为步长的设置问题,可能导致剩下未扫描的空间不足以提供给卷积核的,大小扫描 比如有图大小为5*5,卷积核为2*2,步长为2,卷积核扫描了两次后,剩下一个元素,不够卷积核扫描了,这个时候就在后面补零,补完后满足卷积核的扫描,这种方式就是same。如果说把刚才不足以扫描的元素位置抛弃掉,就是valid方式。
-
函数参数的解释:
tf.nn.conv2d(input, filter, strides, padding, use_cudnn_on_gpu=None, name=None)
除去name参数用以指定该操作的name,与方法有关的一共五个参数:
input:
指需要做卷积的输入图像,它要求是一个Tensor,具有[batch, in_height, in_width, in_channels]这样的shape,具体含义是[训练时一个batch的图片数量, 图片高度, 图片宽度, 图像通道数],注意这是一个4维的Tensor,要求类型为float32和float64其中之一
filter:
相当于CNN中的卷积核,它要求是一个Tensor,具有[filter_height, filter_width, in_channels, out_channels]这样的shape,具体含义是[卷积核的高度,卷积核的宽度,图像通道数,卷积核个数],要求类型与参数input相同,有一个地方需要注意,第三维in_channels,就是参数input的第四维。【有时候也叫ksize或卷积核】
* strides:卷积时在图像每一维的步长,这是一个一维的向量,长度4。【注意:一般两边为1.形如[1,height,weight,1]】。
padding:
string类型的量,只能是”SAME”,”VALID”其中之一,这个值决定了不同的卷积方式【same:不够还加。valid:不够舍弃。】
use_cudnn_on_gpu:
bool类型,是否使用cudnn加速,默认为true
batch和Eposh
神经网络中Batch和Epoch之间的区别是什么? 随机梯度下降法是一种具有大量超参数的学习算法。两个超参数: Batch大小和Epoch数量,它们都是整数值。batch字面上是批量的意思,在深度学习中指的是计算一次cost需要的输入数据个数。 这意味着数据集将分为40个Batch,每个Batch有5个样本。每批五个样品后,模型权重将更新。 这也意味着一个epoch将涉及40个Batch或40个模型更新。 有1000个Epoch,模型将暴露或传递整个数据集1,000次。 一个 batch 的样本通常比单个输入更接近于总体输入数据的分布,batch 越大就越近似。然而,每个 batch 将花费更长的时间来处理,并且仍然只更新模型一次。
-
Sample: 样本,数据集中的一个元素,一条数据。
例1: 在卷积神经网络中,一张图像是一个样本。
例2: 在语音识别模型中,一段音频是一个样本。
-
Batch: 批,含有 N 个样本的集合。每一个 batch 的样本都是独立并行处理的。在训练时,一个 batch 的结果只会用来更新一次模型。
一个 batch 的样本通常比单个输入更接近于总体输入数据的分布,batch 越大就越近似。然而,每个 batch 将花费更长的时间来处理,并且仍然只更新模型一次。在推理(评估/预测)时,建议条件允许的情况下选择一个尽可能大的 batch,(因为较大的 batch 通常评估/预测的速度会更快)。
-
Epoch: 轮次,通常被定义为 「在整个数据集上的一轮迭代」,用于训练的不同的阶段,这有利于记录和定期评估。
当在 Keras 模型的 fit 方法中使用 validation_data 或 validation_split 时,评估将在每个 epoch 结束时运行。
在 Keras 中,可以添加专门的用于在 epoch 结束时运行的 callbacks 回调。例如学习率变化和模型检查点(保存)。
-
这也意味着一个epoch将涉及40个Batch或40个模型更新。
有1000个Epoch,模型将暴露或传递整个数据集1,000次。在整个培训过程中,总共有40,000Batch。
用一个小例子来说明这一点。
假设您有一个包含200个样本(数据行)的数据集,并且您选择的Batch大小为5和1,000个Epoch。
这意味着数据集将分为40个Batch,每个Batch有5个样本。每批五个样品后,模型权重将更新。
-
池化
池化过程在一般卷积过程后。池化(pooling) 的本质,其实就是采样。Pooling 对于输入的 Feature Map,选择某种方式对其进行降维压缩,以加快运算速度。
-


池化的作用:
(1)保留主要特征的同时减少参数和计算量,防止过拟合。
(2)invariance(不变性),这种不变性包括translation(平移),rotation(旋转),scale(尺度)。
Pooling 层说到底还是一个特征选择,信息过滤的过程。也就是说我们损失了一部分信息,这是一个和计算性能的一个妥协,随着运算速度的不断提高,我认为这个妥协会越来越小。
现在有些网络都开始少用或者不用pooling层了。
以上是关于详细:tensorflow构建神经网络基础概念梳理的主要内容,如果未能解决你的问题,请参考以下文章