cgb2108-day14
Posted cgblpx
tags:
篇首语:本文由小常识网(cha138.com)小编为大家整理,主要介绍了cgb2108-day14相关的知识,希望对你有一定的参考价值。
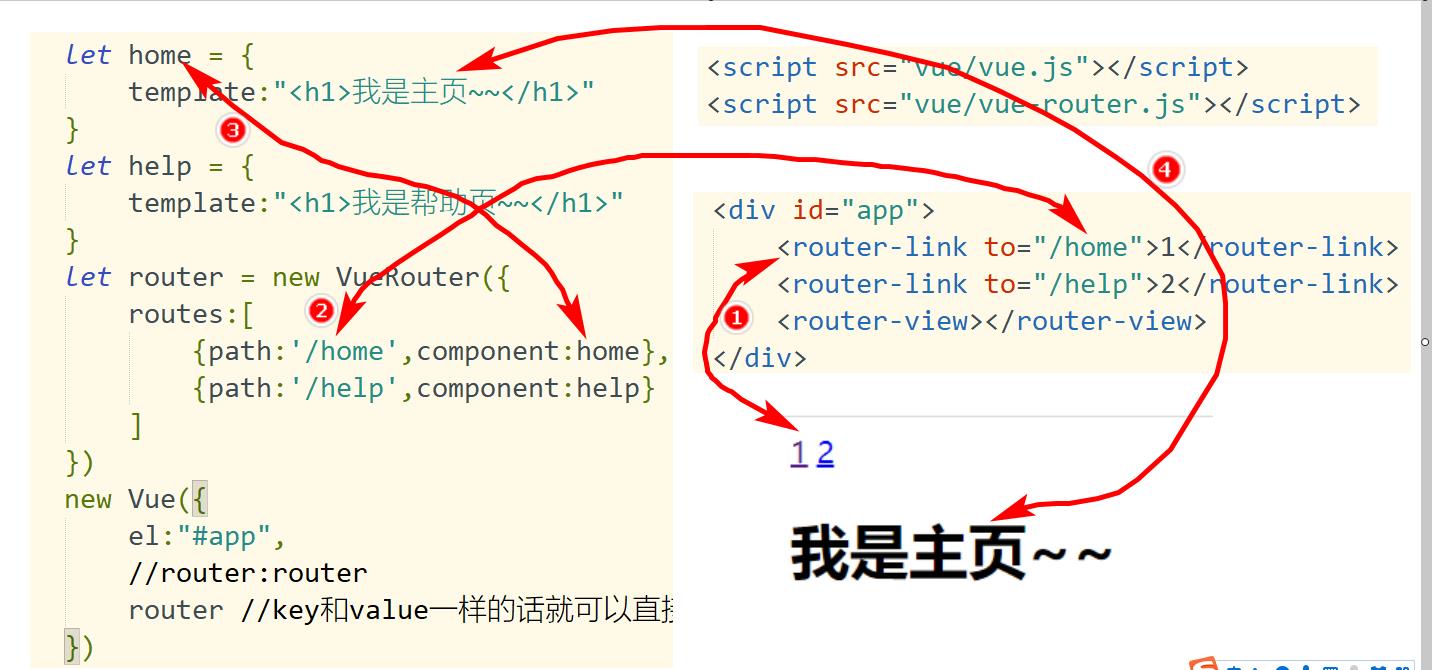
一,练习vue路由
–1,代码
<!DOCTYPE html>
<html>
	<head>
		<meta charset="utf-8">
		<title>练习vue路由</title>
		<script src="vue/vue.js"></script>
		<script src="vue/vue-router.js"></script>
	</head>
	<body>
		<!-- 需求:点击不同的元素,展示不同的网址 -->
		<div id="app">
			<router-link to="/runoob">runoob</router-link>
			<router-link to="/w3c">w3c</router-link>
			<router-view></router-view>
		</div>
		<script>
			let router = new VueRouter({
				routes:[ //把不同的请求,分发给不同的组件处理
					{ //点击runoob时,匹配到对应的组件,展示runoob的网址
						path:'/runoob',
						component:{
							template:'<h1><a href="https://www.runoob.com">https://www.runoob.com/</a></h1>',
						},
					},
					{ //点击w3c时,匹配到对应的组件,展示w3c的网址
						path:'/w3c',
						component:{
							template:'<h1><a href="https://www.w3school.com.cn">https://www.w3school.com.cn/</a></h1>',
						},
					}
				]
			})
			new Vue({
				el:"#app",
				router
			})
		</script>
	</body>
</html>
–2,总结

二,Vue-cli脚手架
–1,概述
是指vue的客户端,是使用vue项目的前提.
vue脚手架提供了丰富的功能,只要安装成功,就可以使用的.
–2,安装
1, 安装Nodejs(下一步下一步), 并检查(在DOS窗口里执行DOS命令 node -v)
2, 修改npm的镜像(下载的快) :
npm config set registry https://registry.npm.taobao.org #修改下载资源的网址成taobao
3, 正式安装(没有飘红ERR就行了):
npm install vue-cli -g  #全局安装vue脚手架
vue –V #查看脚手架的版本
where vue #查看vue脚手架安装在哪里
4, 下载vue项目
指定一个工作空间的路径,存放vue项目的代码
在工作空间的位置,输入cmd,敲入回车,输入以下命令:
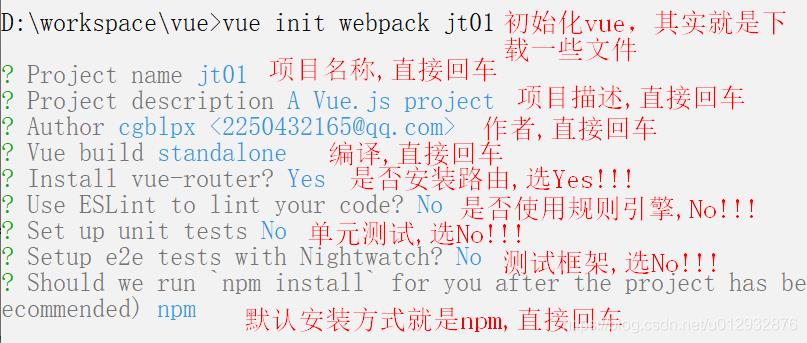
vue init webpack jt01  #利用脚手架下载jt01的项目100M+
进行一些选项的配置,yes/no,参考下图选答案.

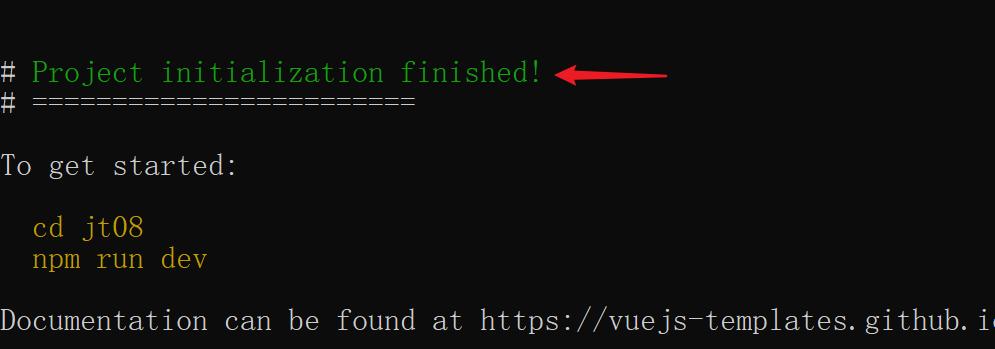
5,检测vue项目是否下载完了
原则是: 一路没有遇到飘红的ERR的话,就可以了

6,测试项目
按照提示,再执行两条命令:
cd jt08  #进入项目文件夹里
npm run dev  #启动项目
DONE  Compiled successfully in 9949ms #表示项目启动成功
打开浏览器访问:http://localhost:8080
7,用Hbuilder打开Vue项目
文件–打开目录–选中刚刚下载好的vue项目–确定
三,在Vue项目中添加自定义组件
–1,创建Car.vue文件-自定义组件
位置:在src/components文件夹里
<!-- 写HTML的代码 -->
<template>
  <div>
    <h1>{{msg}}</h1>
  </div>
</template>
<!-- 写js的代码 -->
<script>
// 提供一个支持导出的组件
export default{
  name:'Car' ,//组件名称,通常和文件名一致
  data(){   //准备返回数据
    return{
      msg:'hello vue~~'
    }
  }
}
</script>
<!-- 写css的代码 -->
<style>
</style>
–2,修改App.vue文件
把自定义组件,引入到这个文件里
<template>
  <div id="app">
    <!-- 3.使用自定义组件,当做HTML元素-->
    <Car></Car>
  </div>
</template>
<script>
  //1.导入指定位置的自定组件car.vue
  import Car from './components/Car.vue'
  //2,使用components属性,使用自定义组件
export default {
  name: 'App',
  components:{
    Car //注册刚刚导入的自定义组件
  }
}
</script>

<style>
#app {
  font-family: 'Avenir', Helvetica, Arial, sans-serif;
  -webkit-font-smoothing: antialiased;
  -moz-osx-font-smoothing: grayscale;
  text-align: center;
  color: #2c3e50;
  margin-top: 60px;
}
</style>
–3,测试
1,服务器保证是启动的,编译了新的代码
2,在浏览器里http://localhost:8080/测试
四,练习自定义组件
–1,创建person.vue的组件
<template>
  <div>{{name}}</div>
</template>

<script>
export default{
  name:'person',
  data(){
    return{
      name:'jack'
    }
  }
}
</script>

<style>
</style>
–2,修改App.vue,引入自定义组件
<template>
  <div id="app">
    <!-- 3.使用自定义组件,当做HTML元素-->
    <Car></Car>
    <person></person>
  </div>
</template>
<script>
  //1.导入指定位置的自定组件car.vue
  import Car from './components/Car.vue'
  import person from './components/person.vue'
  //2,使用components属性,使用自定义组件
export default {
  name: 'App',
  components:{
    Car , //注册刚刚导入的自定义组件
    person
  }
}
</script>

<style>
#app {
  font-family: 'Avenir', Helvetica, Arial, sans-serif;
  -webkit-font-smoothing: antialiased;
  -moz-osx-font-smoothing: grayscale;
  text-align: center;
  color: #2c3e50;
  margin-top: 60px;
}
</style>
–3,测试
1,在DOS窗口敲个回车(目的是自动编译新的代码)
2,打开浏览器,刷新看新数据http://localhost:8080
五,ElementUI
–1,概述
是饿了么提供的一套漂亮的前端网页展示的效果
–2,使用步骤
1, 在当前工程里,下载element-ui的工具

npm i element-ui -S #安装element-ui
2, 检查下载的结果

–3,修改main.js,引入elementui
// The Vue build version to load with the `import` command
// (runtime-only or standalone) has been set in webpack.base.conf with an alias.
import Vue from 'vue'
import App from './App'
import router from './router'

//引入第三方的ElementUI来美化页面
import ElementUI from 'element-ui';
import 'element-ui/lib/theme-chalk/index.css';
Vue.use(ElementUI);

Vue.config.productionTip = false
/* eslint-disable no-new */
new Vue({
  el: '#app',
  router,
  components: { App },
  template: '<App/>'
})
–4,测试,修改自定义组件person.vue/car.vue
<!-- 写HTML的代码 -->
<template>
  <div>
    <h1>{{msg}}</h1>

    <!-- 1.按钮 -->
    <el-button type="success">成功按钮</el-button>
    <el-button type="danger" icon="el-icon-delete" circle></el-button>
    <!-- 2.布局,每行默认是24分格,自由组合
      :span属性表示合并列,el-row表示行元素,el-col表示列元素
    -->
    <el-row>
      <el-col :span="2">123</el-col>
      <el-col :span="12">456</el-col>
    </el-row>
    <!-- 3.图标,i表示图标网页的元素,class属性指定要用哪个图标-->
    <i class="el-icon-share"></i>
    <i class="el-icon-s-flag"></i>
    <!-- 4.按钮,el-button按钮效果,type设置颜色,circle圆形,icon给按钮加图标-->
    <el-button type="success" round icon="el-icon-search">立即注册</el-button>
    <el-button type="success" circle icon="el-icon-delete"></el-button>

  </div>
</template>
<!-- 写js的代码 -->
<script>
// 提供一个支持导出的组件
export default{
  name:'Car' , //组件名称,通常和文件名一致
  data(){   //准备返回数据
    return{
      msg:'hello vue~~'
    }
  }
}
</script>
<!-- 写css的代码 -->
<style>
</style>
以上是关于cgb2108-day14的主要内容,如果未能解决你的问题,请参考以下文章