《Python 深度学习》刷书笔记 Chapter 8 Part-3 神经网络风格转移
Posted FeverTwice
tags:
篇首语:本文由小常识网(cha138.com)小编为大家整理,主要介绍了《Python 深度学习》刷书笔记 Chapter 8 Part-3 神经网络风格转移相关的知识,希望对你有一定的参考价值。
文章目录
神经风格转移
神经风格转移(neural style transfer)中的风格(style)指的是图像中不同空间尺度的纹理、颜色和视觉图案
神经风格转移主要有两个优化目标
- 原图像与生成图像之间内容损失差尽可能小
- 原图像与生成图像之间风格损失差尽可能小
内容损失
一般用两个激活间的L2范数
- 一个激活是预训练的卷积神经网络在更靠近顶部某层的图像计算得到的
- 另一个是同一层在生成图像上计算的激活
风格损失
- 在目标内容图像和生成图像之间保持相似的高层激活,从而能保留内容
- 在较低层和较高层的激活之间保持相互关系,从而能够保持风格
使用Keras实现神经风格迁移
我们使用VGG19来实现这一功能,其过程如下
- 创建一个网络,能够同时参考原始图像、目标图像以及VGG19图像
- 可以使用这三个图像计算激活层来定义之间的损失函数
- 设置梯度下降来使得整个过程的损失函数最小化
8-14 定义初始变量
from keras.preprocessing.image import load_img, img_to_array

# 想要变换的图像路径
target_image_path = r'E:\\code\\PythonDeep\\styleTransfer\\ori1.jpg'
# 风格图像的路径
style_reference_image_path = r'E:\\code\\PythonDeep\\styleTransfer\\objstyle.jpg'

# 生成图像的尺寸
width, height = load_img(target_image_path).size
img_height = 400
img_width = int(width * img_height / height) # 等比例缩放
Using TensorFlow backend.
8-15 辅助函数
import numpy as np
from keras.applications import vgg19

def preprocess_image(image_path):
    img = load_img(image_path, target_size=(img_height, img_width))
    img = img_to_array(img)
    img = np.expand_dims(img, axis=0)
    # 减去ImageNet的平均像素值。使其中心为0
    img = vgg19.preprocess_input(img)
    return img

def deprocess_image(x):
    # Remove zero-center by mean pixel
    x[:, :, 0] += 103.939
    x[:, :, 1] += 116.779
    x[:, :, 2] += 123.68
    # 将图像由BGR转为RGB,这也是VGG19逆操作的一部分
    x = x[:, :, ::-1]
    x = np.clip(x, 0, 255).astype('uint8')
    return x
8-16 加载预训练的VGG19网络并将其应用于三张图
from keras import backend as K
target_image = K.constant(preprocess_image(target_image_path))
style_reference_image = K.constant(preprocess_image(style_reference_image_path))

# 这个占位符用于保存或者生成图像
combination_image = K.placeholder((1, img_height, img_width, 3))

# 将三张图像合并为1张图像
input_tensor = K.concatenate([target_image,
                              style_reference_image,
                              combination_image], axis=0) # 以行的方式叠加

# 将三张图像组成的batch作为输入来构建VGG19网络
model = vgg19.VGG19(input_tensor = input_tensor,
                    weights = 'imagenet',
                    include_top = False)

print('Model loaded.')
Model loaded.
8-17 内容损失
# 计算内容损失
def content_loss(base, combination):
    return K.sum(K.square(combination - base))
8-18 风格损失
def gram_matrix(x):
    features = K.batch_flatten(K.permute_dimensions(x, (2, 0, 1)))
    gram = K.dot(features, K.transpose(features))
    return gram


def style_loss(style, combination):
    S = gram_matrix(style)
    C = gram_matrix(combination)
    channels = 3
    size = img_height * img_width
    return K.sum(K.square(S - C)) / (4. * (channels ** 2) * (size ** 2))
8-19 总变差损失
def total_variation_loss(x):
    a = K.square(
        x[:, :img_height - 1, :img_width - 1, :] - x[:, 1:, :img_width - 1, :])

    b = K.square(
        x[:, :img_height - 1, :img_width - 1, :] - x[:, :img_height - 1, 1:, :])

    return K.sum(K.pow(a + b, 1.25))
我们需要最小化损失的是这三项损失的加权平均,为了计算损失,我们只需一个顶部的层,即block5_conv2层
而对于风格损失,我们需要使用一系列的层,既包括顶层也包括底层,最后还要添加总变差损失
8-20 定义需要最小化的最终损失
# 将层的名称映射为激活张量的字典
outputs_dict = dict([(layer.name, layer.output) for layer in model.layers])

# 用于内容损失的层
content_layer = 'block5_conv2'

# 用于风格损失的层
style_layers = ['block1_conv1',
                'block2_conv1',
                'block3_conv1',
                'block4_conv1',
                'block5_conv1']

# 损失分量的加权平均所使用的权重
total_variation_weight = 1e-4
style_weight = 1.
content_weight = 0.025

# 添加内容损失
loss = K.variable(0.)
# 在定义损失时候将所有的分量都添加到这个标量变量中
layer_features = outputs_dict[content_layer]
target_image_features = layer_features[0, :, :, :]
combination_features = layer_features[2, :, :, :]
loss = loss + content_weight * content_loss(target_image_features,
                                      combination_features)
# 添加每个目标层的风格损失分量
for layer_name in style_layers:
    layer_features = outputs_dict[layer_name]
    style_reference_features = layer_features[1, :, :, :]
    combination_features = layer_features[2, :, :, :]
    sl = style_loss(style_reference_features, combination_features)
    loss = loss + (style_weight / len(style_layers)) * sl

# 添加总变差损失
loss = loss + total_variation_weight * total_variation_loss(combination_image)
8-21 设置梯度下降
# 获得损失相对于生成图像的梯度
grads = K.gradients(loss, combination_image)[0]

# 用于获取当前损失值和当前梯度值的函数
fetch_loss_and_grads = K.function([combination_image], [loss, grads])

# 这个类将fetch_loss_and_grads包装起来
# 让你可以使用两个单独的方法来获取损失和梯度
class Evaluator(object):

    def __init__(self):
        self.loss_value = None
        self.grads_values = None

    def loss(self, x):
        assert self.loss_value is None
        x = x.reshape((1, img_height, img_width, 3))
        outs = fetch_loss_and_grads([x])
        loss_value = outs[0]
        grad_values = outs[1].flatten().astype('float64')
        self.loss_value = loss_value
        self.grad_values = grad_values
        return self.loss_value

    def grads(self, x):
        assert self.loss_value is not None
        grad_values = np.copy(self.grad_values)
        self.loss_value = None
        self.grad_values = None
        return grad_values

evaluator = Evaluator()
8-22 风格迁移循环
from scipy.optimize import fmin_l_bfgs_b
import time
import imageio

result_prefix = 'style_transfer_result'
iterations = 20


# 这个是初始状态:目标图像
# 将图像展平,因为scipy.optimize.fmin_1_bfgs_b只能处理展平的向量
x = preprocess_image(target_image_path)
x = x.flatten()
for i in range(iterations):
    print('Start of iteration', i)
    start_time = time.time()
    # 对生成的图像的像素进行L-BFGS优化
    # 将神经风格的损失最小化
    x, min_val, info = fmin_l_bfgs_b(evaluator.loss, x,
                                     fprime=evaluator.grads, maxfun=20)
    print('Current loss value:', min_val)

    # 保存当前生成的图像
    img = x.copy().reshape((img_height, img_width, 3))
    img = deprocess_image(img)
    fname = result_prefix + '_at_iteration_%d.png' % i

    # 这里同样要改变保存的函数,与上一Part的相同
    imageio.imsave(fname, img)

    end_time = time.time()
    print('Image saved as', fname)
    print('Iteration %d completed in %ds' % (i, end_time - start_time))
Start of iteration 0
Current loss value: 572887550.0
Image saved as style_transfer_result_at_iteration_0.png
Iteration 0 completed in 137s
Start of iteration 1
Current loss value: 262687630.0
Image saved as style_transfer_result_at_iteration_1.png
Iteration 1 completed in 143s
Start of iteration 2
Current loss value: 188103090.0
Image saved as style_transfer_result_at_iteration_2.png
Iteration 2 completed in 146s
Start of iteration 3
Current loss value: 158912400.0
Image saved as style_transfer_result_at_iteration_3.png
Iteration 3 completed in 144s
Start of iteration 4
Current loss value: 137502610.0
Image saved as style_transfer_result_at_iteration_4.png
Iteration 4 completed in 144s
Start of iteration 5
Current loss value: 122368510.0
Image saved as style_transfer_result_at_iteration_5.png
Iteration 5 completed in 143s
Start of iteration 6
Current loss value: 111903220.0
Image saved as style_transfer_result_at_iteration_6.png
Iteration 6 completed in 144s
Start of iteration 7
Current loss value: 102213060.0
Image saved as style_transfer_result_at_iteration_7.png
Iteration 7 completed in 144s
Start of iteration 8
Current loss value: 95047980.0
Image saved as style_transfer_result_at_iteration_8.png
Iteration 8 completed in 144s
Start of iteration 9
Current loss value: 90722060.0
Image saved as style_transfer_result_at_iteration_9.png
Iteration 9 completed in 145s
Start of iteration 10
Current loss value: 85071980.0
Image saved as style_transfer_result_at_iteration_10.png
Iteration 10 completed in 144s
Start of iteration 11
Current loss value: 80578936.0
Image saved as style_transfer_result_at_iteration_11.png
Iteration 11 completed in 144s
Start of iteration 12
Current loss value: 74976456.0
Image saved as style_transfer_result_at_iteration_12.png
Iteration 12 completed in 143s
Start of iteration 13
Current loss value: 70854060.0
Image saved as style_transfer_result_at_iteration_13.png
Iteration 13 completed in 145s
Start of iteration 14
Current loss value: 68048904.0
Image saved as style_transfer_result_at_iteration_14.png
Iteration 14 completed in 144s
Start of iteration 15
Current loss value: 65703100.0
Image saved as style_transfer_result_at_iteration_15.png
Iteration 15 completed in 144s
Start of iteration 16
Current loss value: 63404410.0
Image saved as style_transfer_result_at_iteration_16.png
Iteration 16 completed in 144s
Start of iteration 17
Current loss value: 61337212.0
Image saved as style_transfer_result_at_iteration_17.png
Iteration 17 completed in 143s
Start of iteration 18
Current loss value: 59199800.0
Image saved as style_transfer_result_at_iteration_18.png
Iteration 18 completed in 143s
Start of iteration 19
Current loss value: 57377176.0
Image saved as style_transfer_result_at_iteration_19.png
Iteration 19 completed in 143s
# 画图
from matplotlib import pyplot as plt

# Content image
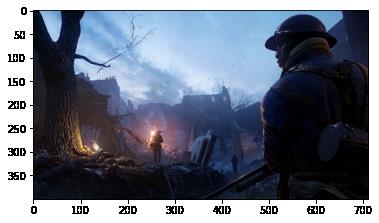
plt.imshow(load_img(target_image_path, target_size=(img_height, img_width)))
plt.figure()

# Style image
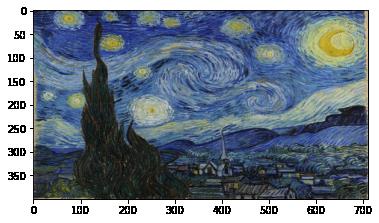
plt.imshow(load_img(style_reference_image_path, target_size=(img_height, img_width)))
plt.figure()

# Generate image
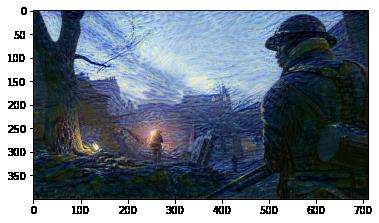
plt.imshow(img)
plt.show()
结果展示
原图片

目标风格

最终生成图片

写在最后
注:本文代码来自《Python 深度学习》,做成电子笔记的方式上传,仅供学习参考,作者均已运行成功,如有遗漏请练习本文作者
各位看官,都看到这里了,麻烦动动手指头给博主来个点赞8,您的支持作者最大的创作动力哟!
<(^-^)>
才疏学浅,若有纰漏,恳请斧正
本文章仅用于各位同志作为学习交流之用,不作任何商业用途,若涉及版权问题请速与作者联系,望悉知
以上是关于《Python 深度学习》刷书笔记 Chapter 8 Part-3 神经网络风格转移的主要内容,如果未能解决你的问题,请参考以下文章