还记不住Spring Bean的生命周期?看这篇你就知道方法了!
Posted SunAlwaysOnline
tags:
篇首语:本文由小常识网(cha138.com)小编为大家整理,主要介绍了还记不住Spring Bean的生命周期?看这篇你就知道方法了!相关的知识,希望对你有一定的参考价值。
一、前言
上次我们在手把手教你解决循环依赖,一步一步地来窥探出三级缓存的奥秘中分析了Spring解决循环依赖的方式,在第6节中的doCreateBean(AbstractAutowireCapableBeanFactory类中)其实已经隐约看到了Bean的生命周期的几个阶段。
    protected Object doCreateBean(final String beanName, final RootBeanDefinition mbd, final @Nullable Object[] args)
            throws BeanCreationException {

        //实例化bean
        BeanWrapper instanceWrapper = createBeanInstance(beanName, mbd, args);

        boolean earlySingletonExposure = (mbd.isSingleton() && this.allowCircularReferences &&
                isSingletonCurrentlyInCreation(beanName));
        if (earlySingletonExposure) {
            //加入到三级缓存中,getEarlyBeanReference会返回单例工厂
            addSingletonFactory(beanName, () -> getEarlyBeanReference(beanName, mbd, bean));
        }

        Object exposedObject = bean;
        //属性赋值
        populateBean(beanName, mbd, instanceWrapper);
        //初始化
        exposedObject = initializeBean(beanName, exposedObject, mbd);

        if (earlySingletonExposure) {
            //从二级缓存中查找
            Object earlySingletonReference = getSingleton(beanName, false);
            if (earlySingletonReference != null) {
                //返回二级缓存中的bean,这里就有可能是代理后的对象
                exposedObject = earlySingletonReference;

            }
        }
        //销毁前的准备,注册待销毁的Bean
		registerDisposableBeanIfNecessary(beanName, bean, mbd);

        return exposedObject;
}doCreateBean基本描述了Bean生命周期的大致框架——实例化、属性赋值与初始化,当然Bean最后一步就是销毁。
基本阶段图
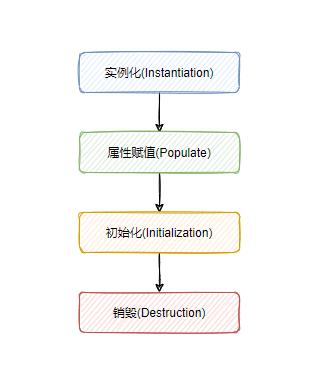
请记住这张图,也许你等会儿就不认识它了。
二、实例化与属性赋值阶段
当容器启动时,会依据配置或注解扫描指定的包,将其中的类转化为BeanDefinition,并集中在DefaultListableBeanFactory类的beanDefinitionMap变量里。
Spring中的BeanDdfinition,可以用来描述一个bean的作用域、是否懒加载、是否单例等。
容器启动完成后,当我们试图从容器获取一个Bean时,第一步就是去实例化该Bean。说白了,就是需要调用构造方法。
注意到在调用doCreateBean之前,调用了resolveBeforeInstantiation方法。
1、resolveBeforeInstantiation
    protected Object createBean(String beanName, RootBeanDefinition mbd, @Nullable Object[] args)
            throws BeanCreationException {
        //省略部分代码
        Object bean = resolveBeforeInstantiation(beanName, mbdToUse);
        if (bean != null) {
            return bean;
        }
        //正式进入生命周期
        Object beanInstance = doCreateBean(beanName, mbdToUse, args);

        return beanInstance;
    }

	protected Object resolveBeforeInstantiation(String beanName, RootBeanDefinition mbd) {
		Object bean = null;
		if (!Boolean.FALSE.equals(mbd.beforeInstantiationResolved)) {
			if (!mbd.isSynthetic() && hasInstantiationAwareBeanPostProcessors()) {
				Class<?> targetType = determineTargetType(beanName, mbd);
				if (targetType != null) {
                    //寻找InstantiationAwareBeanPostProcessor,并执行相应方法
					bean = applyBeanPostProcessorsBeforeInstantiation(targetType, beanName);
                    //在返回不为null的情况下,寻找BeanPostProcessor,执行相应方法
					if (bean != null) {
						bean = applyBeanPostProcessorsAfterInitialization(bean, beanName);
					}
				}
			}
			mbd.beforeInstantiationResolved = (bean != null);
		}
		return bean;
	}
当resolveBeforeInstantiation返回不为null的bean后,createBean会直接返回。也就是说,后续的实例化、属性赋值与初始化阶段都不会进行。这一步,将会给BeanPostProcessor一个返回代理而不是目前bean的机会。
resolveBeforeInstantiation核心的方法如下:
	protected Object applyBeanPostProcessorsBeforeInstantiation(Class<?> beanClass, String beanName) {
        //获取所有BeanPostProcessor的实现类
		for (BeanPostProcessor bp : getBeanPostProcessors()) {
            //如果属于InstantiationAwareBeanPostProcessor类型,则执行postProcessBeforeInstantiation方法
			if (bp instanceof InstantiationAwareBeanPostProcessor) {
				InstantiationAwareBeanPostProcessor ibp = (InstantiationAwareBeanPostProcessor) bp;
				Object result = ibp.postProcessBeforeInstantiation(beanClass, beanName);
				if (result != null) {
					return result;
				}
			}
		}
		return null;
	}

	public Object applyBeanPostProcessorsAfterInitialization(Object existingBean, String beanName)
			throws BeansException {
		Object result = existingBean;
        //获取所有BeanPostProcessor的实现类
		for (BeanPostProcessor processor : getBeanPostProcessors()) {
            //挨个执行postProcessAfterInitialization方法
			Object current = processor.postProcessAfterInitialization(result, beanName);
			if (current == null) {
				return result;
			}
			result = current;
		}
		return result;
	}
2、BeanPostProcessor
BeanPostProcessor是容器提供给我们的一个扩展接口,也称Bean的后置处理器。我们可以实现该接口,用来添加业务中特有的逻辑。
BeanPostProcessor实现类也是一个普通的Bean,那么Spring是怎么保证BeanPostProcessor实现类在开发人员写的Bean之前加载的呢?
这就要回到我们最熟悉的refresh方法中
    public void refresh() {
        // Prepare this context for refreshing.
        prepareRefresh();

        // Tell the subclass to refresh the internal bean factory.
        ConfigurableListableBeanFactory beanFactory = obtainFreshBeanFactory();

        // Prepare the bean factory for use in this context.
        prepareBeanFactory(beanFactory);


        // Allows post-processing of the bean factory in context subclasses.
        postProcessBeanFactory(beanFactory);

        // Invoke factory processors registered as beans in the context.
        invokeBeanFactoryPostProcessors(beanFactory);

        // Register bean processors that intercept bean creation.
        registerBeanPostProcessors(beanFactory);

        // Initialize message source for this context.
        initMessageSource();

        // Initialize event multicaster for this context.
        initApplicationEventMulticaster();

        // Initialize other special beans in specific context subclasses.
        onRefresh();

        // Check for listener beans and register them.
        registerListeners();

        // Instantiate all remaining (non-lazy-init) singletons.
        finishBeanFactoryInitialization(beanFactory);

        // Last step: publish corresponding event.
        finishRefresh();
    }
其中registerBeanPostProcessors方法就会对BeanPostProcessor进行注册,在finishBeanFactoryInitialization中再完成非懒加载的单例Bean的加载。
从而BeanPostProcessor就会在业务Bean之前加载,因此可以在业务Bean实例化前进行调用。
3、instantiateBean
现在可以进入doCreateBean中,createBeanInstance包含了实例化bean并封装为BeanWrapper的逻辑,且内部提供了多种实例化的方式。
    protected BeanWrapper createBeanInstance(String beanName, RootBeanDefinition mbd, @Nullable Object[] args) {
        //将bean转化为class对象
        Class<?> beanClass = resolveBeanClass(mbd, beanName);

        //基于Supplier实例化
        Supplier<?> instanceSupplier = mbd.getInstanceSupplier();
        if (instanceSupplier != null) {
            return obtainFromSupplier(instanceSupplier, beanName);
        }

        //基于工厂方法实例化
        if (mbd.getFactoryMethodName() != null) {
            return instantiateUsingFactoryMethod(beanName, mbd, args);
        }

        //省略部分代码

        //基于有参构造函数实例化
        Constructor<?>[] ctors = determineConstructorsFromBeanPostProcessors(beanClass, beanName);
        if (ctors != null || mbd.getResolvedAutowireMode() == AUTOWIRE_CONSTRUCTOR ||
                mbd.hasConstructorArgumentValues() || !ObjectUtils.isEmpty(args)) {
            return autowireConstructor(beanName, mbd, ctors, args);
        }

        //基于无参构造函数实例化
        return instantiateBean(beanName, mbd);
    }
有兴趣的同学,可以深入到这几种方式的内部,这里就不做探讨了。
4、populateBean
在实例化结束后,将进入属性赋值阶段。
	protected void populateBean(String beanName, RootBeanDefinition mbd, @Nullable BeanWrapper bw) {
		boolean continueWithPropertyPopulation = true;

		if (!mbd.isSynthetic() && hasInstantiationAwareBeanPostProcessors()) {
			for (BeanPostProcessor bp : getBeanPostProcessors()) {
                //如果属于InstantiationAwareBeanPostProcessor类型,则调用postProcessAfterInstantiation
				if (bp instanceof InstantiationAwareBeanPostProcessor) {
					InstantiationAwareBeanPostProcessor ibp = (InstantiationAwareBeanPostProcessor) bp;
					if (!ibp.postProcessAfterInstantiation(bw.getWrappedInstance(), beanName)) {
						continueWithPropertyPopulation = false;
						break;
					}
				}
			}
		}

        //一旦任意一个InstantiationAwareBeanPostProcessor的postProcessAfterInstantiation返回false,属性注入阶段将不再进行,直接进入下一个阶段
		if (!continueWithPropertyPopulation) {
			return;
		}

		PropertyValues pvs = (mbd.hasPropertyValues() ? mbd.getPropertyValues() : null);

		if (mbd.getResolvedAutowireMode() == AUTOWIRE_BY_NAME || mbd.getResolvedAutowireMode() == AUTOWIRE_BY_TYPE) {
			MutablePropertyValues newPvs = new MutablePropertyValues(pvs);
			//按照名称注入
			if (mbd.getResolvedAutowireMode() == AUTOWIRE_BY_NAME) {
				autowireByName(beanName, mbd, bw, newPvs);
			}
			//按照类型注入
			if (mbd.getResolvedAutowireMode() == AUTOWIRE_BY_TYPE) {
				autowireByType(beanName, mbd, bw, newPvs);
			}
			pvs = newPvs;
		}

        //省略掉InstantiationAwareBeanPostProcessor其他两个扩展点及下面的依赖检查

		if (pvs != null) {
            //属性注入
			applyPropertyValues(beanName, mbd, bw, pvs);
		}
	}
到这里,实例化与属性赋值阶段结束,我们整理一下其中的扩展点
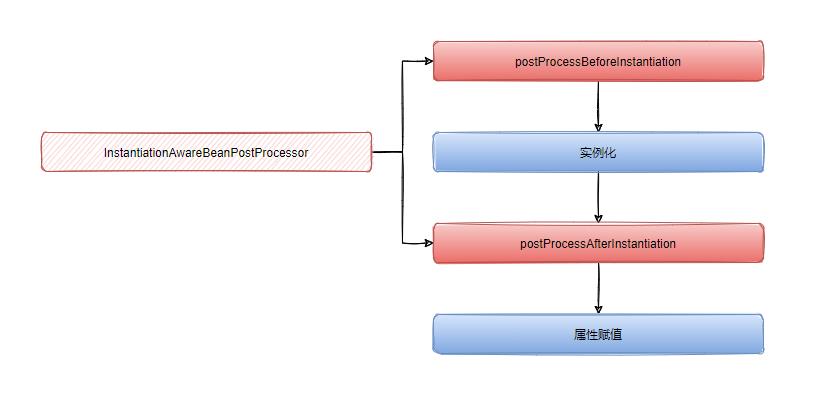
三、初始化阶段
从doCreateBean内的initializeBean开始
    protected Object initializeBean(final String beanName, final Object bean, @Nullable RootBeanDefinition mbd) {
        //1.设置Aware相关依赖
		if (System.getSecurityManager() != null) {
			AccessController.doPrivileged((PrivilegedAction<Object>) () -> {
				invokeAwareMethods(beanName, bean);
				return null;
			}, getAccessControlContext());
		}
		else {
			invokeAwareMethods(beanName, bean);
		}

        //2.调用BeanPostProcessor的前置处理
		Object wrappedBean = bean;
		if (mbd == null || !mbd.isSynthetic()) {
			wrappedBean = applyBeanPostProcessorsBeforeInitialization(wrappedBean, beanName);
		}

        //3.1调用InitializingBean的afterPropertiesSet方法
        //3.2调用自定义的init method方法
		try {
			invokeInitMethods(beanName, wrappedBean, mbd);
		}
		catch (Throwable ex) {
			throw new BeanCreationException(
					(mbd != null ? mbd.getResourceDescription() : null),
					beanName, "Invocation of init method failed", ex);
		}

        //4.调用BeanPostProcessor的后置处理
		if (mbd == null || !mbd.isSynthetic()) {
			wrappedBean = applyBeanPostProcessorsAfterInitialization(wrappedBean, beanName);
		}

		return wrappedBean;
	}
1、设置Aware相关依赖
	private void invokeAwareMethods(final String beanName, final Object bean) {
		if (bean instanceof Aware) {
            //如果bean实现了BeanNameAware接口,则设置BeanName
			if (bean instanceof BeanNameAware) {
				((BeanNameAware) bean).setBeanName(beanName);
			}
            //如果bean实现了BeanClassLoaderAware接口,则设置BeanClassLoader
			if (bean instanceof BeanClassLoaderAware) {
				ClassLoader bcl = getBeanClassLoader();
				if (bcl != null) {
					((BeanClassLoaderAware) bean).setBeanClassLoader(bcl);
				}
			}
            //如果bean实现了BeanFactoryAware接口,则设置BeanFactory
			if (bean instanceof BeanFactoryAware) {
				((BeanFactoryAware) bean).setBeanFactory(AbstractAutowireCapableBeanFactory.this);
			}
		}
	}
从这里可以看出,只要Bean实现了指定的Aware接口,Spring就会向Bean注入这些Aware相关信息。
2、调用BeanPostProcessor的前置处理
	public Object applyBeanPostProcessorsBeforeInitialization(Object existingBean, String beanName)
			throws BeansException {

		Object result = existingBean;
        //获取所有BeanPostProcessor的实现类
		for (BeanPostProcessor processor : getBeanPostProcessors()) {
            //挨个调用postProcessBeforeInitialization方法
			Object current = processor.postProcessBeforeInitialization(result, beanName);
			if (current == null) {
				return result;
			}
			result = current;
		}
		return result;
	}
这一步会获取容器中所有BeanPostProcessor的实现类,挨个调用postProcessBeforeInitialization方法。在其返回不为null的情况下,后一个结果会覆盖上一个结果。
当然在处理到ApplicationContextAwareProcessor的时候,会设置以下Aware依赖。
- EnvironmentAware
- EmbeddedValueResolverAware
- ResourceLoaderAware
- ApplicationEventPublisherAware
- MessageSourceAware
- ApplicationContextAware
在处理到InitDestroyAnnotationBeanPostProcessor,会找出被@PostConstruct注解修饰的方法,并执行。
3、invokeInitMethods
	protected void invokeInitMethods(String beanName, final Object bean, @Nullable RootBeanDefinition mbd)
			throws Throwable {
        //如果实现了InitializingBean接口,则调用afterPropertiesSet方法
		boolean isInitializingBean = (bean instanceof InitializingBean);
		if (isInitializingBean && (mbd == null || !mbd.isExternallyManagedInitMethod("afterPropertiesSet"))) {
			if (logger.isTraceEnabled()) {
				logger.trace("Invoking afterPropertiesSet() on bean with name '" + beanName + "'");
			}
			if (System.getSecurityManager() != null) {
				try {
					AccessController.doPrivileged((PrivilegedExceptionAction<Object>) () -> {
						((InitializingBean) bean).afterPropertiesSet();
						return null;
					}, getAccessControlContext());
				}
				catch (PrivilegedActionException pae) {
					throw pae.getException();
				}
			}
			else {
				((InitializingBean) bean).afterPropertiesSet();
			}
		}

        //调用xml中声明的init-method指定的方法
		if (mbd != null && bean.getClass() != NullBean.class) {
			String initMethodName = mbd.getInitMethodName();
			if (StringUtils.hasLength(initMethodName) &&
					!(isInitializingBean && "afterPropertiesSet".equals(initMethodName)) &&
					!mbd.isExternallyManagedInitMethod(initMethodName)) {
				invokeCustomInitMethod(beanName, bean, mbd);
			}
		}
	}
4、调用BeanPostProcessor的后置处理
和前置处理类似,只是调用postProcessAfterInitialization方法,不再赘述。
因此,初始化过程又可以被细分为
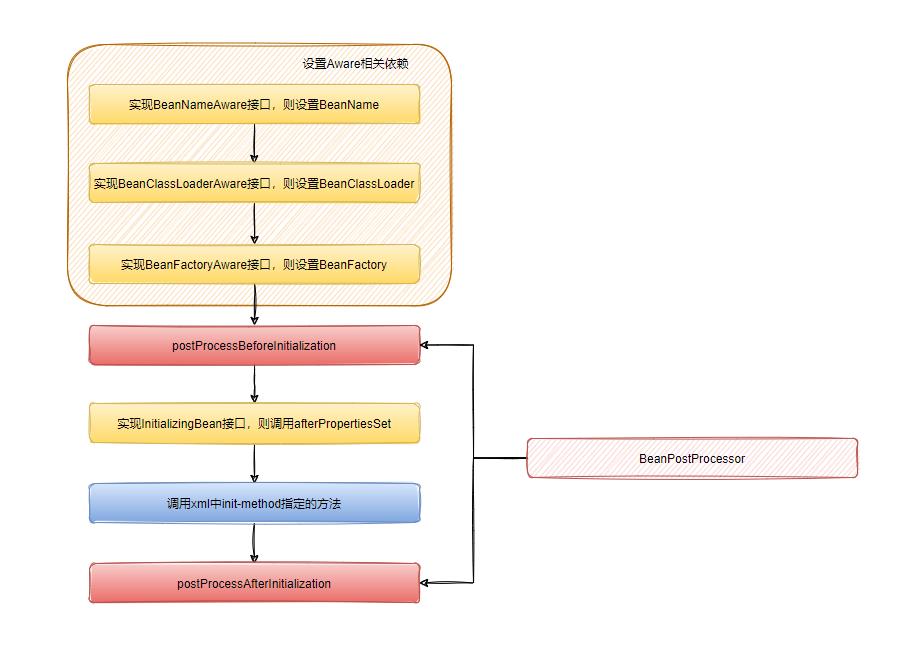
四、销毁阶段
在容器关闭的时候,会进入Bean的销毁阶段,代码从AbstractApplicationContext的close()方法开始
不急着进入close()方法,先看一下第一节代码中最末尾的方法:
	protected void registerDisposableBeanIfNecessary(String beanName, Object bean, RootBeanDefinition mbd) {
		AccessControlContext acc = (System.getSecurityManager() != null ? getAccessControlContext() : null);
        //如果Bean不是多例且需要在容器关闭时销毁
		if (!mbd.isPrototype() && requiresDestruction(bean, mbd)) {
			if (mbd.isSingleton()) {
                //给当前Bean绑定一个DisposableBeanAdapter
				registerDisposableBean(beanName,
						new DisposableBeanAdapter(bean, beanName, mbd, getBeanPostProcessors(), acc));
			}
			else {
				// A bean with a custom scope...
				Scope scope = this.scopes.get(mbd.getScope());
				if (scope == null) {
					throw new IllegalStateException("No Scope registered for scope name '" + mbd.getScope() + "'");
				}
				scope.registerDestructionCallback(beanName,
						new DisposableBeanAdapter(bean, beanName, mbd, getBeanPostProcessors(), acc));
			}
		}
	}

	public void registerDisposableBean(String beanName, DisposableBean bean) {
		synchronized (this.disposableBeans) {
			this.disposableBeans.put(beanName, bean);
		}
	}
在registerDisposableBeanIfNecessary中,会对每一个需要在容器关闭时进行销毁的单例Bean,绑定对应的DisposableBeanAdapter对象。最后把这些Bean及其DisposableBeanAdapter放入进名称为disposableBeans的map中,以供后续使用。
现在我们进入AbstractApplicationContext的close()方法
一路上兜兜转转,会进入到DefaultSingletonBeanRegistry的destroySingletons方法中
	public void destroySingletons() {
		String[] disposableBeanNames = StringUtils.toStringArray(this.disposableBeans.keySet());

		for (int i = disposableBeanNames.length - 1; i >= 0; i--) {
			destroySingleton(disposableBeanNames[i]);
		}
        //省略部分代码
	}
先拿到所有待销毁Bean的名称,挨个调用destroySingleton方法,一直往下走,最终会进入到DefaultSingletonBeanRegistry的destroyBean中
其中核心的一句
		// Actually destroy the bean now...
		bean.destroy();
按照beanName从disposableBeans中获取到bean对应的DisposableBeanAdapter,调用其destroy方法
    public void destroy() {
        //调用被@PreDestroy注解修饰的方法
        //具体可以跟进InitDestroyAnnotationBeanPostProcessor类
        if (!CollectionUtils.isEmpty(this.beanPostProcessors)) {
            for (DestructionAwareBeanPostProcessor processor : this.beanPostProcessors) {
                processor.postProcessBeforeDestruction(this.bean, this.beanName);
            }
        }

        //如果实现了DisposableBean接口,则调用destroy方法
        if (this.invokeDisposableBean) {
            if (System.getSecurityManager() != null) {
                AccessController.doPrivileged((PrivilegedExceptionAction<Object>) () -> {
                    ((DisposableBean) this.bean).destroy();
                    return null;
                }, this.acc);
            } else {
                ((DisposableBean) this.bean).destroy();
            }
        }

        //调用xml中自定义的destroy-method方法
        if (this.destroyMethod != null) {
            invokeCustomDestroyMethod(this.destroyMethod);
        } else if (this.destroyMethodName != null) {
            Method methodToCall = determineDestroyMethod(this.destroyMethodName);
            if (methodToCall != null) {
                invokeCustomDestroyMethod(methodToCall);
            }
        }
    }
到这里,Bean的销毁过程基本就结束了,我们使用一张图来概括下:
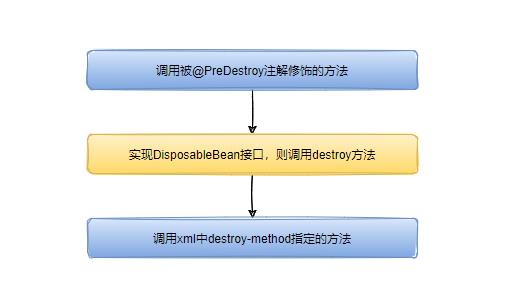
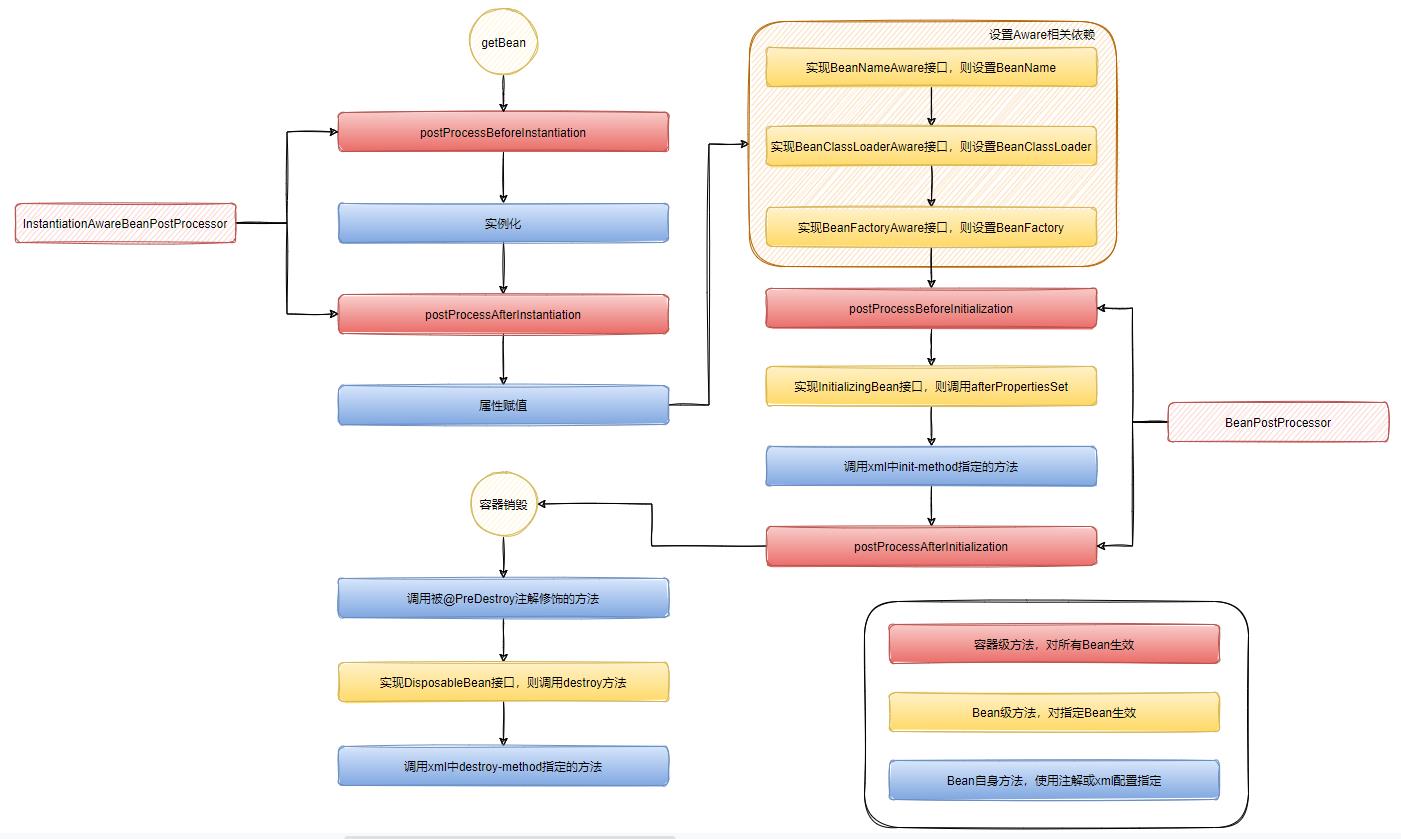
五、生命周期的全流程
我们整个阶段串联起来
六、代码验证
待观察的Bean
public class A implements BeanNameAware, BeanClassLoaderAware, BeanFactoryAware, InitializingBean, DisposableBean {
    private int id;

    public int getId() {
        return id;
    }

    public void setId(int id) {
        this.id = id;
        System.out.println("属性赋值");
    }

    private A() {
        System.out.println("实例化");
    }

    @PostConstruct
    public void postConstruct() {
        System.out.println("@PostConstruct指定的方法");
    }

    @Override
    public void setBeanClassLoader(ClassLoader classLoader) {
        System.out.println("BeanClassLoaderAware.setBeanClassLoader");
    }

    @Override
    public void setBeanFactory(BeanFactory beanFactory) throws BeansException {
        System.out.println("BeanFactoryAware.setBeanFactory");
    }

    @Override
    public void setBeanName(String name) {
        System.out.println("BeanNameAware.setBeanName");
    }

    @Override
    public void afterPropertiesSet() {
        System.out.println("InitializingBean.afterPropertiesSet");
    }

    public void initMethod() {
        System.out.println("xml中init-method指定的方法");
    }

    @PreDestroy
    public void preDestroy() {
        System.out.println("@PreDestroy指定的方法");
    }

    @Override
    public void destroy() {
        System.out.println("DisposableBean.destroy");
    }

    public void destroyMethod() {
        System.out.println("xml中destroy-method指定的方法");
    }

}
自定义的BeanPostProcessor
public class BeanPostProcessorImpl implements BeanPostProcessor {
    @Override
    public Object postProcessBeforeInitialization(Object bean, String beanName) throws BeansException {
        if (beanName.equals("a")) {
            System.out.println("BeanPostProcessor.postProcessBeforeInitialization");
        }
        return bean;
    }

    @Override
    public Object postProcessAfterInitialization(Object bean, String beanName) throws BeansException {
        if (beanName.equals("a")) {
            System.out.println("BeanPostProcessor.postProcessAfterInitialization");
        }
        return bean;
    }
}
自定义的InstantiationAwareBeanPostProcessorImpl
public class InstantiationAwareBeanPostProcessorImpl implements InstantiationAwareBeanPostProcessor {
    @Override
    public Object postProcessBeforeInstantiation(Class<?> beanClass, String beanName) throws BeansException {
        if (beanName.equals("a")) {
            System.out.println("InstantiationAwareBeanPostProcessor.postProcessBeforeInstantiation");
        }
        return null;
    }

    @Override
    public boolean postProcessAfterInstantiation(Object bean, String beanName) throws BeansException {
        if (beanName.equals("a")) {
            System.out.println("InstantiationAwareBeanPostProcessor.postProcessBeforeInstantiation");
        }
        //如果这里返回false,那么所有Bean将不进行属性赋值
        return true;
    }
}
spring.xml配置
<?xml version="1.0" encoding="UTF-8"?>
<beans xmlns="http://www.springframework.org/schema/beans"
       xmlns:xsi="http://www.w3.org/2001/XMLSchema-instance"
       xmlns:context="http://www.springframework.org/schema/context"
       xsi:schemaLocation="http://www.springframework.org/schema/beans
        https://www.springframework.org/schema/beans/spring-beans.xsd http://www.springframework.org/schema/context http://www.springframework.org/schema/context/spring-context.xsd">

    <context:component-scan base-package="com.yang.ym"/>

    <bean id="a" class="com.yang.ym.testBean.A" init-method="initMethod" destroy-method="destroyMethod">
        <property name="id" value="1"/>
    </bean>

    <bean class="com.yang.ym.testBean.BeanPostProcessorImpl"/>
    <bean class="com.yang.ym.testBean.InstantiationAwareBeanPostProcessorImpl"/>
</beans>
测试类
    @Test
    public void get() {
        ClassPathXmlApplicationContext context = new ClassPathXmlApplicationContext("spring.xml");
        A a = (A) context.getBean("a");
        System.out.println("关闭容器");
        context.close();
    }
输出结果:
InstantiationAwareBeanPostProcessor.postProcessBeforeInstantiation
实例化
InstantiationAwareBeanPostProcessor.postProcessBeforeInstantiation

属性赋值

BeanNameAware.setBeanName
BeanClassLoaderAware.setBeanClassLoader
BeanFactoryAware.setBeanFactory

BeanPostProcessor.postProcessBeforeInitialization
@PostConstruct指定的方法
InitializingBean.afterPropertiesSet
xml中init-method指定的方法
BeanPostProcessor.postProcessAfterInitialization

关闭容器
@PreDestroy指定的方法
DisposableBean.destroy
xml中destroy-method指定的方法
七、总结
先记住4个大阶段,实例化、属性赋值、初始化与销毁。
在生命周期内部,可以自定义Bean后置处理器以及实现接口的形式来进行扩展
- 容器级的扩展点,InstantiationAwareBeanPostProcessor与BeanPostProcessor。
- Bean级的扩展点,Aware相关接口,InitializingBean与DisposableBean。
此外,可以使用注解或xml配置形式,指定扩展点
- @PostConstruct注解
- @PreDestroy注解
- xml中init-method
- xml中destroy-method
那么再记忆生命周期的先后顺序,就会容易很多:
getBean
- InstantiationAwareBeanPostProcessor.postProcessBeforeInstantiation
- 实例化
- InstantiationAwareBeanPostProcessor.postProcessBeforeInstantiation
- 属性赋值
- Aware接口回调
- BeanPostProcessor.postProcessBeforeInitialization
- @PostConstruct指定的方法
- InitializingBean.afterPropertiesSet
- xml中init-method指定的方法
- BeanPostProcessor.postProcessAfterInitialization
关闭容器后
- @PreDestroy指定的方法
- DisposableBean.destroy
- xml中destroy-method指定的方法
以上是关于还记不住Spring Bean的生命周期?看这篇你就知道方法了!的主要内容,如果未能解决你的问题,请参考以下文章