Android 插件化VirtualApp 安装并启动资源中自带的 APK 插件 ( 添加依赖库 | 准备插件 APK | 启动插件引擎 | 拷贝 APK 插件 | 安装插件 | 启动插件 )(代码片
Posted 韩曙亮
tags:
篇首语:本文由小常识网(cha138.com)小编为大家整理,主要介绍了Android 插件化VirtualApp 安装并启动资源中自带的 APK 插件 ( 添加依赖库 | 准备插件 APK | 启动插件引擎 | 拷贝 APK 插件 | 安装插件 | 启动插件 )(代码片相关的知识,希望对你有一定的参考价值。
文章目录
前言
在 【Android 插件化】VirtualApp 接入 ( 在 VirtualApp 工程下创建 Module | 添加依赖 | 启动 VirtualApp 插件引擎 ) 和 【Android 插件化】VirtualApp 接入 ( 安装 APK 插件应用 | 启动插件 APK 应用 | MainActivity 安装启动插件完整代码 ) 博客中 , 简要介绍了应用接入 VirtualApp 的流程 ;
下面开始封装一个 APK 插件到应用中 , 并启动该 APK 插件 ;
一、VirtualApp 安装并启动资源中自带的 APK 插件流程
1、依赖 VirtualApp 库
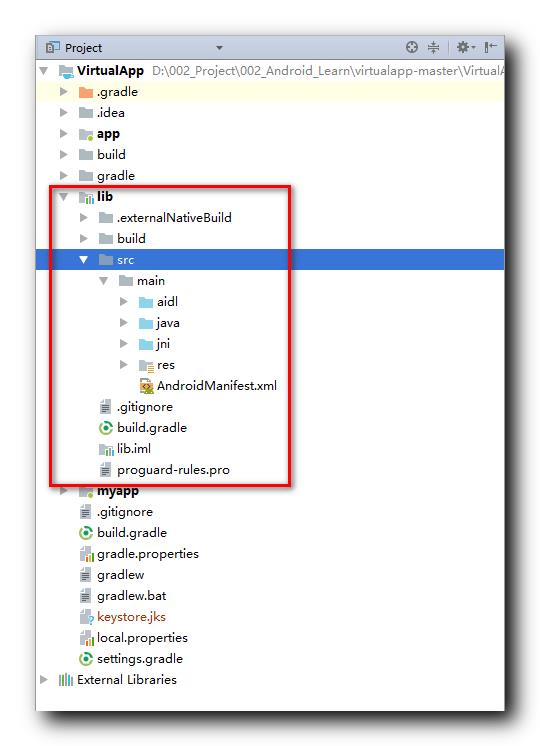
工程中 , 添加 VirtualApp 的 依赖库 , 该依赖库是 android Library 类型的 ;

在 Module 下的 build.gradle 中设置 VirtualApp 依赖库 依赖 ;
dependencies {
    implementation project(':lib')
}
2、插件 APK 准备
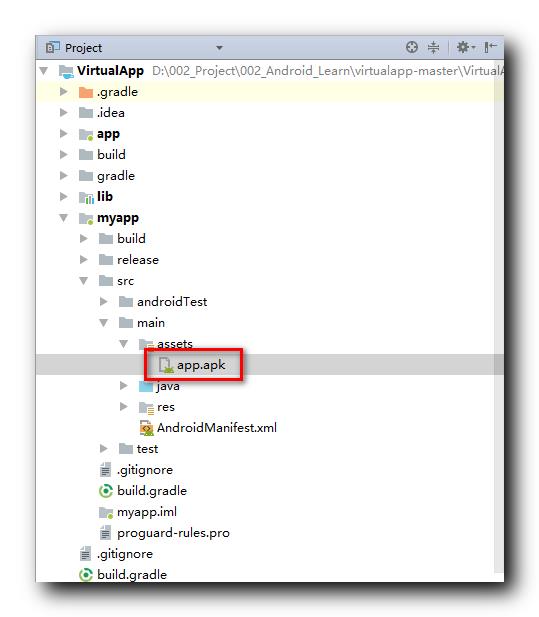
将插件 APK 文件 , 放置在 assets 资源目录下 ;

3、启动插件引擎
在自定义的 Application 中的 protected void attachBaseContext(Context base) 方法中 , 通过调用 VirtualCore.get().startup(base) 方法 , 启动插件化引擎 ;
public class VApp extends Application {

    @Override
    protected void attachBaseContext(Context base) {
        super.attachBaseContext(base);
        try {
            VirtualCore.get().startup(base);
        } catch (Throwable e) {
            e.printStackTrace();
        }
    }
}
4、拷贝 APK 到存储目录
将 VirtualApp\\myapp\\src\\main\\assets\\app.apk 文件 , 拷贝到 /data/user/0/com.example.myapp/files/app.apk 位置 ;
之后可以加载 /data/user/0/com.example.myapp/files/app.apk 插件文件 ;
拷贝过程如下 :
    /**
     * 将 VirtualApp\\myapp\\src\\main\\assets\\app.apk 文件 ,
     * 拷贝到 /data/user/0/com.example.myapp/files/app.apk 位置
     */
    public void copyFile() {
        try {
            InputStream inputStream = getAssets().open("app.apk");
            FileOutputStream fileOutputStream = new FileOutputStream(new File(getFilesDir(), "app.apk"));

            byte[] buffer = new byte[1024 * 4];
            int readLen = 0;
            while ( (readLen = inputStream.read(buffer)) != -1 ) {
                fileOutputStream.write(buffer, 0, readLen);
            }

            inputStream.close();
            fileOutputStream.close();

        } catch (IOException e) {
            e.printStackTrace();
        } finally {
            Log.i("HSL", "文件拷贝完毕");
        }
    }
5、安装插件
调用 VirtualCore.get().installPackage(getFilesDir() + "/app.apk", flags) 方法安装插件 , 该方法第一个参数是 APK 文件的路径 , 即 /data/user/0/com.example.myapp/files/app.apk , 第二个参数是 int 整型 72 ;
    private void installPackage() {
        // int COMPARE_VERSION = 0X01 << 3;
        // int SKIP_DEX_OPT = 0x01 << 6;
        // 或运算结果 72
        int flags = InstallStrategy.COMPARE_VERSION | InstallStrategy.SKIP_DEX_OPT;

        // 安装 SD 卡根目录中的 app.apk 文件
        // /storage/emulated/0/app.apk
        VirtualCore.get().installPackage(getFilesDir() + "/app.apk", flags);
    }
6、启动插件
调用 VirtualCore.get().getLaunchIntent("kim.hsl.svg", 0) 获取已安装插件应用的启动意图 Intent 实例对象 , 根据包名获得 ;
调用 VActivityManager.get().startActivity(intent, 0) 方法 , 启动插件应用 ;
    private void startApp() {
        // 打开应用
        Intent intent =  VirtualCore.get().getLaunchIntent("kim.hsl.svg", 0);
        /*VirtualCore.get().setUiCallback(intent, null);
        try {
            VirtualCore.get().preOpt("kim.hsl.svg");
        } catch (Exception e) {
            e.printStackTrace();
        }*/
        VActivityManager.get().startActivity(intent, 0);

        finish();
    }
二、完整源码
1、自定义 Application 源码
package com.example.myapp;

import android.app.Application;
import android.content.Context;
import android.util.Log;
import android.widget.Toast;

import com.lody.virtual.client.core.VirtualCore;

import java.io.File;
import java.io.FileOutputStream;
import java.io.IOException;
import java.io.InputStream;

public class VApp extends Application {

    private static VApp gApp;

    public static VApp getApp() {
        return gApp;
    }

    @Override
    protected void attachBaseContext(Context base) {
        super.attachBaseContext(base);
        try {
            VirtualCore.get().startup(base);
        } catch (Throwable e) {
            e.printStackTrace();
        }
    }

    @Override
    public void onCreate() {
        gApp = this;
        super.onCreate();

        /*new Thread(){
            @Override
            public void run() {
                File file = new File(getFilesDir(), "app.apk");
                // 如果文件不存在 , 则拷贝文件
                if (!file.exists()) {
                    // 拷贝文件到内置存储
                    copyFile();
                }
            }
        }.start();*/

        File file = new File(getFilesDir(), "app.apk");
        // 如果文件不存在 , 则拷贝文件
        if (!file.exists()) {
            // 拷贝文件到内置存储
            copyFile();
            Toast.makeText(this, file.getAbsolutePath() +  " 文件拷贝完毕 , 可以安装插件", Toast.LENGTH_LONG).show();
            Log.i("HSL", file.getAbsolutePath() +  " 文件拷贝完毕 , 可以安装插件");
        } else {
            Toast.makeText(this, file.getAbsolutePath() + " 文件已存在 , 可以安装插件", Toast.LENGTH_LONG).show();
            Log.i("HSL", file.getAbsolutePath() + " 文件已存在 , 可以安装插件");
        }

    }

    /**
     * 将 VirtualApp\\myapp\\src\\main\\assets\\app.apk 文件 ,
     * 拷贝到 /data/user/0/com.example.myapp/files/app.apk 位置
     */
    public void copyFile() {
        try {
            InputStream inputStream = getAssets().open("app.apk");
            FileOutputStream fileOutputStream = new FileOutputStream(new File(getFilesDir(), "app.apk"));

            byte[] buffer = new byte[1024 * 4];
            int readLen = 0;
            while ( (readLen = inputStream.read(buffer)) != -1 ) {
                fileOutputStream.write(buffer, 0, readLen);
            }

            inputStream.close();
            fileOutputStream.close();

        } catch (IOException e) {
            e.printStackTrace();
        } finally {
            Log.i("HSL", "文件拷贝完毕");
        }
    }
}
2、MainActivity 主界面源码
package com.example.myapp;

import android.content.Intent;
import android.os.Bundle;
import android.os.SystemClock;
import android.support.v7.app.AppCompatActivity;
import android.view.View;

import com.lody.virtual.client.core.InstallStrategy;
import com.lody.virtual.client.core.VirtualCore;
import com.lody.virtual.client.ipc.VActivityManager;

public class MainActivity extends AppCompatActivity {

    @Override
    protected void onCreate(Bundle savedInstanceState) {
        super.onCreate(savedInstanceState);
        setContentView(R.layout.activity_main);

        // 是否自动安装并启动插件应用
        boolean isAuto = true;
        if (isAuto) {
            new Thread() {
                @Override
                public void run() {
                    // 安装插件
                    installPackage();

                    SystemClock.sleep(3000);

                    //启动插件
                    startApp();
                }
            }.start();
        }
    }

    /**
     * 安装应用
     * @param view
     */
    public void onClick0(View view) {
        //installPackage();
    }

    private void installPackage() {
        // int COMPARE_VERSION = 0X01 << 3;
        // int SKIP_DEX_OPT = 0x01 << 6;
        // 或运算结果 72
        int flags = InstallStrategy.COMPARE_VERSION | InstallStrategy.SKIP_DEX_OPT;

        // 安装 SD 卡根目录中的 app.apk 文件
        // /storage/emulated/0/app.apk
        VirtualCore.get().installPackage(getFilesDir() + "/app.apk", flags);
    }

    /**
     * 启动应用
     * @param view
     */
    public void onClick(View view) {
        //startApp();
    }

    private void startApp() {
        // 打开应用
        Intent intent =  VirtualCore.get().getLaunchIntent("kim.hsl.svg", 0);
        /*VirtualCore.get().setUiCallback(intent, null);
        try {
            VirtualCore.get().preOpt("kim.hsl.svg");
        } catch (Exception e) {
            e.printStackTrace();
        }*/
        VActivityManager.get().startActivity(intent, 0);

        finish();
    }
}
3、执行效果

三、博客源码
GitHub : https://github.com/han1202012/VirtualApp
CSDN : https://download.csdn.net/download/han1202012/33239579
以上是关于Android 插件化VirtualApp 安装并启动资源中自带的 APK 插件 ( 添加依赖库 | 准备插件 APK | 启动插件引擎 | 拷贝 APK 插件 | 安装插件 | 启动插件 )(代码片的主要内容,如果未能解决你的问题,请参考以下文章
Android 插件化VirtualApp 源码分析 ( 安装应用源码分析 | HomePresenterImpl 添加应用 | AppRepository.addVirtualApp )
Android 插件化VirtualApp 源码分析 ( 安装应用源码分析 | HomePresenterImpl 添加应用 | AppRepository.addVirtualApp )
Android 插件化VirtualApp 接入 ( 安装 APK 插件应用 | 启动插件 APK 应用 | MainActivity 安装启动插件完整代码 )
Android 插件化VirtualApp 接入 ( 安装 APK 插件应用 | 启动插件 APK 应用 | MainActivity 安装启动插件完整代码 )
Android 插件化VirtualApp 接入 ( 在 VirtualApp 工程下创建 Module | 添加依赖 | 启动 VirtualApp 插件引擎 )
Android 插件化VirtualApp 接入 ( 在 VirtualApp 工程下创建 Module | 添加依赖 | 启动 VirtualApp 插件引擎 )