vue 3.0组件(下)
Posted 程序员--韩同学
tags:
篇首语:本文由小常识网(cha138.com)小编为大家整理,主要介绍了vue 3.0组件(下)相关的知识,希望对你有一定的参考价值。
文章目录
前言:
上一章给大家讲解了组件的注册以及父子组件之间数据的传递,本文继续给大家讲解Vue3组件剩下的东西
一,透传属性和事件
1. 如何“透传属性和事件”
父组件在使用子组件的时候,如何“透传属性和事件”给子组件呢?
- 透传属性和事件并没有在子组件中用
props和emits声明 - 透传属性和事件最常见的如@click和class、id、style
- 当子组件只有一个根元素时,透传属性和事件会自动添加到该根元素上;如果根元素已有class或style属性,它会自动合并
// 父组件
<script setup>
import ChipVue from './components/Chip.vue';

function say()
    alert('Hello')

</script>

<template>
    <!-- 透传的属性(style,class,title)在子组件中并没有在 props 声明 -->
    <!-- 透传的事件(click)在子组件中并没有在 emits 声明 -->
    <ChipVue
        class="rounded"
        style="border: 1px solid blue;"
        title="纸片"
        @click="say"
    />
</template>
// 子组件
<template>
    <!--
        当子组件只有一个根元素时,透传属性和事件会自动添加到该根元素上
        如果根元素已有 class 或 style 属性,它会自动合并
     -->
    <button class="chip" style="box-shadow: 0 0 8px grey;">
        普通纸片
    </button>
</template>

<style>
.chip
    border: none;
    background-color: rgb(231, 231, 231);
    padding: 8px 15px;


.rounded
    border-radius: 100px;

</style>
渲染结果:

2.如何禁止“透传属性和事件”
- 当子组件只有一个根元素时,透传属性和事件会自动添加到该根元素上,那怎么阻止呢?
- 在组合式 API 的
< script setup>中,你需要一个额外的< script>块来书写inheritAttrs: false选项声明来禁止
- 在组合式 API 的
// 父组件
<script setup>
import ChipVue from './components/Chip.vue';

function say()
    alert('Hello')

</script>

<template>
    <!-- 透传的属性(style,class,title)在子组件中并没有在 props 声明 -->
    <!-- 透传的事件(click)在子组件中并没有在 emits 声明 -->
    <ChipVue
        class="rounded"
        style="border: 1px solid blue;"
        title="纸片"
        @click="say"
    />
</template>
// 子组件
<script>
export default
    inheritAttrs: false // 阻止自动透传给唯一的根组件

</script>

<!--
    在组合式 API 的 <script setup> 中,
    你需要一个额外的 <script> 块来书写 inheritAttrs: false 选项声明来禁止
-->
<script setup></script>

<template>
    <!--
        当子组件只有一个根元素时,透传属性和事件会自动添加到该根元素上
        如果根元素已有 class 或 style 属性,它会自动合并
     -->
    <button class="chip" style="box-shadow: 0 0 8px grey;">
        普通纸片
    </button>
</template>

<style>
.chip
    border: none;
    background-color: rgb(231, 231, 231);
    padding: 8px 15px;


.rounded
    border-radius: 100px;

</style>
3.多根元素的“透传属性和事件”
- 多根节点的组件并没有
自动“透传属性和事件”的行为,由于Vue不确定要将“透传属性和事件”透传到哪里,所以我们需要v-bind="$attrs"来显式绑定,否则将会抛出一个运行时警告
// 父组件
<script setup>
import ChipVue from './components/Chip.vue';

function say()
    alert('Hello')

</script>

<template>
    <!-- 透传的属性(style,class,title)在子组件中并没有在 props 声明 -->
    <!-- 透传的事件(click)在子组件中并没有在 emits 声明 -->
    <ChipVue
        class="rounded"
        style="border: 1px solid blue;"
        title="纸片"
        @click="say"
    />
</template>
// 子组件
<template>
    <!-- 多根节点的组件并没有自动“透传属性和事件”的行为 -->

    <button class="chip">
        普通纸片
    </button>

    <hr>

    <button class="chip" v-bind="$attrs">
        普通纸片
    </button>

    <hr>

    <button class="chip" v-bind="$attrs">
        普通纸片
    </button>
</template>

<style>
.chip
    border: none;
    background-color: rgb(231, 231, 231);
    padding: 8px 15px;


.rounded
    border-radius: 100px;

</style>
4. 访问“透传属性和事件”
- 在组合式 API 中的
< script setup>中引入useAttrs()来访问一个组件的“透传属性和事件”
// 父组件
<script setup>
import ChipVue from './components/Chip.vue';

function say()
    alert('Hello')

</script>

<template>
    <!-- 透传的属性(style,class,title)在子组件中并没有在 props 声明 -->
    <!-- 透传的事件(click)在子组件中并没有在 emits 声明 -->
    <ChipVue
        class="rounded"
        style="border: 1px solid blue;"
        title="纸片"
        @click="say"
    />
</template>
// 子组件
<script setup>
import  useAttrs  from 'vue';

// 透传的属性和事件对象
let attrs = useAttrs()

 // 在 JS 中访问透传的属性和事件
function showAttrs()
    console.log(attrs)
    console.log(attrs.class)
    console.log(attrs.title)
    console.log(attrs.style)
    attrs.onClick()

</script>

<template>
    <button class="chip" v-bind="attrs">
        普通纸片
    </button>

    <hr>

    <h6> attrs </h6>

    <ul>
        <li> attrs.title </li>
        <li> attrs.class </li>
        <li> attrs.style </li>
    </ul>

    <button @click="attrs.onClick()">执行透传的事件</button>

    <hr>

    <button @click="showAttrs">在 JS 中访问透传的属性和事件</button>
</template>

<style>
.chip
    border: none;
    background-color: rgb(231, 231, 231);
    padding: 8px 15px;
    margin: 10px;


.rounded
    border-radius: 100px;

</style>
注意:
● 虽然这里的attrs对象总是反映为最新的“透传属性和事件”,但它并不是响应式的 (考虑到性能因素),你不能通过侦听器去监听它的变化
● 如果你需要响应性,可以使用prop或者你也可以使用onUpdated()使得在每次更新时结合最新的attrs执行副作用
二,插槽
- 在某些场景中,我们可能想要为子组件传递一些
模板片段,让子组件在它们的组件中渲染这些片段,为此 vue 提供了组件的插槽
1. 什么是插槽
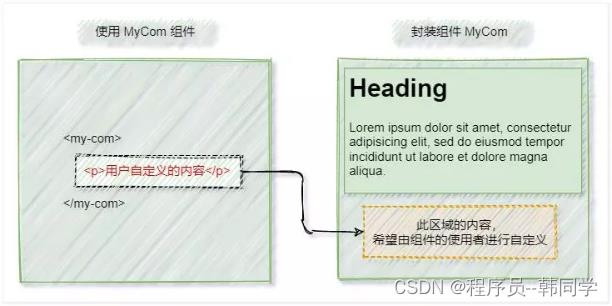
- 在封装组件时,可以使用
<slot>元素把不确定的、希望由用户指定的部分定义为插槽;插槽可以理解为给预留的内容提供占位符 - 插槽也可以提供
默认内容,如果组件的使用者没有为插槽提供任何内容,则插槽内的默认内容会生效
注意:如果在封装组件时没有预留任何插槽,用户提供传递一些模板片段将会被遗弃

// 父组件
<script setup>
import CardVue from './components/Card.vue'
</script>

<template>
    <CardVue>
        <!-- 向子组件插槽中提供内容 -->
        <button>关闭</button>
    </CardVue>
</template>
// 子组件
<template>
    <div class="card">
        <h2 class="title"></h2>
        <div class="subtitle"></div>
        <div class="content"></div>
        <div class="action">
            <!-- 定义一个插槽 -->
            <!-- 插槽的默认内容,只有没有提供内容时,才会显示 -->
            <slot>卡片功能区域</slot>
        </div>
    </div>
</template>

<style>
.card
    width: 250px;
    border: 1px solid black;


.card h2,
.card div
    margin: 10px;
    padding: 5px;


.title
    border: 1px solid red;


.subtitle
    border: 1px solid green;


.content
    border: 1px solid blue;


.action
    border: 1px solid pink;

</style>
2. 具名插槽
- 如果在封装组件时需要预留多个插槽节点,则需要为每个
< slot>插槽指定具体的name名称,这种带有具体名称的插槽叫做“具名插槽” 没有指定name名称的插槽,会有隐含的名称叫做default- 在
< template>元素上使用v-slot:slotName或者#slotName向指定的具名插槽提供内容
// 父组件
<script setup>
import CardVue from './components/Card.vue'
</script>

<template>
    <CardVue>
        <!-- 向具名插槽提供内容 -->
        <template v-slot:cardTitle>
            博客
        </template>

        <template #cardSubtitle>
            <i>百万博主分享经验</i>
        </template>

        <!-- 向子组件默认插槽中提供内容 -->
        <!-- <button>关闭</button> -->

        <template #default>
            <button>关闭</button>
        </template>
    </CardVue>
</template>
// 子组件
<template>
    <div class="card">
        <h2 class="title">
            <!-- 带有 name 的属性的插槽,称为具名插槽 -->
            <slot name="cardTitle"></slot>
        </h2>
        <div class="subtitle">
            <slot name="cardSubtitle"></slot>
        </div>
        <div class="content">
            <slot name="cardContent"></slot>
        </div>
        <div class="action">
            <!-- 定义一个插槽 -->
            <!-- 插槽的默认内容,只有没有提供内容时,才会显示 -->
            <!-- 没有 name 属性的插槽称为默认插槽,会有一个隐含的名字:default -->
            <slot>卡片功能区域</slot>
        </div>
    </div>
</template>

<style>
.card
    width: 250px;
    border: 1px solid black;


.card h2,
.card div
    margin: 10px;
    padding: 5px;


.title
    border: 1px solid red;


.subtitle
    border: 1px solid green;


.content
    border: 1px solid blue;


.action
    border: 1px solid pink;

</style>
3. 作用域插槽
- 如何在向插槽提供的内容时获得子组件域内的数据呢?
- 在声明插槽时使用
属性值的方式来传递子组件的数据,这种带有数据的插槽称之为作用域插槽 - 在
< template>元素上使用v-slot:slotName="slotProps"或#slotName="slotProps"的方式来访问插槽传递属性值 - 如果没有使用
< template>元素,而是直接在使用子组件中直接给默认插槽提供内容,我们可以在使用该子组件时用v-slot="slotProps"来接收该插槽传递的数据对象
- 在声明插槽时使用
注意:
< slot >插槽上的name是一个Vue特别保留的属性,不会在作用域插槽中访问到
// 父组件
<script setup>
import CardVue from './components/Card.vue'
</script>

<template>
    <CardVue>
        <!-- 向具名插槽提供内容 -->
        <template v-slot:cardTitle>
            博客
        </template>

        <template #cardSubtitle>
            <i>百万博主分享经验</i>
        </template>

        <!-- 访问插槽中提供的数据 -->
        <template #cardContent="dataProps">
            <ul>
                <li> dataProps </li>
                <li>博客的标题: dataProps.cardBlog.title </li>
                <li>博客的时间: dataProps.cardBlog.time </li>
                <li>博主: dataProps.cardAuthor </li>
            </ul>
        </template>

        <!-- 向子组件默认插槽中提供内容 -->
        <!-- <button>关闭</button> -->

        <template #default>
            <button>关闭</button>
        </template>
    </CardVue>

    <hr>


    <CardVue v-slot="dataProps">

        <!-- 如果使用子组件时用到了 v-slot,则该子组件标签中将无法向其他具名插槽中提供内容 -->
        <!--
        <template #cardSubtitle>
            <i>百万博主分享经验</i>
        </template>
        -->

        <button>dataProps.close</button>
        <button>dataProps.sure</button>
    </CardVue>
</template>
// 子组件
<script setup>
import  reactive, ref  from 'vue';

let blog = reactive(
    title: 'Java 如何实现上传文件',
    time: '2021-12-25 15:33:25'
)

let author = ref('爱思考的飞飞')

let closeBth = ref('关闭')
let determine = ref('确定')
</script>

<template>
    <div class="card">
        <h2 class="title">
            <!-- 带有 name 的属性的插槽,称为具名插槽 -->
            <slot name="cardTitle"></slot>
        </h2>
        <div class="subtitle">
            <slot name="cardSubtitle"></slot>
        </div>
        <div class="content">
            <!-- 带有数据的插槽称之为作用域插槽 -->
            <!-- <slot>插槽上的 name 是一个Vue特别保留的属性,不会在作用域插槽中访问到 -->
            <slot name="cardContent" :cardBlog="blog" :cardAuthor="author"></slot>
        </div>
        <div class="action">
            <!-- 定义一个插槽 -->
            <!-- 插槽的默认内容,只有没有提供内容时,才会显示 -->
            <!-- 没有 name 属性的插槽称为默认插槽,会有一个隐含的名字:default -->
            <slot :close="closeBth" :sure="determine">卡片功能区域</slot>
        </div>
    </div>
</template>

<style>
.card
    以上是关于vue 3.0组件(下)的主要内容,如果未能解决你的问题,请参考以下文章