❤️Spring全家桶从入门到大神--mvc 常见知识点
Posted 一只楠喃
tags:
篇首语:本文由小常识网(cha138.com)小编为大家整理,主要介绍了❤️Spring全家桶从入门到大神--mvc 常见知识点相关的知识,希望对你有一定的参考价值。
mvc 常见知识点

1 @RequestMapping
- 基本使用
@RequestMapping("/user") //value省略
@RequestMapping(value = “/user”) //值的省略
@RequestMapping(value = {"/user"}) //value的类型String[] 需要{}扩住
请求方式设置:
-
回顾表单常见的请求方式:get、post
- get --> /userServlet?username=jack&password=1234
- post --> 表单提交
<form method="post">
-
通过method属性设置请求方式
//被修饰的方法,可以通过post和get两种请求方式进行访问。
@RequestMapping(value="/selectAll",method = {RequestMethod.GET, RequestMethod.POST} )
//被修饰的方法,只能通过get请求方式进行访问。
@RequestMapping(value="/selectAll",method = RequestMethod.GET)
//被修饰的方法,只能通过post请求方式进行访问。
@RequestMapping(value="/selectAll",method = RequestMethod.POST )
// 如果没有设置method,默认所有请求都可以访问。
2 方法返回值
2.1 默认返回值 ModelAndView
@Controller
@RequestMapping("/book")
public class BookController {
@RequestMapping("/list")
public ModelAndView list() {
//1 创建对象
ModelAndView modelAndView = new ModelAndView();
//2 设置视图
modelAndView.setViewName(“book”); //之前 return “book”;
//3 设置模型数据 key-value
modelAndView.addObject(“username”,“jack”);
return modelAndView;
}
}
2.2 设置Model + String
@RequestMapping("/list2")
public String list2(Model model) {
// 设置数据即可
model.addAttribute(“username”,“rose”);
return “book”;
}
2.3 返回值void
场景1:对浏览器没有任何响应,将适配默认视图名对应jsp,一般此页面不存在,将抛404异常。
- 默认视图名:访问路径

@RequestMapping("/void1")
public void void1() {
System.out.println("void1 执行了 ");
}
- 场景2:通过
请求调度器进行操作(请求转发/请求包含)
@RequestMapping("/void2")
public void void2(HttpServletRequest request , HttpServletResponse response) throws Exception {
request.setAttribute(“username”,“void2”);
// 请求转发
request.getRequestDispatcher("/WEB-INF/pages/book.jsp").forward(request, response);
// 请求包含
// request.getRequestDispatcher("/WEB-INF/pages/book.jsp").include(request, response);
}
- 场景3:通过response以流的方式,向浏览器响应数据。
@RequestMapping("/void3")
public void void3(HttpServletRequest request , HttpServletResponse response) throws Exception {
response.getWriter().print(“void3”);
}
- 场景4:以JSON数据方式响应,必须添加注解
@ResponseBody
@RequestMapping("/void4")
@ResponseBody
public void void4() throws Exception {
System.out.println(“哈哈”);
}
2.4 返回字符串
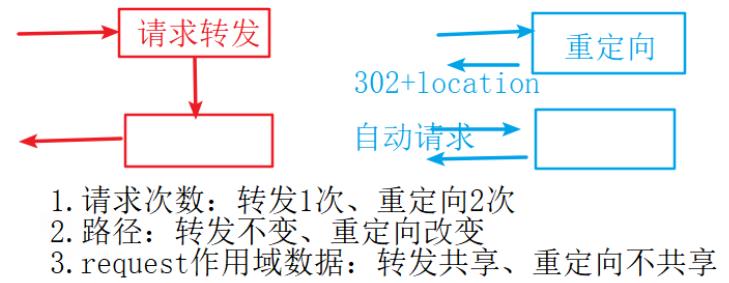
- 返回值字符串有2种情况:请求转发(默认)、重定向

- 默认:请求转发
public String list() {
return “视图名”;
}
- 请求转发
public String list() {
return “forward:视图名”;
}
- 重定向
public String list() {
return “redirect:路径”;
}
3 异常处理
- 使用全局异常处理器,统一维护异常信息。
步骤
- 步骤1:编写自定义异常
- 步骤2:编写Controller,一个参数,控制逻辑代码(正常、系统异常、自定义异常)
- 步骤3:编写异常处理类
- 步骤4:异常信息展示页面
实现
步骤1:编写自定义异常
- 运行时异常:RuntimeException ,并重新构造方法。
public class CustomExcption extends RuntimeException {
public CustomExcption() {
}
public CustomExcption(String message) {
super(message);
}
public CustomExcption(String message, Throwable cause) {
super(message, cause);
}
public CustomExcption(Throwable cause) {
super(cause);
}
public CustomExcption(String message, Throwable cause, boolean enableSuppression, boolean writableStackTrace) {
super(message, cause, enableSuppression, writableStackTrace);
}
}
-
编译时异常:Exception
-
步骤2:编写Controller,一个参数,控制逻辑代码(正常、系统异常、自定义异常)
@Controller
@RequestMapping("/item")
public class ItemController {
@RequestMapping("/list")
public String list(Integer id ) {
if(id == 1) {
// 系统异常
int i = 1 / 0;
} else if( id == 2 ) {
// 自定义
throw new CustomExcption(“自定义异常信息”);
}
//正常
return “list”;
}
}
<a href="${pageContext.request.contextPath}/item/list.action?id=1">异常处理 id =1 系统异常</a> <br/>
<a href="${pageContext.request.contextPath}/item/list.action?id=2">异常处理 id =2 自定义异常 </a> <br/>
<a href="${pageContext.request.contextPath}/item/list.action?id=3">异常处理正常</a> <br/>
步骤3:编写异常处理类
- 注意:检查配置类,是否扫描异常处理类

@Component
public class CustomExceptionResolver implements HandlerExceptionResolver {
@Override
public ModelAndView resolveException(HttpServletRequest httpServletRequest, HttpServletResponse httpServletResponse, Object o, Exception e) {
// 1 统一异常
CustomExcption customExcption = null;
if(e instanceof CustomExcption) {
customExcption = (CustomExcption) e;
} else {
customExcption = new CustomExcption(“系统繁忙,请稍后重试!”);
}
// 2 错误信息返回
ModelAndView modelAndView = new ModelAndView();
modelAndView.addObject(“message” ,customExcption.getMessage());
modelAndView.setViewName(“error”);
return modelAndView;
}
}
- 步骤4:异常信息展示页面
<%--
  Created by IntelliJ IDEA.
  User: Administrator
  Date: 2021-10-12
  Time: 17:09
  To change this template use File | Settings | File Templates.
--%>
<%@ page contentType="text/html;charset=UTF-8" language="java" %>
<html>
<head>
    <title>友好页面</title>
</head>
<body>
    ${message}
</body>
</html>
效果

注:
- 在实际开发中,不能够让用户看到404/500等异常信息。需要提供优化页面。
- 统一处理异常,就是友好页面一种展示形式。
- 注意:配置类,是否扫描各种类?
4 文件上传
4.1 单文件上传
- 步骤1:环境搭建,拷贝jar包

- 步骤2:环境搭建,编写配置类

@Bean
public CommonsMultipartResolver multipartResolver(){
CommonsMultipartResolver multipartResolver = new CommonsMultipartResolver();
// 设置所有的上传文件的总大小 10M
multipartResolver.setMaxInMemorySize(1010241024);
// 设置单个文件上传的大小 4M
multipartResolver.setMaxUploadSize(410241024);
multipartResolver.setDefaultEncoding(“utf-8”);
return multipartResolver;
}
- 步骤3:编写表单
 <form action="${pageContext.request.contextPath}/file/upload.action" method="post" enctype="multipart/form-data">
      选择文件: <input type="file" name="image" /> <br/>
      <input type="submit" value="上传"/> <br/>
    </form>
- 步骤4:编写处理类
@Controller
@RequestMapping("/file")
public class FileController {
@RequestMapping("/upload")
public String upload(MultipartFile image) throws Exception {
System.out.println(“上传文件名:” + image.getOriginalFilename());
System.out.println(“上传文件流:” + image.getInputStream());
File file = new File(“D:\\xml”, image.getOriginalFilename());
FileUtils.copyInputStreamToFile(image.getInputStream(), file );
return “book”;
}
}
4.2 多文件上传
- 表单
  <form action="${pageContext.request.contextPath}/file/upload2.action" method="post" enctype="multipart/form-data">
      选择文件: <input type="file" name="images" /> <br/>
      选择文件: <input type="file" name="images" /> <br/>
      选择文件: <input type="file" name="images" /> <br/>
      <input type="submit" value="上传"/> <br/>
    </form>
- 控制器
@RequestMapping("/upload2")
public String upload2(List images) throws Exception {
for (MultipartFile image : images) {
System.out.println(“上传文件名:” + image.getOriginalFilename());
System.out.println(“上传文件流:” + image.getInputStream());
File file = new File(“D:\\xml”, image.getOriginalFilename());
FileUtils.copyInputStreamToFile(image.getInputStream(), file );
}
return “book”;
}
5 JSON
5.1 JSON 使用流程分析

5.2 JSON数据
-
什么是JSON数据?
- 是一种轻量级的数据交换格式。
- 轻量级,不依赖任何框架,任何语言。
-
数据分类:对象、数组
-
对象
- key必须使用双引号
- value除特殊类型外,都需要使用双引号。(特殊类型:数字、布尔true/false)
{
    "k":"v",
    "k2":"v2",....
}
-
数组
[
	元素,元素2,....
]
5.3 入门案例
- 目标:请求JSON数据,响应JSON数据
- 案例:用户条件查询,
- 请求:查询条件
User - 响应:查询结果
List<User>
- 请求:查询条件
- 前提:spring mvc 底层 jackson 处理json数据。
步骤
- 步骤:
- 导入 jackson 相关的jar包
- 编写JavaBean:User
- 编写controller,接收请求数据 @RequestBody
- 编写controller,响应数据 @ResponseBody
- postman测试
实现
- 导入 jackson 相关的jar包

- 编写JavaBean:User
public class User {
private Integer id;
private String username;
private String password;
public User() {
}
public User(Integer id, String username, String password) {
this.id = id;
this.username = username;
this.password = password;
}
// getter和setter
}
- 编写controller,接收请求数据 @RequestBody
@Controller
@RequestMapping("/json")
public class JsonController {
@RequestMapping("/list")
public void list(@RequestBody User user) {
System.out.println(user);
}
}
- 编写controller,响应数据 @ResponseBody
@Controller
@RequestMapping("/json")
public class JsonController {
@RequestMapping("/list")
@ResponseBody
public List list(@RequestBody User user) {
System.out.println(user);
//响应数据
List list = new ArrayList<>();
list.add(new User(1,“jack”,“1234”));
list.add(new User(2,“rose”,“6666”));
list.add(new User(3,“tom”,“loverose”));
return list;
}
}
- postman测试

6 常见注解
@JsonIgnore作用是json序列化时将java bean中的一些属性忽略掉~
public class User {
@JsonIgnore
private List hobby;
@JsonFormat格式化日期
public class User {
@JsonFormat(pattern = “yyyy-MM-dd HH:mm:ss”,timezone = “GMT+8”)
private Date birthday;
以上是关于❤️Spring全家桶从入门到大神--mvc 常见知识点的主要内容,如果未能解决你的问题,请参考以下文章