使用hardhat将合约部署到ganache
Posted sanqima
tags:
篇首语:本文由小常识网(cha138.com)小编为大家整理,主要介绍了使用hardhat将合约部署到ganache相关的知识,希望对你有一定的参考价值。
hardhat使用命令:npx hardhat run scripts/deploy.js --network XXXnet,既可以把合约部署到主网(mainnet)、测试网(ropsten、rinkey),还可以部署到本地网络(ganache,hardhat-test)。比如,npx hardhat run scripts/deploy.js --network ganache,就可以把合约部署到ganache,下面以onehat工程为例,将token.sol合约部署到ganache。
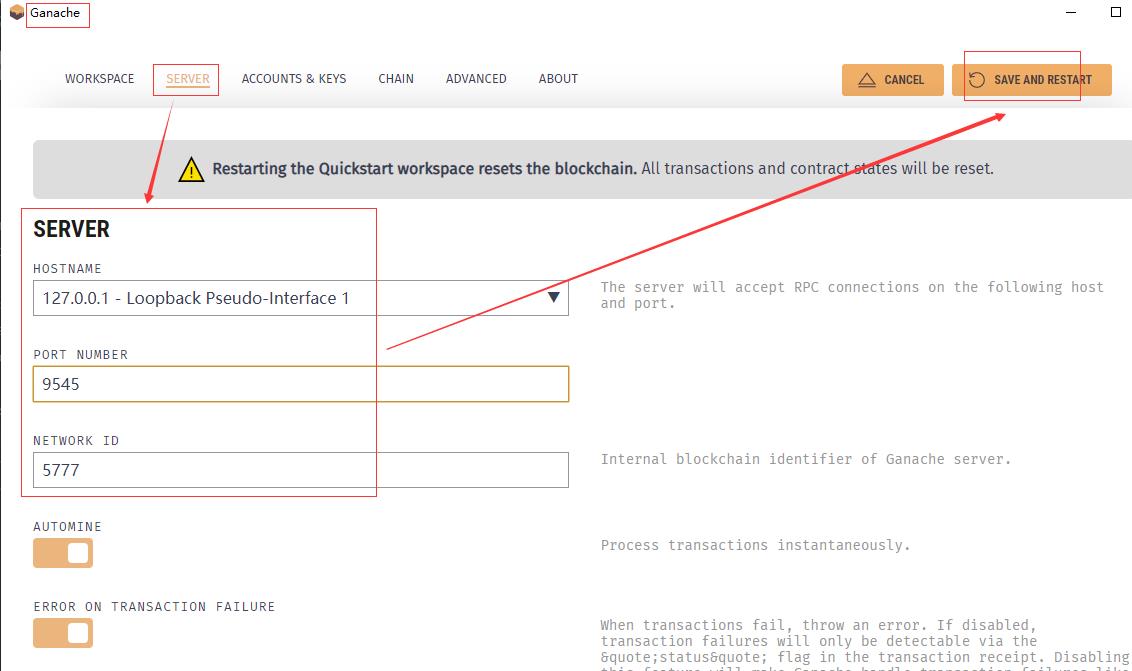
1、配置ganache
设置ganache的IP为127.0.0.1,端口为9545,然后重启ganache

2、修改hardhat.config.js
修改onehat/hardhat.config.js文件,添加 ganache网段和账户,如下所示。
//hardhat.config.js
/**
 * @type import('hardhat/config').HardhatUserConfig
 */
require("@nomiclabs/hardhat-waffle");

//选取ganache下的4个账户的私钥
const PRIVATE_KEY1 = "0dab...4e1c";
const PRIVATE_KEY2 = "ff73...a9e6";
const PRIVATE_KEY3 = "d7b4...5c2d";
const PRIVATE_KEY4 = "28d8...7163";

module.exports = {
  solidity: "0.6.12",
  networks: {

    ganache: {
      url: `http://127.0.0.1:9545`,
      accounts: [`0x${PRIVATE_KEY1}`,`0x${PRIVATE_KEY2}`,`0x${PRIVATE_KEY3}`,`0x${PRIVATE_KEY4}`]
    },
    // ropsten: {
    //   url: `https://eth-ropsten.alchemyapi.io/v2/${ALCHEMY_API_KEY}`,
    //   accounts: [`0x${ROPSTEN_PRIVATE_KEY}`]
    // },
    // rinkeby: {
    //   url: `https://eth-rinkeby.alchemyapi.io/v2/${ALCHEMY_API_KEY}`,
    //   accounts: [`0x${rinkeby_PRIVATE_KEY}`]
    // },
  }
};

3、部署合约
3.1 智能合约.sol
// onehat/contracts/Token.sol
//SPDX-License-Identifier: MIT
pragma solidity ^0.6.0;


// This is the main building block for smart contracts.
contract Token {
    // Some string type variables to identify the token.
    // The `public` modifier makes a variable readable from outside the contract.
    string public name = "My Hardhat Token";
    string public symbol = "MBT";

    // 固定发行量,保存在一个无符号整型里
    uint256 public totalSupply = 1000000;

    // An address type variable is used to store ethereum accounts.
    address public owner;

    // A mapping is a key/value map. Here we store each account balance.
    mapping(address => uint256) balances;

    /**
     * 合约构造函数
     *
     * The `constructor` is executed only once when the contract is created.
     */
    constructor() public {
        // The totalSupply is assigned to transaction sender, which is the account
        // that is deploying the contract.
        balances[msg.sender] = totalSupply;
        owner = msg.sender;
    }

    /**
     * 代币转账.
     *
     * The `external` modifier makes a function *only* callable from outside
     * the contract.
     */
    function transfer(address to, uint256 amount) external {
        // Check if the transaction sender has enough tokens.
        // If `require`'s first argument evaluates to `false` then the
        // transaction will revert.
        require(balances[msg.sender] >= amount, "Not enough tokens");

        // Transfer the amount.
        balances[msg.sender] -= amount;
        balances[to] += amount;
    }

    /**
     * 返回账号的代币余额,只读函数。
     *
     * The `view` modifier indicates that it doesn't modify the contract's
     * state, which allows us to call it without executing a transaction.
     */
    function balanceOf(address account) external view returns (uint256) {
        return balances[account];
    }
}
3.2 部署脚本.js
// onehat/scripts/1_deploy_token.js
async function main() {
    //使用hardhat.config.js network字段里指定的网段
    //比如,npx hardhat run scripts/deploy.js --network ganache,表示使用ganache网段
    //      npx hardhat run scripts/deploy.js --network rinkeby,表示使用rinkeby网段
    //      npx hardhat run scripts/deploy.js --network ropsten,表示使用ropsten网段
    //  ethers.getSigners是根据--network参数来获取对应的网段,
    //  若没有填写--network,则使用hardhat自带的测试网络: hardhat-test
    //  比如,npx hardhat run scripts/deploy.js ,则表示使用 hardhat-test网段(端口为8545)
    const [deployer] = await ethers.getSigners();

    console.log("Deploying contracts with the account:", deployer.address);

    console.log("Account balance:", (await deployer.getBalance()).toString());

    const Token = await ethers.getContractFactory("Token");
    const token = await Token.deploy();

    console.log("Token address:", token.address);
  }

  main()
    .then(() => process.exit(0))
    .catch((error) => {
      console.error(error);
      process.exit(1);
    });
3.3 测试脚本.js
// onehat/test/token.js
// We import Chai to use its asserting functions here.
const { expect } = require("chai");

// `describe` is a Mocha function that allows you to organize your tests. It's
// not actually needed, but having your tests organized makes debugging them
// easier. All Mocha functions are available in the global scope.

// `describe` receives the name of a section of your test suite, and a callback.
// The callback must define the tests of that section. This callback can't be
// an async function.
describe("Token contract", function () {
  // Mocha has four functions that let you hook into the the test runner's
  // lifecyle. These are: `before`, `beforeEach`, `after`, `afterEach`.

  // They're very useful to setup the environment for tests, and to clean it
  // up after they run.

  // A common pattern is to declare some variables, and assign them in the
  // `before` and `beforeEach` callbacks.

  let Token;
  let hardhatToken;
  let owner;
  let addr1;
  let addr2;
  let addrs;

  // `beforeEach` will run before each test, re-deploying the contract every
  // time. It receives a callback, which can be async.
  beforeEach(async function () {
    // Get the ContractFactory and Signers here.
    Token = await ethers.getContractFactory("Token");
    [owner, addr1, addr2, ...addrs] = await ethers.getSigners();

    // To deploy our contract, we just have to call Token.deploy() and await
    // for it to be deployed(), which happens onces its transaction has been
    // mined.
    hardhatToken = await Token.deploy();
  });

  // You can nest describe calls to create subsections.
  describe("Deployment", function () {
    // `it` is another Mocha function. This is the one you use to define your
    // tests. It receives the test name, and a callback function.

    // If the callback function is async, Mocha will `await` it.
    it("Should set the right owner", async function () {
      // Expect receives a value, and wraps it in an Assertion object. These
      // objects have a lot of utility methods to assert values.

      // This test expects the owner variable stored in the contract to be equal
      // to our Signer's owner.
      expect(await hardhatToken.owner()).to.equal(owner.address);
    });

    it("Should assign the total supply of tokens to the owner", async function () {
      const ownerBalance = await hardhatToken.balanceOf(owner.address);
      expect(await hardhatToken.totalSupply()).to.equal(ownerBalance);
    });
  });

  describe("Transactions", function () {
    it("Should transfer tokens between accounts", async function () {
      // Transfer 50 tokens from owner to addr1
      await hardhatToken.transfer(addr1.address, 50);
      const addr1Balance = await hardhatToken.balanceOf(addr1.address);
      expect(addr1Balance).to.equal(50);

      // Transfer 50 tokens from addr1 to addr2
      // We use .connect(signer) to send a transaction from another account
      await hardhatToken.connect(addr1).transfer(addr2.address, 50);
      const addr2Balance = await hardhatToken.balanceOf(addr2.address);
      expect(addr2Balance).to.equal(50);
    });

    it("Should fail if sender doesn’t have enough tokens", async function () {
      const initialOwnerBalance = await hardhatToken.balanceOf(owner.address);

      // Try to send 1 token from addr1 (0 tokens) to owner (1000 tokens).
      // `require` will evaluate false and revert the transaction.
      await expect(
        hardhatToken.connect(addr1).transfer(owner.address, 1)
      ).to.be.revertedWith("Not enough tokens");

      // Owner balance shouldn't have changed.
      expect(await hardhatToken.balanceOf(owner.address)).to.equal(
        initialOwnerBalance
      );
    });

    it("Should update balances after transfers", async function () {
      const initialOwnerBalance = await hardhatToken.balanceOf(owner.address);

      // Transfer 100 tokens from owner to addr1.
      await hardhatToken.transfer(addr1.address, 100);

      // Transfer another 50 tokens from owner to addr2.
      await hardhatToken.transfer(addr2.address, 50);

      // Check balances.
      const finalOwnerBalance = await hardhatToken.balanceOf(owner.address);
      expect(finalOwnerBalance).to.equal(initialOwnerBalance - 150);

      const addr1Balance = await hardhatToken.balanceOf(addr1.address);
      expect(addr1Balance).to.equal(100);

      const addr2Balance = await hardhatToken.balanceOf(addr2.address);
      expect(addr2Balance).to.equal(50);
    });
  });
});
3.4 部署到ganache
使用npx命令运行1_deploy_token.js脚本,即可在ganache里部署合约
## 进入工程目录
cd onehat
npx hardhat run scripts/1_deploy_token.js --network ganache
效果如下:

使用hardhat,部署token.sol合约到ganache网络(127.0.0.1:9545) 成功。
3.5 在ganache里测试合约
使用npx命令运行token.js脚本,即可在ganache里测试合约
npx hardhat test test/token.js --network ganache
4、 完整工程
onehat工程地址: onehat案例 提取码:y5t1
以上是关于使用hardhat将合约部署到ganache的主要内容,如果未能解决你的问题,请参考以下文章