阿里开源的这个库,让Excel导出不再复杂(填充模板的使用指南)
Posted 看山
tags:
篇首语:本文由小常识网(cha138.com)小编为大家整理,主要介绍了阿里开源的这个库,让Excel导出不再复杂(填充模板的使用指南)相关的知识,希望对你有一定的参考价值。

你好,我是看山。
前文 说了写操作,可以实现简单的列表导出,还能 定义样式。有时候,我们还需要导出的一个大表单,或者是表单+列表的形式,这个时候,我们就需要填充功能。
内容比较多,文内只会列出关键代码,想要完整源码,可以关注公号「看山的小屋」回复“easyexcel”获取。
在 EasyExcel 中,写操作可以完成大部分工作,填充的优势在于,可以实现自定义样式的,只要在模板中设置好样式,填充的数据就能够带着样式。
先写个表单
既然是使用模板,写来定义一个模板。
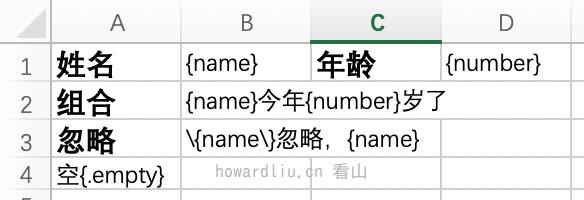
在 EasyExcel 的模板填充定义中,使用{}来表示你要用的变量,如果本来就有"{","}“特殊字符,需要对其进行转义,用”{","}"代替。
写对象
既然是写对象,先定义一下对象结构。
@Data
public class Item {
    private String name;
    private double number;
}
然后开始填充:
private static void fillUseObject() {
    String fileName = defaultFileName("fillUseObject");
    String templateFile = getPath() + File.separator + "template_fill_sample.xlsx";

    Item item = new Item();
    item.setName("法外狂徒张三");
    item.setNumber(89757);
    EasyExcelFactory.write(fileName)
            .withTemplate(templateFile)
            .sheet()
            .doFill(item);
}
在写操作中我们也使用过模板写列表,这里填充模板,使用的是同样的方法:com.alibaba.excel.write.builder.ExcelWriterBuilder#withTemplate(java.lang.String)指定模板文件路径,这里再重复一遍。withTemplate 方法有几个重载实现:
- 指定模板文件路径
ExcelWriterBuilder#withTemplate(java.lang.String) - 指定模板文件对象
ExcelWriterBuilder#withTemplate(java.io.File) - 指定模板文件输入流
ExcelWriterBuilder#withTemplate(java.io.InputStream)
指定模板文件和模板文件对象都是操作文件的,需要有文件信息。
指定模板文件输入流是只要文件流,这个可操作性空间就比较大了。比如,模板文件是可变的,我们可以基于一个带变量的模板文件,使用填充写入的方式初始化模板文件,然后再用模板写入的方式,写入列表。
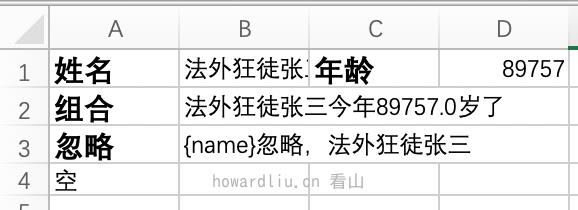
结果为:
写 Map
我们也可以不用非得创建类,用 Map 也能实现相同的功能。
private static void fillUseMap() {
    String fileName = defaultFileName("fillUseMap");
    String templateFile = getPath() + File.separator + "template_fill_sample.xlsx";

    Map<String, Object> data = new HashMap<>();
    data.put("name", "法外狂徒张三");
    data.put("number", 89757);
    EasyExcelFactory.write(fileName)
            .withTemplate(templateFile)
            .sheet()
            .doFill(data);
}
虽然 Map 能够功能相同,不过还是建议定义具体的类。因为类是可校验的,Map 是弱检测机制,纯靠约定或者测试,不是很安全。
结果为:
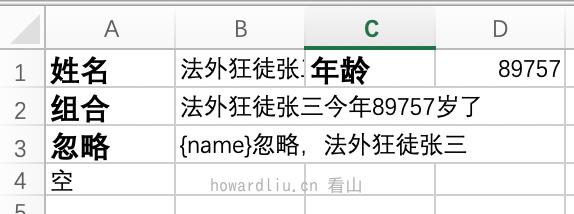
从效果上看,结果是相同的。
再写个列表
先定义模板:

可以看到,填充列表的参数定义,与填充对象的有些差别,模板中{.}多了个点。
对于表格的场景,从大体上会分为少量数据和大量数据。对于少量数据,直接在内存中操作即可。对于大量数据,可以使用分批写入,借助文件缓存的方式节省内存。
少量写
上代码:
private static void fillListInMemory() {
    String fileName = defaultFileName("fillListInMemory");
    String templateFile = getPath() + File.separator + "template_fill_list.xlsx";

    EasyExcelFactory.write(fileName)
            .withTemplate(templateFile)
            .sheet()
            .doFill(sampleItems());
}
可以看到,填充列表与前文说到的写文件操作在代码实现上没有太大差异,这也是 EasyExcel 架构设计上的强悍。通过建造器模式的 fluent 写法,屏蔽啰嗦的写入,同时也屏蔽不同业务实现参数的差异,只在doFill的时候,根据不同参数实现不同逻辑。
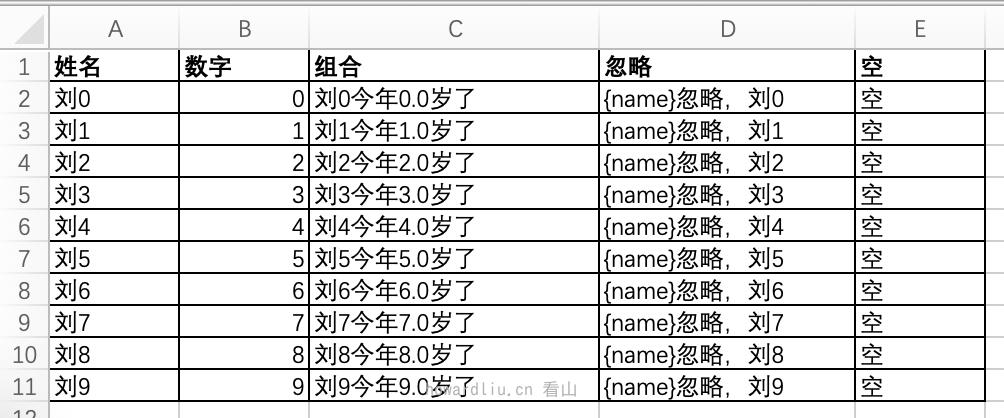
结果为:
大量写
接下来就是大量数据填充了。与上面的差异在于需要手动创建ExcelWriter和WriteSheet对象,然后使用com.alibaba.excel.ExcelWriter.fill方法多次写入数据。
fill方法支持直接写入列表和使用 lambda 函数方式,注意是fill,不是doFill。doFill会调用finish方法自动关闭流,fill方法只做数据填充,需要手动关闭流。
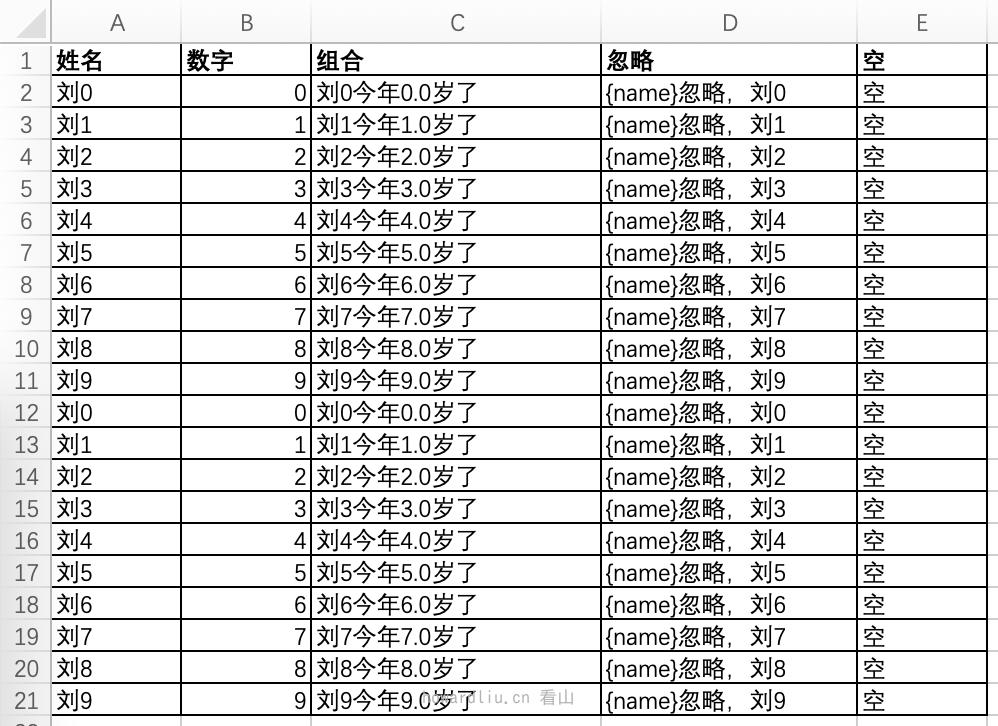
代码为:
private static void fillListSegment() {
    String fileName = defaultFileName("fillListSegment");
    String templateFile = getPath() + File.separator + "template_fill_list.xlsx";

    final ExcelWriter excelWriter = EasyExcelFactory.write(fileName).withTemplate(templateFile).build();
    try {
        final WriteSheet writeSheet = EasyExcelFactory.writerSheet().build();
        excelWriter.fill(BaseFill::sampleItems, writeSheet);
        excelWriter.fill(sampleItems(), writeSheet);
    } finally {
        if (excelWriter != null) {
            excelWriter.finish();
        }
    }
}
结果为:
最后写个表单+列表
最后来个表单与列表的形式。比如销售统计,表头需要填写参数信息,比如店铺信息、时间等,然后是销售记录,最后需要增加类似合计之类的信息。
这种的话,可以实现的方式也挺多,这里介绍固定列表的实现,在技巧篇中会再介绍一种动态列表的实现。
填充对象+列表
先定义模板:

从模板中可以看到,开头是时间信息,结尾有统计信息,中间是一个列表。
上代码:
/**
 * 填充对象+列表,因为列表之后还有一个字段,所以需要将{@link FillConfigBuilder#forceNewRow(Boolean)}设置为 TRUE 才行。
 * <p>
 * 这样会有一个副作用:所有数据会在内存中,即数据量大的时候特别耗内存。
 * <p>
 * 想要解决有两种方式:
 *
 * <ul>
 *     <li>list 之后没有数据了,{@link FillConfigBuilder#forceNewRow(Boolean)}设置为 FALSE</li>
 *     <li>list 写完之后,手动写后面的数据</li>
 * </ul>
 */
private static void fillObjectAndListInMemory() {
    String fileName = defaultFileName("fillObjectAndListInMemory");
    String templateFile = getPath() + File.separator + "template_fill_object_and_list.xlsx";

    final ExcelWriter excelWriter = EasyExcelFactory.write(fileName).withTemplate(templateFile).build();
    try {
        final WriteSheet writeSheet = EasyExcelFactory.writerSheet().build();

        Map<String, Object> map = new HashMap<>();
        map.put("date", DateTimeFormatter.ISO_LOCAL_DATE_TIME.format(LocalDateTime.now()));
        map.put("total", System.currentTimeMillis());
        excelWriter.fill(map, writeSheet);

        FillConfig fillConfig = FillConfig.builder().forceNewRow(Boolean.TRUE).build();

        excelWriter.fill(BaseFill::sampleItems, fillConfig, writeSheet);
        excelWriter.fill(sampleItems(), fillConfig, writeSheet);
    } finally {
        if (excelWriter != null) {
            excelWriter.finish();
        }
    }
}
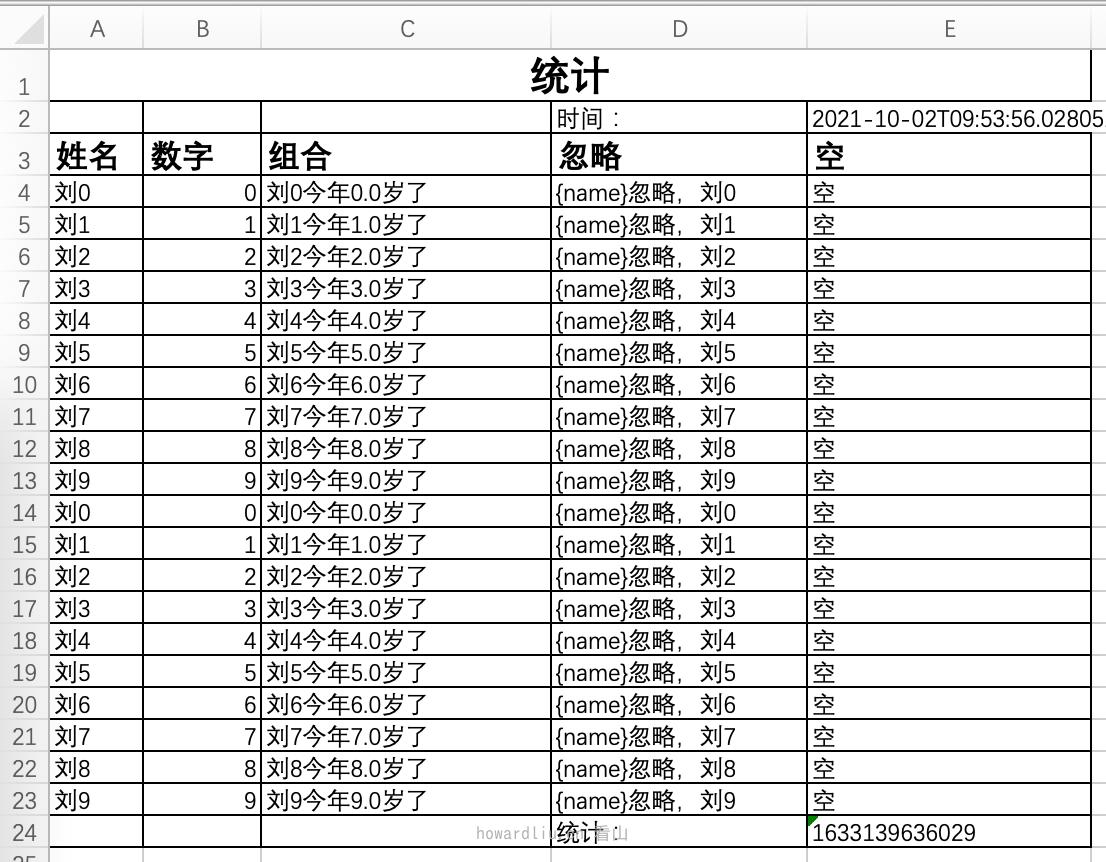
这里有一个新增的配置类:FillConfig fillConfig = FillConfig.builder().forceNewRow(Boolean.TRUE).build(),这个是用来定义写入时的配置信息。配置为 true,代表在写入列表的时候,不管下面有没有空行,都会创建一行,然后下面的数据往后移动。如果不定义或者设置为 false,最后那行的统计信息会被覆盖。
但是只要设置为 true 了,整个填充操作将都在内存中操作,比较耗费内存。
结果为:
填充对象+列表(大数据量)
如果列表数据比较大,还在内存中操作就比较容易内存溢出了。所以需要特殊的操作:
- 列表之后没有表单填充了,这种最容易实现,一句话实现不了,改需求。
- 只能在列表之后手动写数据
代码如下:
private static void fillObjectAndListManual() {
    String fileName = defaultFileName("fillObjectAndListManual");
    String templateFile = getPath() + File.separator + "template_fill_object_and_list_manual.xlsx";

    final ExcelWriter excelWriter = EasyExcelFactory.write(fileName).withTemplate(templateFile).build();
    try {
        final WriteSheet writeSheet = EasyExcelFactory.writerSheet().build();

        Map<String, Object> map = new HashMap<>();
        map.put("date", DateTimeFormatter.ISO_LOCAL_DATE_TIME.format(LocalDateTime.now()));
        excelWriter.fill(map, writeSheet);

        FillConfig fillConfig = FillConfig.builder().forceNewRow(Boolean.TRUE).build();

        excelWriter.fill(BaseFill::sampleItems, fillConfig, writeSheet);
        excelWriter.fill(sampleItems(), fillConfig, writeSheet);

        // 下面是纯手工写数据
        List<List<String>> totalListList = new ArrayList<>();
        List<String> totalList = new ArrayList<>();
        totalListList.add(totalList);
        totalList.add(null);
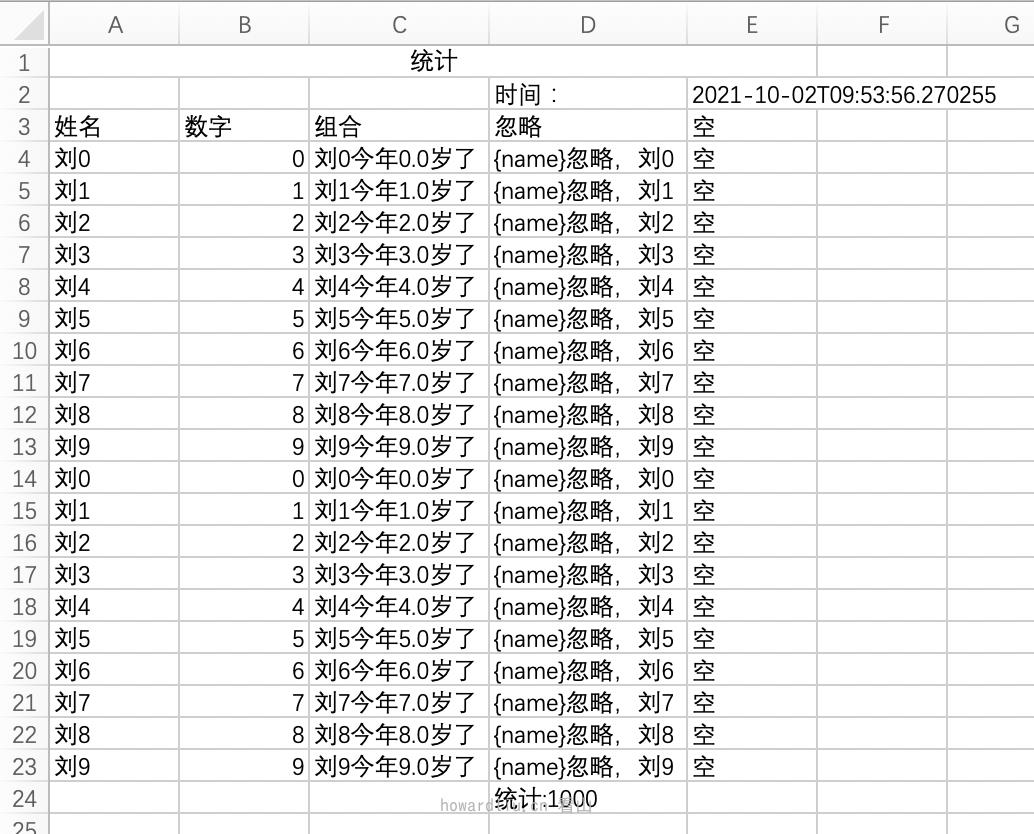
        totalList.add("统计:1000");
        excelWriter.write(totalListList, writeSheet);
    } finally {
        if (excelWriter != null) {
            excelWriter.finish();
        }
    }
}
结果为:
横向填充数据
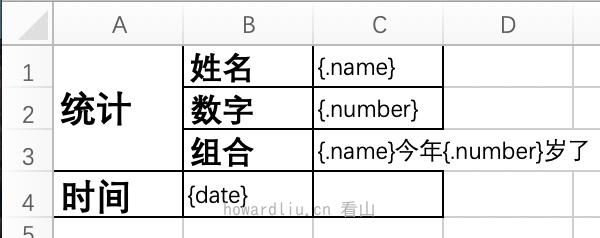
先定义模板:
private static void fillObjectAndListHorizontal() {
    String fileName = defaultFileName("fillObjectAndListHorizontal");
    String templateFile = getPath() + File.separator + "template_fill_list_horizontal.xlsx";

    final ExcelWriter excelWriter = EasyExcelFactory.write(fileName).withTemplate(templateFile).build();
    try {
        final WriteSheet writeSheet = EasyExcelFactory.writerSheet().build();

        Map<String, Object> map = new HashMap<>();
        map.put("date", DateTimeFormatter.ISO_LOCAL_DATE_TIME.format(LocalDateTime.now()));
        excelWriter.fill(map, writeSheet);

        FillConfig fillConfig = FillConfig.builder().direction(WriteDirectionEnum.HORIZONTAL).build();

        excelWriter.fill(BaseFill::sampleItems, fillConfig, writeSheet);
        excelWriter.fill(sampleItems(), fillConfig, writeSheet);
    } finally {
        if (excelWriter != null) {
            excelWriter.finish();
        }
    }
}
这里配置FillConfig fillConfig = FillConfig.builder().direction(WriteDirectionEnum.HORIZONTAL).build(),用于定义写入方向。
结果为:

填充多个表格
与写操作相同,填充操作也可以实现多表格的写入。
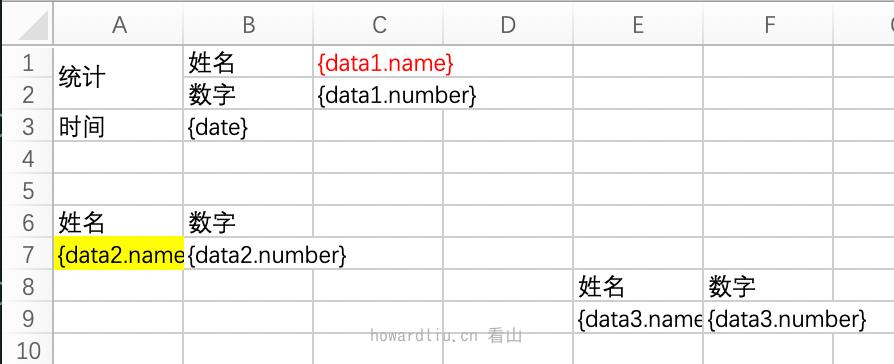
对于多表格写入,定义模板时,必须有{前缀。}。
private static void fillMultiList() {
    String fileName = defaultFileName("fillMultiList");
    String templateFile = getPath() + File.separator + "template_fill_multi_list.xlsx";

    final ExcelWriter excelWriter = EasyExcelFactory.write(fileName).withTemplate(templateFile).build();
    try {
        final WriteSheet writeSheet = EasyExcelFactory.writerSheet().build();

        Map<String, Object> map = new HashMap<>();
        map.put("date", DateTimeFormatter.ISO_LOCAL_DATE_TIME.format(LocalDateTime.now()));
        excelWriter.fill(map, writeSheet);

        FillConfig fillConfig = FillConfig.builder().direction(WriteDirectionEnum.HORIZONTAL).build();

        excelWriter.fill(new FillWrapper("data1", sampleItems()), fillConfig, writeSheet);
        // data2 分批写入
        excelWriter.fill(new FillWrapper("data2", sampleItems()), writeSheet);
        excelWriter.fill(new FillWrapper("data3", sampleItems()), writeSheet);
    } finally {
        if (excelWriter != null) {
            excelWriter.finish();
        }
    }
}
这里用到了FillWrapper,用来包装前缀。
结果为:
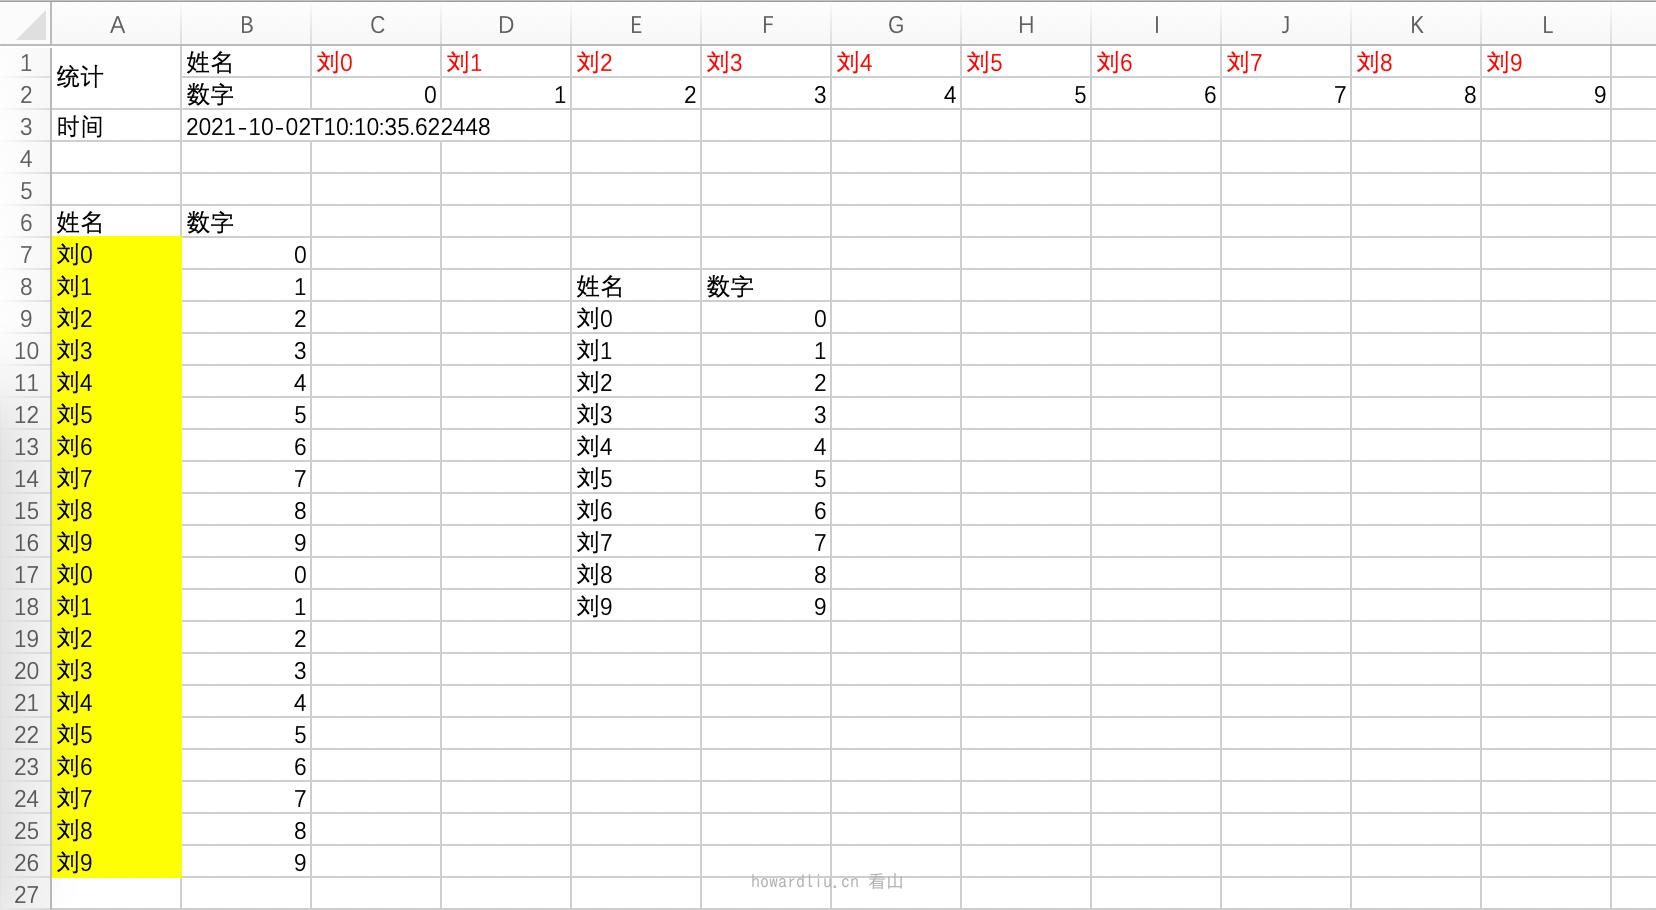
至此,写操作和填充操作全部介绍完成。
文末总结
本文从实战角度说了一下 EasyExcel 如果实现填充模板导出表格,有了模板填充逻辑,再加上写逻辑,我们会有更多的玩法,接下来就会说一下这些好玩的骚操作。
推荐阅读
- 阿里开源的这个库,让 Excel 导出不再复杂(简简单单的写)
- 阿里开源的这个库,让 Excel 导出不再复杂(既要能写,还要写的好看)
- 阿里开源的这个库,让 Excel 导出不再复杂(填充模板的使用指南)
你好,我是看山。游于码界,戏享人生。如果文章对您有帮助,请点赞、收藏、关注。
个人主页:https://www.howardliu.cn
个人博文:阿里开源的这个库,让 Excel 导出不再复杂(填充模板的使用指南)
CSDN 主页:https://kanshan.blog.csdn.net/
CSDN 博文:阿里开源的这个库,让 Excel 导出不再复杂(填充模板的使用指南)
以上是关于阿里开源的这个库,让Excel导出不再复杂(填充模板的使用指南)的主要内容,如果未能解决你的问题,请参考以下文章