springboot内置tomcat启动全流程详解及处理请求详解
Posted OkidoGreen
tags:
篇首语:本文由小常识网(cha138.com)小编为大家整理,主要介绍了springboot内置tomcat启动全流程详解及处理请求详解相关的知识,希望对你有一定的参考价值。
(1518条消息) springboot内置tomcat之NIO处理流程详解_CRUD的W的博客-CSDN博客_springboot tomcat nio https://blog.csdn.net/qq_31086797/article/details/107703053
前言
springboot默认内置了tomcat容器,启动时可以直接启动内置tomcat来启动应用
本文要介绍的内容有
- tomcat启动的全流程
- 发起http请求后tomcat转发请求到我们的DispatcherServlet的全过程
tomcat启动的全流程
直接从源码开始分析,先从run方式开始分析,我们只关注主要流程,只关心核心代码
public ConfigurableApplicationContext run(String... args)
		    ......
			// 核心代码,刷新spring上下文
			refreshContext(context);
			afterRefresh(context, applicationArguments);
			stopWatch.stop();
			if (this.logStartupInfo)
				new StartupInfoLogger(this.mainApplicationClass)
						.logStarted(getApplicationLog(), stopWatch);

			listeners.started(context);
			callRunners(context, applicationArguments);

		catch (Throwable ex)
			handleRunFailure(context, ex, exceptionReporters, listeners);
			throw new IllegalStateException(ex);


		try
			listeners.running(context);

		catch (Throwable ex)
			handleRunFailure(context, ex, exceptionReporters, null);
			throw new IllegalStateException(ex);

		return context;
核心方法 refreshContext(context);
private void refreshContext(ConfigurableApplicationContext context)
		// 核心代码
		refresh(context);
		if (this.registerShutdownHook)
			try
				context.registerShutdownHook();

			catch (AccessControlException ex)
				// Not allowed in some environments.
protected void refresh(ApplicationContext applicationContext)
	Assert.isInstanceOf(AbstractApplicationContext.class, applicationContext);
	((AbstractApplicationContext) applicationContext).refresh();
继续看 refresh(),有三个实现类,默认的是servlet环境,所以看实现类ServletWebServerApplicationContext
@Override
	public final void refresh() throws BeansException, IllegalStateException
		try
			super.refresh();

		catch (RuntimeException ex)
			stopAndReleaseWebServer();
			throw ex;
继续看 super.refresh(),父类AbstractApplicationContext的refresh()
@Override
	public void refresh() throws BeansException, IllegalStateException
		synchronized (this.startupShutdownMonitor)
			// Prepare this context for refreshing.
			prepareRefresh();

			// Tell the subclass to refresh the internal bean factory.
			ConfigurableListableBeanFactory beanFactory = obtainFreshBeanFactory();

			// Prepare the bean factory for use in this context.
			prepareBeanFactory(beanFactory);

			try
				......

				// Initialize other special beans in specific context subclasses.
				// 核心代码
				onRefresh();

				// Check for listener beans and register them.
				registerListeners();

				// Instantiate all remaining (non-lazy-init) singletons.
				finishBeanFactoryInitialization(beanFactory);

				// Last step: publish corresponding event.
				finishRefresh();

	......
回到ServletWebServerApplicationContext的onRefresh()
@Override
	protected void onRefresh()
		super.onRefresh();
		try
			// 核心代码,创建web容器
			createWebServer();

		catch (Throwable ex)
			throw new ApplicationContextException("Unable to start web server", ex);
这里就可以看到核心代码了createWebServer(),创建一个web容器
private void createWebServer()
		WebServer webServer = this.webServer;
		ServletContext servletContext = getServletContext();
		if (webServer == null && servletContext == null)
			ServletWebServerFactory factory = getWebServerFactory();
			// 核心代码
			this.webServer = factory.getWebServer(getSelfInitializer());

		else if (servletContext != null)
			try
				getSelfInitializer().onStartup(servletContext);

			catch (ServletException ex)
				throw new ApplicationContextException("Cannot initialize servlet context",
						ex);


		initPropertySources();
到了TomcatServletWebServerFactory的getWebServer
@Override
	public WebServer getWebServer(ServletContextInitializer... initializers)
		Tomcat tomcat = new Tomcat();
		File baseDir = (this.baseDirectory != null) ? this.baseDirectory
				: createTempDir("tomcat");
		tomcat.setBaseDir(baseDir.getAbsolutePath());
		Connector connector = new Connector(this.protocol);
		tomcat.getService().addConnector(connector);
		customizeConnector(connector);
		tomcat.setConnector(connector);
		tomcat.getHost().setAutoDeploy(false);
		configureEngine(tomcat.getEngine());
		for (Connector additionalConnector : this.additionalTomcatConnectors)
			tomcat.getService().addConnector(additionalConnector);

		prepareContext(tomcat.getHost(), initializers);
		// 核心代码
		return getTomcatWebServer(tomcat);
protected TomcatWebServer getTomcatWebServer(Tomcat tomcat)
	return new TomcatWebServer(tomcat, getPort() >= 0);
public TomcatWebServer(Tomcat tomcat, boolean autoStart)
		Assert.notNull(tomcat, "Tomcat Server must not be null");
		this.tomcat = tomcat;
		this.autoStart = autoStart;
		// 核心代码
		initialize();
进入initialize()
private void initialize() throws WebServerException
		logger.info("Tomcat initialized with port(s): " + getPortsDescription(false));
		synchronized (this.monitor)
			try
				......

				// Start the server to trigger initialization listeners
				// 核心代码
				this.tomcat.start();

				// We can re-throw failure exception directly in the main thread
				rethrowDeferredStartupExceptions();

				try
					ContextBindings.bindClassLoader(context, context.getNamingToken(),
							getClass().getClassLoader());

				catch (NamingException ex)
					// Naming is not enabled. Continue


				// Unlike Jetty, all Tomcat threads are daemon threads. We create a
				// blocking non-daemon to stop immediate shutdown
				startDaemonAwaitThread();

			catch (Exception ex)
				stopSilently();
				throw new WebServerException("Unable to start embedded Tomcat", ex);
进入tomcat.start()
 @Override
    public final synchronized void start() throws LifecycleException

        if (LifecycleState.STARTING_PREP.equals(state) || LifecycleState.STARTING.equals(state) ||
                LifecycleState.STARTED.equals(state))

            if (log.isDebugEnabled())
                Exception e = new LifecycleException();
                log.debug(sm.getString("lifecycleBase.alreadyStarted", toString()), e);
             else if (log.isInfoEnabled())
                log.info(sm.getString("lifecycleBase.alreadyStarted", toString()));


            return;


        if (state.equals(LifecycleState.NEW))
        	// 核心代码1
            init();
         else if (state.equals(LifecycleState.FAILED))
            stop();
         else if (!state.equals(LifecycleState.INITIALIZED) &&
                !state.equals(LifecycleState.STOPPED))
            invalidTransition(Lifecycle.BEFORE_START_EVENT);


        try
            setStateInternal(LifecycleState.STARTING_PREP, null, false);
            // 核心代码2
            startInternal();
           ......
         catch (Throwable t)
            // This is an 'uncontrolled' failure so put the component into the
            // FAILED state and throw an exception.
            handleSubClassException(t, "lifecycleBase.startFail", toString());
这里有两个核心代码init()和startInternal()
先看init方法
    @Override
    public final synchronized void init() throws LifecycleException
        if (!state.equals(LifecycleState.NEW))
            invalidTransition(Lifecycle.BEFORE_INIT_EVENT);


        try
            setStateInternal(LifecycleState.INITIALIZING, null, false);
            // 核心代码
            initInternal();
            setStateInternal(LifecycleState.INITIALIZED, null, false);
         catch (Throwable t)
            handleSubClassException(t, "lifecycleBase.initFail", toString());
initInternal这里实现类太多了,我们关注重点组件Connector,进入initInternal方法,来到了Connector类的initInternal()
@Override
    protected void initInternal() throws LifecycleException

        ......

        try
        	// 核心代码
            protocolHandler.init();
         catch (Exception e)
            throw new LifecycleException(
                    sm.getString("coyoteConnector.protocolHandlerInitializationFailed"), e);
进入AbstractProtocol的init()
 @Override
    public void init() throws Exception
        if (getLog().isInfoEnabled())
            getLog().info(sm.getString("abstractProtocolHandler.init", getName()));


        if (oname == null)
            // Component not pre-registered so register it
            oname = createObjectName();
            if (oname != null)
                Registry.getRegistry(null, null).registerComponent(this, oname, null);


        if (this.domain != null)
            rgOname = new ObjectName(domain + ":type=GlobalRequestProcessor,name=" + getName());
            Registry.getRegistry(null, null).registerComponent(
                    getHandler().getGlobal(), rgOname, null);


        String endpointName = getName();
        endpoint.setName(endpointName.substring(1, endpointName.length()-1));
        endpoint.setDomain(domain);
		// 核心代码
        endpoint.init();
endpoint.init()
 public final void init() throws Exception
        if (bindOnInit)
        	// 核心代码
            bind();
            bindState = BindState.BOUND_ON_INIT;

        if (this.domain != null)
            // Register endpoint (as ThreadPool - historical name)
            oname = new ObjectName(domain + ":type=ThreadPool,name=\\"" + getName() + "\\"");
            Registry.getRegistry(null, null).registerComponent(this, oname, null);

            for (SSLHostConfig sslHostConfig : findSslHostConfigs())
                registerJmx(sslHostConfig);
这个bind方法很关键,这里有多个实现类,当前我的版本默认环境是NIO,即进入NioEndpoint类
 @Override
    public void bind() throws Exception
    	// 核心代码
        initServerSocket();

        // Initialize thread count defaults for acceptor, poller
        if (acceptorThreadCount == 0)
            // FIXME: Doesn't seem to work that well with multiple accept threads
            acceptorThreadCount = 1;

        if (pollerThreadCount <= 0)
            //minimum one poller thread
            pollerThreadCount = 1;

        setStopLatch(new CountDownLatch(pollerThreadCount));

        // Initialize SSL if needed
        initialiseSsl();

        selectorPool.open();
initServerSocket可以看出是初始化Socket的
protected void initServerSocket() throws Exception
    if (!getUseInheritedChannel())
        serverSock = ServerSocketChannel.open();
        socketProperties.setProperties(serverSock.socket());
        InetSocketAddress addr = (getAddress()!=null?new InetSocketAddress(getAddress(),getPort()):new InetSocketAddress(getPort()));
        serverSock.socket().bind(addr,getAcceptCount());
     else
        // Retrieve the channel provided by the OS
        Channel ic = System.inheritedChannel();
        if (ic instanceof ServerSocketChannel)
            serverSock = (ServerSocketChannel) ic;

        if (serverSock == null)
            throw new IllegalArgumentException(sm.getString("endpoint.init.bind.inherited"));


    serverSock.configureBlocking(true); //mimic APR behavior
可以看到我们熟悉的Socket代码了,绑定了ip端口,至此Socket初始化完成
然后我们看之前的核心代码2,startInternal()方法
同样我们看关键组件Connector的startInternal()
@Override
protected void startInternal() throws LifecycleException

    // Validate settings before starting
    if (getPort() < 0)
        throw new LifecycleException(sm.getString(
                "coyoteConnector.invalidPort", Integer.valueOf(getPort())));


    setState(LifecycleState.STARTING);

    try
    	// 核心代码
        protocolHandler.start();
     catch (Exception e)
        throw new LifecycleException(
                sm.getString("coyoteConnector.protocolHandlerStartFailed"), e);
protocolHandler.start()
 @Override
    public void start() throws Exception
        if (getLog().isInfoEnabled())
            getLog().info(sm.getString("abstractProtocolHandler.start", getName()));

		// 核心代码
        endpoint.start();

        // Start async timeout thread
        asyncTimeout = new AsyncTimeout();
        Thread timeoutThread = new Thread(asyncTimeout, getNameInternal() + "-AsyncTimeout");
        int priority = endpoint.getThreadPriority();
        if (priority < Thread.MIN_PRIORITY || priority > Thread.MAX_PRIORITY)
            priority = Thread.NORM_PRIORITY;

        timeoutThread.setPriority(priority);
        timeoutThread.setDaemon(true);
        timeoutThread.start();
endpoint.start()
public final void start() throws Exception
    if (bindState == BindState.UNBOUND)
        bind();
        bindState = BindState.BOUND_ON_START;

    // 核心代码
    startInternal();
进入NioEndpoint的startInternal()
 public void startInternal() throws Exception

        if (!running)
            ......

            // Start poller threads
            // 核心代码
            pollers = new Poller[getPollerThreadCount()];
            for (int i=0; i<pollers.length; i++)
                pollers[i] = new Poller();
                Thread pollerThread = new Thread(pollers[i], getName() + "-ClientPoller-"+i);
                pollerThread.setPriority(threadPriority);
                pollerThread.setDaemon(true);
                pollerThread.start();


            startAcceptorThreads();
这里的核心代码pollers数组很关键,创建了多个Poller类并且放到了线程里面启动了,从这里可以看出来Poller是一个实现了Runnable类的线程类
线程启动后就会执行Poller类的run方法了
 @Override
    public void run()
        // Loop until destroy() is called

        // 核心代码1,轮询
        while (true)

            boolean hasEvents = false;

            try
                if (!close)
                    hasEvents = events();
                    if (wakeupCounter.getAndSet(-1) > 0)
                        //if we are here, means we have other stuff to do
                        //do a non blocking select
                        keyCount = selector.selectNow();
                     else
                        keyCount = selector.select(selectorTimeout);

                    wakeupCounter.set(0);

                if (close)
                    events();
                    timeout(0, false);
                    try
                        selector.close();
                     catch (IOException ioe)
                        log.error(sm.getString("endpoint.nio.selectorCloseFail"), ioe);

                    break;

             catch (Throwable x)
                ExceptionUtils.handleThrowable(x);
                log.error("",x);
                continue;

            //either we timed out or we woke up, process events first
            if ( keyCount == 0 ) hasEvents = (hasEvents | events());

            Iterator<SelectionKey> iterator =
                keyCount > 0 ? selector.selectedKeys().iterator() : null;
            // Walk through the collection of ready keys and dispatch
            // any active event.
            while (iterator != null && iterator.hasNext())
                SelectionKey sk = iterator.next();
                NiosocketWrapper attachment = (NioSocketWrapper)sk.attachment();
                // Attachment may be null if another thread has called
                // cancelledKey()
                if (attachment == null)
                    iterator.remove();
                 else
                    iterator.remove();
                    // 核心代码2
                    processKey(sk, attachment);

            //while

            //process timeouts
            timeout(keyCount,hasEvents);
        //while

        getStopLatch().countDown();
这里启动了一个while(true)循环,不停的监听NIO接受的请求,直到收到数据执行核心代码2,processKey(sk, attachment)
到这里为止,我们已经启动了多个监听线程对象Poller,Poller类会轮询监听socket连接,即我们的Tomcat容器已经启动完成了。
处理http请求
DispatcherServlet
DispatcherServlet是我们在学习spring mvc的一个非常重要的servlet,我们都知道http请求后会进入DispatcherServlet的doService方法,那么这是怎么进入的呢?接下来我们就来看一下源码
我们发起一个http请求访问一下我们的一个测试的controller方法,我们在上述的核心代码2,processKey(sk, attachment)处打上断点
发起请求后进入了我们的断点,processKey方法
 protected void processKey(SelectionKey sk, NioSocketWrapper attachment)
        try
            if ( close )
                cancelledKey(sk);
             else if ( sk.isValid() && attachment != null )
                if (sk.isReadable() || sk.isWritable() )
                    if ( attachment.getSendfileData() != null )
                        processSendfile(sk,attachment, false);
                     else
                        unreg(sk, attachment, sk.readyOps());
                        boolean closeSocket = false;
                        // Read goes before write
                        if (sk.isReadable())
                        	// 核心代码
                            if (!processSocket(attachment, SocketEvent.OPEN_READ, true))
                                closeSocket = true;


                        if (!closeSocket && sk.isWritable())
                            if (!processSocket(attachment, SocketEvent.OPEN_WRITE, true))
                                closeSocket = true;


                        if (closeSocket)
                            cancelledKey(sk);


             else
                //invalid key
                cancelledKey(sk);

         catch ( CancelledKeyException ckx )
            cancelledKey(sk);
         catch (Throwable t)
            ExceptionUtils.handleThrowable(t);
            log.error("",t);
看上面的核心代码,sk.isReadable(),可以看出来当请求可以处理时会进入,然后执行processSocket
public boolean processSocket(SocketWrapperBase<S> socketWrapper,
        SocketEvent event, boolean dispatch)
    try
        if (socketWrapper == null)
            return false;

        // 核心代码
        SocketProcessorBase<S> sc = processorCache.pop();
        if (sc == null)
            sc = createSocketProcessor(socketWrapper, event);
         else
            sc.reset(socketWrapper, event);

        Executor executor = getExecutor();
        if (dispatch && executor != null)
        	// 核心代码,放到线程池里面执行
            executor.execute(sc);
         else
            sc.run();

     catch (RejectedExecutionException ree)
        getLog().warn(sm.getString("endpoint.executor.fail", socketWrapper) , ree);
        return false;
     catch (Throwable t)
        ExceptionUtils.handleThrowable(t);
        // This means we got an OOM or similar creating a thread, or that
        // the pool and its queue are full
        getLog().error(sm.getString("endpoint.process.fail"), t);
        return false;

    return true;
这里的核心类,拿到一个SocketProcessorBase后有线程池则放到线程池里面去执行,则说明SocketProcessorBase也是一个线程类,相当于又把请求交给了SocketProcessorBase的run方法去处理了
SocketProcessorBase的run()
  @Override
    public final void run()
        synchronized (socketWrapper)

            if (socketWrapper.isClosed())
                return;

            // 核心代码
            doRun();
执行doRun()
接下去执行了几十个类的转发请求,我们不做详细解释,我们直接找到关键类ApplicationFilterChain的internalDoFilter方法,
  private void internalDoFilter(ServletRequest request,
                                  ServletResponse response)
        throws IOException, ServletException

        ......
             else
            	// 核心代码
                servlet.service(request, response);

         catch (IOException | ServletException | RuntimeException e)
            throw e;
         catch (Throwable e)
            e = ExceptionUtils.unwrapInvocationTargetException(e);
            ExceptionUtils.handleThrowable(e);
            throw new ServletException(sm.getString("filterChain.servlet"), e);
         finally
            if (ApplicationDispatcher.WRAP_SAME_OBJECT)
                lastServicedRequest.set(null);
                lastServicedResponse.set(null);
我们在核心代码servlet.service(request, response)出打上断点,我们就可以看到我们上面省略的所有流程,即从SocketProcessorBase的run执行到ApplicationFilterChain的internalDoFilter方法的详细流程了
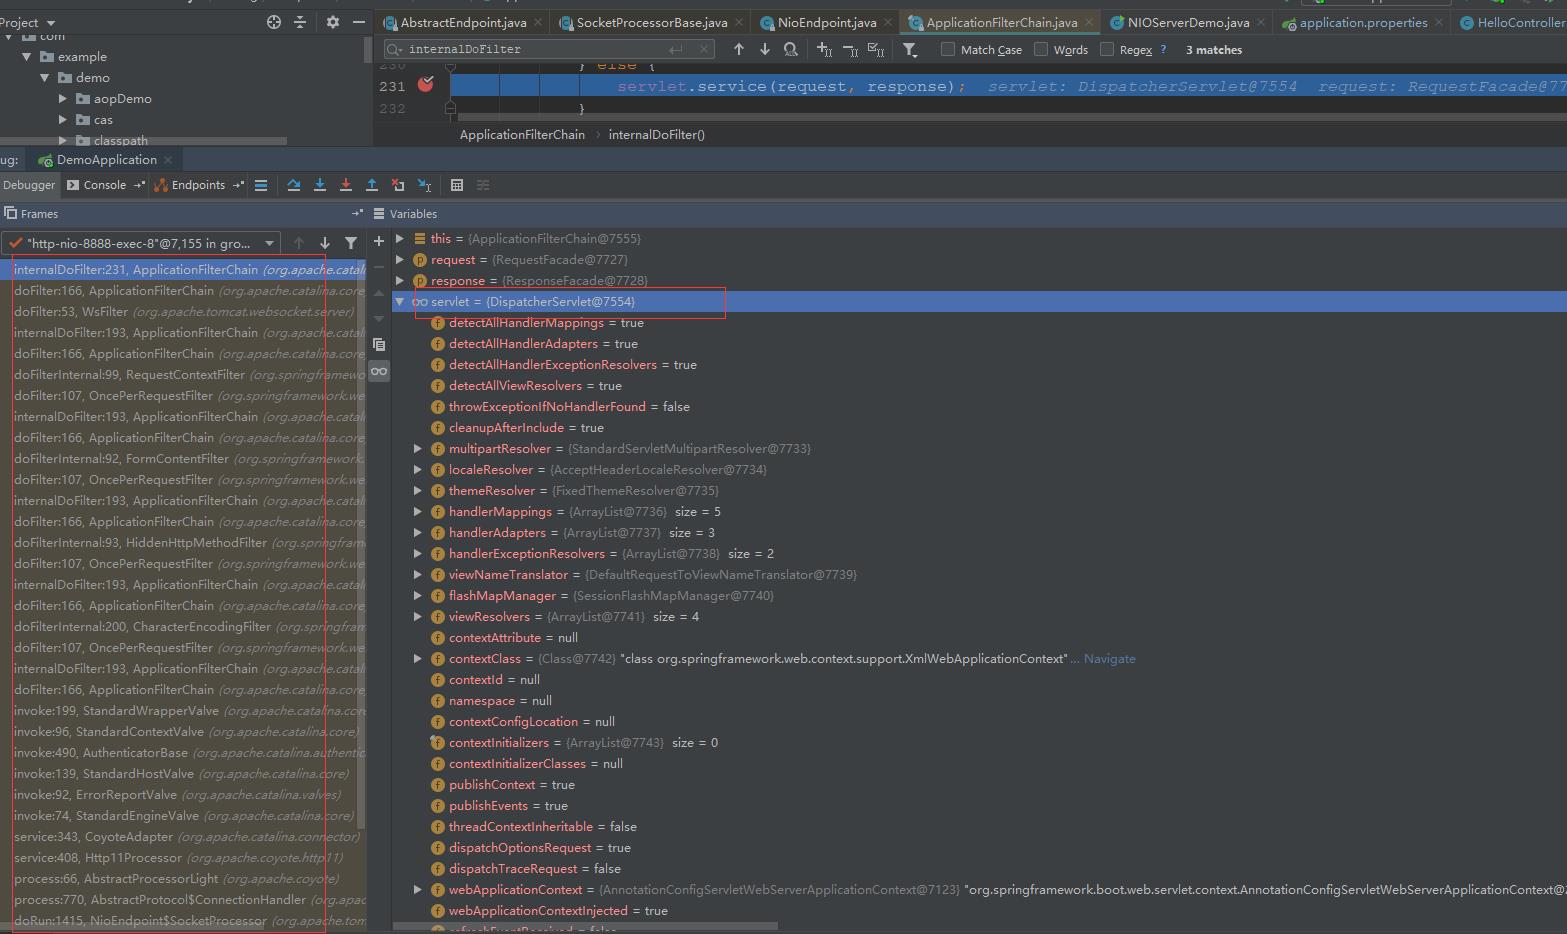
这里就可以看到我们的servlet的具体实现类就是我们要找的DispatchServlet了,执行DispatchServlet的service方法,并且传入了request和response
经过一些转发会进入DispatchServlet的父类FrameworkServlet的service方法
 protected void service(HttpServletRequest request, HttpServletResponse response) throws ServletException, IOException
        HttpMethod httpMethod = HttpMethod.resolve(request.getMethod());
        if (httpMethod != HttpMethod.PATCH && httpMethod != null)
        	// 核心方法
            super.service(request, response);
         else
            this.processRequest(request, response);
然后进入了HttpServlet的service,在里面根据HttpServletRequest的请求method类型,当前我们是get请求
 protected void service(HttpServletRequest req, HttpServletResponse resp)
        throws ServletException, IOException

        String method = req.getMethod();

		// 核心方法,根据不同method进入不同的处理
        if (method.equals(METHOD_GET))
        	if (lastModified == -1)
                // servlet doesn't support if-modified-since, no reason
                // to go through further expensive logic
                // 进入get方法
                doGet(req, resp);

            ......

         else if (method.equals(METHOD_HEAD))
            long lastModified = getLastModified(req);
            maybeSetLastModified(resp, lastModified);
            doHead(req, resp);

         else if (method.equals(METHOD_POST))
            doPost(req, resp);

         else if (method.equals(METHOD_PUT))
            doPut(req, resp);

         else if (method.equals(METHOD_DELETE))
            doDelete(req, resp);

         else if (method.equals(METHOD_OPTIONS))
            doOptions(req,resp);

         else if (method.equals(METHOD_TRACE))
            doTrace(req,resp);

         else
           ......
进入FrameworkServlet的doGet方法
protected final void doGet(HttpServletRequest request, HttpServletResponse response) throws ServletException, IOException
    this.processRequest(request, response);
protected final void processRequest(HttpServletRequest request, HttpServletResponse response) throws ServletException, IOException
    ......

    try
    	// 核心方法
        this.doService(request, response);
     catch (IOException | ServletException var16)
        failureCause = var16;
        throw var16;
     catch (Throwable var17)
        failureCause = var17;
        throw new NestedServletException("Request processing failed", var17);
     finally
        this.resetContextHolders(request, previousLocaleContext, previousAttributes);
        if (requestAttributes != null)
            requestAttributes.requestCompleted();


        this.logResult(request, response, (Throwable)failureCause, asyncManager);
        this.publishRequestHandledEvent(request, response, startTime, (Throwable)failureCause);
this.doService(request, response),然后就进入了我们的DispatcherServlet的doService,至此我们的请求成功的被tomcat转发到了DispatcherServlet的doService方法
总结
我们从源码层面从头到尾分析了一遍tomcat的启动流程和tomcat处理http请求的全过程,可以看到虽然省略了很多详细的代码,但是整体流程还是相对清晰的
主要流程是
1、根据配置信息启动了一个ServerSocket
2、启动了多个Poller线程类来接受请求
3、接受到http请求后扔给SocketProcessorBase线程来处理
4、SocketProcessorBase执行后最终把请求扔到了DispatcherServlet的doService方法处理
5、doService基于spring mvc调用Controller请求并且返回数据给浏览器渲染
以上是关于springboot内置tomcat启动全流程详解及处理请求详解的主要内容,如果未能解决你的问题,请参考以下文章