开源 Python OpenCV 小项目
Posted yddcs
tags:
篇首语:本文由小常识网(cha138.com)小编为大家整理,主要介绍了开源 Python OpenCV 小项目相关的知识,希望对你有一定的参考价值。
1. Drowsiness Detector 睡意检测
环境配置
import cv2  # opencv-python
import dlib #
from scipy.spatial import distance
若pip install报错,需要先安装boost和cmake
pip install boost
pip install cmake
pip install dlib
def calculate_EAR(eye):
	A = distance.euclidean(eye[1], eye[5])
	B = distance.euclidean(eye[2], eye[4])
	C = distance.euclidean(eye[0], eye[3])
	ear_aspect_ratio = (A+B)/(2.0*C)
	return ear_aspect_ratio

cap = cv2.VideoCapture(0)
hog_face_detector = dlib.get_frontal_face_detector()
dlib_facelandmark = dlib.shape_predictor("shape_predictor_68_face_landmarks.dat")

while True:
    _, frame = cap.read()
    gray = cv2.cvtColor(frame, cv2.COLOR_BGR2GRAY)

    faces = hog_face_detector(gray)
    for face in faces:

        face_landmarks = dlib_facelandmark(gray, face)
        leftEye = []
        rightEye = []

        for n in range(36,42):
        	x = face_landmarks.part(n).x
        	y = face_landmarks.part(n).y
        	leftEye.append((x,y))
        	next_point = n+1
        	if n == 41:
        		next_point = 36
        	x2 = face_landmarks.part(next_point).x
        	y2 = face_landmarks.part(next_point).y
        	cv2.line(frame,(x,y),(x2,y2),(0,255,0),1)

        for n in range(42,48):
        	x = face_landmarks.part(n).x
        	y = face_landmarks.part(n).y
        	rightEye.append((x,y))
        	next_point = n+1
        	if n == 47:
        		next_point = 42
        	x2 = face_landmarks.part(next_point).x
        	y2 = face_landmarks.part(next_point).y
        	cv2.line(frame,(x,y),(x2,y2),(0,255,0),1)

        left_ear = calculate_EAR(leftEye)
        right_ear = calculate_EAR(rightEye)

        EAR = (left_ear+right_ear)/2
        EAR = round(EAR,2)
        if EAR<0.26:
        	cv2.putText(frame,"DROWSY",(20,100),
        		cv2.FONT_HERSHEY_SIMPLEX,3,(0,0,255),4)
        	cv2.putText(frame,"Are you Sleepy?",(20,400),
        		cv2.FONT_HERSHEY_SIMPLEX,2,(0,0,255),4)
        	print("Drowsy")
        print(EAR)

    cv2.imshow("Are you Sleepy", frame)

    key = cv2.waitKey(1)
    if key == 27:
        break
cap.release()
cv2.destroyAllWindows()
2. Object Tracking 目标跟踪
pip install opencv-contrib-python
import cv2

tracker = cv2.TrackerKCF_create()
video = cv2.VideoCapture(1)

while True:
    k,frame = video.read()
    cv2.imshow("Tracking",frame)
    k = cv2.waitKey(30) & 0xff
    if k == 27:
        break
bbox = cv2.selectROI(frame, False)

ok = tracker.init(frame, bbox)
cv2.destroyWindow("ROI selector")

while True:
    ok, frame = video.read()
    ok, bbox = tracker.update(frame)

    if ok:
        p1 = (int(bbox[0]), int(bbox[1]))
        p2 = (int(bbox[0] + bbox[2]),
              int(bbox[1] + bbox[3]))
        cv2.rectangle(frame, p1, p2, (0,0,255), 2, 2)

    cv2.imshow("Tracking", frame)
    k = cv2.waitKey(1) & 0xff
    if k == 27 : break
3. lane detection 车道线检测
import cv2
import numpy as np

def canny(img):
    if img is None:
        cap.release()
        cv2.destroyAllWindows()
        exit()
    gray = cv2.cvtColor(img, cv2.COLOR_BGR2GRAY)
    kernel = 5
    blur = cv2.GaussianBlur(gray,(kernel, kernel),0)
    canny = cv2.Canny(gray, 50, 150)
    return canny

def region_of_interest(canny):
    height = canny.shape[0]
    width = canny.shape[1]
    mask = np.zeros_like(canny)
    triangle = np.array([[
    (200, height),
    (800, 350),
    (1200, height),]], np.int32)
    cv2.fillPoly(mask, triangle, 255)
    masked_image = cv2.bitwise_and(canny, mask)
    return masked_image

def houghLines(cropped_canny):
    return cv2.HoughLinesP(cropped_canny, 2, np.pi/180, 100,
        np.array([]), minLineLength=40, maxLineGap=5)

def addWeighted(frame, line_image):
    return cv2.addWeighted(frame, 0.8, line_image, 1, 1)

def display_lines(img,lines):
    line_image = np.zeros_like(img)
    if lines is not None:
        for line in lines:
            for x1, y1, x2, y2 in line:
                cv2.line(line_image,(x1,y1),(x2,y2),(0,0,255),10)
    return line_image

def make_points(image, line):
    slope, intercept = line
    y1 = int(image.shape[0])
    y2 = int(y1*3.0/5)
    x1 = int((y1 - intercept)/slope)
    x2 = int((y2 - intercept)/slope)
    return [[x1, y1, x2, y2]]

def average_slope_intercept(image, lines):
    left_fit    = []
    right_fit   = []
    if lines is None:
        return None
    for line in lines:
        for x1, y1, x2, y2 in line:
            fit = np.polyfit((x1,x2), (y1,y2), 1)
            slope = fit[0]
            intercept = fit[1]
            if slope < 0:
                left_fit.append((slope, intercept))
            else:
                right_fit.append((slope, intercept))
    left_fit_average  = np.average(left_fit, axis=0)
    right_fit_average = np.average(right_fit, axis=0)
    left_line  = make_points(image, left_fit_average)
    right_line = make_points(image, right_fit_average)
    averaged_lines = [left_line, right_line]
    return averaged_lines

cap = cv2.VideoCapture("test1.mp4")
while(cap.isOpened()):
    _, frame = cap.read()
    canny_image = canny(frame)
    cropped_canny = region_of_interest(canny_image)
    # cv2.imshow("cropped_canny",cropped_canny)

    lines = houghLines(cropped_canny)
    averaged_lines = average_slope_intercept(frame, lines)
    line_image = display_lines(frame, averaged_lines)
    combo_image = addWeighted(frame, line_image)
    cv2.imshow("result", combo_image)

    if cv2.waitKey(1) & 0xFF == ord('q'):
        break

cap.release()
cv2.destroyAllWindows()
5. background removal 背景移除
import cv2
import numpy as np
import sys

def resize(dst,img):
	width = img.shape[1]
	height = img.shape[0]
	dim = (width, height)
	resized = cv2.resize(dst, dim, interpolation = cv2.INTER_AREA)
	return resized

video = cv2.VideoCapture(1)
oceanVideo = cv2.VideoCapture("ocean.mp4")
success, ref_img = video.read()
flag = 0

while(1):
        success, img = video.read()
        success2, bg = oceanVideo.read()
        bg = resize(bg,ref_img)
        if flag==0:
                ref_img = img
        # create a mask
        diff1=cv2.subtract(img,ref_img)
        diff2=cv2.subtract(ref_img,img)
        diff = diff1+diff2
        diff[abs(diff)<13.0]=0
        gray = cv2.cvtColor(diff.astype(np.uint8), cv2.COLOR_BGR2GRAY)
        gray[np.abs(gray) < 10] = 0
        fgmask = gray.astype(np.uint8)
        fgmask[fgmask>0]=255
        #invert the mask
        fgmask_inv = cv2.bitwise_not(fgmask)
        #use the masks to extract the relevant parts from FG and BG
        fgimg = cv2.bitwise_and(img,img,mask = fgmask)
        bgimg = cv2.bitwise_and(bg,bg,mask = fgmask_inv)
        #combine both the BG and the FG images
        dst = cv2.add(bgimg,fgimg)
        cv2.imshow('Background Removal',dst)
        key = cv2.waitKey(5) & 0xFF
        if ord('q') == key:
                break
        elif ord('d') == key:
                flag = 1
                print("Background Captured")
        elif ord('r') == key:
                flag = 0
                print("Ready to Capture new Background")

cv2.destroyAllWindows()
video.release()
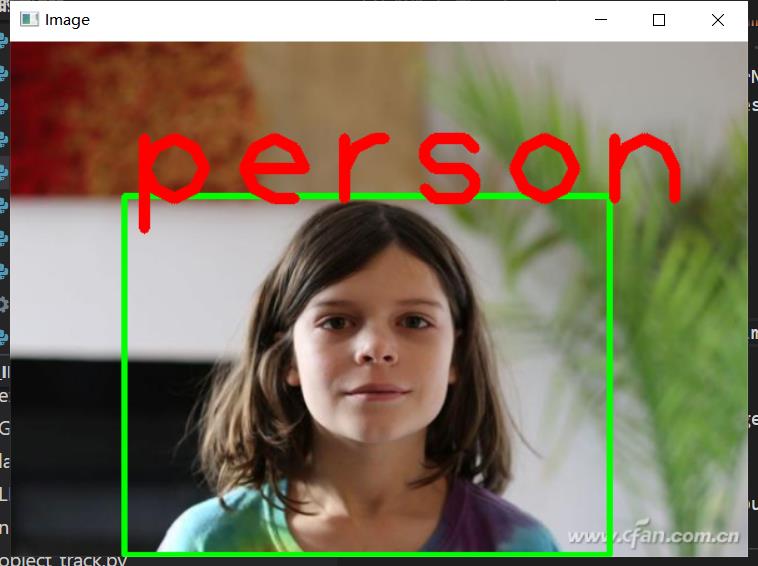
6. YOLO 目标检测
需要准备权重、配置文件和coco类别文件,YOLO
import cv2
import numpy as np

yolo = cv2.dnn.readNet("./CV_101/yolov3.weights", "./CV_101/yolov3.cfg")
classes = []

with open("./CV_101/coco.names", "r") as file:
    classes = [line.strip() for line in file.readlines()]
layer_names = yolo.getLayerNames()
output_layers = [layer_names[i[0] - 1] for i in yolo.getUnconnectedOutLayers()]

colorRed = (0,0,255)
colorGreen = (0,255,0)

# #Loading Images
name = "./CV_101/c1.png"
img = cv2.imread(name)
height, width, channels = img.shape

# # Detecting objects
blob = cv2.dnn.blobFromImage(img, 0.00392, (416, 416), (0, 0, 0), True, crop=False)

yolo.setInput(blob)
outputs = yolo.forward(output_layers)

class_ids = []
confidences = []
boxes = []
for output in outputs:
    for detection in output:
        scores = detection[5:]
        class_id = np.argmax(scores)
        confidence = scores[class_id]
        if confidence > 0.5:
            center_x = int(detection[0] * width)
            center_y = int(detection[1] * height)
            w = int(detection[2] * width)
            h = int(detection[3] * height)

            x = int(center_x - w / 2)
            y = int(center_y - h / 2)

            boxes.append([x, y, w, h])
            confidences.append(float(confidence))
            class_ids.append(class_id)

indexes = cv2.dnn.NMSBoxes(boxes, confidences, 0.5, 0.4)
for i in range(len(boxes)):
    if i in indexes:
        x, y, w, h = boxes[i]
        label = str(classes[class_ids[i]])
        cv2.rectangle(img, (x, y), (x + w, y + h), colorGreen, 3)
        cv2.putText(img, label, (x, y + 10), cv2.FONT_HERSHEY_PLAIN, 8, colorRed, 8)

cv2.imshow("Image", img)
# cv2.imwrite("output.jpg",img)
cv2.waitKey(0)
cv2.destroyAllWindows()

7. plate detection 车牌检测
import cv2
import pytesseract
# Read the image file
image = cv2.imread('car0.JPG')
# Convert to Grayscale Image
gray_image = cv2.cvtColor(image, cv2.COLOR_BGR2GRAY)
#Canny Edge Detection
canny_edge = cv2.Canny(gray_image, 170, 200)
# Find contours based on Edges
contours, new = cv2.findContours(canny_edge.copy(), cv2.RETR_LIST, cv2.CHAIN_APPROX_SIMPLE)
contours=sorted(contours, key = cv2.contourArea, reverse = True)[:30]
# Initialize license Plate contour and x,y coordinates
contour_with_license_plate = None
license_plate = None
x = None
y = None
w = None
h