❤️vue webpack打包原理❤️十一假期,弯道超车
Posted 哪 吒
tags:
篇首语:本文由小常识网(cha138.com)小编为大家整理,主要介绍了❤️vue webpack打包原理❤️十一假期,弯道超车相关的知识,希望对你有一定的参考价值。
🍅 Java学习路线:搬砖工逆袭Java架构师
🍅 粉丝专属福利:包邮送书3本,价值89元的热销图书《分布式一致性算法开发实战》
🍅 获取方式:
1、评论区评论:获取点赞最多者,获取一本;
2、评论区评论:通过random函数,随机抽取两名;
【注意】想加入微信群聊,可以扫描主页左侧二维码、私信与我、加本人微信guo_rui_
目录
2、webpack.config.js配置和package.json配置
3、配置[Configuration]允许你在 webpack 配置中指定多个 loader
2、在 webpack 配置对象中,需要添加 babel-loader 到 module 的 loaders 列表中,
6、第三方插件uglifyjs-webpack-plugin
一、前端模块化
webpack是让我们可以进行模块化开发,并且会帮助我们处理模块间的依赖关系。
并且不仅仅是javascript文件,还有CSS、图片、json文件等等,在webpack中都可以被当做模块来使用。
二、打包
webpack中的各种资源模块进行打包合并成一个或多个包(Bundle)。
在打包的过程中,还可以对资源进行处理,比如压缩图片,将scss转成css,将ES6语法转成ES5语法,将TypeScript转成JavaScript等等操作。
和gulp的有什么区别?
- gulp叫做前端自动化任务管理工具;
- gulp会定义一系列的task,处理各种事务(ES6、ts转化、图片压缩、scss转成css)
- 通过gulp依次执行这些task,并且让整个流程自动化;
const gulp = require('gulp')
const babel = require('gulp-babel')

gulp.task('js',() =>
    gulp.src('src/*.js')
        .pipe(babel({
            prests:['es2015']
        }))
        .pipe(gulp.dest('dist'))
);
什么时候使用gulp呢?
- 如果工程模块依赖比较简单,甚至没有用到模块化的概念;
- 只需要进行简单的合并、压缩;
总而言之,webpack是功能更加强大的gulp。
三、安装webpack
1、安装node.js
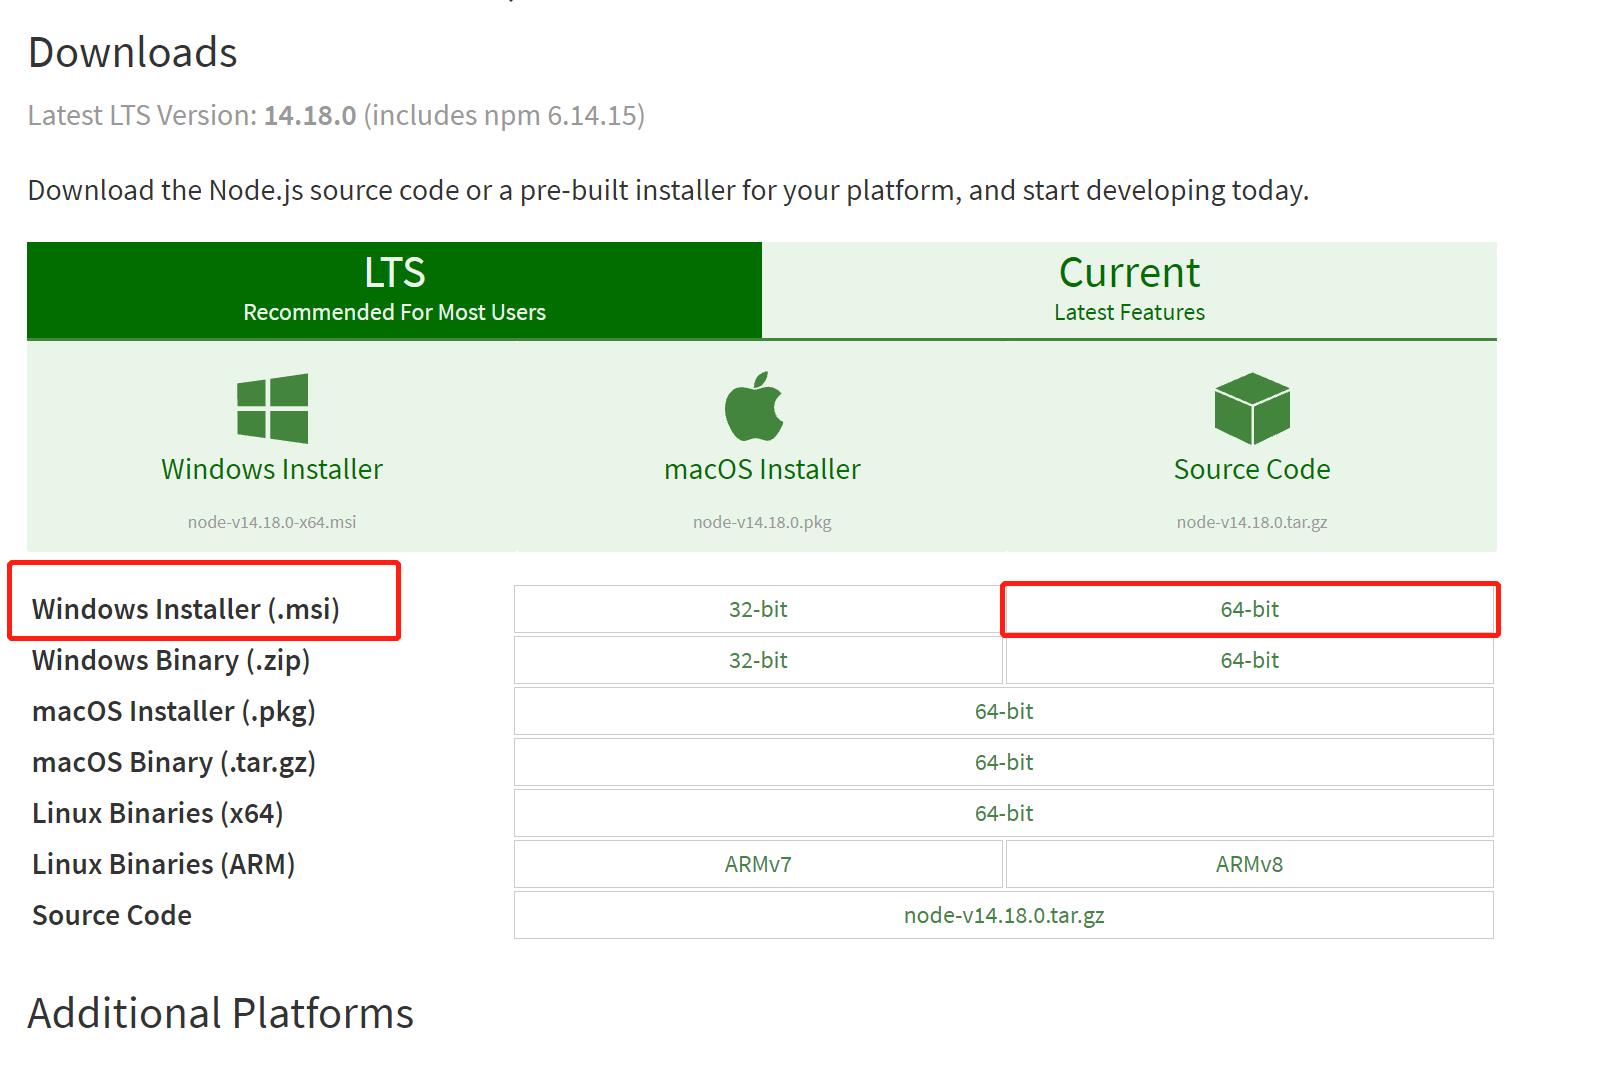
打开官网下载链接:Download | Node.js 我这里下载的是node-v6.9.2-x64.msi,如下图:

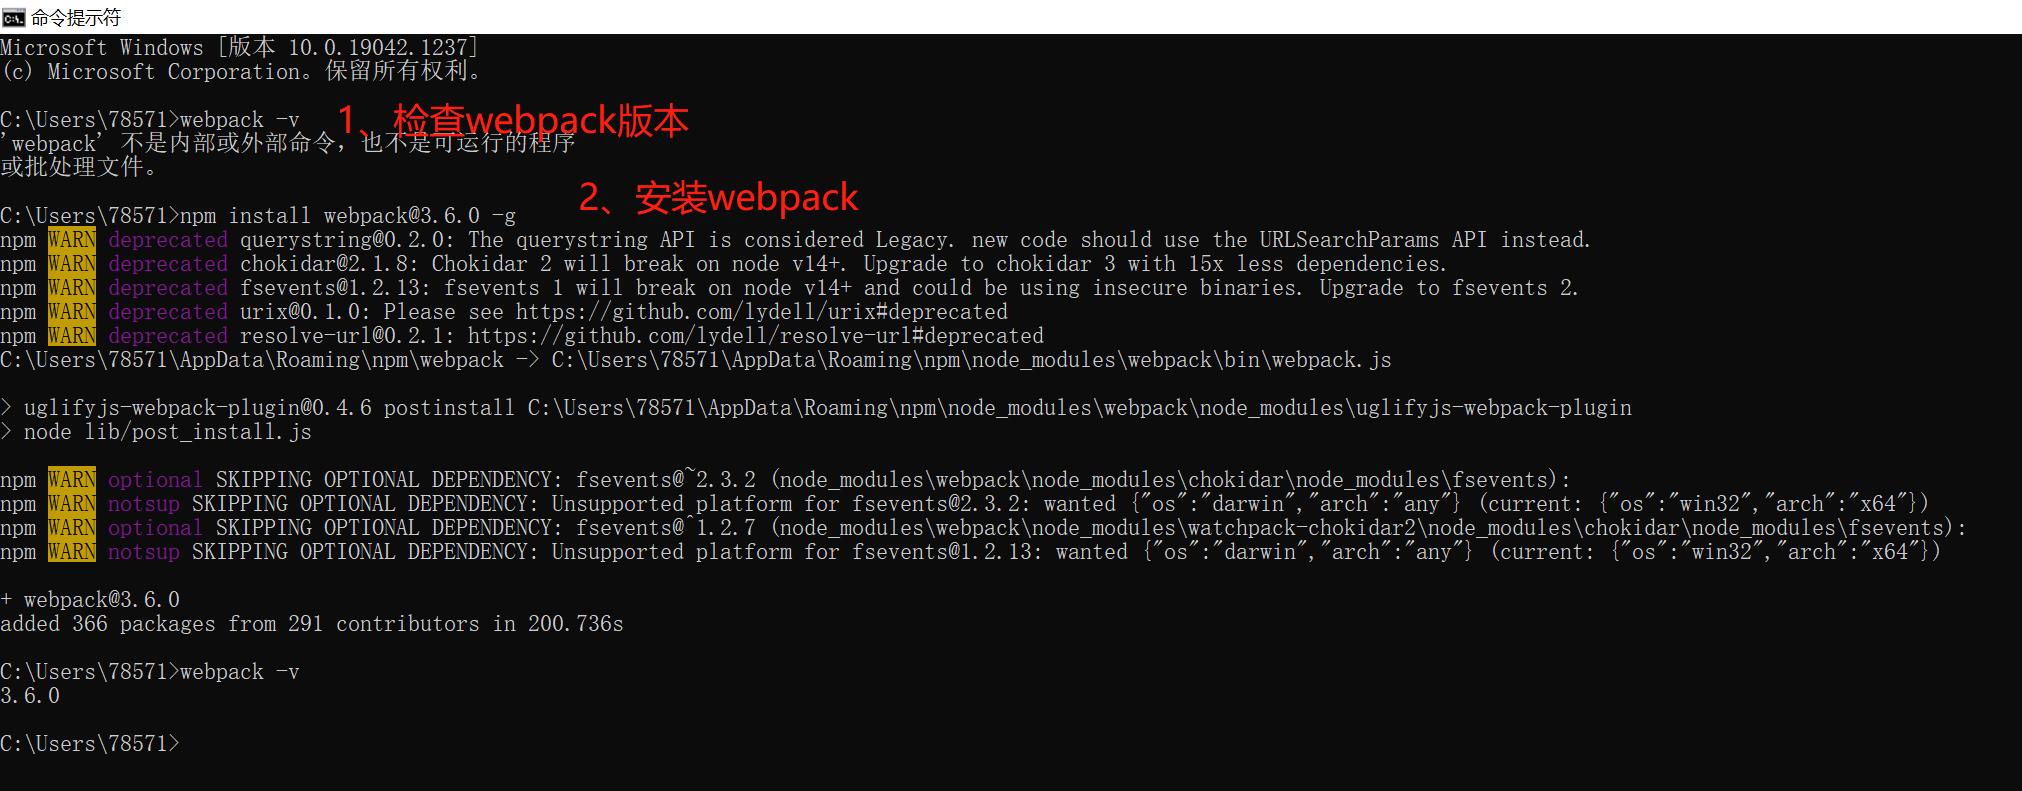
2、安装webpack
npm install webpack@3.6.0 -g

四、webpack打包js
1、普通打包方式
webpack .\\src\\main.js .\\dist\\bundle.js
打包之后,就可以在index.html中引入bundle.js了。
<!DOCTYPE html>
<html lang="en">
<head>
  <meta charset="UTF-8">
  <title>Title</title>
</head>
<body>

<script src="./dist/bundle.js"></script>
</body>
</html>
2、webpack.config.js配置和package.json配置
(1)webpack.config.js
const path = require('path')

module.exports = {
  entry: './src/main.js',
  output: {
    path: path.resolve(__dirname, 'dist'),
    filename: 'bundle.js'
  },
}
(2)package.json
{
  "name": "meetwebpack",
  "version": "1.0.0",
  "description": "",
  "main": "index.js",
  "scripts": {
    "test": "echo \\"Error: no test specified\\" && exit 1",
    "build": "webpack"
  },
  "author": "",
  "license": "ISC",
  "devDependencies": {
    "webpack": "^3.6.0"
  }
}
3、理解开发时依赖和运行时依赖
本地安装webpack
npm install webpack@3.6.0 --save-dev

在终端中敲的命令,运用的都是全局的webpack。
五、loader
1、loader简介
loader 用于对模块的源代码进行转换。loader 可以使你在 import 或"加载"模块时预处理文件。因此,loader 类似于其他构建工具中“任务(task)”,并提供了处理前端构建步骤的强大方法。loader 可以将文件从不同的语言(如 TypeScript)转换为 JavaScript,或将内联图像转换为 data URL。loader 甚至允许你直接在 JavaScript 模块中 import CSS文件!
你可以使用 loader 告诉 webpack 加载 CSS 文件,或者将 TypeScript 转为 JavaScript。为此,首先安装相对应的 loader:
npm install --save-dev css-loader
npm install --save-dev ts-loader
然后指示 webpack 对每个 .css 使用 css-loader,以及对所有 .ts 文件使用 ts-loader:
webpack.config.js
module.exports = {
  module: {
    rules: [
      { test: /\\.css$/, use: 'css-loader' },
      { test: /\\.ts$/, use: 'ts-loader' }
    ]
  }
};
2、使用 loader
在你的应用程序中,有三种使用 loader 的方式:
- 配置(推荐):在 webpack.config.js 文件中指定 loader。
- 内联:在每个
import语句中显式指定 loader。 - CLI:在 shell 命令中指定它们。
3、配置[Configuration]允许你在 webpack 配置中指定多个 loader
这是展示 loader 的一种简明方式,并且有助于使代码变得简洁。同时让你对各个 loader 有个全局概览:
六、less与url-loader
1、安装less
npm install --save-dev less-loader less

2、less示例
将 css-loader、style-loader 和 less-loader 链式调用,可以把所有样式立即应用于 DOM。
module.exports = {
    ...
    module: {
        rules: [{
            test: /\\.less$/,
            use: [{
                loader: "style-loader" // creates style nodes from JS strings
            }, {
                loader: "css-loader" // translates CSS into CommonJS
            }, {
                loader: "less-loader" // compiles Less to CSS
            }]
        }]
    }
};
3、安装url-loader
npm install --save-dev url-loader
4、url-loader用法
url-loader 功能类似于 file-loader,但是在文件大小(单位 byte)低于指定的限制时,可以返回一个 DataURL。
import img from './image.png'webpack.config.js
module.exports = {
  module: {
    rules: [
      {
        test: /\\.(png|jpg|gif)$/,
        use: [
          {
            loader: 'url-loader',
            options: {
              limit: 8192
            }
          }
        ]
      }
    ]
  }
}
当图片大小大于limit中限制时,需要使用file-loader进行图片加载,再转为base64字符串。
5、file-loader
1、安装file-loader
npm install --save-dev file-loader
七、加载图片代码实例
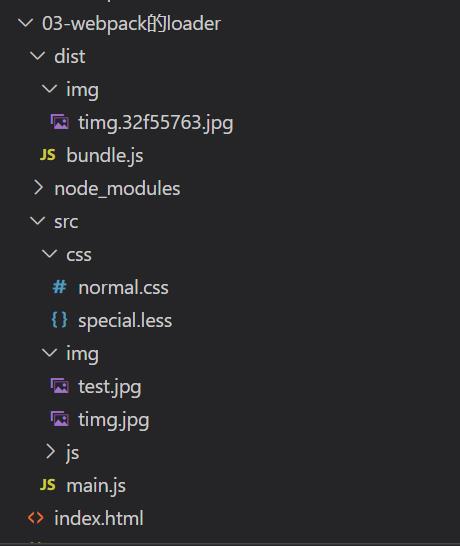
1、项目目录

2、index.html
<!DOCTYPE html>
<html lang="en">
<head>
  <meta charset="UTF-8">
  <title>Title</title>
</head>
<body>

<script src="./dist/bundle.js"></script>
</body>
</html>
3、main.js
// 1.使用commonjs的模块化规范
const {add, mul} = require('./js/mathUtils.js')

console.log(add(20, 30));
console.log(mul(20, 30));

// 2.使用ES6的模块化的规范
import {name, age, height} from "./js/info";

console.log(name);
console.log(age);
console.log(height);

// 3.依赖css文件
require('./css/normal.css')

// 4.依赖less文件
require('./css/special.less')
document.writeln('<h2>你好啊,哪吒!</h2>')
4、info.js
export const name = 'why';
export const age = 18;
export const height = 1.88;
5、mathUtils.js
export const name = 'why';
export const age = 18;
export const height = 1.88;
6、normal.css
body {
  /*background-color: red;*/
  background: url("../img/timg.jpg");
}
7、special.less
@fontSize: 50px;
@fontColor: orange;

body {
  font-size: @fontSize;
  color: @fontColor;
}
八、ES6语法处理
webpack打包的js文件,并没有将ES6语法转译成ES5的语法,因此可能对某些浏览器不兼容,此时需要使用babel。
1、安装babel-loader
npm install --save-dev babel-loader@7 babel-core babel-preset-es20152、在 webpack 配置对象中,需要添加 babel-loader 到 module 的 loaders 列表中,
像下面这样:
module: {
  rules: [
    {
      test: /\\.js$/,
      exclude: /(node_modules|bower_components)/,
      use: {
        loader: 'babel-loader',
        options: {
          presets: ['es2015']
        }
      }
    }
  ]
}
bundle.js从ES6语法编译为ES5语法了。
九、webpack使用vue的配置过程
1、安装vue的三种方式
- 直接下载应用
- CDN引入
- npm安装
2、npm安装vue
因为不是运行时依赖,以后部署的时候也要使用vue,所以不需要-vue
npm install vue --save
runtime-only -> 代码中,不可以有任何的template
runtime-compiler -> 代码中可以有template,因为有compiler可以用于编译template
使用如下配置解决找不到template的报错问题:
resolve: {
    // alias: 别名
    extensions: ['.js', '.css', '.vue'],
    alias: {
      'vue$': 'vue/dist/vue.esm.js'
    }
  }
十、el和template区别
1、正常运行之后,我们要考虑一个问题
如果我们将data中的数据显示在界面中,就必须修改index.html;
如果我们后面自定义了组件,也必须修改index.html来使用组件;
但是html模板在之后的开发中,并不希望手动的频繁的修改index.html;
2、解决方法 --> 定义template属性
在前面的Vue实例中,我们定义了el属性,用于和index.html中的#app进行绑定,让Vue实例之后可以管理它其中的内容;
这里我们可以将div元素中的{{message}}内容删掉,只保留一个基本的id为div的元素;
但是如果我们依然希望在其中显示{{message}}的内容,我们可以定义一个template属性;
如果el和template同时存在时,template会替换掉el的内容:
new Vue({
    el:'#app',
    template:`
        <div>
            <h2>{{message}}</h2>
            <button @click="btnClick">按钮</button>
            <h2>{{name}}</h2>
        </div>
    `,
    data:{
        message:'hello webpack',
        name:'哪吒'
    },
    methods:{
        btnClick(){
            console.log('i am csdn 哪吒!')
        }
    }
})
简化:
const App = {
     template:`
        <div>
            <h2>{{message}}</h2>
            <button @click="btnClick">按钮</button>
            <h2>{{name}}</h2>
        </div>
    `,
    data:{
        return {
            message:'hello webpack',
            name:'哪吒'
        }
    },
    methods:{
        btnClick(){
            console.log('i am csdn 哪吒!')
        }
    }
}

new Vue({
    el:'#app',
    template:`<App/>`,
    components:{
        App
    }
})
再次简化:
app.js
export default {
  template:  `
  <div>
    <h2>{{message}}</h2>
    <button @click="btnClick">按钮</button>
    <h2>{{name}}</h2>
  </div>
  `,
  data() {
    return {
      message: 'Hello Webpack',
      name: 'coderwhy'
    }
  },
  methods: {
    btnClick() {

    }
  }
}
main.js
// 5.使用Vue进行开发
import Vue from 'vue'
import App from './vue/app'

new Vue({
  el: '#app',
  template: '<App/>',
  components: {
    App
  }
})
终极优化
App.vue
<template>
  <div>
    <h2 class="title">{{message}}</h2>
    <button @click="btnClick">按钮</button>
    <h2>{{name}}</h2>
    <Cpn/>
  </div>
</template>

<script>
  import Cpn from './Cpn'

  export default {
    name: "App",
    components: {
      Cpn
    },
    data() {
      return {
        message: 'Hello Webpack',
        name: 'coderwhy'
      }
    },
    methods: {
      btnClick() {

      }
    }
  }
</script>

<style scoped>
  .title {
    color: green;
  }
</style>
main.js
// 5.使用Vue进行开发
import Vue from 'vue'
import App from './vue/App.vue'

new Vue({
  el: '#app',
  template: '<App/>',
  components: {
    App
  }
})
但是,此时程序无法加载vue文件,需要npm安装loader
npm install vue-loader vue-template-compiler --save-devwebpack.config.js中配置:
...
{
    test: /\\.vue$/,
    use: ['vue-loader']
}
...
十一、认识plugin
1、plugin是什么?
plugin是插件的意思,通常适用于对某个现有的框架的扩展。
webpack中的插件,就是对webpack现有功能的各种扩展,比如打包优化,文件压缩等。
2、loader和plugin的区别?
loader主要用于转换某些类型的模板,它是一个转换器。
plugin是插件,它是对webpack本身的扩展,是一个扩展器。
3、plugin的使用过程
- 通过npm安装需要使用的plugins
- 在webpack.config.js中的plugins中配置插件
4、代码实例
plugins: [
    new webpack.BannerPlugin('最终版权归aaa所有'),
],
5、htmlWebpackPlugin
(1)、作用
- 自动生成一个index.html文件
- 将打包的js文件,自动通过script标签插入到body中
(2)安装htmlWebpackPlugin
npm install htnl-webpack-plugin --save-dev
(3)使用插件
修改webpack.config.js文件中plugins部分的内容
plugins: [
    new webpack.BannerPlugin('最终版权归aaa所有'),
    new HtmlWebpackPlugin({
      template: 'index.html'
    })
],
6、第三方插件uglifyjs-webpack-plugin
指定版本1.1.1,和CLI2保持一致。
(1)安装
npm install uglifyjs-webpack-plugin@1.1.1 --save-dev
(2)修改配置文件
plugins: [
    new webpack.BannerPlugin('最终版权归aaa所有'),
    new HtmlWebpackPlugin({
      template: 'index.html'
    }),
    new UglifyjsWebpackPlugin()
],
7、webpack-dev-server搭建本地服务器
(1)webpack-dev-server简介
webpack提供了一个可选的本地开发服务器,这个本地服务器基于node.js搭建,内部使用express框架,可以实现我们想要的让浏览器自动刷新显示我们修改后的结果。
(2)安装
npm install --save-dev webpack-dev-server@2.9.1
(3)属性介绍
devserver作为webpack的一个选项,选项本身可以设置如下属性:
- contentBase:为哪一个文件夹提供本地服务,默认是根文件夹,我们这里要填写./dist
- port:端口号
- inline:页面实时刷新
- historyApiFallback:在SPA页面中,依赖HTML5的history模式
(4)配置实例
  devServer: {
    contentBase: './dist',
    inline: true
  }
8、webpack配置文件的分离
(1)安装插件
npm install webpack-merge --save-dev
(2)分离代码实例
webpack-config.js
const path = require('path')

module.exports = {
  entry: './src/main.js',
  output: {
    path: path.resolve(__dirname, 'dist'),
    filename: 'bundle.js',
    publicPath: 'dist/'
  },
  module: {
    rules: [
      {
        test: /\\.css$/,
        // css-loader只负责将css文件进行加载
        // style-loader负责将样式添加到DOM中
        // 使用多个loader时, 是从右向左
        use: [ 'style-loader', 'css-loader' ]
      },
      {
        test: /\\.less$/,
        use: [{
          loader: "style-loader", // creates style nodes from JS strings
        }, {
          loader: "css-loader" // translates CSS into CommonJS
        }, {
          loader: "less-loader", // compiles Less to CSS
        }]
      },
      {
        test: /\\.(png|jpg|gif|jpeg)$/,
        use: [
          {
            loader: 'url-loader',
            options: {
              // 当加载的图片, 小于limit时, 会将图片编译成base64字符串形式.
              // 当加载的图片, 大于limit时, 需要使用file-loader模块进行加载.
              limit: 13000,
              name: 'img/[name].[hash:8].[ext]'
            },
          }
        ]
      },
      {
        test: /\\.js$/,
        // exclude: 排除
        // include: 包含
        exclude: /(node_modules|bower_components)/,
        use: {
          loader: 'babel-loader',
          options: {
            presets: ['es2015']
          }
        }
      },
      {
        test: /\\.vue$/,
        use: ['vue-loader']
      }
    ]
  },
  resolve: {
    // alias: 别名
    extensions: ['.js', '.css', '.vue'],
    alias: {
      'vue$': 'vue/dist/vue.esm.js'
    }
  }
}
build/base.config.js
const path = require('path')
const webpack = require('webpack')
const HtmlWebpackPlugin = require('html-webpack-plugin')
const UglifyjsWebpackPlugin = require('uglifyjs-webpack-plugin')

module.exports = {
  entry: './src/main.js',
  output: {
    path: path.resolve(__dirname, '../dist'),
    filename: 'bundle.js',
    // publicPath: 'dist/'
  },
  module: {
    rules: [
      {
        test: /\\.css$/,
        // css-loader只负责将css文件进行加载
        // style-loader负责将样式添加到DOM中
        // 使用多个loader时, 是从右向左
        use: [ 'style-loader', 'css-loader' ]
      },
      {
        test: /\\.less$/,
        use: [{
          loader: "style-loader", // creates style nodes from JS strings
        }, {
          loader: "css-loader" // translates CSS into CommonJS
        }, {
          loader: "less-loader", // compiles Less to CSS
        }]
      },
      {
        test: /\\.(png|jpg|gif|jpeg)$/,
        use: [
          {
            loader: 'url-loader',
            options: {
              // 当加载的图片, 小于limit时, 会将图片编译成base64字符串形式.
              // 当加载的图片, 大于limit时, 需要使用file-loader模块进行加载.
              limit: 13000,
              name: 'img/[name].[hash:8].[ext]'
            },
          }
        ]
      },
      {
        test: /\\.js$/,
        // exclude: 排除
        // include: 包含
        exclude: /(node_modules|bower_components)/,
        use: {
          loader: 'babel-loader',
          options: {
            presets: ['es2015']
          }
        }
      },
      {
        test: /\\.vue$/,
        use: ['vue-loader']
      }
    ]
  },
  resolve: {
    // alias: 别名
    extensions: ['.js', '.css', '.vue'],
    alias: {
      'vue$': 'vue/dist/vue.esm.js'
    }
  },
  plugins: [
    new webpack.BannerPlugin('最终版权归aaa所有'),
    new HtmlWebpackPlugin({
      template: 'index.html'
    })
  ]
}
build/dev.config.js
const webpackMerge = require('webpack-merge')
const baseConfig = require('./base.config')

module.exports = webpackMerge(baseConfig, {
  devServer: {
    contentBase: './dist',
    inline: true
  }
})
build/prod.config.js
const UglifyjsWebpackPlugin = require('uglifyjs-webpack-plugin')
const webpackMerge = require('webpack-merge')
const baseConfig = require('./base.config')

module.exports = webpackMerge(baseConfig, {
  plugins: [
    new UglifyjsWebpackPlugin()
  ]
})
更改package.json
"scripts": {
    "test": "echo \\"Error: no test specified\\" && exit 1",
    "build": "webpack --config ./build/prod.config.js",
    "dev": "webpack-dev-server --open --config ./build/dev.config.js"
  }
🍅 Java学习路线:搬砖工逆袭Java架构师
🍅 粉丝专属福利:包邮送书3本,价值89元的热销图书《分布式一致性算法开发实战》
🍅 获取方式:
1、评论区评论:获取点赞最多者,获取一本;
2、评论区评论:通过random函数,随机抽取两名;
【注意】想加入微信群聊,可以扫描主页左侧二维码、私信与我、加本人微信guo_rui_
送书啦!!!
【图书简介】
- 系统:选举、日志和多个高级主题逐步深入讲解。
- 详尽:通过3万行源码和测试,详细分析设计细节及实现难点。
- 生产级:基于Netty的生产级异步IO实现。
- 完整:包含交互式客户端的简易分布式KV服务。
【内容简介】
从介绍分布式一致性算法开始,分析了Raft算法以及Raft算法所依赖的理论,在此基础上讲解并实现了Raft算法以及基于Raft算法的KV服务。通过本书,可以深入了解Raft算法的运行机制,也可以学到如何相对正确地实现Raft。
《分布式一致性算法开发实战》分为11章,第1章简单介绍分布式一致性算法,第2章详细分析Raft算法,第3章在第2章的基础上进行整体设计,第4~8章逐个讲解基于Raft算法的KV服务的各个组件的实现,第9章讲解日志快照,第10章是生产环境必需的服务器成员变更功能,第11章介绍一些相关的Raft算法优化。
本书详细介绍了Raft的核心算法、服务器成员变更以及各种优化的实现,适合那些想尝试实现Raft算法或者在生产环境加入Raft算法的人,也适合那些对于Raft算法有兴趣的读者。
【作者简介】
赵辰,男,1989年生于上海,软件工程师。曾在蚂蚁金服工作四年,擅长基于Java语言的后端开发,对Java语言下的多线程编程、分布式计算、多核编程有深入研究。
京东自营购买链接:
《分布式一致性算法开发实战》(赵辰)【摘要 书评 试读】- 京东图书
当当自营购买链接:
《分布式一致性算法开发实战》(赵辰)【简介_书评_在线阅读】 - 当当图书
往期精彩回顾
【Vue基础知识总结 6】Spring Boot + Vue 全栈开发,都需要哪些前端知识?

以上是关于❤️vue webpack打包原理❤️十一假期,弯道超车的主要内容,如果未能解决你的问题,请参考以下文章