超分辨率重建SRGAN详解 - 基于Pytorch
Posted 千鱼干
tags:
篇首语:本文由小常识网(cha138.com)小编为大家整理,主要介绍了超分辨率重建SRGAN详解 - 基于Pytorch相关的知识,希望对你有一定的参考价值。
好长一段时间没有写博客了,最近学习了超分辨率重构,曾经说过将来会写一些关于机器学习的博客的,今天就实现诺言吧。
SRGAN
代码参考了这篇博客:超分辨率——基于SRGAN的图像超分辨率重建 (Pytorch实现|新手向)_NikkiElwin的博客-CSDN博客并在其基础上添加了注释。
非常感谢 NikkiElwin,我才搞懂了 SRGAN 的架构!
概述
以往基于 CNN 的超分辨率重建模型在较高放大倍数时过于平滑,在高频细节上有诸多损失。这是因为传统方法最小均方差(MSE)作为损失函数,这会使图像具有较高信噪比。
为了解决这个问题,SRGAN 提出了一种感知损失函数(Perceptual Loss Function),该函数由对抗损失(Content Loss)和内容损失(Adversarial Loss)组成。对抗损失解决了使用鉴别器(Discriminator)网络来解决自然图像流形的问题,该网络被训练来区分超分辨率图像和原始照片真实感图像。此外,SRGAN 使用了基于感知相似性的内容损失,而不是基于像素空间中的相似性。
SRGAN 基于 ResNet(残差网络)和 GAN(生成对抗网络),是首个可以推演出原图像四倍分辨率而充分还原自然细节的框架。
大致内容
网络架构
关于 GAN(生成对抗网络)
典型网络架构:
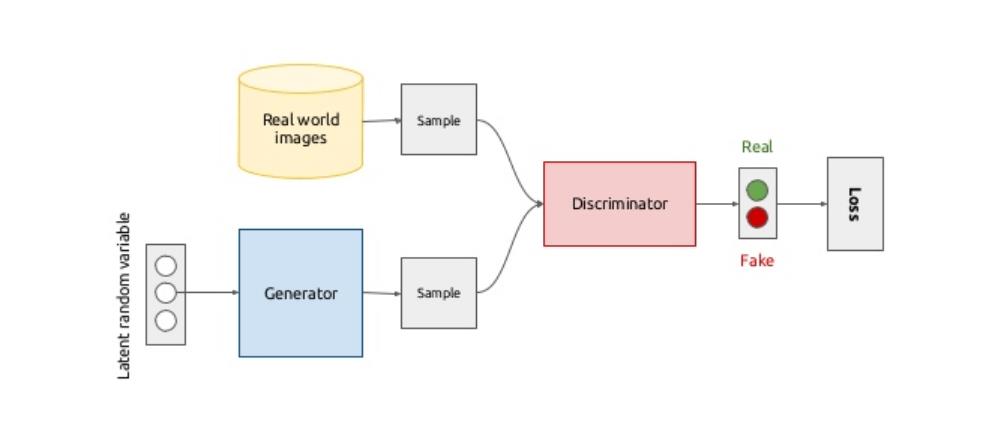
GAN 的核心由生成器(Generator Network)和判别器(Discriminator Network)组成。通俗一点的讲,告诉生成器训练的方法,生成器按照这个方法训练,最后将训练好的数据传递给判别器。判别器将生成器递交的样本和真实样本作比较,得到差异(Loss)。判别器告诉生成器错误情况,生成器依此修改训练方法。以此往复训练,直到生成器递交的结果和真实样本的差异最小。
SRGAN 的架构
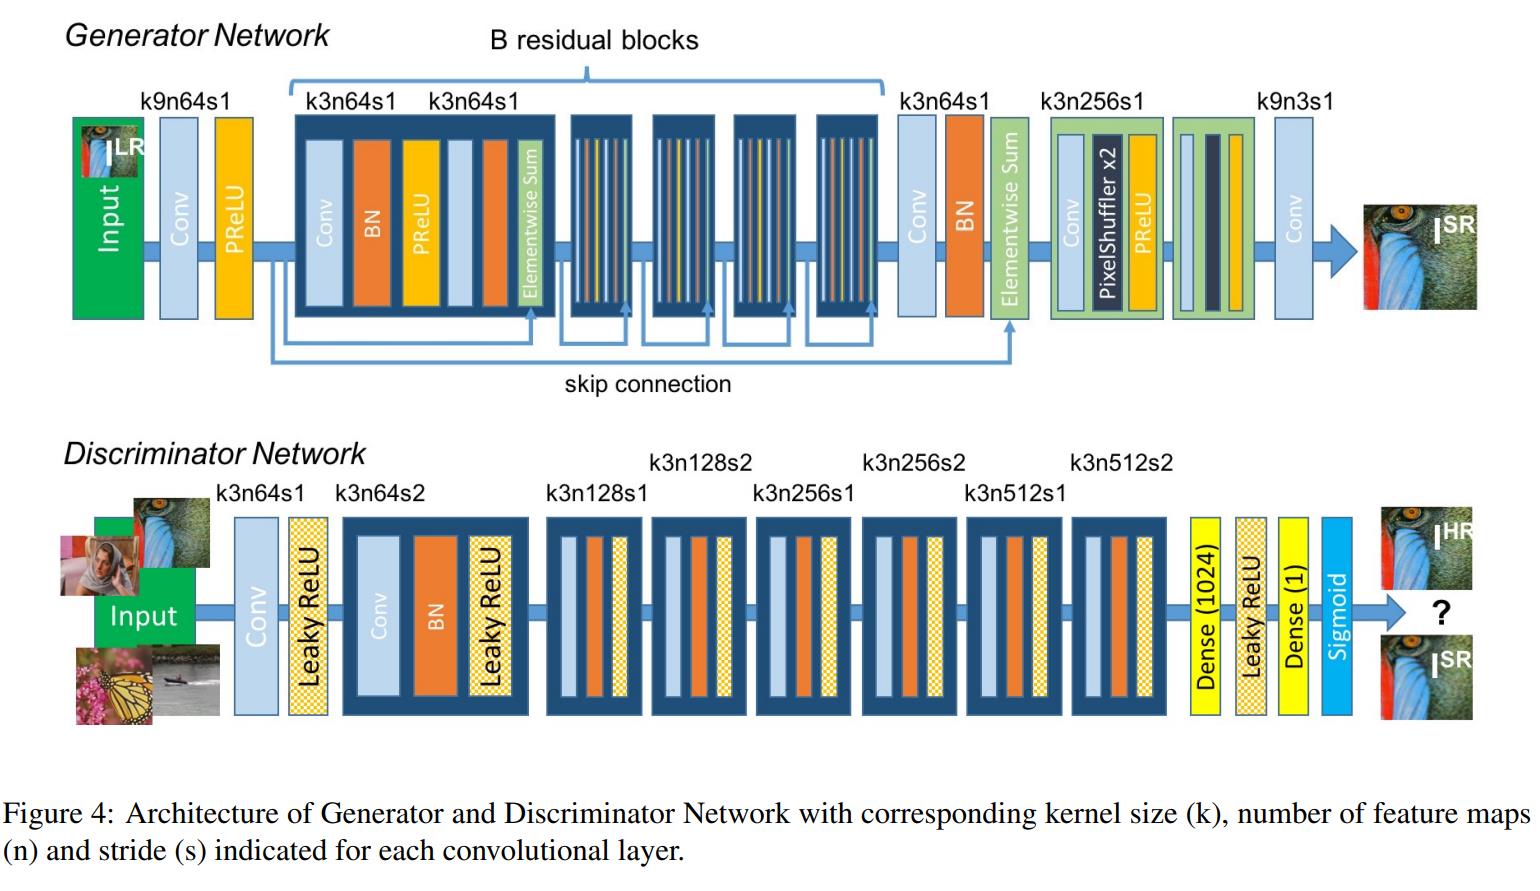
生成器(Generator Network):采用了 SRResNet 的结构,激活函数采用了 PReLU,加入了 BN(Batch Normalization)层,生成的伪高分辨率图像(Fake Image)传递给判别器。
判别器(Discriminator Network):激活函数采用 Leaky ReLU,加入了 BN 层,接收来自生成器别的图像并加以判别。
SRGAN 采用的感知损失函数
SRGAN 采用的对抗损失(Content Loss)和内容损失(Adversarial Loss)函数如下:
内容损失: l X S R l_{X}^{SR} lXSR;对抗损失: l G e n S R l_{Gen}^{SR} lGenSR。
其中内容损失和对抗损失的加权和为:
l
S
R
=
l
X
S
R
+
1
0
−
3
l
G
e
n
S
R
l^{SR}=l_{X}^{SR}+10^{-3}l_{Gen}^{SR}
lSR=lXSR+10−3lGenSR
内容损失:
许多算法采用的像素级别的均方误差损失(Pixel-wise MSE Loss)为:
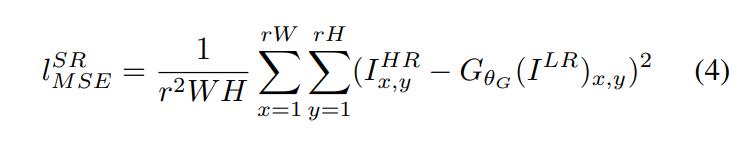
然而,这种方法在高频部分上会使图像过于平滑,丢失很多细节。为此, SRGAN 采用了一种基于 Gatys、Bruna、Johnson等人的方法。SRGAN 基于 Simonyan 和 Zisserman 描述的预先训练的19层 VGG 网络的 RELU 激活层来定义 VGG 损失(VGG feature map loss)。
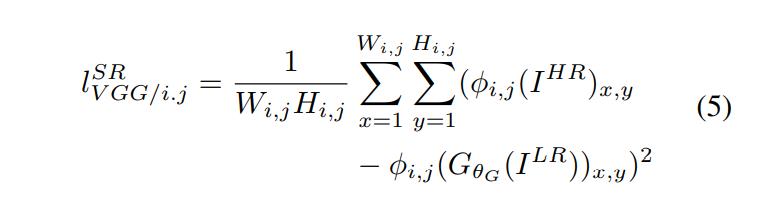
用
ϕ
i
,
j
\\phi_{i,j}
ϕi,j 表示认为给定的 VGG19 网络内第
i
i
i 个最大池层之前的第
j
j
j 次卷积(激活后)所获得的特征映射(Feature map)。
对抗损失:

代码实现(基于 Pytorch)
这里的代码参考了这篇博客:超分辨率——基于SRGAN的图像超分辨率重建 (Pytorch实现|新手向)_NikkiElwin的博客-CSDN博客
注意:这里的代码并没有评估 PSNR(Peak Signal to Noise Ratio,峰值信噪比),后期我可能会加上。
生成模型(model.py)
数据集:./AnimeTest/,我用了 814 张二次元图像
模型保存至 ./model/
迭代生成的图片效果保存至 ./result/
数据集:
需要引入的库:
# 此模型是基于 SRGAN 的超分辨率重构模型。
# 数据集:./AnimeTest/,包含了 814 张二次元头像
# 模型保存至 ./model/
# 迭代生成的图片效果保存至 ./result/
# 英语可能有纰漏,望谅解!

import os
import torch
import numpy as np
from tqdm import tqdm
from PIL import Image
import torch.nn as nn
import torch.optim as optim
import matplotlib.pyplot as plt
import torchvision.utils as vutils
from torch.utils.data import Dataset
from torch.utils.data import DataLoader
from torchvision.models.vgg import vgg16
import torchvision.transforms as transforms
首先定义预处理数据类,将图片转换为 96 x 96 的图片并转换成张量:
# Image treatment: Crop images and transform to tensor
transform = transforms.Compose([transforms.RandomCrop(96), transforms.ToTensor()])

class PreprocessDataset(Dataset):  # Meaning class PreprocessDataset inherit from class Dataset
    """Preprocess dataset"""

    def __init__(self, imgPath, transforms=transform, ex=10):
        """Initialize preprocess dataset"""

        self.transforms = transform

        for _, _, files in os.walk(imgPath):  # Walking through directory imgPath
            self.imgs = [imgPath + file for file in files] * ex  # ... * ex means expand the dataset 10x

        np.random.shuffle(self.imgs)  # shuffle means make the dataset unordered

    def __len__(self):
        """Get len of dataset"""
        return len(self.imgs)

    def __getitem__(self, index):
        """Get images data"""
        tempImg = self.imgs[index]
        tempImg = Image.open(tempImg)

        sourceImg = self.transforms(tempImg)  # Process the raw images
        cropImg = torch.nn.MaxPool2d(4, stride=4)(sourceImg)
        # MaxPool2d the first and then Conv2d make the same result.
        # MaxPool2d at first means "Subsampled(下采样), which can minus the process time

        return cropImg, sourceImg
此处数据集扩展了十倍。
接着,导入数据集,并定义好参数:
path = './AnimeTest/'
device = torch.device('cuda:0' if torch.cuda.is_available() else "cpu")
batch = 32  # batch is belong to class "quantity", not "size". DO NOT confuse it with "epochs"
epochs = 100

# Construct Dataset
processDataset = PreprocessDataset(imgPath=path)
trainData = DataLoader(processDataset, batch_size=batch)

# Construct iterator and take out one of samples
dataiter = iter(trainData)
testImgs, labels = dataiter.next()
# .next() function: get next element from iterator
# If there is no sample in iterator, it will return StopIteration

testImgs = testImgs.to(device)  # Use of testImgs is to make the generate against result visualize
定义残差模块:
class ResBlock(nn.Module):
    """Residual(残差) Block"""

    def __init__(self, inChannels, outChannels):
        """Initialize residual block"""
        super(ResBlock, self).__init__()
        # The super () function is used to call the parent class(父类)
        # to solve the problem of multiple inheritance(多继承).

        # If u want get more about convolution, batch normalization and other concepts(概念), please Baidu it.

        self.conv1 = nn.Conv2d(inChannels, outChannels, kernel_size=1, bias=False)
        # Why there  uses 1 x 1 kernel?
        # Because 1 x 1 kernel can not only deeper the feature map, but also can shallow the feature map.
        # More details please Baidu it.

        self.bn1 = nn.BatchNorm2d(outChannels)

        self.conv2 = nn.Conv2d(outChannels, outChannels, kernel_size=3, stride=1, padding=1, bias=False)
        # padding means "expand" the area, e.x. a 3x3 feature map padding=1 -> 5x5

        self.bn2 = nn.BatchNorm2d(outChannels)

        self.conv3 = nn.Conv2d(outChannels, outChannels, kernel_size=1, bias=False)
        self.relu = nn.PReLU()
        # The activation function can introduce nonlinear factors to solve the problems
        # that can not be solved by linear model.

    def forward(self, x):
        """Forward Spread"""

        residual = x

        out = self.conv1(x)
        out = self.bn1(out)
        out = self.relu(out)

        out = self.conv2(x)
        out = self.bn2(out)
        out = self.relu(out)

        out = self.conv3(x)

        out += residual
        out = self.relu(out)

        return out
定义生成器:
class Generator(nn.Module):
    """Generate Model(4x)"""

    def __init__(self):
        """Initialize Model Configuration(配置)"""

        super(Generator, self).__init__()
        # Convolution Model 1
        self.conv1 = nn.Conv2d(3, 64, kernel_size=9, padding=4, padding_mode='reflect', stride=1)
        self.relu = nn.PReLU()

        # Residual Model
        self.resBlock = self._makeLayer_(ResBlock, 64, 64, 5)

        # Convolution Model 2
        self.conv2 = nn.Conv2d(64, 64, kernel_size=1, stride=1)
        self.bn2 = nn.BatchNorm2d(64)
        self.relu2 = nn.PReLU()

        # Subpixel(子像素) convolution
        self.convPos1 = nn.Conv2d(64, 256, kernel_size=3, stride=1, padding=2, padding_mode='reflect')
        self.pixelShuffler1 = nn.PixelShuffle(2)
        self.reluPos1 = nn.PReLU()

        self.convPos2 = nn.Conv2d(64, 256, kernel_size=3, stride=1, padding=1, padding_mode='reflect')
        self.pixelShuffler2 = nn.PixelShuffle(2)
        self.reluPos2 = nn.PReLU()

        self.finalConv = nn.Conv2d(64, 3, kernel_size=9, stride=1)

    def _makeLayer_(self, block, inChannels, outChannels, blocks):
        """Construct Residual Block"""
        layers = []
        layers.append(block(inChannels, outChannels))

        for i in range(1, blocks):
            layers.append(block(outChannels, outChannels))

        return nn.Sequential(*layers)

    def forward(self, x):
        """Forward Procession"""
        x = self.conv1(x)
        x = self.relu(x)
        residual = x

        out = self.resBlock(x)

        out = self.conv2(out)
        out = self.bn2(out)
        out += residual

        out = self.convPos1(out)
        out = self.pixelShuffler1(out)
        out = self.reluPos1(out)

        out = self.convPos2(out)
        out = self.pixelShuffler2(out)
        out = self.reluPos2(out)

        out = self.finalConv(out)

        return out
判别模块(与下):
class ConvBlock(nn.Module):
    """Construct Convolution Block"""

    def __init__(self, inChannels, outChannels, stride=1):
        """Initialize Residual Block"""

        super(ConvBlock, self).__init__()
        self.conv = nn.Conv2d(inChannels, outChannels, kernel_size=3, stride=stride, padding=1, padding_mode='reflect',
                              bias=False)
        self.bn = nn.BatchNorm2d(outChannels)
        self.relu = nn.LeakyReLU()

    def forward(self, x):
        """Forward Spread"""

        out = self.conv(x)
        out = self.bn(out)
        out = self.relu(out)

        return out
定义鉴别器,这里使用了 LeakyReLU 和 AdaptiveAvgPool:
class Discriminator(nn.Module):
    """Discriminator means "鉴别器" """

    def __init__(self):
        super(Discriminator, self).__init__()
        self.conv1 = nn.Conv2d(3, 64, kernel_size=3, stride=1, padding=1, padding_mode='reflect')
        self.relu1 = nn.LeakyReLU()

        self.convBlock1 = ConvBlock(64, 64, stride=2)
        self.convBlock2 = ConvBlock(64, 128, stride=1)
        self.convBlock3 = ConvBlock(128, 128, stride=2)
        self.convBlock4 = ConvBlock(128, 256, stride=1)
        self.convBlock5 = ConvBlock(256, 256, stride=2)
        self.convBlock6 = ConvBlock(256, 512, stride=1)
        self.convBlock7 = ConvBlock(512, 512, stride=2)

        self.avePool = nn.AdaptiveAvgPool2d(1)
        # AdaptiveAvgPool can automatically infer the adaptive parameters

        self.conv2 = nn.Conv2d(512, 1024, kernel_size=1)
        self.relu2 = nn.LeakyReLU()
        self.conv3 = nn.Conv2d(1024, 1, kernel_size=1)
        self.sigmoid = nn.Sigmoid()

    def forward(self, x):
        x = self.conv1(x)
        x = self.relu1(x)

        x = self.convBlock1(x)
        x = self.convBlock2(x)
        x = self.convBlock3(x)
        x = self.convBlock4(x)
        x = self.convBlock5(x)
        x = self.convBlock6(x)
        x = self.convBlock7(x)

        x = self.avePool(x)
        x = self.conv2(x)
        x = self.relu2(x)
        x = self.conv3(x)
        x = self.sigmoid(x)

        return x
训练迭代:
迭代器使用 Adam,两个网络的迭代器是互不相同的,为了保证网络之间对抗的稳定性,这里设置了两个模型的学习率相同。
# Construct Model
netD = Discriminator()
netG = Generator()
netD.to(device)
netG.to(device)

# Construct Iterator
optimizerG = optim.Adam(netG.parameters())
optimizerD = optim.Adam(netD.parameters())

# Construct Loss Function
lossF = nn.MSELoss().to(device)

# Construct Network Model in VGG Loss
vgg = vgg16(pretrained=True).to(device)
lossNetwork = nn.Sequential(*list(vgg.features)[:31]).eval()

for param in lossNetwork.parameters():
    param.requires_grad = False  # Make VGG stop learning

for epoch in range(epochs):
    netD.train()
    netG.train()
    processBar = tqdm(enumerate(trainData, 1))
    # tqdm is a useful progress bar tool, there it received parameters from enumerator

    for i, (cropImg, sourceImg) in processBar:
        cropImg, sourceImg = cropImg.to(device), sourceImg.to(device)

        fakeImg = netG(cropImg).to(device)

        # Iterate Discriminator Network
        netD.zero_grad()
        realOut = netD(sourceImg).mean()
  以上是关于超分辨率重建SRGAN详解 - 基于Pytorch的主要内容,如果未能解决你的问题,请参考以下文章