Elasticsearch:使用 search_analyzer 及 edge ngram 来实现 Search-As-You-Type
Posted 中国社区官方博客
tags:
篇首语:本文由小常识网(cha138.com)小编为大家整理,主要介绍了Elasticsearch:使用 search_analyzer 及 edge ngram 来实现 Search-As-You-Type相关的知识,希望对你有一定的参考价值。
在我们定制分词器(analyzer)时,通常在 indexing 时的分词器和在查询(query)时的分词器一般来说是一样的。这样做的目的就是确保查询中的术语与反向索引(inverted index)中的术语具有相同的格式。如果你对分词器还不是很了解的话,那么请阅读我之前的文章 “Elasticsearch: analyzer”。
但是,有时在搜索时使用其他分析器是有意义的,例如,使用 edge_ngram tokenizer 实现自动完成功能或使用搜索时同义词时。
默认情况下,查询将使用在字段映射中定义的分析器,但是可以使用 search_analyzer 设置将其覆盖。
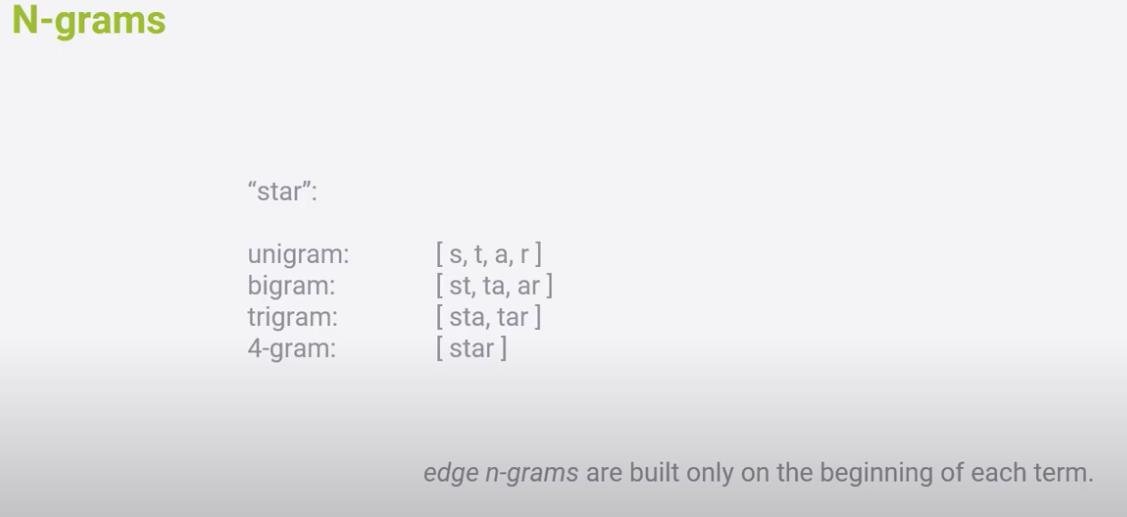
N-grams
Ngrams 和 edge ngrams 是在 Elasticsearch 中标记文本的两种更独特的方式。 Ngrams 是一种将一个标记分成一个单词的每个部分的多个子字符的方法。 ngram 和 edge ngram 过滤器都允许你指定 min_gram 以及 max_gram 设置。我在文章 “Elasticsearch: Ngrams, edge ngrams, and shingles” 有比较详细的描述。
比如:

上面显示了单词 star 在使用 N-grams 时的分词情况。edge ngram 其实就是 N-grams 一种特殊情况。它是在每个术语的开始进行的。比如在定义 min_gram 为2, max_gram 为4 时,那么 edge ngram 针对 star 所生成的分词为:
st sta star使用 Elasticsearch 完成 Search-As-You-Type
在我们的实际使用中,我们经常会用到当我们输入一些字母或词,然后,希望能有自动补全的功能。比如当我们输入:

我们想看到一些候选的词出现,并让我们选择。在我之前的文章 “Elasticsearch:定制分词器(analyzer)及相关性” 有相应的实现。在今天的文章中,我将展示为啥我们必须有时需要使用不同的分词器。
我们首先来创建一个索引 my-index-000001:
PUT my-index-000001
{
  "settings": {
    "analysis": {
      "filter": {
        "autocomplete_filter": {
          "type": "edge_ngram",
          "min_gram": 1,
          "max_gram": 20
        }
      },
      "analyzer": {
        "autocomplete": {
          "type": "custom",
          "tokenizer": "standard",
          "filter": [
            "lowercase",
            "autocomplete_filter"
          ]
        }
      }
    }
  },
  "mappings": {
    "properties": {
      "content": {
        "type": "text",
        "analyzer": "autocomplete"
      }
    }
  }
}
在上面,我创建了一个叫做 my-index-000001 的索引。为了说明问题的方便,我没有把我们的 search_analyzer 定义。这样,当我们 query 的时候,它还是将使用上面定义的 autocomplete 分词器。
我们可以使用如下的命令来测试一下我们的 analyzer:
POST my-index-000001/_analyze
{
  "text": "star",
  "analyzer": "autocomplete"
}
上面的命令显示的结果为:
{
  "tokens" : [
    {
      "token" : "s",
      "start_offset" : 0,
      "end_offset" : 4,
      "type" : "<ALPHANUM>",
      "position" : 0
    },
    {
      "token" : "st",
      "start_offset" : 0,
      "end_offset" : 4,
      "type" : "<ALPHANUM>",
      "position" : 0
    },
    {
      "token" : "sta",
      "start_offset" : 0,
      "end_offset" : 4,
      "type" : "<ALPHANUM>",
      "position" : 0
    },
    {
      "token" : "star",
      "start_offset" : 0,
      "end_offset" : 4,
      "type" : "<ALPHANUM>",
      "position" : 0
    }
  ]
}
从上面的结果中,我们可以看出来,当我们打入 s, st, sta 以及 star 的任何一个,那么含有 star 的文档都将被搜索到。这个是由于我们的 autocomplete 分词器含有 edge_ngram 过滤器的原因。
接下来我们使用如下的方法导入两个文档:
POST my-index-000001/_bulk
{ "index" : { "_id" : "1" } }
{ "content" : "He is a movie star" }
{ "index" : { "_id" : "2" } }
{ "content" : "This is a nice space" }
当我们使用如下的方法来进行搜索时:
GET my-index-000001/_search
{
  "query": {
    "match": {
      "content": "sta"
    }
  }
}
上面命令显示的结果为:
{
  "took" : 1,
  "timed_out" : false,
  "_shards" : {
    "total" : 1,
    "successful" : 1,
    "skipped" : 0,
    "failed" : 0
  },
  "hits" : {
    "total" : {
      "value" : 2,
      "relation" : "eq"
    },
    "max_score" : 0.33425623,
    "hits" : [
      {
        "_index" : "my-index-000001",
        "_type" : "_doc",
        "_id" : "1",
        "_score" : 0.33425623,
        "_source" : {
          "content" : "He is a movie star"
        }
      },
      {
        "_index" : "my-index-000001",
        "_type" : "_doc",
        "_id" : "2",
        "_score" : 0.25069216,
        "_source" : {
          "content" : "This is a nice space"
        }
      }
    ]
  }
}
可能很多小伙伴要问:这到底是咋回事呢?我们明明搜索的是 sta,但是 ID 为2的文档并没有 sta,为啥它还出现在搜索的结果中呢。这是因为如果我们在没有搜索指定 analyzer,那么它将使用 index analyzer,也就是 autocomplete analyzer。使用它的结果就是把 sta,也分词为:
s, st, sta很显然 s 也匹配我们的 ID 为2 的文档。这是因为 ID 为2 的文档在 indexing 时,space 被分词为:
s, sp, spa, spac, space在这个时候,我们必须在 query 时使用不同于 indexing 时的分词器。我们尝试使用如下的查询:
GET my-index-000001/_search
{
  "query": {
    "match": {
      "content": {
        "query": "sta",
        "analyzer": "standard"
      }
    }
  }
}
在上面,我们指定了 search_analyzer 为 standard。那么 sta 就不会使用 edge ngram 过滤器进行分词了。这样搜索的结果就变成了:
{
  "took" : 1,
  "timed_out" : false,
  "_shards" : {
    "total" : 1,
    "successful" : 1,
    "skipped" : 0,
    "failed" : 0
  },
  "hits" : {
    "total" : {
      "value" : 1,
      "relation" : "eq"
    },
    "max_score" : 0.9530773,
    "hits" : [
      {
        "_index" : "my-index-000001",
        "_type" : "_doc",
        "_id" : "1",
        "_score" : 0.9530773,
        "_source" : {
          "content" : "He is a movie star"
        }
      }
    ]
  }
}
这次我们只看到了一个文档。在实际的使用中,我们每次搜索时都写上分词器,确实很麻烦。我们可以直接在 mapping 中字段里定义 search_analyzer。我接下来删除索引:
DELETE my-index-000001我们在次打入如下的命令:
PUT my-index-000001
{
  "settings": {
    "analysis": {
      "filter": {
        "autocomplete_filter": {
          "type": "edge_ngram",
          "min_gram": 1,
          "max_gram": 20
        }
      },
      "analyzer": {
        "autocomplete": {
          "type": "custom",
          "tokenizer": "standard",
          "filter": [
            "lowercase",
            "autocomplete_filter"
          ]
        }
      }
    }
  },
  "mappings": {
    "properties": {
      "content": {
        "type": "text",
        "analyzer": "autocomplete",
        "search_analyzer": "standard"
      }
    }
  }
}
在上面,我们指定了 search_analyzer 为 standard。我们重新导入文档:
POST my-index-000001/_bulk
{ "index" : { "_id" : "1" } }
{ "content" : "He is a movie star" }
{ "index" : { "_id" : "2" } }
{ "content" : "This is a nice space" }
那么我们再次执行如下的搜索:
GET my-index-000001/_search
{
  "query": {
    "match": {
      "content": "sta"
    }
  }
}
这次,我们只看到一个搜索的结果:
{
  "took" : 934,
  "timed_out" : false,
  "_shards" : {
    "total" : 1,
    "successful" : 1,
    "skipped" : 0,
    "failed" : 0
  },
  "hits" : {
    "total" : {
      "value" : 1,
      "relation" : "eq"
    },
    "max_score" : 0.9530773,
    "hits" : [
      {
        "_index" : "my-index-000001",
        "_type" : "_doc",
        "_id" : "1",
        "_score" : 0.9530773,
        "_source" : {
          "content" : "He is a movie star"
        }
      }
    ]
  }
}
参考:
【1】https://www.elastic.co/guide/en/elasticsearch/reference/current/search-analyzer.html
以上是关于Elasticsearch:使用 search_analyzer 及 edge ngram 来实现 Search-As-You-Type的主要内容,如果未能解决你的问题,请参考以下文章
Elasticsearch:使用 Python elasticsearch-dsl-py 库对 Elasticsearch 进行查询
Elasticsearch:使用 Python elasticsearch-dsl-py 库对 Elasticsearch 进行查询
python使用elasticsearch模块操作elasticsearch
Elasticsearch:如何使用 shell 脚本来写入数据到 Elasticsearch 中