Observability:Data pipeline:Beats => Redis => Logstash => Elasticsearch
Posted 中国社区官方博客
tags:
篇首语:本文由小常识网(cha138.com)小编为大家整理,主要介绍了Observability:Data pipeline:Beats => Redis => Logstash => Elasticsearch相关的知识,希望对你有一定的参考价值。
在 Elastic Stack 的架构中,我们通常使用如下的一个图来表示:
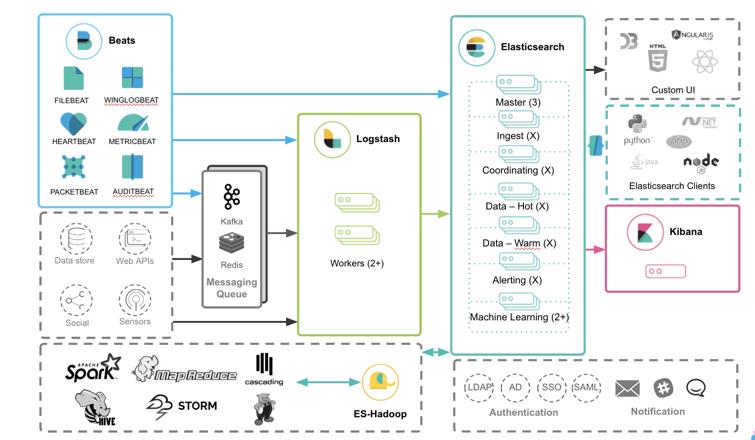
如上图所示,我们通常会使用 Kafka 或者 Redis 作为一种 Message Queue(消息队列)来作为一种数据的缓冲。在我之前的文章:
我详述了如何使用 Kafka 作为消息队列把数据导入到 Elasticsearch 中。 在今天的文章中,我将介绍如何使用 Redis 来作为 Message Queue 来导入数据。在实际的使用中,使用 Redis 作为消息队列甚至比使用 Kafka 更为常见。Redis 以其灵活性、性能和广泛的语言支持而闻名,它既用作数据库和缓存,也用作消息代理。 对于基于 ELK 的数据管道,Redis 可以放在 Beats 和 Logstash 之间,作为缓冲层,让下游组件有更好的机会成功处理和索引数据。
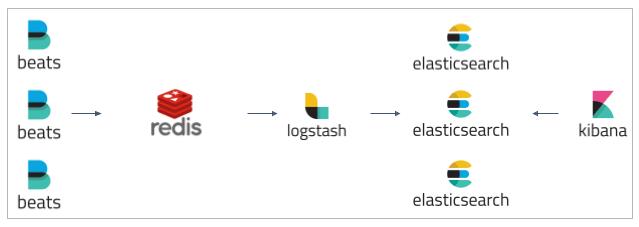
在今天的练习中,我将使用如下的配置:

- Filebeat – 收集日志并将它们转发到 Redis
- Redis – 代理数据流并将其排队
- Logstash – 订阅 Redis,处理数据并将其发送到 Elasticsearch
- Elasticsearch – 索引和存储数据
- Kibana – 分析数据。
今天文章的配置非常类似之前我的文章 “如何使用 Elasticsearch,Logstash 和 Kibana 管理 Apache 日志”。只是在 Logstash 之前我们添加了 Redis 的部分。其中的部署也可以参考那篇文章。我们将使用 Filebeat 的 Apache 模块来导入 Apache logs。
安装
Elasticsearch
我按照文档 “如何在Linux,MacOS 及 Windows 上进行安装 Elasticsearch” 安装 Elasticsearch。但是为了能够让我的 Elasticsearch 能被其它的虚拟机中被访问,我对 Elasticsearch 的配置文件 config/elasticsearch.yml 做了如下的配置:
config/elasticsearch.yml
network.host: 0.0.0.0
discovery.type: single-node
在这里,我们配置 network.host 为 0.0.0.0 是为了能够使得我们部署在 MacOS 上的 Elasticsearch 可以被 Ubuntu OS 上的 Logstash 及 Filebeat 进行访问。这样的设置可以使我们的 Elasticsearch 可以绑定所有的网络接口。完成 elasticsearch.yml 的配置后,我们重新启动 Elasticsearch。我们可以看到:
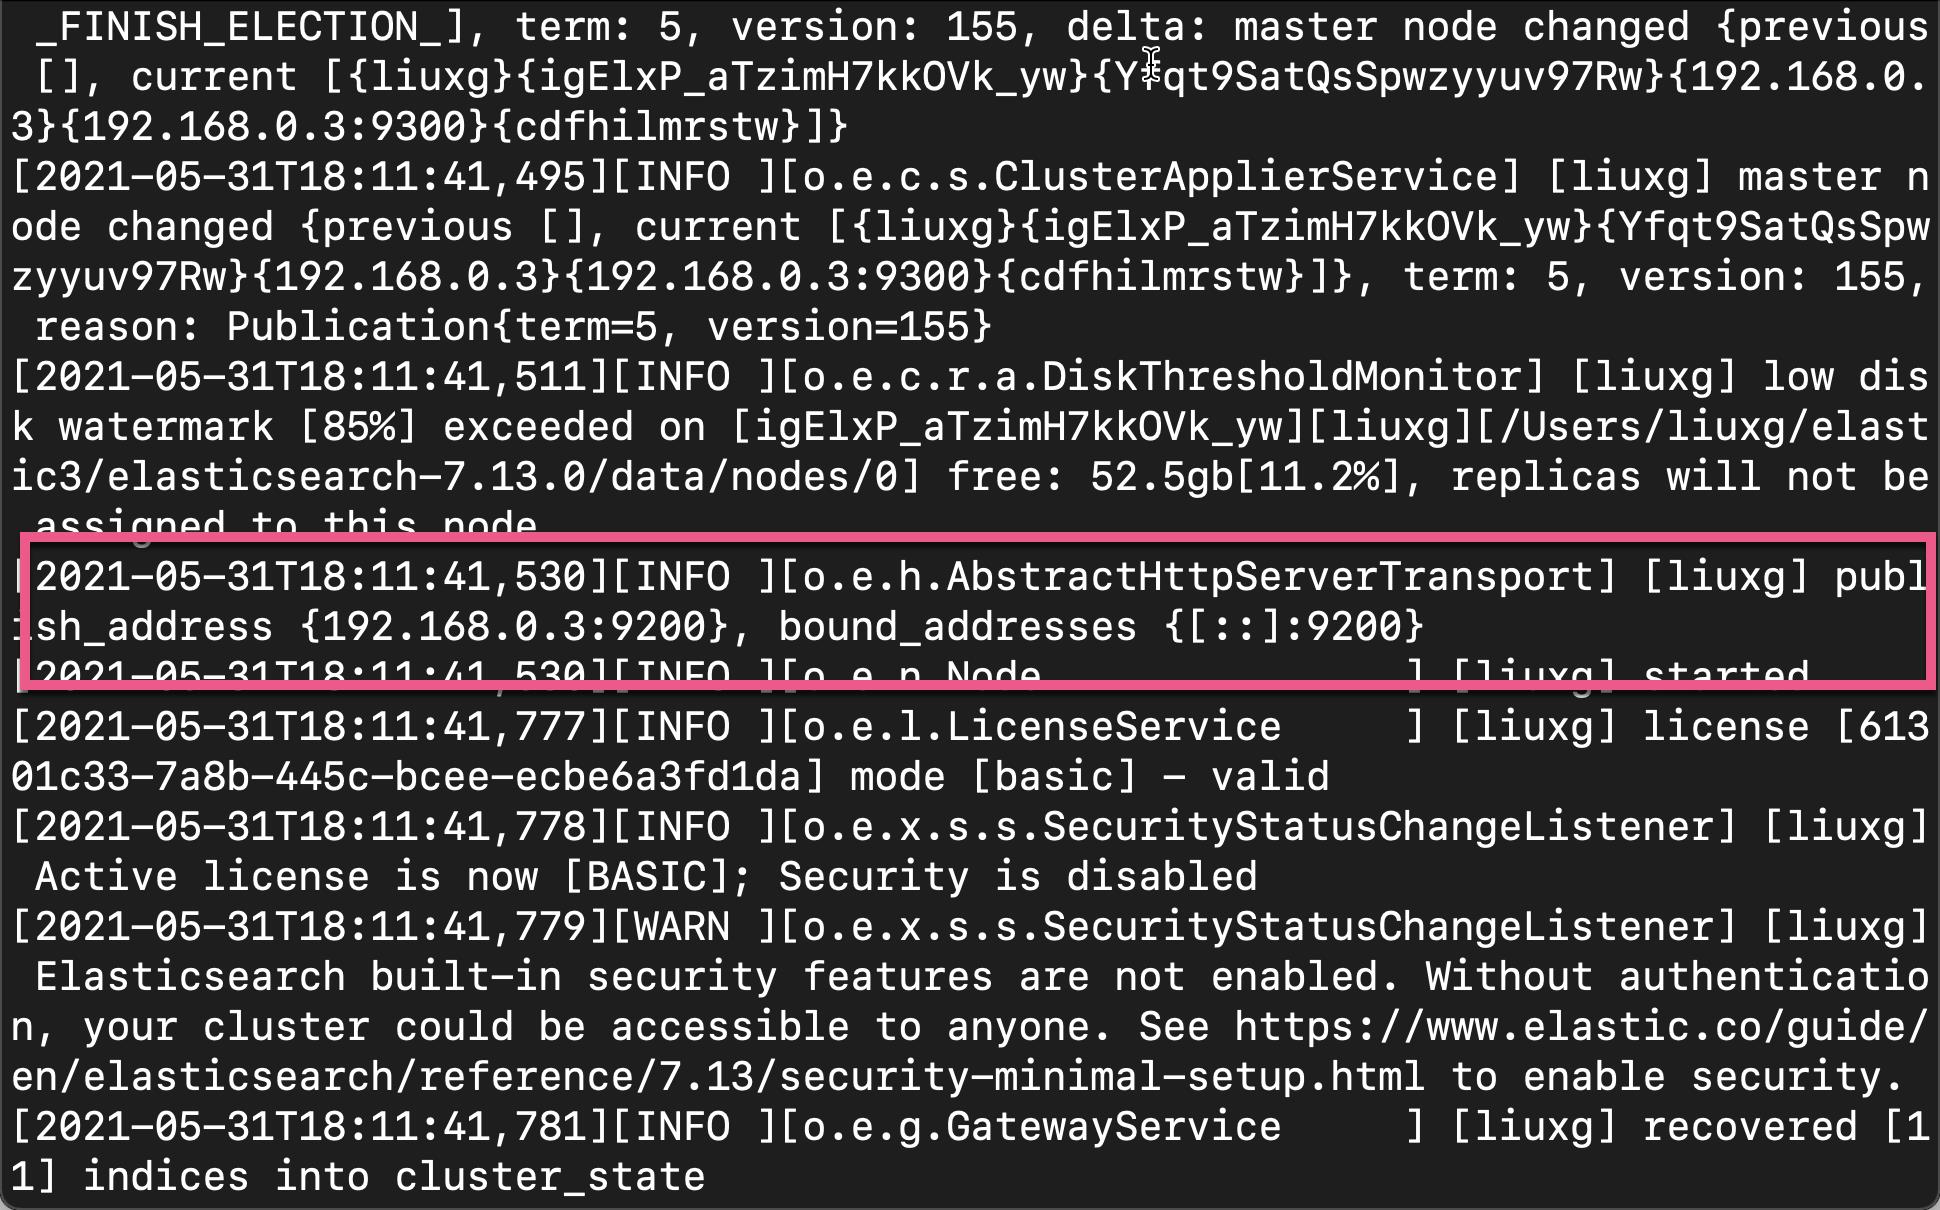
我么可以通过 curl 指令来查看结果:
curl http://192.168.0.3:9200$ curl http://192.168.0.3:9200
{
"name" : "liuxg",
"cluster_name" : "elasticsearch",
"cluster_uuid" : "kjYtLn_3QC6D4qh6FdMyNQ",
"version" : {
"number" : "7.13.0",
"build_flavor" : "default",
"build_type" : "tar",
"build_hash" : "5ca8591c6fcdb1260ce95b08a8e023559635c6f3",
"build_date" : "2021-05-19T22:22:26.081971330Z",
"build_snapshot" : false,
"lucene_version" : "8.8.2",
"minimum_wire_compatibility_version" : "6.8.0",
"minimum_index_compatibility_version" : "6.0.0-beta1"
},
"tagline" : "You Know, for Search"
}Kibana
我们根据文章 “如何在 Linux,MacOS 及 Windows 上安装 Elastic 栈中的 Kibana” 来安装 Kibana。为了能够访问我们上面安装的 Elasticsearch,我们需要在默认的 Kibana 中做相应的调整。我们来修改 config/kibana.yml 文件:
config/kibana.yml
server.host: "192.168.0.3"请注意在上面,我设置了本地 IP 地址为 Kibana 的服务器地址。你需要按照自己的 IP 地址进行修改。这是因为我们可以使得 Filebeat 可以访问 Kibana 来进行 setup (生成相应的 Dashboard 等,详细阅读,请参阅 “Beats 入门教程 (二)”)。等配置完 kibana.yml 文件后,我们重新启动 Kibana。在我们的浏览器中,我们输入相应的 IP:5601 来查看安装是否正确:
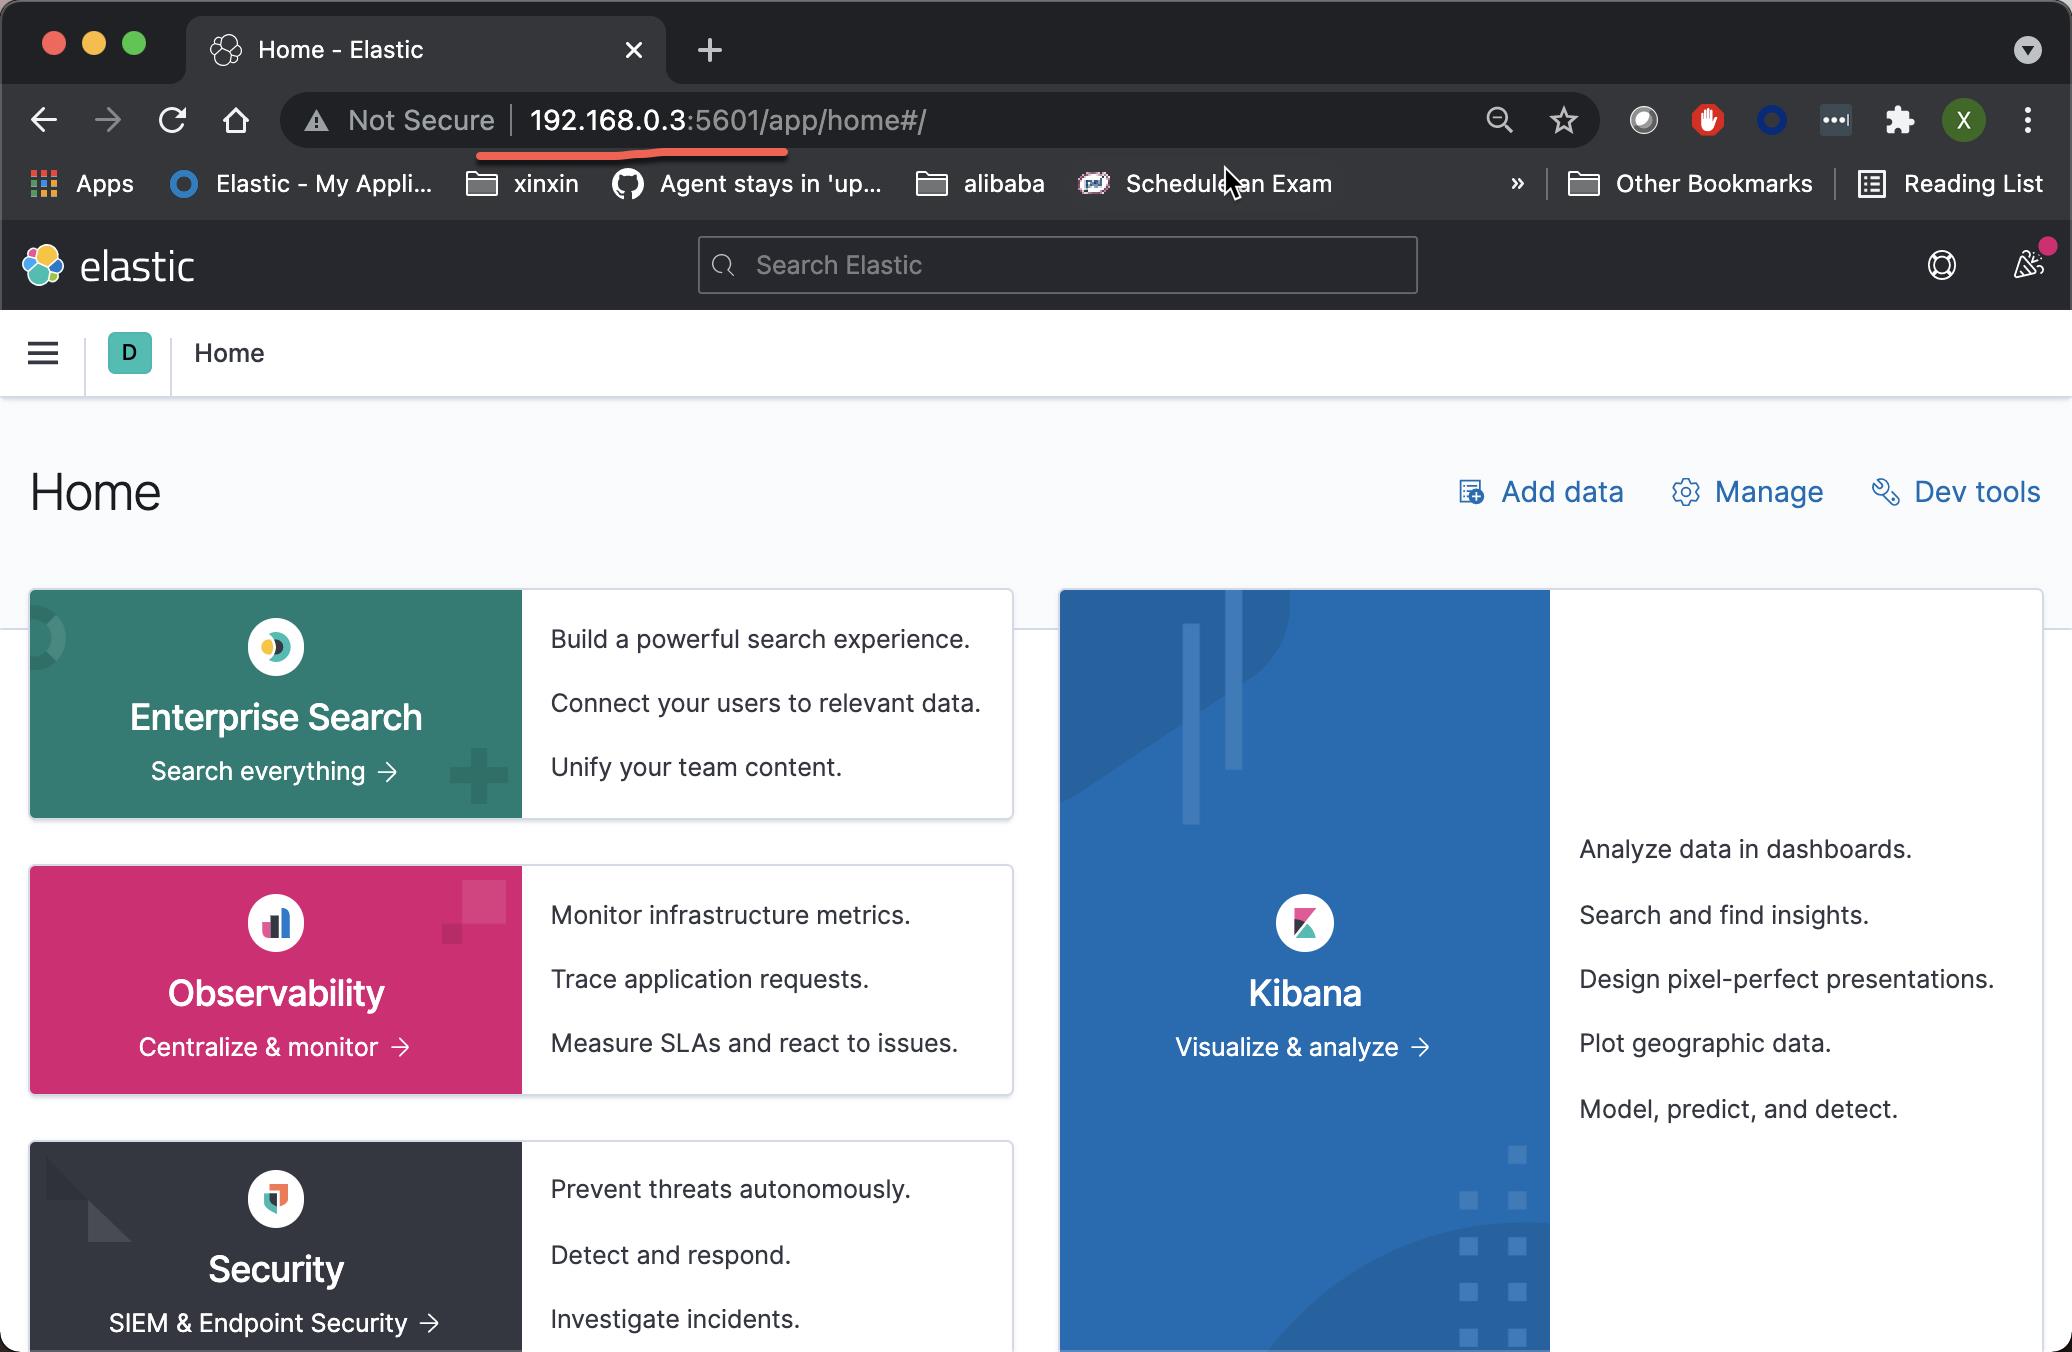
如果能看到上面的输出,则表明我们的 Kibana 安装已经正确。
Filebeat
我们接下来按照 Kibana 给出的指南来安装 Filebeat。在我们的练习中,我们将使用 Apache server 来生产 log,并使用 Filebeat 来收集这些 Log。

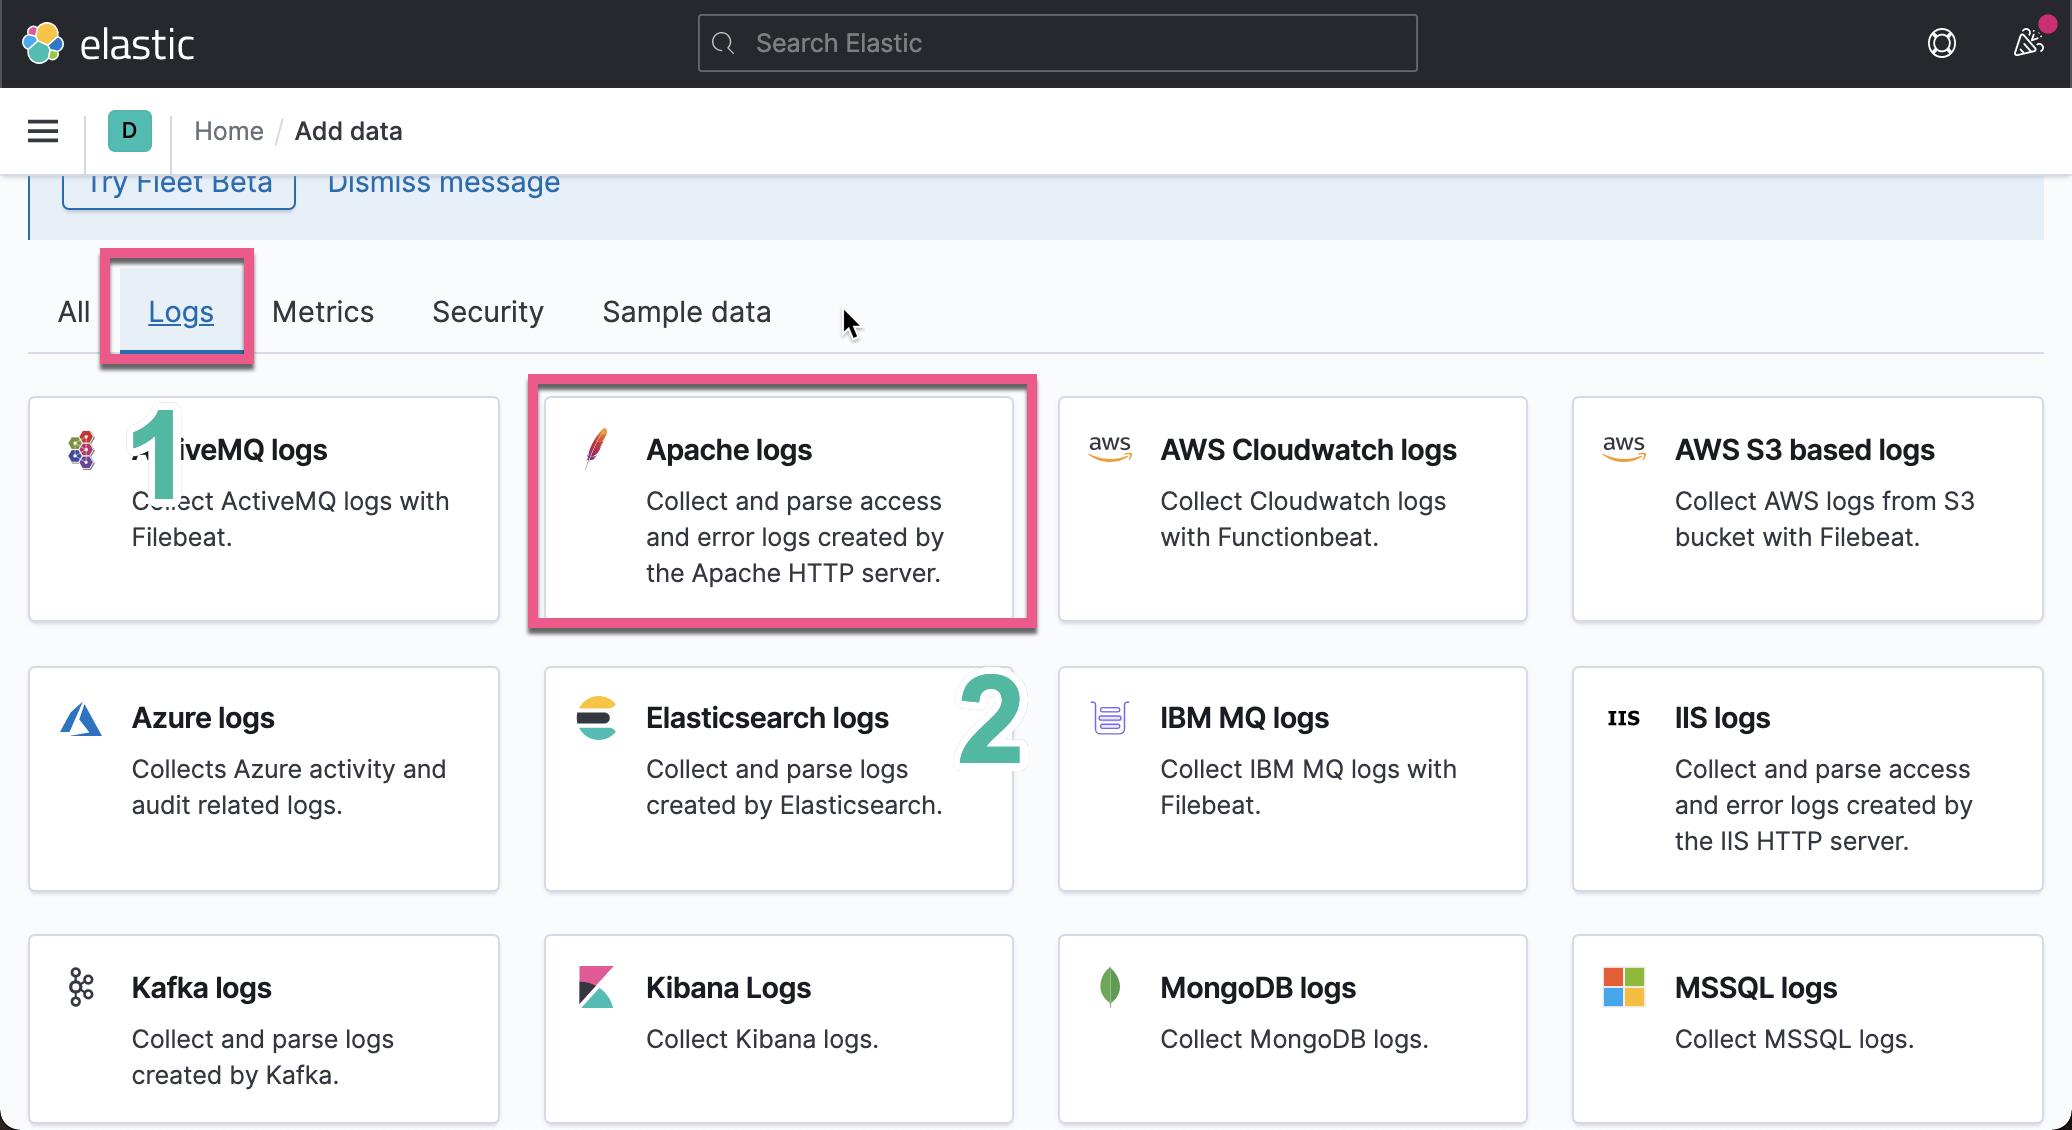

在上面它显示了各个平台的安装指令。针对 Ubuntu OS,我们选择 DEB 平台。我们按照上面的指令来进行安装:
liuxg@liuxgu:~/beats$ sudo dpkg -i filebeat-7.13.0-amd64.deb
[sudo] password for liuxg:
(Reading database ... 368789 files and directories currently installed.)
Preparing to unpack filebeat-7.13.0-amd64.deb ...
Unpacking filebeat (7.13.0) over (7.13.0) ...
Setting up filebeat (7.13.0) ...
Processing triggers for systemd (245.4-4ubuntu3.6) ...
上面显示我们的安装是成功的。我们先不启动 Filebeat。
Apache
在今天的 Web server 设计中,我们将使用 Nodejs + Apache 的组合。你可以根据自己喜欢的方式选用自己喜欢的语言来设计自己的 Web:

我们在 Ubuntu OS 上来安装 nodejs 及 Apache。
sudo apt-get update
sudo apt-get install apache2 nodejs
接下来,我们需要将通过 node.js 应用程序的 URL 在端口80上传入的所有请求代理到正在运行的本地 node.js 进程。 为此,我们需要在 Apache 服务器上安装/启用 mod_proxy 和 mod_proxy_http 模块:
sudo a2enmod proxy
sudo a2enmod proxy_http
因此,现在令人兴奋的部分开始了。 我们需要配置 Apache 服务器以代理对 node.js 应用程序的请求。 然后,我们将为此配置一个 VirtualHost。我们首先进入目录 /etc/apache2/sites-available
$ pwd
/etc/apache2/sites-available
liuxg@liuxg:/etc/apache2/sites-available$ ls
000-default.conf  default-ssl.conf
我首先来创建一个属于我们自己的 conf 文件。针对我的情况,我创建一个叫做 liuxg.conf 为文件,它的内容如下:
liuxg.conf
<VirtualHost *:80>
	# The ServerName directive sets the request scheme, hostname and port that
	# the server uses to identify itself. This is used when creating
	# redirection URLs. In the context of virtual hosts, the ServerName
	# specifies what hostname must appear in the request's Host: header to
	# match this virtual host. For the default virtual host (this file) this
	# value is not decisive as it is used as a last resort host regardless.
	# However, you must set it for any further virtual host explicitly.
	ServerName www.liuxg.com
        ServerAlias www.liuxg.com

        ProxyRequests Off
        ProxyPreserveHost On
        ProxyVia Full
        <Proxy *>
          Require all granted
        </Proxy>

        ProxyPass / http://127.0.0.1:3000/
        ProxyPassReverse / http://127.0.0.1:3000/

	# Available loglevels: trace8, ..., trace1, debug, info, notice, warn,
	# error, crit, alert, emerg.
	# It is also possible to configure the loglevel for particular
	# modules, e.g.
	#LogLevel info ssl:warn

	ErrorLog ${APACHE_LOG_DIR}/error.log
	CustomLog ${APACHE_LOG_DIR}/access.log combined

	# For most configuration files from conf-available/, which are
	# enabled or disabled at a global level, it is possible to
	# include a line for only one particular virtual host. For example the
	# following line enables the CGI configuration for this host only
	# after it has been globally disabled with "a2disconf".
	#Include conf-available/serve-cgi-bin.conf
</VirtualHost>

# vim: syntax=apache ts=4 sw=4 sts=4 sr noet
在上面,我们配置了如下的设置:
        ProxyPass / http://127.0.0.1:3000/
        ProxyPassReverse / http://127.0.0.1:3000/
请注意我们在 VirtualHost 里定义的80口。通过上面的配置,我们可以把来自 127.0.0.1:80 的请求都映射到 127.0.0.1:3000。我在上面定义了 ServerName 定义为 www.liuxg.com。如果我们还没有自己的域名,我们可以在 /etc/hosts 里定义这个域名的解析:
liuxg@liuxgu:/etc$ pwd
/etc
liuxg@liuxgu:/etc$ cat hosts
127.0.0.1	localhost
127.0.0.1	liuxg
127.0.0.1	liuxg.com
192.168.0.4 ubuntu


# The following lines are desirable for IPv6 capable hosts
::1     ip6-localhost ip6-loopback
fe00::0 ip6-localnet
ff00::0 ip6-mcastprefix
ff02::1 ip6-allnodes
ff02::2 ip6-allrouters
接下来,我们必须启用此新站点配置,并禁用默认站点配置。
sudo a2ensite liuxg.conf
sudo a2dissite 000-default.conf
$ sudo a2ensite liuxg.conf
Enabling site liuxg.
To activate the new configuration, you need to run:
systemctl reload apache2
liuxg@liuxgu:/etc/apache2/sites-available$ sudo a2dissite 000-default.conf
Site 000-default disabled.
To activate the new configuration, you need to run:
systemctl reload apache2
liuxg@liuxgu:/etc/apache2/sites-available$ systemctl reload apache2
==== AUTHENTICATING FOR org.freedesktop.systemd1.manage-units ===
Authentication is required to reload 'apache2.service'.
Authenticating as: liuxg,,, (liuxg)
Password:
==== AUTHENTICATION COMPLETE ===在修改完我们上面配置后,我们需要重新启动 Apache 的服务:
sudo service apache2 restart我们可以通过如下命令来检查 apache 是否已经正常运行:
systemctl status apache2$ systemctl status apache2
● apache2.service - The Apache HTTP Server
Loaded: loaded (/lib/systemd/system/apache2.service; enabled; vendor preset:>
Active: active (running) since Tue 2021-06-01 07:30:10 CST; 1h 17min ago
Docs: https://httpd.apache.org/docs/2.4/
Process: 878 ExecStart=/usr/sbin/apachectl start (code=exited, status=0/SUCCE>
Main PID: 1058 (apache2)
Tasks: 55 (limit: 18984)
Memory: 18.6M
CGroup: /system.slice/apache2.service
├─1058 /usr/sbin/apache2 -k start
├─1060 /usr/sbin/apache2 -k start
└─1061 /usr/sbin/apache2 -k start如果你看到上面的状态为 active,则表明 Apache 服务正在运行。我们也可以在浏览器地址栏中输入 localhost:80 来检查一下 apache 是否正常工作。在下面我们尝试在 Mac 里的浏览器来访问 Ubuntu OS 中的 IP:80 端口:

接下来,我们来用一个 nodejs 的项目做测试。首先我们下载如下的项目:
git clone https://github.com/contentful/the-example-app.nodejs等下载上面的项目过后,我们进行到项目的根目录中:
liuxg@liuxgu:~/nodejs/the-example-app.nodejs$ pwd
/home/liuxg/nodejs/the-example-app.nodejs
liuxg@liuxgu:~/nodejs/the-example-app.nodejs$ ls
Dockerfile  app.json      helpers.js         package.json  test
LICENSE     bin           i18n               public        variables.env
README.md   cypress.json  lib                routes        views
app.js      handlers      package-lock.json  services
打入如下的命令:
npm install等安装完后,接着打入如下的命令来进行运行:
npm run start:dev
这样在我们的 Mac OS 里的浏览器中,我们可以检测 Web 服务器是否正常运行:

上面标明我们的 nodejs 服务器运行正常。
我们可以在如下的地址找到 Apache 的 log 文件:
liuxg@liuxgu:/var/log/apache2$ pwd
/var/log/apache2
liuxg@liuxgu:/var/log/apache2$ ls
access.log        access.log.3.gz  error.log.1      error.log.4.gz
access.log.1      access.log.4.gz  error.log.10.gz  error.log.5.gz
access.log.10.gz  access.log.5.gz  error.log.11.gz  error.log.6.gz
access.log.11.gz  access.log.6.gz  error.log.12.gz  error.log.7.gz
access.log.12.gz  access.log.7.gz  error.log.13.gz  error.log.8.gz
access.log.13.gz  access.log.8.gz  error.log.14.gz  error.log.9.gz
access.log.14.gz  access.log.9.gz  error.log.2.gz   other_vhosts_access.log
access.log.2.gz   error.log        error.log.3.gz
在上面我们可以看到 access.log,error.log 等文件。access.log 的内容如下:
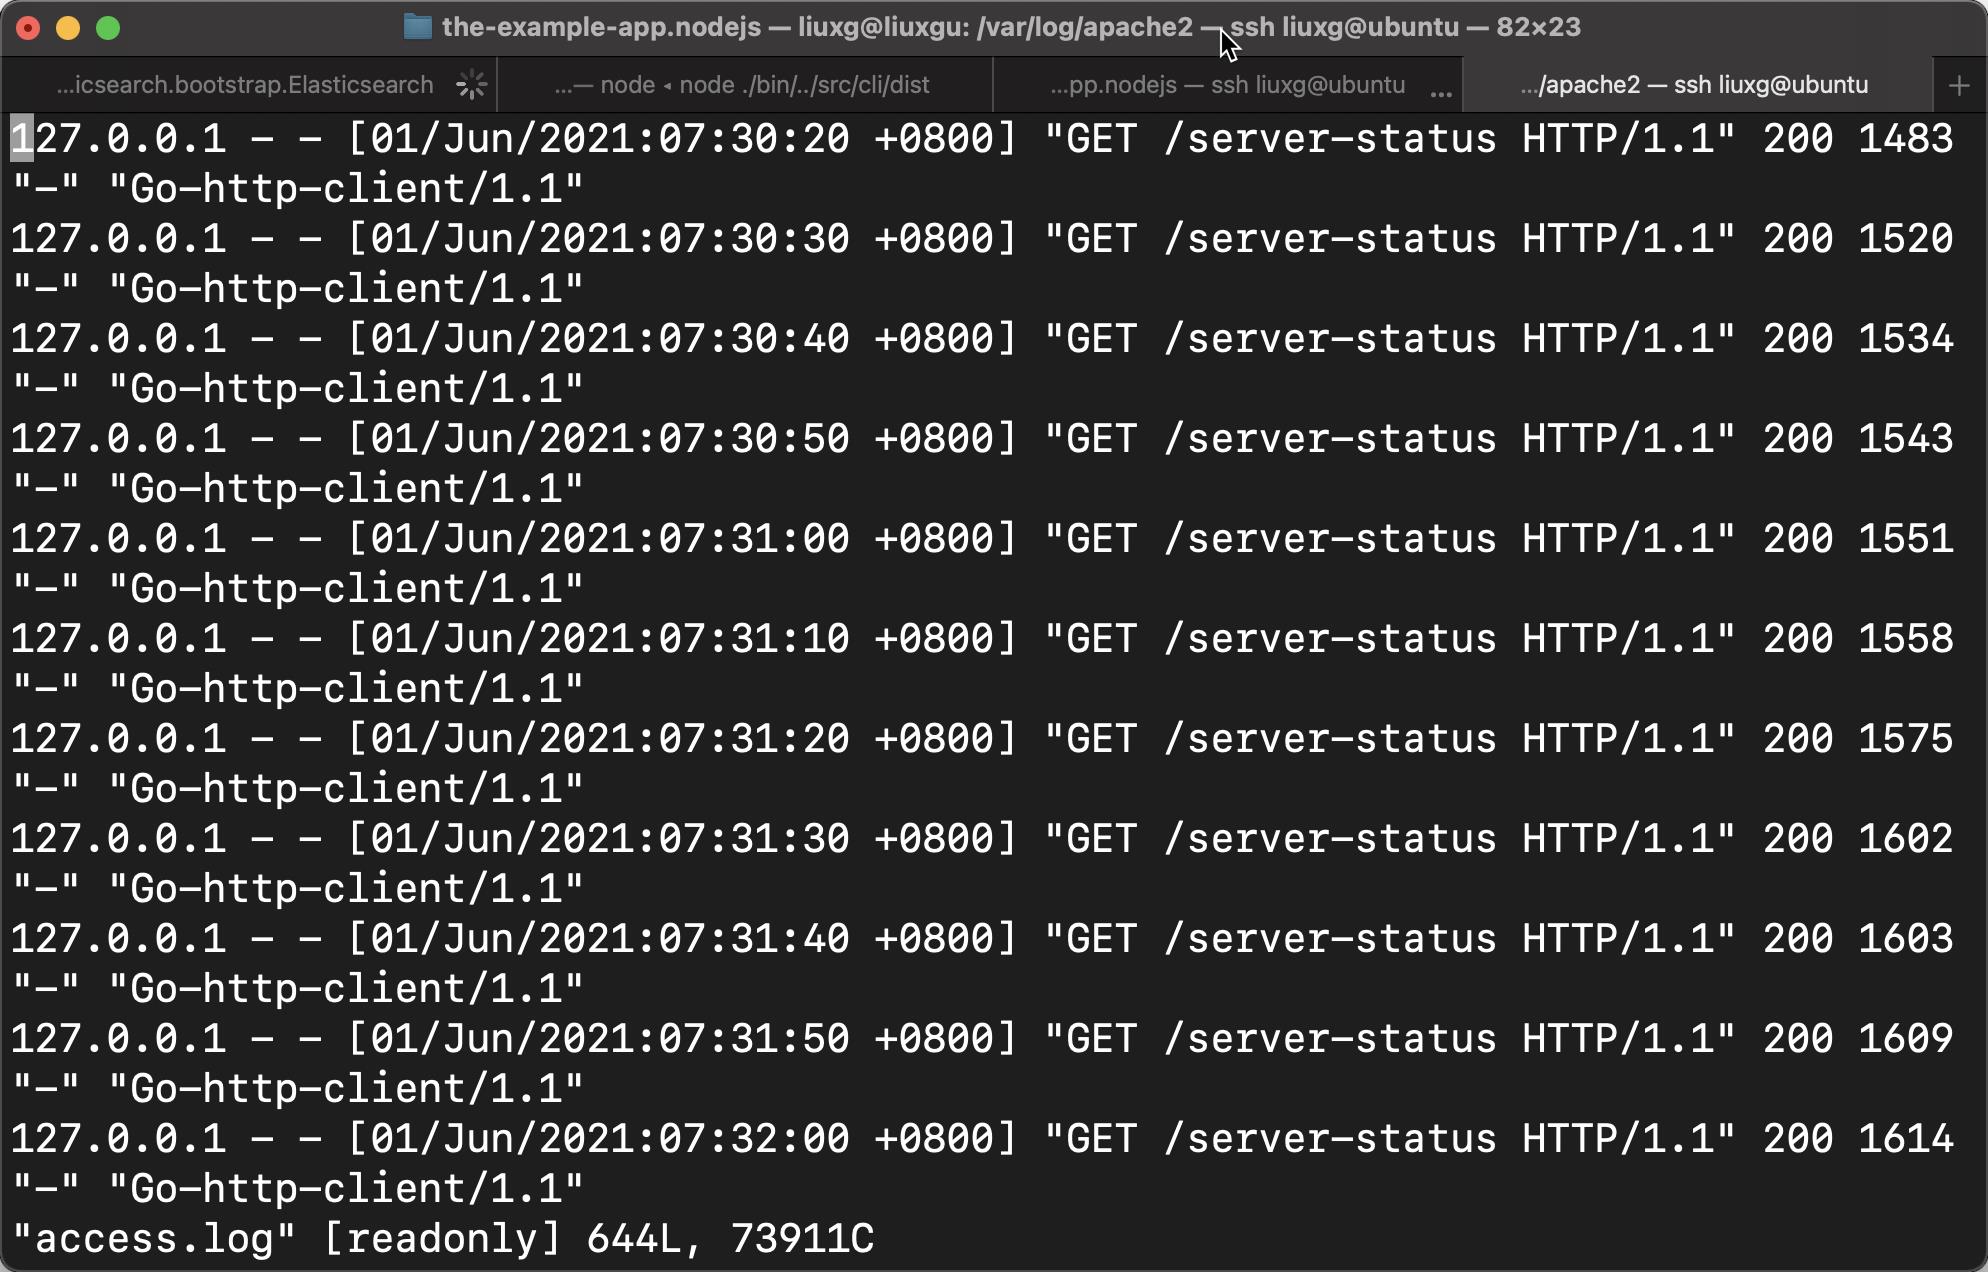
我们可以在 nodejs 的服务器网页中做更多的操作,你将看到更多的 log。
Logstash
我们在 Ubuntu OS 上安装 Logstash。
Logstash 是一个开源工具,可以收集,解析和存储日志以备将来使用,并可以进行快速日志分析。 Logstash 可用于聚合来自多个来源(如 Docker 实例集群)的日志,并将其从文本行解析为 JSON 之类的结构化格式。 在 Elastic Stack 中,Logstash 使 Elasticsearch 来存储和索引日志。
Logstash 需要安装 Java 8 或 Java 11:
sudo apt-get install default-jre验证是否已安装 Java:
java -version如果上一个命令的输出与下面的相似,那么您将知道自己朝着正确的方向前进:
openjdk version "11.0.6" 2020-01-14
OpenJDK Runtime Environment (build 11.0.6+10-post-Ubuntu-1ubuntu118.04.1)
OpenJDK 64-Bit Server VM (build 11.0.6+10-post-Ubuntu-1ubuntu118.04.1, mixed mode, sharing)
使用以下命令安装 Logstash:
curl -L -O https://artifacts.elastic.co/downloads/logstash/logstash-7.13.0-amd64.deb
sudo dpkg -i logstash-7.13.0-amd64.deb
上面我们安装的是和我们的 Elasticsearch 相匹配的7.13.0版本。你可以根据自己的 Elasticsearch 版本修改上面的版本来进行下载。
Redis
最后但并非最不重要的,我们最后的安装步骤 - Redis。我们在 Ubuntu OS 上使用如下的命令来运行 Redis:
sudo apt install redis-server等安装完成后,我们使用如下的命令来启动 Redis:
sudo service redis start$ sudo service redis start
liuxg@liuxgu:~$ service redis status
● redis-server.service - Advanced key-value store
Loaded: loaded (/lib/systemd/system/redis-server.service; enabled; vendor pr>
Active: active (running) since Tue 2021-06-01 10:32:36 CST; 55s ago
Docs: http://redis.io/documentation,
man:redis-server(1)
Main PID: 42700 (redis-server)
Tasks: 4 (limit: 18984)
Memory: 2.6M
CGroup: /system.slice/redis-server.service
└─42700 /usr/bin/redis-server 127.0.0.1:6379
6月 01 10:32:36 liuxgu systemd[1]: Starting Advanced key-value store...
6月 01 10:32:36 liuxgu systemd[1]: redis-server.service: Can't open PID file /run>
6月 01 10:32:36 liuxgu systemd[1]: Started Advanced key-value store.从上面我们可以看出来 redis 服务已经成功地启动起来了。
为确保一切按预期运行,我们在终端上运行 Redis CLI:
$ redis-cli
127.0.0.1:6379> ping
PONG
配资 Logstash
Logstash 配置文件采用 JSON 格式,位于 /etc/logstash/conf.d 中。 该配置包括三个部分:输入,过滤器和输出。

让我们创建一个名为 02-apache-input.conf 的配置文件,并设置我们的 Apache 输入:
sudo vi /etc/logstash/conf.d/apache.conf我们输入如下的内容到 apache.conf 中:
/etc/logstash/conf.d/apache.conf
input {
  redis {
    host => "localhost"
    key => "apache"
    data_type => "list"
  }
}

filter {
    grok {
      match => { "message" => "%{COMBINEDAPACHELOG}" }
    }
    date {
    match => [ "timestamp" , "dd/MMM/yyyy:HH:mm:ss Z" ]
    }
  geoip {
      source => "clientip"
    }
}

output {
  stdout {
    codec => rubydebug
  }

  elasticsearch {
    hosts => ["mac:9200"]
  }
}
如你所见——我们使用 Logstash Redis 输入插件来定义 Redis 主机和我们希望 Logstash 从中提取的特定 Redis 通道。 data_type 设置为 list,这意味着 Logstash 将使用 BLPOP 操作从 Redis 通道中拉取数据。在上面,我们需要根据自己的 Elasticsearch 地址修改上面的在 output 中的配置。
保存文件。我们使用如下的命令来启动 Logstash:
$ sudo service logstash restart
[sudo] password for liuxg:
liuxg@liuxgu:/etc/logstash/conf.d$ service logstash status
● logstash.service - logstash
     Loaded: loaded (/etc/systemd/system/logstash.service; disabled; vendor prese>
     Active: active (running) since Tue 2021-06-01 10:22:37 CST; 4s ago
   Main PID: 40425 (java)
      Tasks: 24 (limit: 18984)
     Memory: 445.4M
     CGroup: /system.slice/logstash.service
             └─40425 /usr/share/logstash/jdk/bin/java -Xms1g -Xmx1g -XX:+UseConcM>

6月 01 10:22:37 liuxgu systemd[1]: Started logstash.
6月 01 10:22:37 liuxgu logstash[40425]: Using bundled JDK: /usr/share/logstash/jdk
6月 01 10:22:37 liuxgu logstash[40425]: OpenJDK 64-Bit Server VM warning: Option >
lines 1-12/12 (END)
如果你看到上面的信息,则表明我们的 Logstash 已经成功运行了。
启动 data pipeline
在上面,我们已经完成了所有需要的安装的组件。现在该是我们启动 data pipeline 了。在上面,我已经成功地配置并启动了如下的组件:
- Elasticsearch
- Kibana
- Logstash
- Redis
在我们这样做之前,在我们的第二个终端中,让我们访问 Redis-CLI 监控模式,以便能够看到发生的所有 Redis 操作。 只需输入以下命令即可完成此操作:
monitor$ redis-cli
127.0.0.1:6379> ping
PONG
127.0.0.1:6379> monitor
OK现在,你将看到的只是一条 OK 消息:
我们可以回顾一下在文章开头部分介绍的 data pipeline。目前唯一没有配置的就是 Filebeat。在之前安装 Filebeat 时,我们把 Filebeat 直接连接到 Elasticsearch 了。我们现在需要对它进行修改,并让它访问 apache 日志,并传送到 Redis。我们需要对 filebeat.yml 文件进行如下的修改:
/etc/filebeat/filebeat.yml

我们接下来添加对 redis 的输出:
/etc/filebeat/filebeat.yml
filebeat.inputs:

# Each - is an input. Most options can be set at the input level, so
# you can use different inputs for various configurations.
# Below are the input specific configurations.

- type: log

  # Change to true to enable this input configuration.
  enabled: true

  # Paths that should be crawled and fetched. Glob based paths.
  paths:
    - /var/log/apache2/access.log
在文件的开始部分添加对 access.log 的采集。
在 filebeat.yml 的后面添加:
output.redis:
  hosts: ["localhost"]
  key: "apache"
  db: 0
  timeout: 5
  data_type: "list"
这样我们的 Filebeat 的输入就会级联到 redis。保存好 filebeat.yml 文件,在输入部分,我们告诉 Filebeat 要收集哪些日志——Apache 访问日志。 在输出部分,我们告诉 Filebeat 将数据转发到我们本地的 Redis 服务器和要订阅的相关频道 “apache”。
data_type 设置为 list,在这种情况下,这意味着 Filebeat 将使用 RPUSH 将日志推送到 Redis 通道。保存文件并使用如下的命令启动 Filebeat:
$ sudo service filebeat restart
liuxg@liuxgu:~$ service filebeat status
● filebeat.service - Filebeat sends log files to Logstash or directly to Elastics>
     Loaded: loaded (/lib/systemd/system/filebeat.service; disabled; vendor prese>
     Active: active (running) since Tue 2021-06-01 10:55:56 CST; 12s ago
       Docs: https://www.elastic.co/beats/filebeat
   Main PID: 47511 (filebeat)
      Tasks: 13 (limit: 18984)
     Memory: 160.2M
     CGroup: /system.slice/filebeat.service
             └─47511 /usr/share/filebeat/bin/filebeat --environment systemd -c /e>

6月 01 10:55:57 liuxgu filebeat[47511]: 2021-06-01T10:55:57.534+0800        INFO >
6月 01 10:55:57 liuxgu filebeat[47511]: 2021-06-01T10:55:57.535+0800        INFO >
6月 01 10:55:57 liuxgu filebeat[47511]: 2021-06-01T10:55:57.535+0800        INFO >
6月 01 10:55:57 liuxgu filebeat[47511]: 2021-06-01T10:55:57.538+0800        ERROR
这个时候,我们切换到 Redis CLI 的终端上,我们可以看到如下所示的输出:
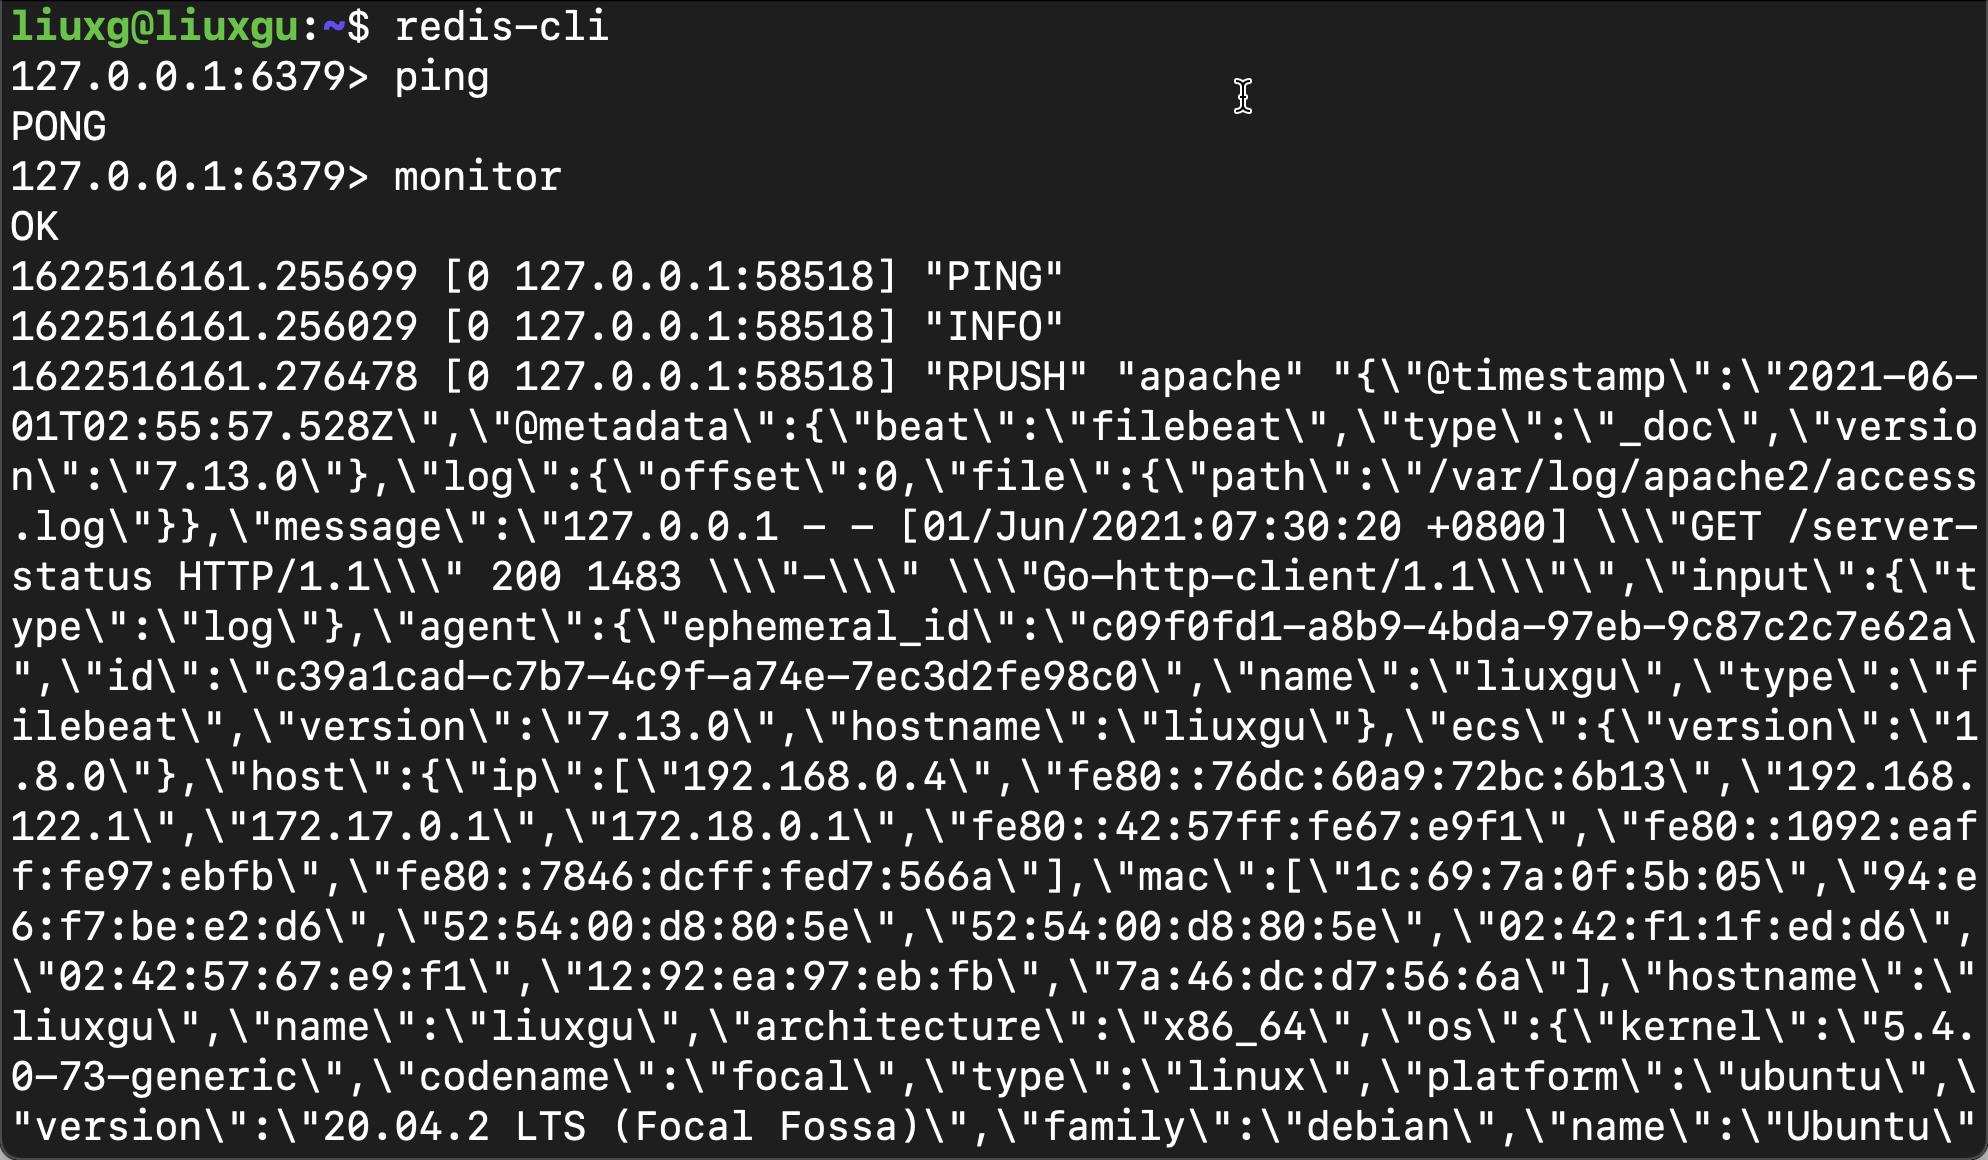
这个应该是采集的 access.log Apache 日志信息。
在 Logstash 里,我有意识地添加了 console 的输出。我们可以开启一个终端,并打入如下的命令:
journalctl -u logstash
它说明我们的 Logstash 的输出是对的。
我们接下来到 Kibana 中去查看最新的索引变化:
GET _cat/indicesgreen open .kibana_task_manager_7.13.0_001 d7rhl5y2TW2i-OFS4hiS6Q 1 0 10 767 1.3mb 1.3mb
green open .apm-custom-link kkg4g6i5Qg6VQ4fph2LYzQ 1 0 0 0 208b 208b
green open .kibana-event-log-7.13.0-000001 a37rAENuReSIs_zBL0TJDg 1 0 11 0 44.2kb 44.2kb
green open .apm-agent-configuration zPQxIZxWR3SX-DCD4NvpXA 1 0 0 0 208b 208b
green open .kibana_7.13.0_001 yr4gx8DeQMq9C2ios6C9UA 1 0 2340 21 2.7mb 2.7mb
green open kibana_sample_data_logs UpNaMIsAQg6XePEefnvB7w 1 0 14074 0 9.8mb 9.8mb
yellow open logstash-2021.06.01-000001 Ajm2UXxrRS2zF82yy3pcXQ 1 1 2981 0 1012kb 1012kb
green open .async-search oKAmnYWfS4qsTLgZAUR-vQ 1 0 72 1 447.2kb 447.2kb
yellow open metricbeat-7.13.0 2-usjsWIRRuqhYEr6SlyWQ 1 1 90 0 2.9mb 2.9mb
green open .tasks p6Ln5UHdTWamRZ3vJAr_4g 1 0 14 0 20.8kb 20.8kb从上面,我们可以看出来一个最新的 logstash-2021.06.01-000001 索引。我们可以通过如下的命令来查看它里面的文档:
GET logstash-2021.06.01-000001/_search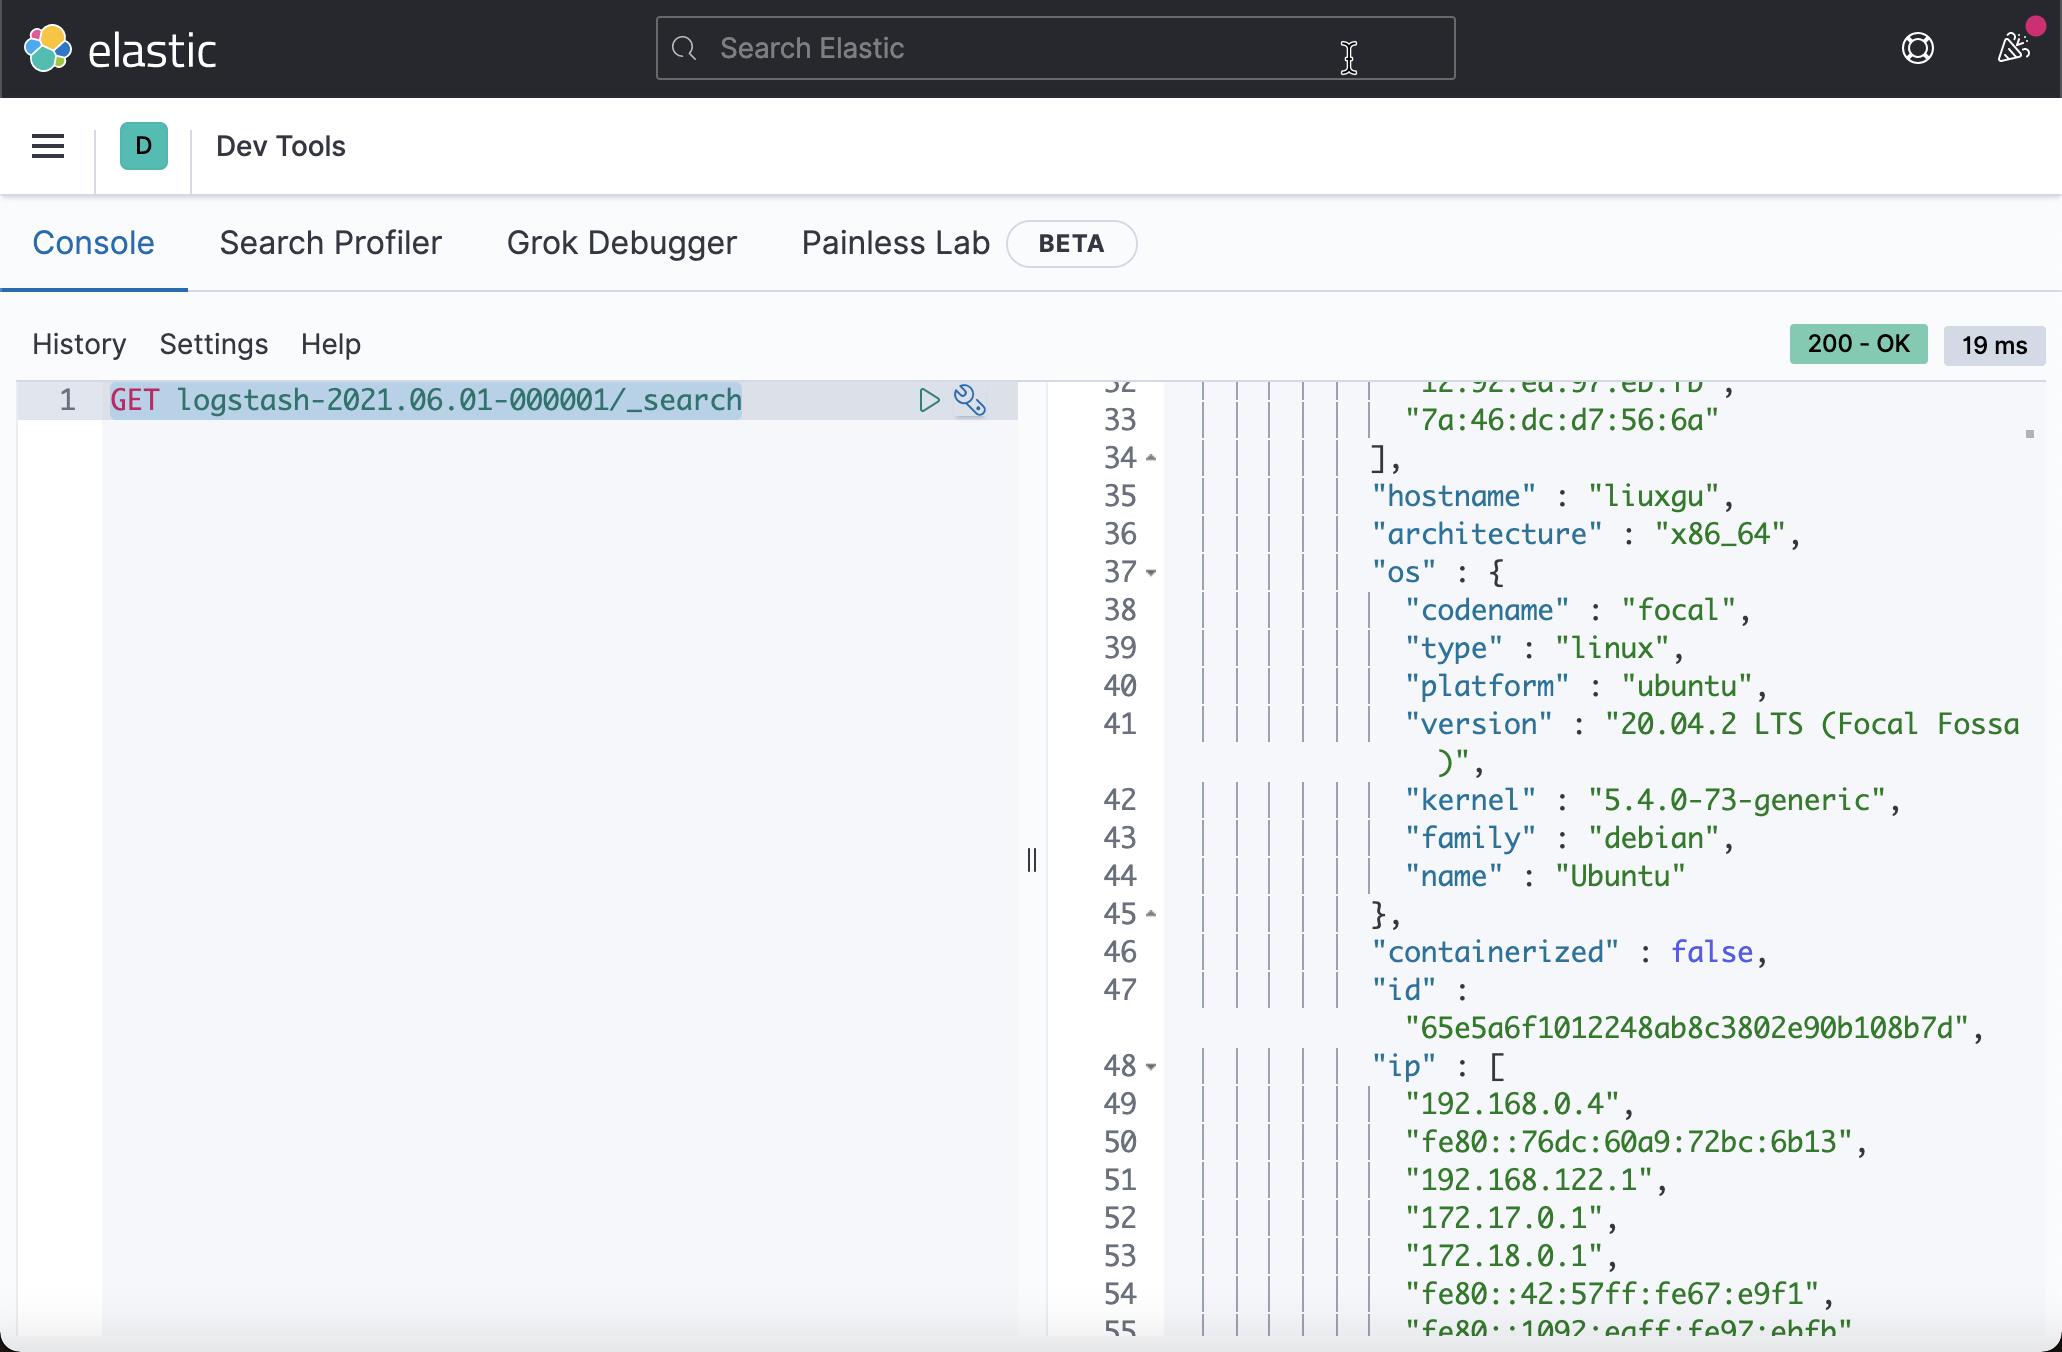

从上面的输出中,我们可以看到这里的日志就是我们在 /var/log/apache2/access.log 里的内容。
以上是关于Observability:Data pipeline:Beats => Redis => Logstash => Elasticsearch的主要内容,如果未能解决你的问题,请参考以下文章
OpenTelemetry项目中的Observability
[NPM] Pipe data from one npm script to another
Observability:在 Elastic Observability 部署中添加免费和开放的 Elastic APM
Observability:在 Elastic Observability 部署中添加免费和开放的 Elastic APM