Flutter 历时5天,我终于做出它!!!(炫酷的引导页登录界面)
Posted 阿 T
tags:
篇首语:本文由小常识网(cha138.com)小编为大家整理,主要介绍了Flutter 历时5天,我终于做出它!!!(炫酷的引导页登录界面)相关的知识,希望对你有一定的参考价值。
小知识,大挑战!本文正在参与“程序员必备小知识”创作活动。
前言:五天前,我发布了很多登录界面的UI,并发起投票:https://juejin.cn/post/7010922696988966919
从那天开始我就找了ui小姐姐,使用一杯送到手中的奶茶,换取了小姐姐的切图。然后我在两天的工作之余,我开始使用Flutter实现,可是,这张设计图在很多android手机的表现并不好,作为一个良心up😭,那我必须不能把它给大家
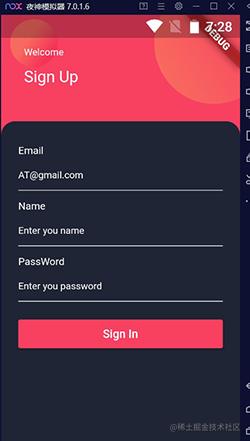
做了一半,发现效果不好,我都封装好了,就想着大家下载改一改就可以商用
然后我又选择了一张,这次秉承着是男人就带点绿的原则我实现了它!!!
效果图:
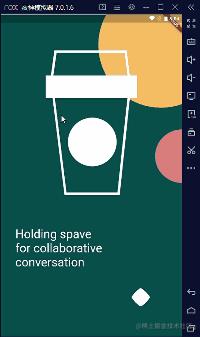

有点累,但还是封装了数据,所以给我点个赞吧😘 代码数据基本封装完成,界面适配也做好了,需要代码的在文章的最后,自己改改就可以放到项目里,请认真看文章,不然有可能运行不起来😜
分析:
1.数据封装
2.引导页·左右滑动
3.引导页·底部动画处理(跟随动画)
4.引导页·判断滑动到最后跳转至登陆界面,并从内存中移除
5.首页·输入框处理
6.首页·忘记密码,注册按钮,登录按钮处理
注:屏幕适配使用 flutter_screenutil: ^5.0.0 (可以自己写,这样可以只需要写自己需要的,代码会比较清晰)
1.数据封装
为了后续更好的维护,我们需要将data进行封装,如果有接口,也需要对接口表进行封装:
class TextData {
  static String welcome = "Holding spave\\nfor collaborative\\nconversation"; //欢迎词
  static String login = "Login"; // 登录
  static String name = "username"; //姓名框提示
  static String password = "password";
  static String register = "Not a member yet? Sing up!\\n Forgot password"; //登录按钮
  static String welcomeImage = "images/welcome.png"; //欢迎界面背景
  static String loginBackImage = "images/loginBack.png"; //登录界面背景
}
2.左右滑动
从效果图中可以看出是可以左右移动的Widget,这样的场景下,PageView是非常适合的,为了适配,我们需要使用Stack来包裹PageView:
return Scaffold(
    body: Stack(
    childern:[
    ....
    ]
  ));
这里为了大家更好的修改,我选择了PageView.builder(),大家只需要编辑所需要的引导Widget就可以。
来看代码:
1.我们需要使用一个PageController来控制PageView
PageController _pageController;
2.定义一个int变量用于记录当前是第几个引导页
int _currentPage = 0;
3.自己使用时,可以使用数组来存放Widget,代码中给了替换的注释😉
4.在onPageChanged中处理当页面滑动改变时的数据
PageView.builder(
  itemBuilder: (context, index) {
    return Stack(
      children: [
        Container(
          width: 1.sw,
          height: 1.sh,
          child: Image.asset(
            TextData.welcomeImage,
            fit: BoxFit.fill,
          ),
        ),
        Positioned(
          left: 60.w,
          bottom: 200,
          child: Text(TextData.welcome,
              style: TextStyle(fontSize: 50.sp, color: Colors.white)), ///博主自己随便写写,大家自己修改哈
        ),
      ],
    );
  },
  onPageChanged: (int index) {
    setState(() {
      _currentPage = index; ///保存当前页面的下标
    });
  },
  itemCount: 5, //换成自己的Widget
  scrollDirection: Axis.horizontal,
  reverse: false,
  controller: _pageController,
),
3.引导页·底部动画处理(跟随动画)
我建议可以在菱形中加入当前界面的下标,可惜ui小姐姐没有帮我画😭
这个是对如何画带弧的菱形做处理:
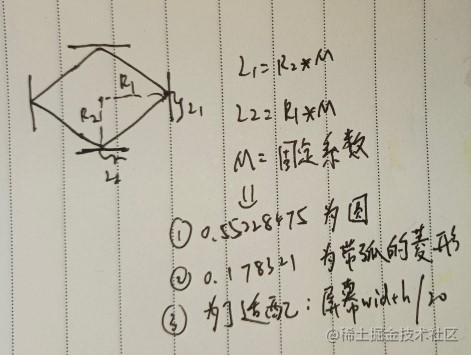
我们定义一个double来存放M系数:
double radius = 1.sw / 20; //这个值是为了适配
我们还需要对运动时的动画进行分析处理,这样的动画很类似三阶贝塞尔曲线:
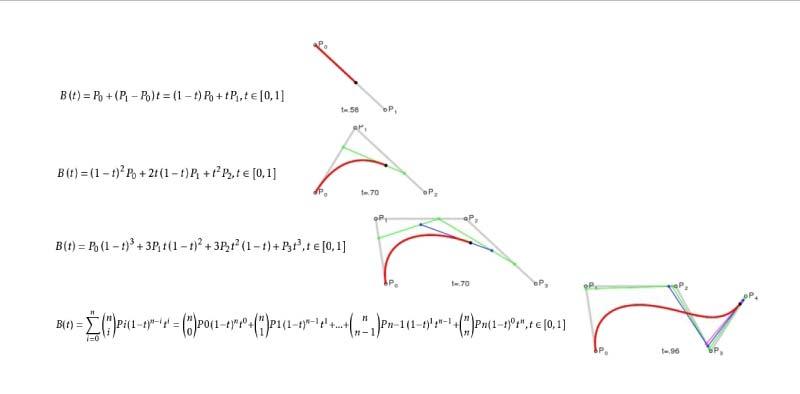
p0、p1、p2、p3四个点在平面或在三维空间定义了三次贝塞尔曲线。曲线起始于p0走向p1,并从p2的方向来到p3.一般不会经过p1或者p2;这两点只是在那里提供了方向资讯。p0和p1之间的间距,决定了曲线在转而趋进p3之前,走向p2方向的“长度有多长”。
根据这样的公式,我计算出了动画路径:
void _canvasBesselPath(Path path) {

  Point p1 = Point(x: radius*2,y: radius);
  Point p2 = Point(x: radius,y: radius*2);
  Point p3 = Point(x: 0,y: radius);
  Point p4 = Point(x: radius,y: 0);

  if (isToRight) {
    if (percent <= 0.2) {
      p1.x = radius*2 + radius*percent/0.2;
    } else if (percent <= 0.4) {
      p4.x = p2.x = radius + radius*(percent-0.2)/0.2;
      p1.x = p2.x + radius*2;
    } else if (percent <= 0.6) {
      p3.x = radius*(percent - 0.4)/0.2;
      p4.x = p2.x = p3.x + radius*2;
      p1.x = radius*4;
    } else if (percent <= 0.8) {
      p3.x = radius + radius*(percent - 0.6)/0.2;
      p4.x = p2.x = radius*3;
      p1.x = radius*4;
    } else if (percent <= 0.9) {
      p3.x = 2*radius+radius*(percent - 0.8)/0.3;
      p4.x = p2.x = radius*3;
      p1.x = radius*4;
    } else if (percent <= 1.0) {
      p3.x = 2*radius+radius*(1 - percent)/0.3;
      p4.x = p2.x = radius*3;
      p1.x = radius*4;
    }
  } else {
    if (percent <= 0.2) {
      p3.x = - radius*percent/0.2;
    } else if (percent <= 0.4) {
      p3.x = -radius - radius*(percent-0.2)/0.2;
      p4.x = p2.x = p3.x + 2*radius;
    } else if (percent <= 0.6) {
      p3.x = - 2*radius;
      p4.x = p2.x = - radius*(percent - 0.4)/0.2;
      p1.x = p2.x + radius*2;
    } else if (percent <= 0.8) {
      p3.x = -2*radius;
      p4.x = p2.x = -radius;
      p1.x = p2.x + radius*2 - radius*(percent - 0.6)/0.2;
    } else if (percent <= 0.9) {
      p3.x = -2*radius;
      p4.x = p2.x = -radius;
      p1.x = p2.x + radius - radius*(percent - 0.8)/0.4;
    } else if (percent <= 1.0) {
      p3.x = -2*radius;
      p4.x = p2.x = -radius;
      p1.x = p2.x + radius - radius*(1 - percent)/0.4;
    }
  }

  final p1Radius = p2.y - p1.y;
  final p24LeftRadius = p2.x - p3.x;
  final p24RightRadius = p1.x - p2.x;
  final p3Radius = p2.y - p3.y;
  path.moveTo(p1.x, p1.y);
  path.cubicTo(
      p1.x, p1.y + p1Radius*M,
      p2.x + p24RightRadius*M, p2.y,
      p2.x, p2.y
  );
  path.cubicTo(
      p2.x - p24LeftRadius*M, p2.y,
      p3.x, p3.y + p3Radius*M,
      p3.x, p3.y
  );
  path.cubicTo(
      p3.x, p3.y - p3Radius*M,
      p4.x - p24LeftRadius*M, p4.y,
      p4.x, p4.y
  );
  path.cubicTo(
      p4.x + p24RightRadius*M, p4.y,
      p1.x , p1.y - p1Radius*M,
      p1.x, p1.y
  );
}
我们还需要计算每次的落点:(已经自适应了,XDM放心食用)
定义一个int变量与当前页面下标做比较:
int preInteger = 0;
然后对PageView的controller进行监听:
@override
void initState() {
  super.initState();
  _pageController = PageController(viewportFraction: 1);
  _pageController.addListener(() {
    curPosition = _pageController.page;
    if (curPosition.toInt() == curPosition) {
      preInteger = curPosition.toInt();
    } else if (curPosition > preInteger) {
      isToRight = true;
    } else {
      isToRight = false;
    }
    setState(() {});
  });
}
使用Transform.translate对路径进行定位(使用):
计算offSetX的值用于定位,横坐标:
double percent;
if (isToRight) {
  percent = curPosition - curPosition.toInt();
} else {
  percent = 1 - curPosition + curPosition.toInt();
}

double offsetPercent;
if (isToRight) {
  if (percent <= 0.8) {
    offsetPercent = curPosition.toInt() + percent / 0.8;
  } else {
    offsetPercent = curPosition.ceil().toDouble();
  }
} else {
  if (percent <= 0.8) {
    offsetPercent = curPosition.ceil() - percent / 0.8;
  } else {
    offsetPercent = curPosition.toInt().toDouble();
  }
}

double deviceWidth = 1.sw;
double offSetX = deviceWidth * 0.2 +
    (deviceWidth - radius * 2 - deviceWidth * 0.2) * offsetPercent / 5 - 20;
最重要的是:
double offSetX = deviceWidth * 0.2 +
    (deviceWidth - radius * 2 - deviceWidth * 0.2) * offsetPercent / 5 - 20;
这句话才是定位算出横坐标的关键!
下面是使用代码:
Transform.translate(
  offset: Offset(offSetX, 0), ///offSetx用于定位
  child: Stack(
    children: [
      CustomPaint(
        painter: BesselView( ///这个是上面计算的动画路径
            radius: radius,
            percent: percent,
            isToRight: isToRight,
            color: Colors.white),
      ),
      // Text(currentPage.toString(),style: TextStyle(fontSize: 50.sp),),本来想自己写下标的,但是样式很难看就注释了
    ],
  ),
)
完整的实现,大家可以看看源代码
4.引导页·判断滑动到最后跳转至登陆界面,并从内存中移除
在PageView中的onPageChanged进行判断,当滑动时的下标超出定义的Widget数组时,我们跳转:
pushReplacement跳转方式:换当前页为目标页(也就是说,堆栈中只有首页和当前页 两个页面,当前页返回自然是首页)。使用以下语句完成替换跳转。
onPageChanged: (int index) {
  print("当前的页面是 $index");
  if (index + 1 == 5) {
    print("跳转到首页");
    ///清除引导页
    Navigator.pushReplacement(context,
        MaterialPageRoute(builder: (context) => LoginPage()));
  }
  setState(() {
    _currentPage = index;
  });
},
5.首页·输入框处理
这个就很常规了,不过我针对这个效果给大家封装了一下:
import 'package:flutter/material.dart';

inputTextItem(
    {FocusNode focusNode,
    TextEditingController controller,
    TextInputType textInputType,
    String hintText,
    double hintFontSize,
    double cursorHeight = 2.0,
    ValueChanged onPress,
    bool obscureText = false,
    Key key}) {
  return TextField(
    controller: controller,
    focusNode: focusNode,
    keyboardType: textInputType,
    obscureText: obscureText,
    cursorHeight: cursorHeight,
    decoration: InputDecoration(
      isCollapsed: true,
      contentPadding: EdgeInsets.symmetric(horizontal: 0, vertical: 8),
      //内容内边距,影响高度
      border: InputBorder.none,
      filled: false,
      fillColor: Color.fromARGB(255, 225, 225, 225),
      hintText: hintText,
      hintStyle: TextStyle(fontSize: hintFontSize, color: Colors.grey,
          textBaseline: TextBaseline.alphabetic),
    ),
    onSubmitted: onPress,
  );
}
6.首页·忘记密码,注册按钮,登录按钮处理
这里主要是想告诉大家一些不常用的Text的属性,以及简单处理了一下字符串,告诉一下小白:
style: TextStyle(
  color: Colors.white,
  fontSize: 32.sp,
  decoration: TextDecoration.underline,
),
decoration: TextDecoration.underline,文字下划线
decoration: TextDecoration.lineThrough,删除线
虚线和上划线:
decoration: TextDecoration.overline,
decorationStyle: TextDecorationStyle.dashed,
好啦,历时5天修修改改,终于完成啦!给个赞吧 哥哥酱😜
需要源码在评论区留言,会很快回复(不想建仓库了,下次整一个综合的放出来)🐮🐴
以上是关于Flutter 历时5天,我终于做出它!!!(炫酷的引导页登录界面)的主要内容,如果未能解决你的问题,请参考以下文章