搭建一个简单的SpringBoot+Vue+MySQL | (集成MyBatis-PluslombokSwagger)
Posted 明金同学
tags:
篇首语:本文由小常识网(cha138.com)小编为大家整理,主要介绍了搭建一个简单的SpringBoot+Vue+MySQL | (集成MyBatis-PluslombokSwagger)相关的知识,希望对你有一定的参考价值。
文章目录
案例项目的创建
步骤:
- 创建SpringBoot项目(Java、SpringBoot、SpringMVC、RESTful、json)
- 引入Swagger(接口文档和测试页面生成工具)
- 定义统一结果(让前后端数据通信更规范)
- 创建和连接数据库(mysql、IDEA内置的数据库管理工具)
- 集成MyBatis-Plus(MyBatis)
- 搭建前端环境(了解html和CSS、熟悉javascript、了解Vue)
- 认识 Vue.js
- SpringBoot+Vue
- Java、MyBatis-Plus、MySQL、HTML
- JavaScript、Vue
1、创建SpringBoot项目
1.1、新建项目
注意:Java版本选择8,选择maven
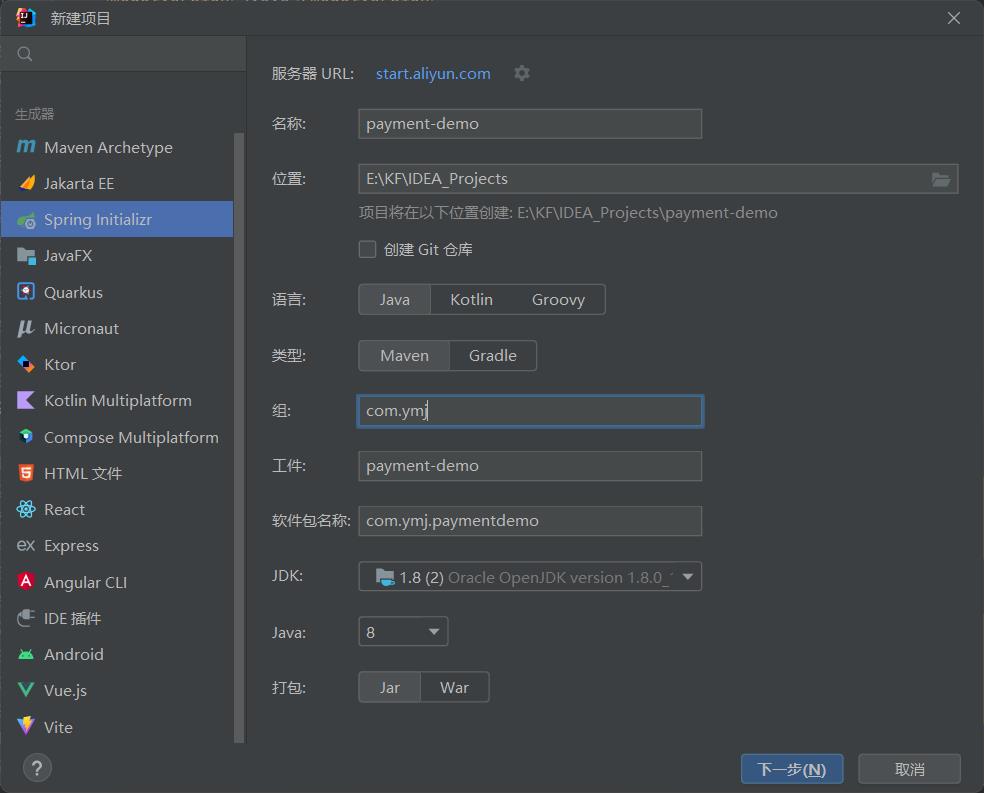
spring Boot版本2.3.X.RELEASE
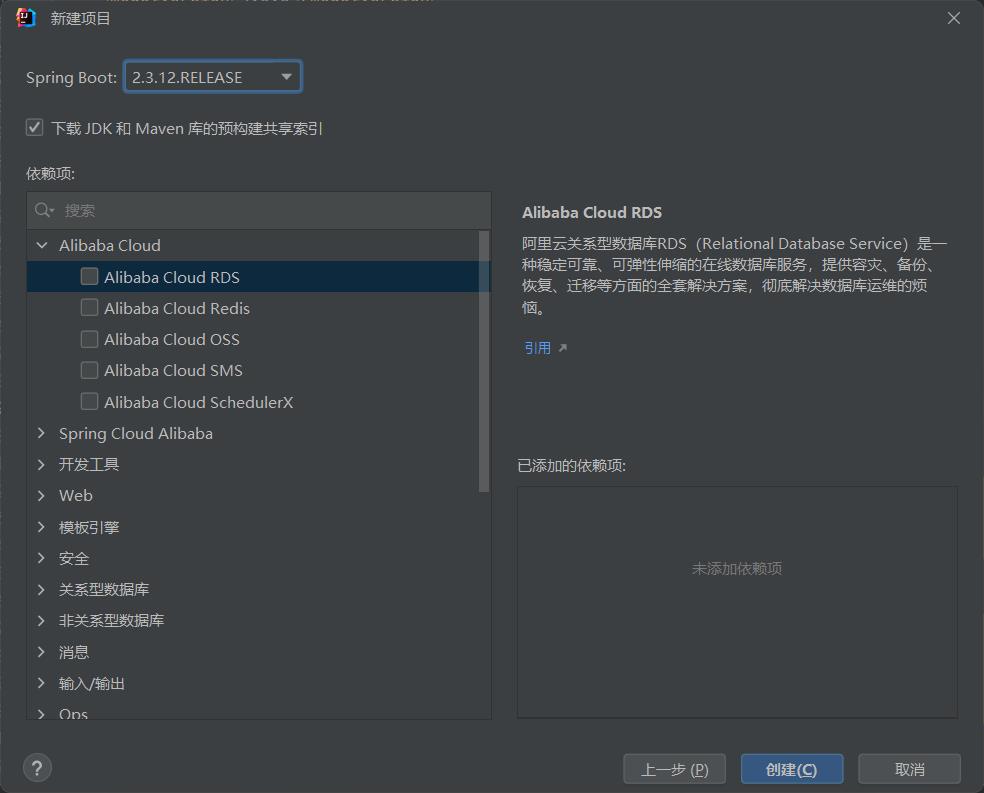
1.2、添加依赖
添加SpringBoot web依赖
<dependency>
  <groupId>org.springframework.boot</groupId>
  <artifactId>spring-boot-starter-web</artifactId>
</dependency>

1.3、配置application.yml文件
server:
  port: 8090 # 服务端口

spring:
  application: # 应用的名字
    name: payment
1.4、创建controller
创建controller包,创建ProductController类
package com.ymj.paymentdemo.controller;
import org.springframework.web.bind.annotation.GetMapping;
import org.springframework.web.bind.annotation.RequestMapping;
import org.springframework.web.bind.annotation.RestController;
@RestController
@RequestMapping("/api/product")
@CrossOrigin //跨域
public class ProductController
    @GetMapping("/test")
    public String test()
        return "hello";
修改Swagger2Config文档标题
package com.ymj.payment.config;
import org.springframework.context.annotation.Bean;
import org.springframework.context.annotation.Configuration;
import springfox.documentation.builders.ApiInfoBuilder;
import springfox.documentation.spi.DocumentationType;
import springfox.documentation.spring.web.plugins.ApiSelectorBuilder;
import springfox.documentation.spring.web.plugins.Docket;
import springfox.documentation.swagger2.annotations.EnableSwagger2;
@Configuration
@EnableSwagger2
public class Swagger2Config
@Bean
public Docket docket()
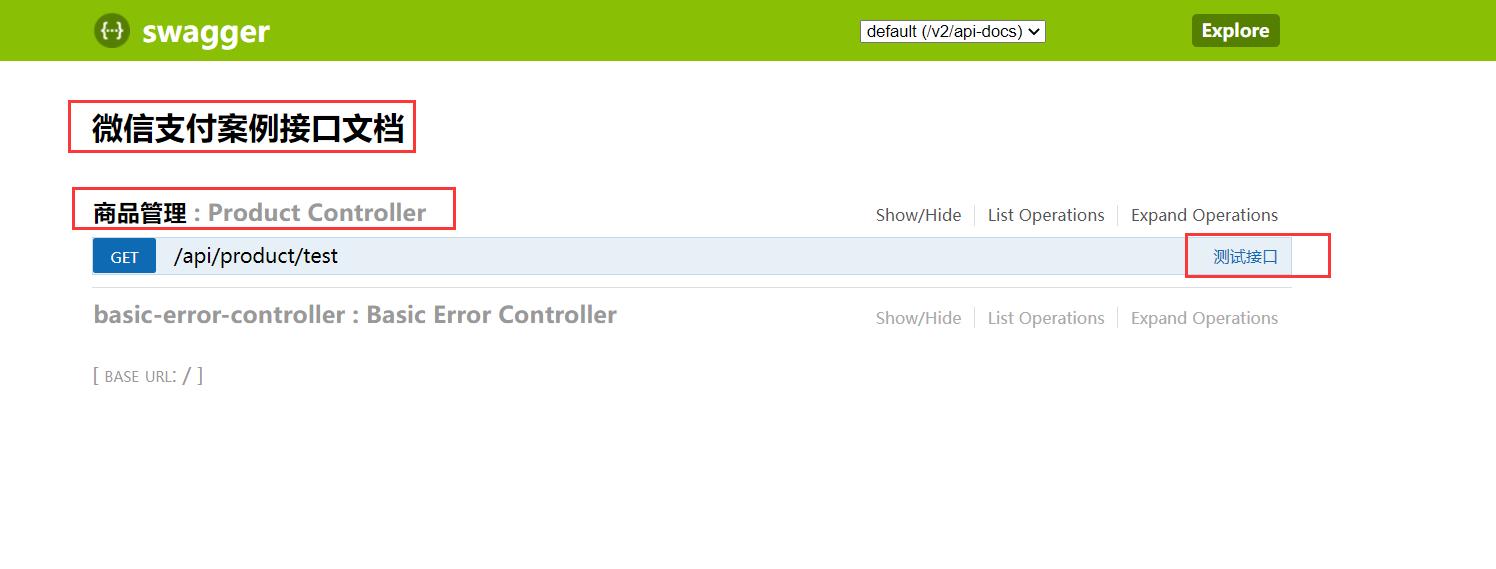
return new Docket(DocumentationType.SWAGGER_2).apiInfo(new ApiInfoBuilder().title("微信支付案例接口文档").build());
1.5、测试
访问:http://localhost:8090/api/product/test
2、引入Swagger
作用:自动生成接口文档和测试页面。
2.1、引入依赖
<!--swagger-->
<dependency>
  <groupId>io.springfox</groupId>
  <artifactId>springfox-swagger2</artifactId>
  <version>2.7.0</version>
</dependency>
<!--swagger ui-->
<dependency>
  <groupId>io.springfox</groupId>
  <artifactId>springfox-swagger-ui</artifactId>
  <version>2.7.0</version>
</dependency>
2.2、Swagger配置文件
创建confifig包,创建Swagger2Confifig类
package com.ymj.paymentdemo.config;
import org.springframework.context.annotation.Bean;
import org.springframework.context.annotation.Configuration;
import springfox.documentation.builders.ApiInfoBuilder;
import springfox.documentation.spi.DocumentationType;
import springfox.documentation.spring.web.plugins.Docket;
import springfox.documentation.swagger2.annotations.EnableSwagger2;
@Configuration
    @EnableSwagger2
    public class Swagger2Config
        @Bean
        public Docket docket()
            return new Docket(DocumentationType.SWAGGER_2)
                .apiInfo(new ApiInfoBuilder().title("微信支付案例接口文
                    档").build());
2.3、Swagger注解
controller中可以添加常用注解
@Api(tags="商品管理") //用在类上
@ApiOperation("测试接口") //用在方法上
2.4、测试
访问:http://localhost:8090/swagger-ui.html
3、定义统一结果
作用:定义统一响应结果,为前端返回标准格式的数据。
3.1、引入lombok依赖
简化实体类的开发
<!--实体对象工具类:低版本idea需要安装lombok插件-->
<dependency>
  <groupId>org.projectlombok</groupId>
  <artifactId>lombok</artifactId>
</dependency>
3.2、创建R类
创建统一结果类
package com.ymj.paymentdemo.vo;
import lombok.NoArgsConstructor;
import lombok.Setter;
import java.util.HashMap;
import java.util.Map;
@Data //生成set、get等方法
public class R
    private Integer code;
    private String message;
    private Map<String, Object> data = new HashMap<>();
    public static R ok()
        R r = new R();
        r.setCode(0);
        r.setMessage("成功");
        return r;

    public static R error()
        R r = new R();
        r.setCode(-1);
        r.setMessage("失败");
        return r;

    public R data(String key, Object value)
        this.data.put(key, value);
        return this;
3.3、修改controller
package com.ymj.payment.controller;
import com.ymj.payment.vo.R;
import io.swagger.annotations.Api;
import io.swagger.annotations.ApiOperation;
import org.springframework.web.bind.annotation.GetMapping;
import org.springframework.web.bind.annotation.RequestMapping;
import org.springframework.web.bind.annotation.RestController;
import java.util.Date;
@Api(tags = "商品管理")
@RestController
@RequestMapping("/api/product")
public class ProductController
@ApiOperation("测试接口")
@GetMapping("/test")
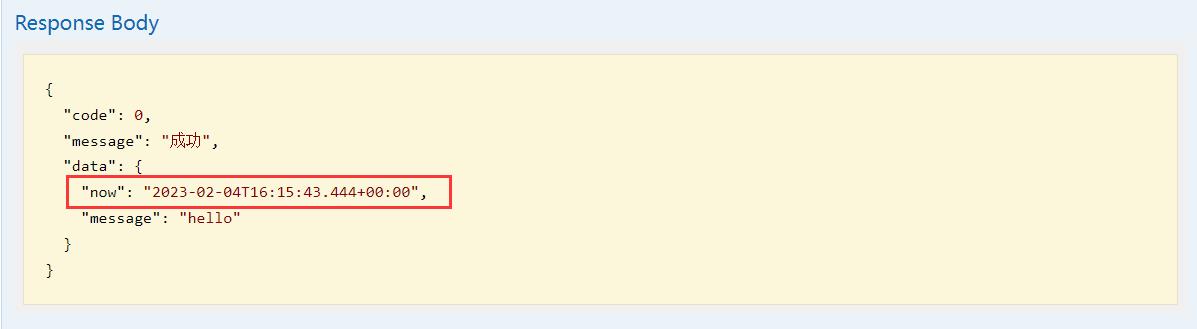
public R test()
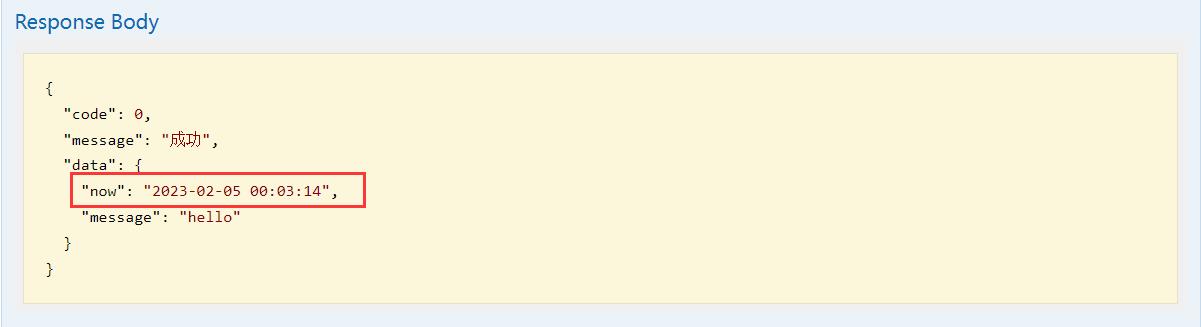
return R.ok().data("message","hello").data("now",new Date());
3.4、配置json时间格式
server:
  port: 8090 # 服务端口

spring:
  application: # 应用的名字
    name: payment

  jackson: # json时间格式
    date-format: yyyy-MM-dd HH:mm:ss
    time-zone: GMT+8
3.5、Swagger测试
4、创建数据库
4.1、创建数据库
mysql -uroot -p
mysql> create database payment_demo;
4.2、IDEA配置数据库连接
(1)打开数据库面板

(2)添加数据库
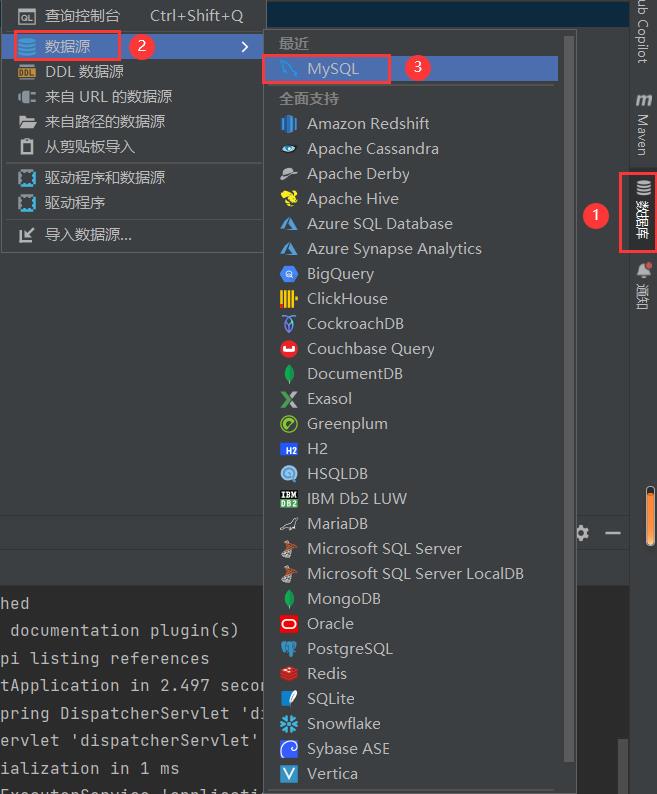
(3)配置数据库连接参数

4.3、执行SQL脚本
payment_demo.sql
CREATE TABLE `t_order_info` (
  `id` bigint(11) unsigned NOT NULL AUTO_INCREMENT COMMENT '订单id',
  `title` varchar(256) DEFAULT NULL COMMENT '订单标题',
  `order_no` varchar(50) DEFAULT NULL COMMENT '商户订单编号',
  `user_id` bigint(20) DEFAULT NULL COMMENT '用户id',
  `product_id` bigint(20) DEFAULT NULL COMMENT '支付产品id',
  `total_fee` int(11) DEFAULT NULL COMMENT '订单金额(分)',
  `code_url` varchar(50) DEFAULT NULL COMMENT '订单二维码连接',
  `order_status` varchar(10) DEFAULT NULL COMMENT '订单状态',
  `create_time` datetime DEFAULT CURRENT_TIMESTAMP COMMENT '创建时间',
  `update_time` datetime DEFAULT CURRENT_TIMESTAMP ON UPDATE CURRENT_TIMESTAMP COMMENT '更新时间',
  PRIMARY KEY (`id`)
) ENGINE=InnoDB AUTO_INCREMENT=1 DEFAULT CHARSET=utf8mb4;


/*Table structure for table `t_payment_info` */

CREATE TABLE `t_payment_info` (
  `id` bigint(20) unsigned NOT NULL AUTO_INCREMENT COMMENT '支付记录id',
  `order_no` varchar(50) DEFAULT NULL COMMENT '商户订单编号',
  `transaction_id` varchar(50) DEFAULT NULL COMMENT '支付系统交易编号',
  `payment_type` varchar(20) DEFAULT NULL COMMENT '支付类型',
  `trade_type` varchar(20) DEFAULT NULL COMMENT '交易类型',
  `trade_state` varchar(50) DEFAULT NULL COMMENT '交易状态',
  `payer_total` int(11) DEFAULT NULL COMMENT '支付金额(分)',
  `content` text COMMENT '通知参数',
  `create_time` datetime DEFAULT CURRENT_TIMESTAMP COMMENT '创建时间',
  `update_time` datetime DEFAULT CURRENT_TIMESTAMP ON UPDATE CURRENT_TIMESTAMP COMMENT '更新时间',
  PRIMARY KEY (`id`)
) ENGINE=InnoDB AUTO_INCREMENT=1 DEFAULT CHARSET=utf8mb4;


/*Table structure for table `t_product` */

CREATE TABLE `t_product` (
  `id` bigint(20) NOT NULL AUTO_INCREMENT COMMENT '商品id',
  `title` varchar(20) DEFAULT NULL COMMENT '商品名称',
  `price` int(11) DEFAULT NULL COMMENT '价格(分)',
  `create_time` datetime DEFAULT CURRENT_TIMESTAMP COMMENT '创建时间',
  `update_time` datetime DEFAULT CURRENT_TIMESTAMP ON UPDATE CURRENT_TIMESTAMP COMMENT '更新时间',
  PRIMARY KEY (`id`)
) ENGINE=InnoDB AUTO_INCREMENT=1 DEFAULT CHARSET=utf8mb4;

/*Data for the table `t_product` */

insert  into `t_product`(`title`,`price`) values ('Java课程',1);
insert  into `t_product`(`title`,`price`) values ('大数据课程',1);
insert  into `t_product`(`title`,`price`) values ('前端课程',1);
insert  into `t_product`(`title`,`price`) values ('UI课程',1);

/*Table structure for table `t_refund_info` */

CREATE TABLE `t_refund_info` (
  `id` bigint(20) unsigned NOT NULL AUTO_INCREMENT COMMENT '退款单id',
  `order_no` varchar(50) DEFAULT NULL COMMENT '商户订单编号',
  `refund_no` varchar(50) DEFAULT NULL COMMENT '商户退款单编号',
  `refund_id` varchar(50) DEFAULT NULL COMMENT '支付系统退款单号',
  `total_fee` int(11) DEFAULT NULL COMMENT '原订单金额(分)',
  `refund` int(11) DEFAULT NULL COMMENT '退款金额(分)',
  `reason` varchar(50)以上是关于搭建一个简单的SpringBoot+Vue+MySQL | (集成MyBatis-PluslombokSwagger)的主要内容,如果未能解决你的问题,请参考以下文章