Netty框架之概述及基本组件介绍
Posted 踩踩踩从踩
tags:
篇首语:本文由小常识网(cha138.com)小编为大家整理,主要介绍了Netty框架之概述及基本组件介绍相关的知识,希望对你有一定的参考价值。
概述
- JDK 的 NIO 底层由 epoll 实现,该实现饱受诟病的Selector 空轮询 bug 会导致 cpu 飙升 100%
- NIO的API繁杂,使用麻烦,必须熟练掌握Selector、Channel、Buffer等相关API。并且需要熟练Java多线程编程和网络编程,才能写出高质量的NIO代码。
- 开发工作量和难度都非常大。例如客户端的断连重连,网络闪退,半包读取,失败缓存等问题。
才出现了一些例如Netty的优秀的开发源框架
特性
-
设计 统一的API,支持多种传输类型,阻塞和非阻塞的 简单而强大的线程模型,真正的无连接数据报套接字支持基于灵活且可扩展的事件模型,可以清晰地分离关注点
- 易于使用 翔实的Javadoc和大量的实例集 没有其他依赖项,JDK 5(Netty 3.x)或6(Netty 4.x)就足够了。(一些可选的特性可能需要Java1.7+或额外的依赖)
-
性能 拥有比Java的核心API更高的吞吐量以及更低的延迟 得益于池化和复用,拥有更低的资源消耗 最小化不必要的内存复制 内存复用 可以使得 性能提升
- 健壮性 不会因为慢速、快速或超载的连接而导致OutOfMemoryError消除在高速网络中NIO应用程序常见的不公平读/写比率
-
安全性 完整的SSL / TLS和StartTLS支持
-
社区 发布快速而且频繁
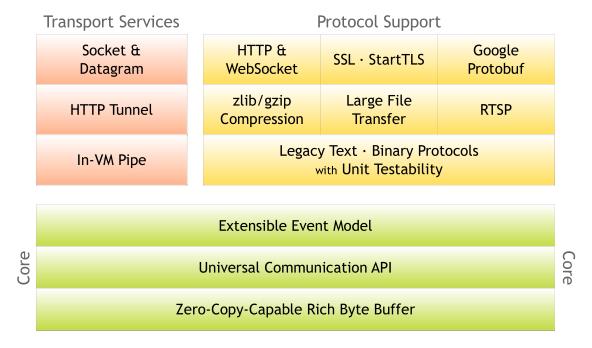
整体结构图

netty分为三大模块
- 支持tcp udp http 等多种传输方式
- 提供多种协议的编解码实现
- 核心设计包含包括事件处理模型、API处理模型、零拷贝机制 byteBuffer增强 这部分作为 nio的增强
Netty核心组件
- Channel:netty中自己定义的Channel,增强版的通道概念
- EventLoop:由线程驱动,处理channel的所有I/O事件 事件轮询器
- ChannelPiepleline:事件处理机制 职责链 主要做事件间传递
- ChannelHandler:事件处理器
- ByteBuf:增强ByteBuffer 缓冲区
- Bootstrap:启动器,引导Netty应用程序启动 做设置 事件处理器等
使用方式
可以直接在项目中添加 maven 依赖或者gradle
		 <dependency>
            <groupId>io.netty</groupId>
            <artifactId>netty-all</artifactId>
            <version>4.1.68.Final</version>
        </dependency>
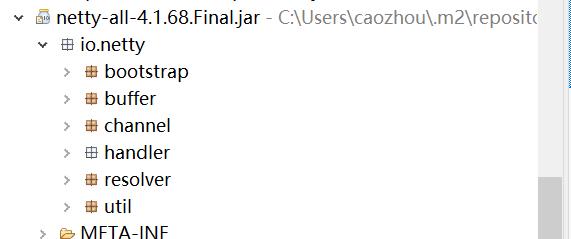
在netty-all中包含的这所有的模块,包括buffer channel handler 等等核心,根据需要选择 不同 maven 依赖

这里面包含了netty的各个部分。
使用一个netty作为一个例子将例子启动起来
public class NettyStarter {
	public static void main(String[] args) throws InterruptedException {
		// 主线程组 处理客户连接
		NioEventLoopGroup mainGroup = new NioEventLoopGroup(1);
		// 工人线程组,处理客户端的请求 读取 和写入
		NioEventLoopGroup subGroup = new NioEventLoopGroup();

		// 创建启动器, 并配置

		ServerBootstrap boostrap = new ServerBootstrap();
		boostrap.group(mainGroup, subGroup).option(ChannelOption.SO_BACKLOG, 1024).channel(NioserverSocketChannel.class)
				.handler(new LoggingHandler(LogLevel.INFO));
		// 绑定端口并使用
		Channel channel = boostrap.bind(8081).sync().channel();

		// 监听channeal 释放并 停止 线程组
		channel.closeFuture().addListeners(future -> {
			mainGroup.shutdownGracefully();
			subGroup.shutdownGracefully();
		});
	}
}- 创建 主线程组 以及 子线程组
- 创建启动器 并配置启动器
- 启动启动器
- 绑定好端口既可启动该netty了 。
- 等待服务端channel关闭并释放资源
并且netty是可以使用bio的程序需要修改 线程组,这是netty提供的类,这个修改也是非常简单的
	// 主线程组 处理客户都安连接
		OioEventLoopGroup mainGroup = new OioEventLoopGroup(1);
		// 工人线程组,处理客户端的请求 读取 和写入
		OioEventLoopGroup subGroup = new OioEventLoopGroup();
至于为什么 要加主线程组以及子线程组,可以看一下下面篇博客
netty 在github源代码
Netty线程模型
-
Resources 资源(请求/任务)
- Synchronized Event Demultiplexer 同步事件复用器 事件不停的死循环查找是否死循环
- 分配器 dispatcher
- Request Handler 请求处理器


请求流程
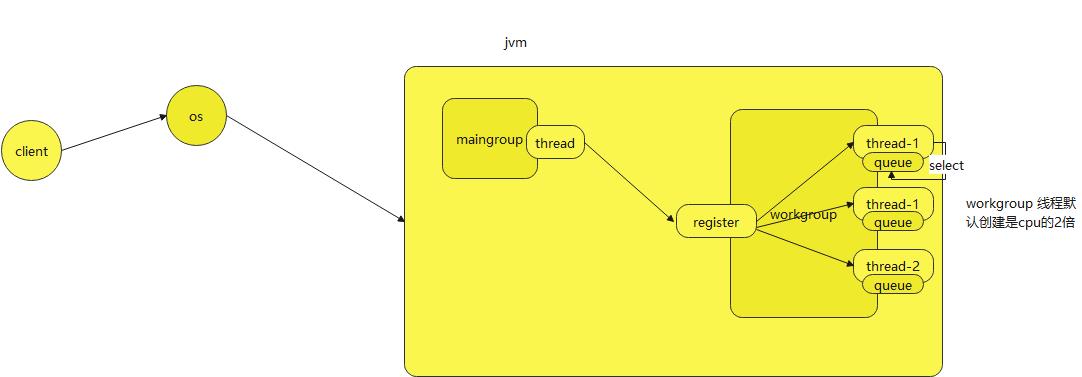
- 客户端发起请求,首先到达操作系统
- 操作系统会转发给jvm netty是启动着,最先找到设置的NioEventLoopGroup 主线程 默认为1 持有连接
- 连接注册到register 分配到选择 对应的workgroup 的NioEventLoopGroup 线程去读取请求数据 创建的线程默认是cpu的2倍 每个线程都有个 queue 存放任务, 当用户线程不空闲时,过来的请求会放到queue中
- 每个IO的工作线程都有个死循环去读取数据,这个select 会阻塞 释放cpu的
NioEventLoopGroup初始化过程


NioEventLoopGroup 初始化过程从源码中看
NioEventLoopGroup subGroup = new NioEventLoopGroup();- 父类的MultithreadEventLoopGroup 类中初始化时创建对应的线程数 默认就是 cpu的两倍,NettyRuntime.availableProcessors()获取cpu数 全局的系统参数 io.netty.eventLoopThreads 可以在外部指定
    static {
        DEFAULT_EVENT_LOOP_THREADS = Math.max(1, SystemPropertyUtil.getInt(
                "io.netty.eventLoopThreads", NettyRuntime.availableProcessors() * 2));

        if (logger.isDebugEnabled()) {
            logger.debug("-Dio.netty.eventLoopThreads: {}", DEFAULT_EVENT_LOOP_THREADS);
        }
    }

  protected MultithreadEventLoopGroup(int nThreads, Executor executor, Object... args) {
        super(nThreads == 0 ? DEFAULT_EVENT_LOOP_THREADS : nThreads, executor, args);
    }
- 父类的MultithreadEventLoopGroup 最核心的初始化方法
1. 首先做了创建线程执行器 和 事件执行器数组
 protected MultithreadEventExecutorGroup(int nThreads, Executor executor,
                                            EventExecutorChooserFactory chooserFactory, Object... args) {
        checkPositive(nThreads, "nThreads");

        //线程执行器 ,如果在创建eventLoopGroup时没有指定,则使用netty提供的默认执行器
        if (executor == null) {
            executor = new ThreadPerTaskExecutor(newDefaultThreadFactory());
        }

        //创建 事件执行器的数组
        children = new EventExecutor[nThreads];
        //创建事件轮询器
        for (int i = 0; i < nThreads; i ++) {
            boolean success = false;
            try {
                children[i] = newChild(executor, args);
                success = true;
            } catch (Exception e) {
                // TODO: 创建失败
                throw new IllegalStateException("failed to create a child event loop", e);
            } finally {

                //等等就省略掉
            }
        }


    }
从这个newChild方法上追寻下去 是由NioEventLoopGroup里面实现 这里使用了模板模式 创建NioEventLoop其实上面做了一些操作,和我们初始化并不是特别大的关联就不看了

在NioEventLoop初始化就能看到里面做的一些事情了
 包括比较重要的newTaskQueue 选择提供器 和 selector provider 提供器,如果不太清楚的话可以看一下 nio 中selector.open()方法也是通过provider方法 去创建selector对象
  public static Selector open() throws IOException {
        return SelectorProvider.provider().openSelector();
    }
2.继续创建一个选择器
 //创建选择器
chooser = chooserFactory.newChooser(children);
这个选择器的作用用于连接过来时选择不同的工作线程 也就是NioEventLoop
从MultithreadEventLoopGroup的实现来看出 netty包括下面几种实现创建evntLoop事件驱动器

MultithreadEventExecutorGroup 的register Channel 通道流程
该方法主要用于选择那个工作子线程进行读取 数据
 @Override
    public ChannelFuture register(Channel channel) {
        return next().register(channel);
    }
而这里的next 方法就是刚才 创建选择器的 方法
  @Override
    public EventExecutorChooser newChooser(EventExecutor[] executors) {
        if (isPowerOfTwo(executors.length)) {
            return new PowerOfTwoEventExecutorChooser(executors);
        } else {
            return new GenericEventExecutorChooser(executors);
        }
    }
随便点DefaultEventExecutorChooserFactory 这个进去就能很容易看到选择线程的方式
 public EventExecutor next() {
            return executors[Math.abs(idx.getAndIncrement() % executors.length)];
        }
EventLoop 的启动

- 查看NioEventLoop 的继承体系
public final class NioEventLoop extends SingleThreadEventLoop {
- 而SingleThreadEventLoop 继续继承
public abstract class SingleThreadEventLoop extends SingleThreadEventExecutor implements EventLoop {- 在 SingleThreadEventExecutor 中有 执行方法

- 在启动线程中 到doStartThread 方法中
  private void doStartThread() {
        assert thread == null;
        executor.execute(new Runnable() {
            @Override
            public void run() {
                thread = Thread.currentThread();
                if (interrupted) {
                    thread.interrupt();
                }

                boolean success = false;
                updateLastExecutionTime();
                try {
                    SingleThreadEventExecutor.this.run();
                    success = true;
                } catch (Throwable t) {
                    logger.warn("Unexpected exception from an event executor: ", t);
                } finally {
                    for (;;) {
                        int oldState = state;
                        if (oldState >= ST_SHUTTING_DO
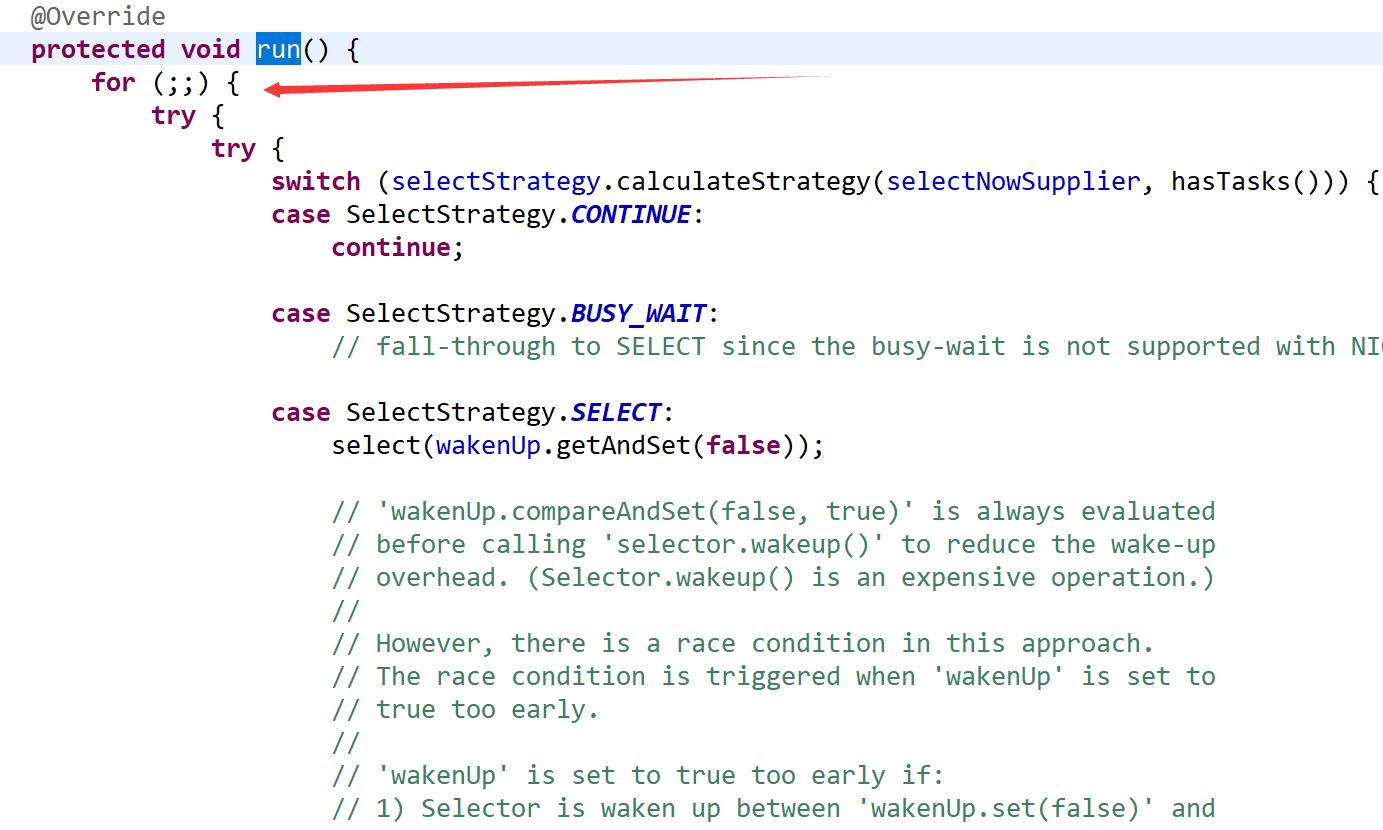
这里做的就是不断的死循环,队列里面的方法。
Channel概念

总结
以上是关于Netty框架之概述及基本组件介绍的主要内容,如果未能解决你的问题,请参考以下文章