睿智的目标检测53——Pytorch搭建YoloX目标检测平台
Posted Bubbliiiing
tags:
篇首语:本文由小常识网(cha138.com)小编为大家整理,主要介绍了睿智的目标检测53——Pytorch搭建YoloX目标检测平台相关的知识,希望对你有一定的参考价值。
睿智的目标检测53——Pytorch搭建YoloX目标检测平台
学习前言
还有Pytorch版本的YoloX。

源码下载
https://github.com/bubbliiiing/yolox-pytorch
喜欢的可以点个star噢。
YoloX改进的部分(不完全)
1、主干部分:使用了Focus网络结构,这个结构是在YoloV5里面使用到比较有趣的网络结构,具体操作是在一张图片中每隔一个像素拿到一个值,这个时候获得了四个独立的特征层,然后将四个独立的特征层进行堆叠,此时宽高信息就集中到了通道信息,输入通道扩充了四倍。
2、分类回归层:Decoupled Head,以前版本的Yolo所用的解耦头是一起的,也就是分类和回归在一个1X1卷积里实现,YoloX认为这给网络的识别带来了不利影响。在YoloX中,Yolo Head被分为了两部分,分别实现,最后预测的时候才整合在一起。
3、数据增强:Mosaic数据增强、Mosaic利用了四张图片进行拼接实现数据中增强,根据论文所说其拥有一个巨大的优点是丰富检测物体的背景!且在BN计算的时候一下子会计算四张图片的数据!
4、Anchor Free:不使用先验框。
5、SimOTA :为不同大小的目标动态匹配正样本。
以上并非全部的改进部分,还存在一些其它的改进,这里只列出来了一些我比较感兴趣,而且非常有效的改进。
YoloX实现思路
一、整体结构解析
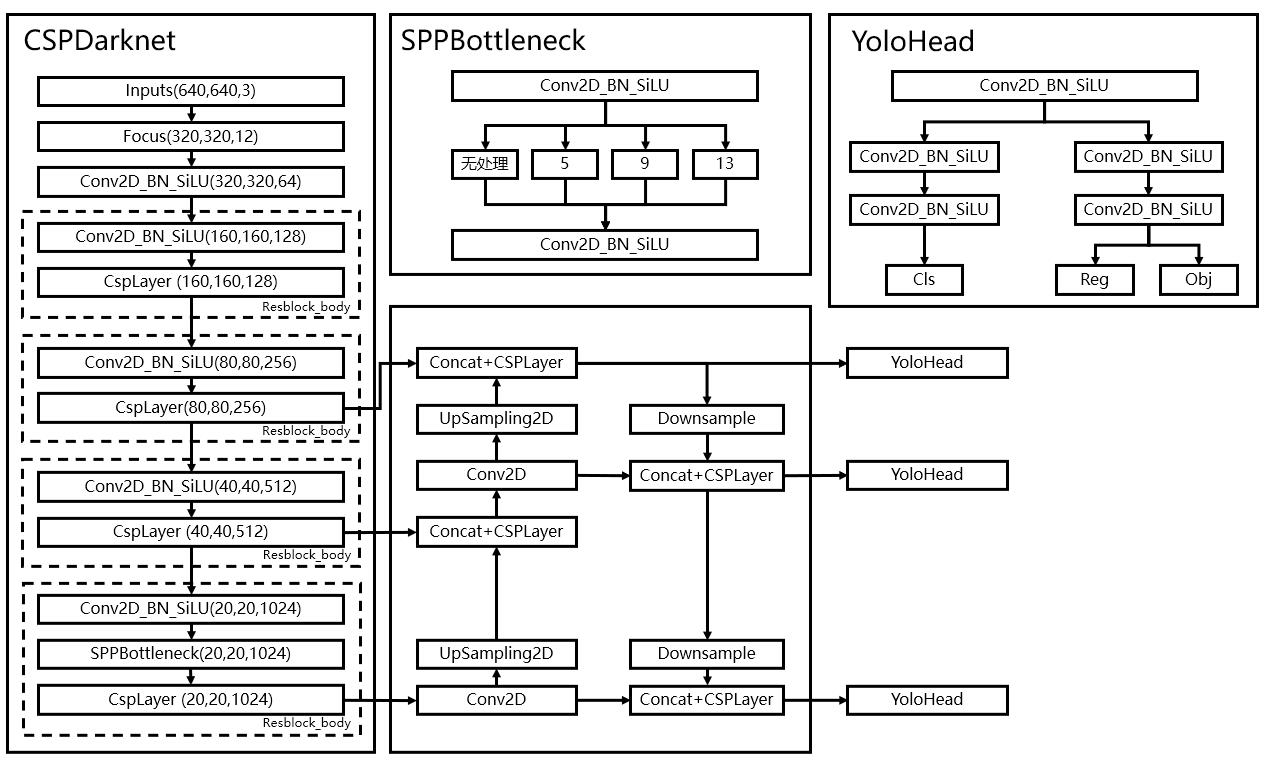
在学习YoloX之前,我们需要对YoloX所作的工作有一定的了解,这有助于我们后面去了解网络的细节。
和之前版本的Yolo类似,整个YoloX可以依然可以分为三个部分,分别是CSPDarknet,FPN以及Yolo Head。
CSPDarknet可以被称作YoloX的主干特征提取网络,输入的图片首先会在CSPDarknet里面进行特征提取,提取到的特征可以被称作特征层,是输入图片的特征集合。在主干部分,我们获取了三个特征层进行下一步网络的构建,这三个特征层我称它为有效特征层。
FPN可以被称作YoloX的加强特征提取网络,在主干部分获得的三个有效特征层会在这一部分进行特征融合,特征融合的目的是结合不同尺度的特征信息。在FPN部分,已经获得的有效特征层被用于继续提取特征。在YoloX里面同样使用了YoloV4中用到的Panet的结构,我们不仅会对特征进行上采样实现特征融合,还会对特征再次进行下采样实现特征融合。
Yolo Head是YoloX的分类器与回归器,通过CSPDarknet和FPN,我们已经可以获得三个加强过的有效特征层。每一个特征层都有宽、高和通道数,此时我们可以将特征图看作一个又一个特征点的集合,每一个特征点都有通道数个特征。Yolo Head实际上所做的工作就是对特征点进行判断,判断特征点是否有物体与其对应。以前版本的Yolo所用的解耦头是一起的,也就是分类和回归在一个1X1卷积里实现,YoloX认为这给网络的识别带来了不利影响。在YoloX中,Yolo Head被分为了两部分,分别实现,最后预测的时候才整合在一起。
因此,整个YoloX网络所作的工作就是 特征提取-特征加强-预测特征点对应的物体情况。
二、网络结构解析
1、主干网络CSPDarknet介绍
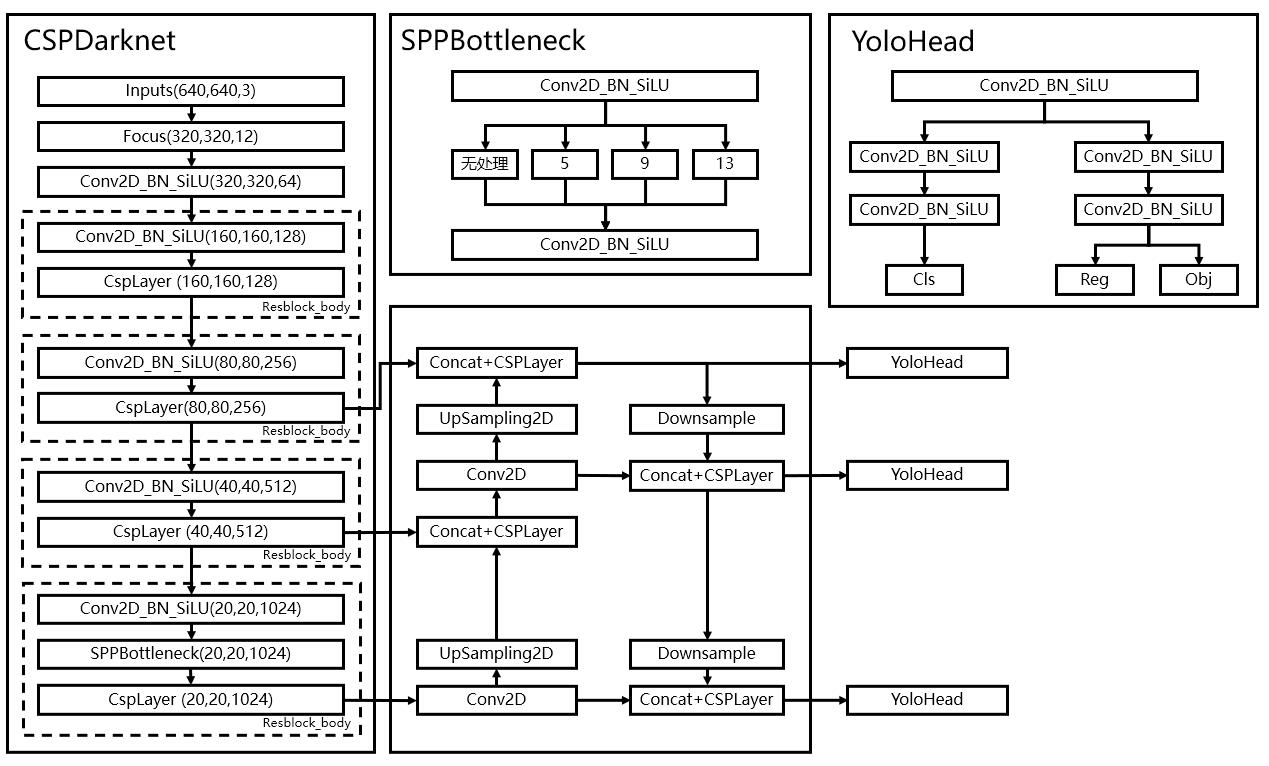
YoloX所使用的主干特征提取网络为CSPDarknet,它具有五个重要特点:
1、使用了残差网络Residual,CSPDarknet中的残差卷积可以分为两个部分,主干部分是一次1X1的卷积和一次3X3的卷积;残差边部分不做任何处理,直接将主干的输入与输出结合。整个YoloV3的主干部分都由残差卷积构成:
class Bottleneck(nn.Module):
    # Standard bottleneck
    def __init__(self, in_channels, out_channels, shortcut=True, expansion=0.5, depthwise=False, act="silu",):
        super().__init__()
        hidden_channels = int(out_channels * expansion)
        Conv = DWConv if depthwise else BaseConv
        self.conv1 = BaseConv(in_channels, hidden_channels, 1, stride=1, act=act)
        self.conv2 = Conv(hidden_channels, out_channels, 3, stride=1, act=act)
        self.use_add = shortcut and in_channels == out_channels

    def forward(self, x):
        y = self.conv2(self.conv1(x))
        if self.use_add:
            y = y + x
        return y

残差网络的特点是容易优化,并且能够通过增加相当的深度来提高准确率。其内部的残差块使用了跳跃连接,缓解了在深度神经网络中增加深度带来的梯度消失问题。
2、使用CSPnet网络结构,CSPnet结构并不算复杂,就是将原来的残差块的堆叠进行了一个拆分,拆成左右两部分:主干部分继续进行原来的残差块的堆叠;另一部分则像一个残差边一样,经过少量处理直接连接到最后。因此可以认为CSP中存在一个大的残差边。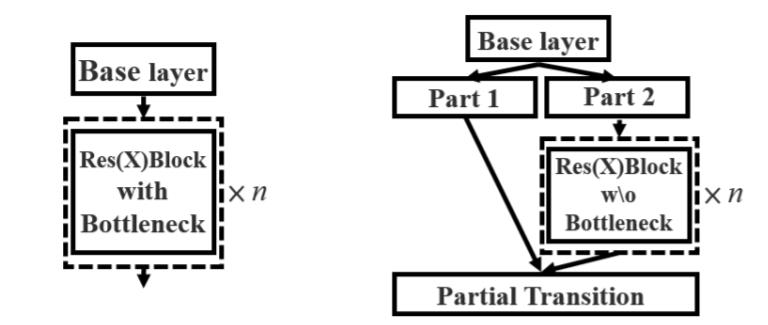
class CSPLayer(nn.Module):
    def __init__(self, in_channels, out_channels, n=1, shortcut=True, expansion=0.5, depthwise=False, act="silu",):
        # ch_in, ch_out, number, shortcut, groups, expansion
        super().__init__()
        hidden_channels = int(out_channels * expansion)  # hidden channels
        self.conv1  = BaseConv(in_channels, hidden_channels, 1, stride=1, act=act)
        self.conv2  = BaseConv(in_channels, hidden_channels, 1, stride=1, act=act)

        self.conv3  = BaseConv(2 * hidden_channels, out_channels, 1, stride=1, act=act)

        module_list = [Bottleneck(hidden_channels, hidden_channels, shortcut, 1.0, depthwise, act=act) for _ in range(n)]
        self.m      = nn.Sequential(*module_list)

    def forward(self, x):
        x_1 = self.conv1(x)
        x_2 = self.conv2(x)
        x_1 = self.m(x_1)
        x = torch.cat((x_1, x_2), dim=1)
        return self.conv3(x)
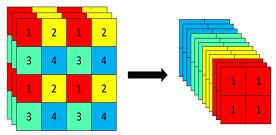
3、使用了Focus网络结构,这个网络结构是在YoloV5里面使用到比较有趣的网络结构,具体操作是在一张图片中每隔一个像素拿到一个值,这个时候获得了四个独立的特征层,然后将四个独立的特征层进行堆叠,此时宽高信息就集中到了通道信息,输入通道扩充了四倍。拼接起来的特征层相对于原先的三通道变成了十二个通道,下图很好的展示了Focus结构,一看就能明白。
class Focus(nn.Module):
    def __init__(self, in_channels, out_channels, ksize=1, stride=1, act="silu"):
        super().__init__()
        self.conv = BaseConv(in_channels * 4, out_channels, ksize, stride, act=act)

    def forward(self, x):
        patch_top_left  = x[...,  ::2,  ::2]
        patch_bot_left  = x[..., 1::2,  ::2]
        patch_top_right = x[...,  ::2, 1::2]
        patch_bot_right = x[..., 1::2, 1::2]
        x = torch.cat((patch_top_left, patch_bot_left, patch_top_right, patch_bot_right,), dim=1,)
        return self.conv(x)
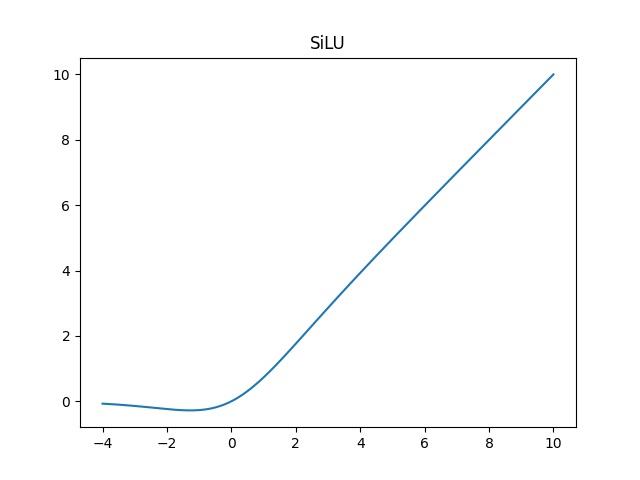
4、使用了SiLU激活函数,SiLU是Sigmoid和ReLU的改进版。SiLU具备无上界有下界、平滑、非单调的特性。SiLU在深层模型上的效果优于 ReLU。可以看做是平滑的ReLU激活函数。
f
(
x
)
=
x
⋅
sigmoid
(
x
)
f(x) = x · \\text{sigmoid}(x)
f(x)=x⋅sigmoid(x)
class SiLU(Layer):
    def __init__(self, **kwargs):
        super(SiLU, self).__init__(**kwargs)
        self.supports_masking = True

    def call(self, inputs):
        return inputs * K.sigmoid(inputs)

    def get_config(self):
        config = super(SiLU, self).get_config()
        return config

    def compute_output_shape(self, input_shape):
        return input_shape
5、使用了SPP结构,通过不同池化核大小的最大池化进行特征提取,提高网络的感受野。在YoloV4中,SPP是用在FPN里面的,在YoloX中,SPP模块被用在了主干特征提取网络中。
class SPPBottleneck(nn.Module):
    def __init__(self, in_channels, out_channels, kernel_sizes=(5, 9, 13), activation="silu"):
        super().__init__()
        hidden_channels = in_channels // 2
        self.conv1      = BaseConv(in_channels, hidden_channels, 1, stride=1, act=activation)
        self.m          = nn.ModuleList([nn.MaxPool2d(kernel_size=ks, stride=1, padding=ks // 2) for ks in kernel_sizes])
        conv2_channels  = hidden_channels * (len(kernel_sizes) + 1)
        self.conv2      = BaseConv(conv2_channels, out_channels, 1, stride=1, act=activation)

    def forward(self, x):
        x = self.conv1(x)
        x = torch.cat([x] + [m(x) for m in self.m], dim=1)
        x = self.conv2(x)
        return x
整个主干实现代码为:
import torch
from torch import nn

class SiLU(nn.Module):
    @staticmethod
    def forward(x):
        return x * torch.sigmoid(x)

def get_activation(name="silu", inplace=True):
    if name == "silu":
        module = SiLU()
    elif name == "relu":
        module = nn.ReLU(inplace=inplace)
    elif name == "lrelu":
        module = nn.LeakyReLU(0.1, inplace=inplace)
    else:
        raise AttributeError("Unsupported act type: {}".format(name))
    return module

class Focus(nn.Module):
    def __init__(self, in_channels, out_channels, ksize=1, stride=1, act="silu"):
        super().__init__()
        self.conv = BaseConv(in_channels * 4, out_channels, ksize, stride, act=act)

    def forward(self, x):
        patch_top_left  = x[...,  ::2,  ::2]
        patch_bot_left  = x[..., 1::2,  ::2]
        patch_top_right = x[...,  ::2, 1::2]
        patch_bot_right = x[..., 1::2, 1::2]
        x = torch.cat((patch_top_left, patch_bot_left, patch_top_right, patch_bot_right,), dim=1,)
        return self.conv(x)

class BaseConv(nn.Module):
    def __init__(self, in_channels, out_channels, ksize, stride, groups=1, bias=False, act="silu"):
        super().__init__()
        pad         = (ksize - 1) // 2
        self.conv   = nn.Conv2d(in_channels, out_channels, kernel_size=ksize, stride=stride, padding=pad, groups=groups, bias=bias)
        self.bn     = nn.BatchNorm2d(out_channels)
        self.act    = get_activation(act, inplace=True)

    def forward(self, x):
        return self.act(self.bn(self.conv(x)))

    def fuseforward(self, x):
        return self.act(self.conv(x))

class DWConv(nn.Module):
    def __init__(self, in_channels, out_channels, ksize, stride=1, act="silu"):
        super().__init__()
        self.dconv = BaseConv(in_channels, in_channels, ksize=ksize, stride=stride, groups=in_channels, act=act,)
        self.pconv = BaseConv(in_channels, out_channels, ksize=1, stride=1, groups=1, act=act)

    def forward(self, x):
        x = self.dconv(x)
        return self.pconv(x)

class SPPBottleneck(nn.Module):
    def __init__(self, in_channels, out_channels, kernel_sizes=(5, 9, 13), activation="silu"):
        super().__init__()
        hidden_channels = in_channels // 2
        self.conv1      = BaseConv(in_channels, hidden_channels, 1, stride=1, act=activation)
        self.m          = nn.ModuleList([nn.MaxPool2d(kernel_size=ks, stride=1, padding=ks // 2) for ks in kernel_sizes])
        conv2_channels  = hidden_channels * (len(kernel_sizes) + 1)
        self.conv2      = BaseConv(conv2_channels, out_channels, 1, stride=1, act=activation)

    def forward(self, x):
        x = self.conv1(x)
        x = torch.cat([x] + [m(x) for m in self.m], dim=1)
        x = self.conv2(x)
        return x

class Bottleneck(nn.Module):
    # Standard bottleneck
    def __init__(self, in_channels, out_channels, shortcut=True, expansion=0.5, depthwise=False, act="silu",):
        super().__init__()
        hidden_channels = int(out_channels * expansion)
        Conv = DWConv if depthwise else BaseConv
        self.conv1 = BaseConv(in_channels, hidden_channels, 1, stride=1, act=act)
        self.conv2 = Conv(hidden_channels, out_channels, 3, stride=1, act=act)
        self.use_add = shortcut and in_channels == out_channels

    def forward(self, x):
        y = self.conv2(self.conv1(x))
        if self.use_add:
            y = y + x
        return y

class CSPLayer(nn.Module):
    def __init__(self, in_channels, out_channels, n=1, shortcut=True, expansion=0.5, depthwise=False, act="silu",):
        # ch_in, ch_out, number, shortcut, groups, expansion
        super().__init__()
        hidden_channels = int(out_channels * expansion)  # hidden channels
        self.conv1  = BaseConv(in_channels, hidden_channels, 1, stride=1, act=act)
        self.conv2  = BaseConv(in_channels, hidden_channels, 1, stride=1, act=act)

        self.conv3  = BaseConv(2 * hidden_channels, out_channels, 1, stride=1, act=act)

        module_list = [Bottleneck(hidden_channels, hidden_channels, shortcut, 1.0, depthwise, act=act) for _ in range(n)]
        self.m      = nn.Sequential(*module_list)

    def forward(self, x):
        x_1 = self.conv1(x)
        x_2 = self.conv2(x)
        x_1 = self.m(x_1)
        x = torch.cat((x_1, x_2), dim=1)
        return self.conv3(x以上是关于睿智的目标检测53——Pytorch搭建YoloX目标检测平台的主要内容,如果未能解决你的问题,请参考以下文章