终于向她(他)表白了!爱上Python之安装及基础操作
Posted Friends of the wind
tags:
篇首语:本文由小常识网(cha138.com)小编为大家整理,主要介绍了终于向她(他)表白了!爱上Python之安装及基础操作相关的知识,希望对你有一定的参考价值。
基础环境:
Linux系统安装Python3(默认安装Python2,不要卸载,命令程序依赖它)
配yum仓库
cd /etc/yum.repos.d/
vim python3.repo
删除源yum文件,创建python3文件添加内容并保存
[base]
name=CentOS-\\$releasever - Base
baseurl=https://mirrors.tuna.tsinghua.edu.cn/centos/\\$releasever/os/\\$basearch/
enabled=1
gpgcheck=0

#released updates
[updates]
name=CentOS-\\$releasever - Updates
baseurl=https://mirrors.tuna.tsinghua.edu.cn/centos/\\$releasever/updates/\\$basearch/
#baseurl=https://mirrors.aliyun.com/centos/\\$releasever/updates/\\$basearch/
#mirrorlist=http://mirrorlist.centos.org/?release=\\$releasever&arch=\\$basearch&repo=updates
enabled=1
gpgcheck=0

#additional packages that may be useful

[centosplus]
name=CentOS-\\$releasever - Plus
baseurl=https://mirrors.tuna.tsinghua.edu.cn/centos/\\$releasever/centosplus/\\$basearch/
#baseurl=https://mirrors.aliyun.com/centos/\\$releasever/centosplus/\\$basearch/
#mirrorlist=http://mirrorlist.centos.org/?release=\\$releasever&arch=\\$basearch&repo=centosplus
enabled=1
gpgcheck=0

[cloud]
name=CentOS-\\$releasever - Cloud
baseurl=https://mirrors.tuna.tsinghua.edu.cn/centos/\\$releasever/cloud/\\$basearch/openstack-train/
#baseurl=https://mirrors.aliyun.com/centos/\\$releasever/cloud/\\$basearch/openstack-train/
enabled=1
gpgcheck=0

[paas]
name=CentOS-\\$releasever - paas
baseurl=https://mirrors.tuna.tsinghua.edu.cn/centos/\\$releasever/paas/\\$basearch/openshift-origin13/
#baseurl=https://mirrors.aliyun.com/centos/\\$releasever/paas/\\$basearch/openshift-origin13/
enabled=1
gpgcheck=0

[kvm]
name=CentOS-\\$releasever - kvm
baseurl=https://mirrors.tuna.tsinghua.edu.cn/centos/\\$releasever/virt/\\$basearch/kvm-common/
#baseurl=https://mirrors.aliyun.com/centos/\\$releasever/virt/\\$basearch/kvm-common/
enabled=1
gpgcheck=0

[extras]
name=CentOS-\\$releasever - extras
baseurl=https://mirrors.tuna.tsinghua.edu.cn/centos/\\$releasever/extras/\\$basearch/
#baseurl=https://mirrors.aliyun.com/centos/\\$releasever/extras/\\$basearch/
enabled=1
gpgcheck=0

[epel]
name=Extra Packages for Enterprise Linux 7 - $basearch
baseurl=https://mirrors.tuna.tsinghua.edu.cn/epel/7/$basearch
#mirrorlist=https://mirrors.fedoraproject.org/metalink?repo=epel-7&arch=$basearch
failovermethod=priority
enabled=1
gpgcheck=0

[epel-debuginfo]
name=Extra Packages for Enterprise Linux 7 - $basearch - Debug
baseurl=https://mirrors.tuna.tsinghua.edu.cn/epel/7/$basearch/debug
#mirrorlist=https://mirrors.fedoraproject.org/metalink?repo=epel-debug-7&arch=$basearch
failovermethod=priority
enabled=1
gpgcheck=0

[epel-source]
name=Extra Packages for Enterprise Linux 7 - $basearch - Source
baseurl=https://mirrors.tuna.tsinghua.edu.cn/epel/7/SRPMS
#mirrorlist=https://mirrors.fedoraproject.org/metalink?repo=epel-source-7&arch=$basearch
failovermethod=priority
enabled=1
gpgcheck=0

验证:

创建Python3的虚拟环境(工作场景可能需要多个环境来操作)
mkdir /opt/py3  创建工作目录
cd /opt/py3
python3 -m venv /opt/py3  命令创建环境
cd bin/  进入可执行文件目录
source  ./activate  进入虚拟环境
deactivate  退出虚拟环境

验证:

安装扩展功能插件:

升级pip

基本操作:
1、 注释
单行 #
多行 " " "或’’’
(py3) [root@ansible bin]# cd lesson9/
(py3) [root@ansible lesson9]# ls
(py3) [root@ansible lesson9]# vim notify.py
(py3) [root@ansible lesson9]# chmod +x notify.py
(py3) [root@ansible lesson9]# ./notify.py
编辑内容:vim notify.py

设置执行权:


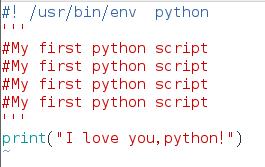
执行脚本:不显示#或'''注释的内容。

2、 操作符
-
标准算术操作符 + - * / //(整除) % (取模,得余数) ** 次方

-
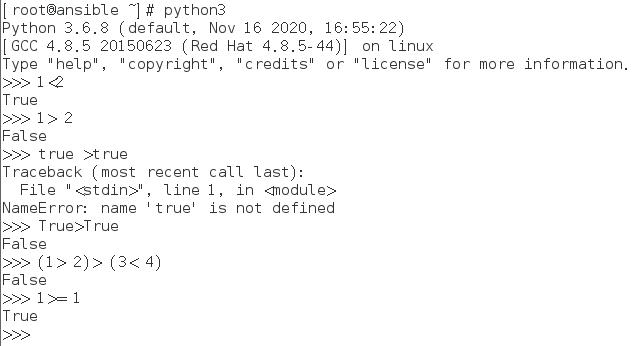
标准比较操作符 < <= > >= == !=


-
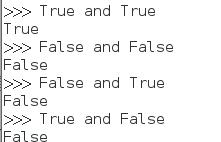
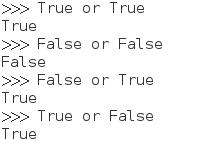
逻辑操作符 and or not(优先级not>and>or)

3、 表达式 1+3等等
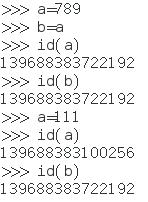
4、变量与赋值(a的值变化,b的id不会随a的变化改变)
变量定义方法:字母、数字(不能以数字开头)、下划线,不能和关键字一样
动态语言:不用预先声明变量类型
数据类型
字符串(/或r转义)
查看帮助


1、 首字母大写


驼峰式

2、 所有变大写或小写

3、 取反(大写变小写,小写变大写;源值不变,只是本次输出结果)

4、格式
居中

左对齐

右对齐(right justify)

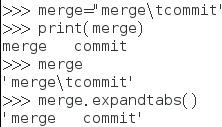
空一格tab(\\转义)
格式化输出
以数字序号的方式:

以变量的方式:

填充总数为10的*号;后面的值是从0开始,0,1

以上是关于终于向她(他)表白了!爱上Python之安装及基础操作的主要内容,如果未能解决你的问题,请参考以下文章