风格迁移(Style Transfer)首次学习总结
Posted 小吴同学真棒
tags:
篇首语:本文由小常识网(cha138.com)小编为大家整理,主要介绍了风格迁移(Style Transfer)首次学习总结相关的知识,希望对你有一定的参考价值。
0、写在前面
最近看了吴恩达老师风格迁移相关的讲解视频,深受启发,于是想着做做总结。
1、主要思想
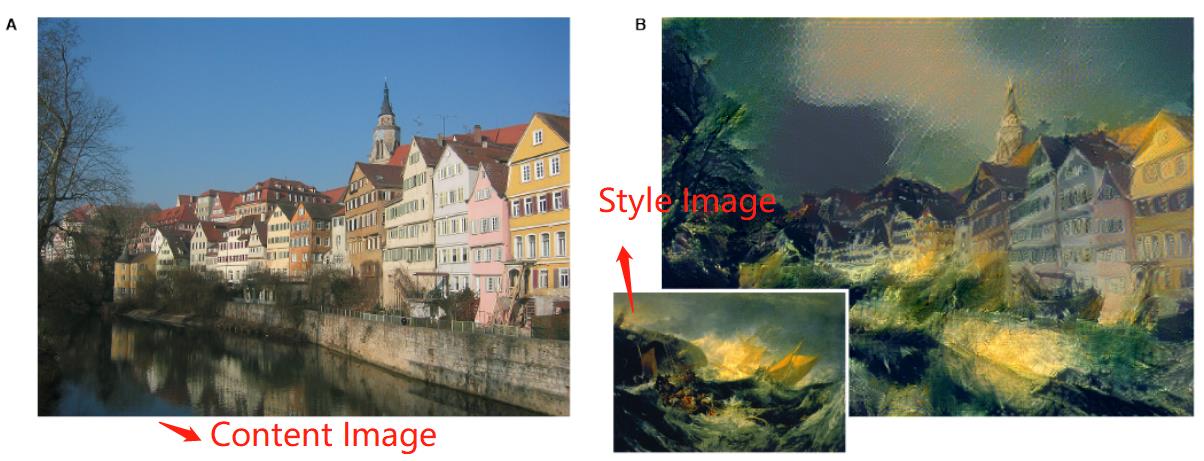
目的:把一张内容图片(content image)的风格迁移成与另一张图片(style image)风格一致。
(图自论文:A Neural Algorithm of Artistic Style)

方法:通过约束 Content Loss 和 Style Loss 来生成最终的图片。
1.0 activation(representation)、kernel(filter)、channel 和 input
用一个已经 pretrained 好的网络(如 Resnet-50)作为 backbone 来提取图片每一层的特征。
每一个 filter 用来检测该层 input 的某一种特征,如果有这种特征,那么输出(activation)中对应 channel 就会被“点亮”(数值大)。
比如:假设这个 pretrained 好的网络中第一层有一个 filter 用来检测图像中处于水平状态的边缘,那么,如果图片(input)左上角有一些水平的边缘,那这个图片在该层的输出(activation)中对应 channel 左上角的数值就会比较大。
1.1 Content Loss
要保证 Style Transferred Image 和原 Content Image 的内容尽可能相似【即,原 Content Image 左上角有处于水平状态的边缘,那么 Style Transferred Image 左上角也要有处于水平状态的边缘】,就意味着 Content Image 和 Style Transferred Image 经过同一个 pretrained 好的网络后,其对应层的输出(activation)要尽可能一致。
比如 ,Content Image 左上角有一些水平的边缘,则 activation 中 channel i 的左上角数值就会比较大,那么,我们也希望 Style Transferred Image 的 activation 中 channel i 的左上角数值也比较大(尽可能接近)。
所以,Content Loss 定义如下:

(图自论文:A Neural Algorithm of Artistic Style)
公式中的 representation 就是 activation。
1.2 Style Loss
论文中关于 Style 的定义如下:
we built a style representation that computes the correlations between the different filter responses, where the expectation is taken over the spatial extend of the input imag
一张图片的 style 可以定义为某一层的 activation 里 channel 与 channel 之间的 correlation 矩阵。
比如:某张 Style 图片里左上角部分全是红色水平边缘的元素。
那么检测水平边缘特征的 filter 得到的 channel i 和检测红色特征的 filter 得到的 channel j 高亮(数值大)的地方就都会在左上角,那么,这两个 channel 对应位置相乘得到的数值就会比较大(10 * 10 = 100)。
假如此时还有一个检测蓝色特征的 filter,那么其对应得到的 channel k 左上角部分就不怎么会被点亮(数值小)【因为左上角部分全是红色水平边缘的元素】。那么,检测水平边缘特征的 filter 得到的 channel i 和 检测蓝色特征的 filter 得到的 channel k 对应位置的乘积就可能会比较小(10 * 0.5 = 5)。
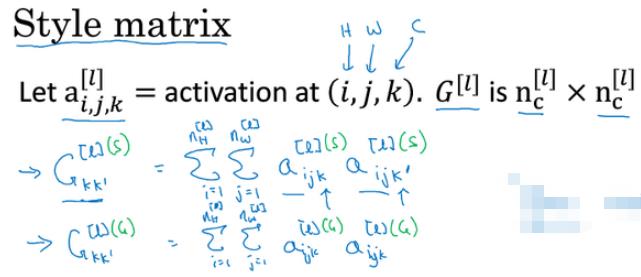
那么,一张图片的 style 矩阵定义如下:

(图自吴恩达老师的课程 ppt)
其中,k 和 k' 代表两个不同的 channel;l 是指第 l 层。
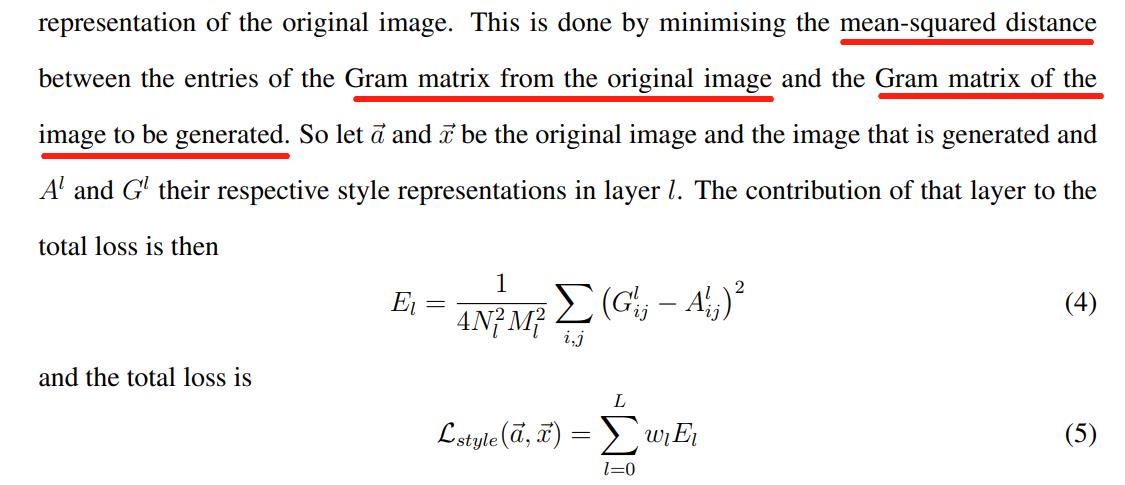
那么要保证 Style Transferred Image 和 Style Image 的风格相近,也就是让两张图片的风格矩阵尽可能相似。所以 Style Loss 定义如下:

(图自论文:A Neural Algorithm of Artistic Style)
2、示例代码
我在 Github 上找了一个能跑得通的示例代码:https://github.com/Zhenye-Na/neural-style-pytorch
其中的核心代码如下:
Content Loss & Style Loss & Style Matrix
class ContentLoss(nn.Module):
    """
    Content Loss.
    """

    def __init__(self, target,):
        """Initialize content loss"""
        super(ContentLoss, self).__init__()
        # we 'detach' the target content from the tree used
        # to dynamically compute the gradient: this is a stated value,
        # not a variable. Otherwise the forward method of the criterion
        # will throw an error.
        self.target = target.detach()

    def forward(self, inputs):
        """Forward pass."""
        self.loss = F.mse_loss(inputs, self.target)
        return inputs


class StyleLoss(nn.Module):
    """Style Loss."""

    def __init__(self, target_feature):
        """Initialize style loss."""
        super(StyleLoss, self).__init__()
        self.target = gram_matrix(target_feature).detach()

    def forward(self, inputs):
        """Forward pass."""
        G = gram_matrix(inputs)
        self.loss = F.mse_loss(G, self.target)
        return inputs


def gram_matrix(inputs):
    """Gram matrix."""
    a, b, c, d = inputs.size()

    # resise F_XL into \\hat F_XL
    features = inputs.view(a * b, c * d)

    # compute the gram product
    G = torch.mm(features, features.t())

    return G.div(a * b * c * d)
train
for epoch in range(0, self.args.epochs):

    def closure():
        # correct the values of updated input image
        input_img.data.clamp_(0, 1)

        self.optimizer.zero_grad()
        model(input_img)
        style_score = 0
        content_score = 0

        for sl in style_losses:
            style_score += sl.loss
        for cl in content_losses:
            content_score += cl.loss

        style_score *= self.style_weight
        content_score *= self.content_weight

        loss = style_score + content_score
        loss.backward()

        if epoch % 5 == 0:
            print("Epoch {}: Style Loss : {:4f} Content Loss: {:4f}".format(
                        epoch, style_score.item(), content_score.item()))

        return style_score + content_score

    self.optimizer.step(closure)
优化器
def _init_optimizer(self, input_img):
    """Initialize LBFGS optimizer."""
    self.optimizer = optim.LBFGS([input_img.requires_grad_()])
注意!这里只更新 input image,网络是不进行学习的!
还有,这是一个我之前没用过的优化器:LBFGS,其中有一个参数:
max_iter (int): maximal number of iterations per optimization step (default: 20)
这也就是为什么训练结果里每一个 epoch 更新会有二十次打印信息(iteration)了,之前一直想不通,我还找半天代码里哪里有 20 这个数字。。。
运行结果

以上是关于风格迁移(Style Transfer)首次学习总结的主要内容,如果未能解决你的问题,请参考以下文章